- Пароли в Tiny Core
- Сообщений 2
- 1 Тема от monstr 2011-09-28 22:08:16
- Тема: Пароли в Tiny Core
- What is the default root password?
- 4 Answers 4
- Как сбросить пароль в Linux
- Когда можно использовать GRUB
- Когда нет возможности использовать GRUB
- How to Reset or Change the Root Password in Linux
- Changing Your Root Password in Ubuntu
- Step 1: Open a Terminal Window
- Step 2: Change Your Root Password
- Resetting a Root Password in Ubuntu
- Step 1: Boot to Recovery Mode
- Step 2: Drop Out to Root Shell
- Step 3: Remount the File System with Write-Permissions
- Step 4: Change the Password
- Changing the Root Password in CentOS
- Step 1: Access the Command Line (Terminal)
- Step 2: Change the Password
- Reset Root Password in CentOS
- Step 1: Access Boot Menu
- Step 2: Edit Boot Options
- Step 3: Remount the Drive
- Step 4: Changing the Password
- Step 5: Restart
Пароли в Tiny Core
Чтобы отправить ответ, вы должны войти или зарегистрироваться
Сообщений 2
1 Тема от monstr 2011-09-28 22:08:16
- monstr
- Administrator
- Неактивен
- Зарегистрирован: 2011-09-24
- Сообщений: 48
Тема: Пароли в Tiny Core
Если вы хотите, чтобы другие люди не смогли войти в компьютер, вы можете добавить пароли к Tinycore.
Если вы используете загрузчик Extlinux, есть еще один вариант — добавить пароли к Extlinux.
Добавление паролей в Tiny Core
Чтобы добавить пароль для пользователя tc, откройте терминал и введите:
Для добавления пароля пользователю root введите:
Сохранение паролей, используя бэкап:
Если хотите использовать Backup для сохранения паролей, то добавьте строку:
в файл /opt/.filetool.lst
Сохранение будет происходить при выключении компьютера.
Сохранение пароля, используя директорию opt
Если вы используете постоянную директорию opt, то откройте терминал и введите:
В файл /opt/bootsync.sh добавьте следующие строки:
Заметим, что эта команда и права доступа для группы g+w будут применяться при каждой загрузке, как и для других файлов в opt.
Запрос пароля при загрузке системы
Для активации опции запроса пароля при загрузке системы используйте следующий загрузочный код:
в менеджере загрузки.
Не входите в систему как ROOT!
Входите в систему как пользователь tc, не как root.
Для запуска каких-либо задач от имени root используйте sudo перед командой.
Источник
What is the default root password?
I installed Ubuntu 12.04 LTS (Precise Pangolin), 64 bit. Nowhere was I asked to set password for root.
I just installed AccuRev SCM software. It was installed under the /root folder by default. Now I try do something on that folder. I tried with su to switch to root, but I don’t know its password.
Should I always use sudo or get the default root password, if any?
How do I create a launcher for software installed inside the /root directory?
4 Answers 4
By default, the root account is accessed by sudo.
For a complete discussion in the topic, and information for how to set a root password, see: RootSudo — Community Ubuntu Documentation
With that said, it is extremely unlikely you need to set a root password, I advise you use
Or for graphical applications, use gksu

Password for root is not set in Ubuntu which means the root login is disabled by default.
The user account created during Ubuntu installation is associated with all sudo capabilities. You could use sudo for commands that require root privileges in Ubuntu terminal.
However you can enable the root account and set a password for it. To do so use:
Firstly you will be asked for your current user password and after this you will be asked for the new password twice (new and retype password) as your new root password.
By default Ubuntu does not set up a root password and therefore you don’t get the ability to log in as root. Instead you are given the ability to perform tasks with superuser privileges using sudo.
I’ve answered a similar question before.
While you can create a password for the root account allowing you to log in as root with su , this isn’t the typical «Ubuntu» way of doing things. Instead Ubuntu expects that you will be using sudo .
Using sudo
Sudo is an alternative to giving people a root password in order to perform superuser duties. In a default Ubuntu install the person who installed the OS is given «sudo» permission by default.
Anybody with «sudo» permission may perform something «as a superuser» by pre-pending sudo to their command. For instance, to run apt-get dist-upgrade as a superuser, you could use:
By default, sudo will ask you for your own account password when performing this. This helps security. This is remembered for a few minutes so if you have a few tasks to do with sudo it will only ask you for your password on the first.
You will see the above usage of sudo pretty much anywhere you read a tutorial about Ubuntu on the web. It’s an alternative to doing this.
Benefits
With sudo, you choose in advance which users have sudo access. There is no need for them to remember a root password, as they use their own password. If you have multiple users, you can revoke one’s superuser access just by removing their sudo permission, without needing to change the root password and notify everyone of a new password. You can even choose which commands a user is allowed to perform using sudo and which commands are forbidden for that user. And lastly, if there is a security breach it can in some cases leave a better audit trail showing which user account was compromised.
Not having a root password makes brute force attacks on the root account impossible: this is relevant if you allow login over SSH. Instead, an attacker would need to know a local account name.
Sudo makes it easier to perform a single command with superuser privileges. With su , you permanently drop to a superuser shell which must be exited using exit or logout . This can lead to people staying in the superuser shell for longer than necessary just because it’s more convenient than logging out and in again later.
Getting a root shell
With sudo, you still have the option of opening a permanent (interactive) superuser shell with the command:
. and this can still be done without any root password, because sudo gives superuser privileges to the su command.
And similarly, instead of su — for a login shell you can use sudo su — or even sudo -i .
However when doing so you just need to be aware that you are acting as a superuser for every command. It’s a good security principle not to stay as a superuser for longer than necessary, just to lessen the possibility of accidentally causing some damage to the system (without it, you can only damage files your user owns).
Just to clarify, you can, if you choose, give the root user a password allowing logins as root, if you specifically want to do things this way instead. I just wanted to let you know about the Ubuntu convention of preferring sudo instead and let you know that there is an alternative.
Источник
Как сбросить пароль в Linux

Давайте рассмотрим несколько способов сбрасывания системного пароля в Linux. Вы наверное знаете, что у пользователя root есть права на изменение пароля любого пользователя в системе. А что если вы забыли пароль от рута? Вот об этом и пойдет речь в статье.
При восстановления пароля (рута или любого другого пользователя) встречаются две различные ситуации, требующие разного подхода.
Когда можно использовать GRUB
- После этого вы либо увидите приглашение для рута, либо восстанавливающее меню, где нужно выбрать строку с рутом. Используйте passwd для того чтобы изменить пароль у любого пользователя
Также следует заметить что некоторые дистрибутивы создают режим восстановления во время установки. Если в вашем меню GRUB есть такой пункт, вам не нужно производить все вышеперечисленные действия, просто выберите режим восстановления, а затем приглашение для рута, в последующем диалоговом окне.
Когда нет возможности использовать GRUB
Если вы не используете GRUB по каким-то причинам, вы можете восстановить пароль с помощью live CD (Я буду использовать Ubuntu live CD, вы можете взять любой другой). Просто следуйте дальнейшим инструкциям:
- Загрузитесь с live CD
- Выберите «Попробовать Ubuntu без изменений на вашем компьютере» (Try Ubuntu without any changes to your computer)
Далее нам нужно монтировать линукс-раздел. Для этого создайте папку, в качестве точки для монтирования, используя команду: sudo mkdir /media/linx_part
Примонтируйте линукс-раздел командой sudo mount /dev/sda1 /media/linx_part
Источник
How to Reset or Change the Root Password in Linux
Home » SysAdmin » How to Reset or Change the Root Password in Linux
In Linux, root privileges (or root access) refers to a user account that has full access to all files, applications, and system functions.
Most basic Linux user accounts run with limited privileges. This keeps users from making mistakes or accidentally exposing the system to vulnerabilities.
To use protected operating system features, a Linux user has to temporarily elevate their privileges using a command like sudo . The sudo command tells the system to run a command as a superuser, or root user. When you run a function using sudo , you’ll usually have to enter your password.
Some versions of Linux will elevate your user privileges for a set amount of time around (15 minutes) before reverting. Other versions only perform a single task with elevated privileges.
It’s a good idea to change your passwords regularly and consider using enterprise password management software.
This guide will help you change your Linux root password in Ubuntu or CentOS, or reset the password.
- A computer running Linux
- Command-line interface (terminal)
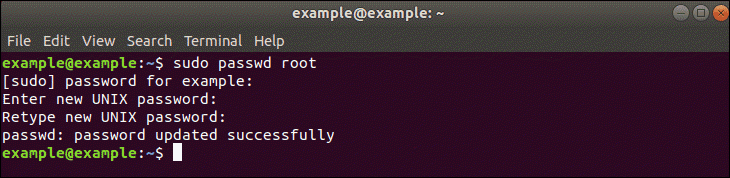
Changing Your Root Password in Ubuntu
Step 1: Open a Terminal Window
Right-click the desktop, then left-click Open in terminal.
Alternately, you can click Menu > Applications > Accessories > Terminal.
Step 2: Change Your Root Password
In the terminal window, type the following:
The system will prompt you to enter your password – this is the same password you use to log in to the system.
Next, the system will prompt you to enter a new password. Do so, and then re-enter it exactly the same when the system prompts you to retype the password. This double-entry confirms that you have typed the password correctly.
Resetting a Root Password in Ubuntu
In some situations, you may need to access an account for which you’ve lost or forgotten a password.
Step 1: Boot to Recovery Mode
Restart your system. Once you see the splash screen for the computer manufacturer, hold down the shift key. The system should come up with a black and white GRUB, or boot menu, with different Linux kernel versions displayed.
Select the second one from the top – the highest revision, followed by (recovery mode). Press Enter.
Step 2: Drop Out to Root Shell
The system should display a menu with different boot options. Use the arrow keys to navigate to the option labeled root and press Enter.
The system should respond by giving you a command-line interface with a prompt.
Step 3: Remount the File System with Write-Permissions
Right now, your system only has read-only access to your system. That means it can look at the data, but cannot make any changes. But we need write-access to change the password, so we’ll need to remount the drive with the appropriate permissions.
At the prompt, type:
Press Enter. This should allow you to make changes to the data on the hard drive.
Step 4: Change the Password
At the prompt, type:
Substitute the name of the user for username, then press Enter. The system asks you to type a new UNIX password and then to retype it.
Once you’ve entered and confirmed the new password, reboot the system by entering the following:
Hit Enter, and your system should restart. Don’t press any keys, let the system come up to the login screen, and test to make sure the new password works.
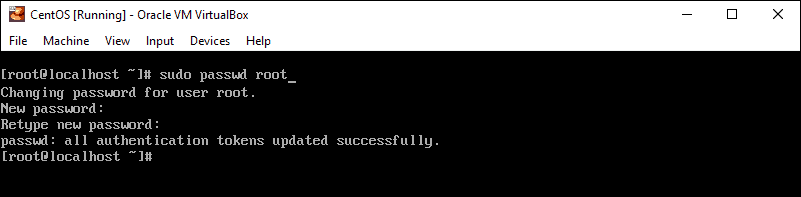
Changing the Root Password in CentOS
Changing a password in CentOS is almost identical to changing it in Ubuntu.
Step 1: Access the Command Line (Terminal)
Right-click the desktop, then left-click Open in Terminal. Or, click Menu > Applications > Utilities > Terminal.
Step 2: Change the Password
At the prompt, type the following, then press Enter:
The system should prompt you to enter your existing password. Do so, then follow the prompts to enter and confirm a new root password.
Reset Root Password in CentOS
This is a similar process as in Ubuntu, with a couple of variations.
Step 1: Access Boot Menu
Restart the system, then tap the Esc key about once per second to launch the GRUB menu.
Step 2: Edit Boot Options
Use the arrows to highlight the version of Linux you boot into, then press e.
Use the arrows to highlight the line that starts with kernel or Linux.
Press E.
At the end of the line, add a space then type single. Press Enter, then boot into single-user mode by pressing Ctrl-X or B. (The system will display the command to use.)
Step 3: Remount the Drive
You should have a command line, and you’ll have root privileges. To enable read/write access on your hard drive, type the following:
Step 4: Changing the Password
Type the following:
Press Enter, and the system should prompt you to enter and confirm a new password.
Step 5: Restart
Type the following, pressing enter after each line:
Your system should restart. Confirm that your new password works by logging in.
If you already have access to your user account, resetting or changing your password in Linux is simple.
It can be more challenging if you’ve lost or forgotten a password, but with a little creative restarting and editing, you shouldn’t find it too hard.
Источник


