- How to install a Standard TCP/IP Printer on Windows 10?
- How to install a Standard TCP/IP Printer on Windows 10?
- How to install a Standard TCP/IP Printer on Windows 10?
- Инструкция и руководство для TP-Link TL-PS110U V2 на русском
- Руководство по быстрой установке TL.
- A. для полноценного использования вам потребуются, B. проводная сеть с принте-сервером, C. подключение устройства
- . Выберите пункт Setup Wizard для начала настройки принт.
- . В окне Change Settings, выберите No или Yes: Нажмите кн.
- сетевым адаптером. .
- . Убедитесь в том, что выбран пункт Use the following port и.
- вопрос, использовать старый драйвер или установить новый. .
How to install a Standard TCP/IP Printer on Windows 10?
The print server works on AD-Hoc mode with the SSID WLAN-PS by default, but due to Windows 10 is unable to connect Ad-hoc wireless network, you may use other computer to setup TL-WPS510U in order to connect to your main router and then finish the rest installing part on Windows10. Since Windows 10 supports TCP/IP printing, it is compatible with our Print Servers, like TL-PS110U/TL-PS110P/TL-PS310U/TL-WPS510U. Here is the configuration guide.
Before the installation, please make sure the printer works fine if it is connected to computer directly.
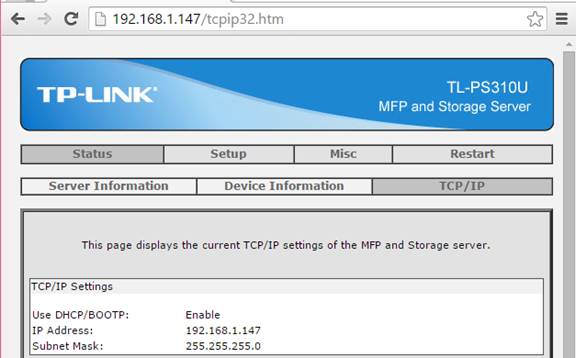
Step 1 Configure the print server as usual. Example looks below (sample is using IP 192.168.1.147).
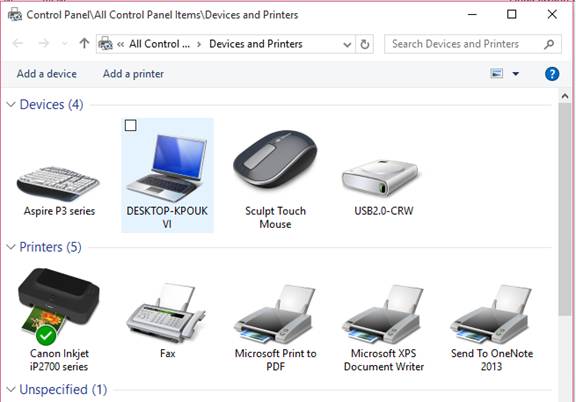
Step 2 Open Device & Printers on Control Panel, or Press Window Button, then type “Printer” then Enter.
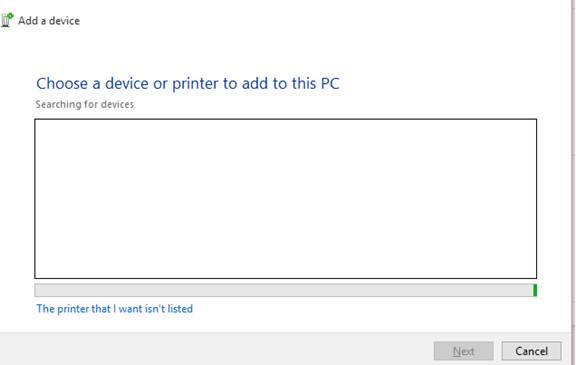
Step 3 Click “Add a printer”. Then it will automatically search for devices. Instead, click “The Printer that I want isn’t listed”.
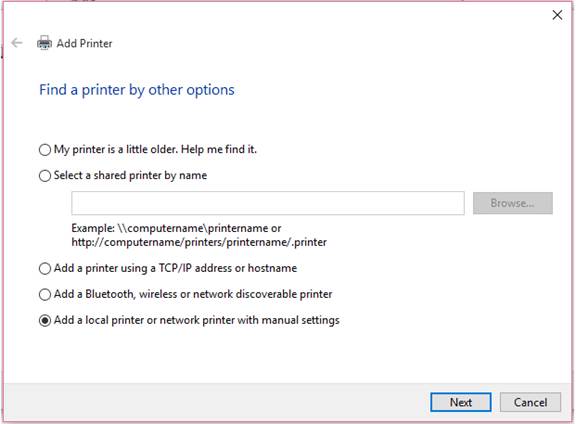
Step 4 Then it will show Add Printer page. Select “Add a local printer or network printer with manual settings”. Then next.
Step 5 On the next page, you will be asked for printer port. In this case, select “Create a new port”, and then select “Standard TCP/IP Port”. Then next.

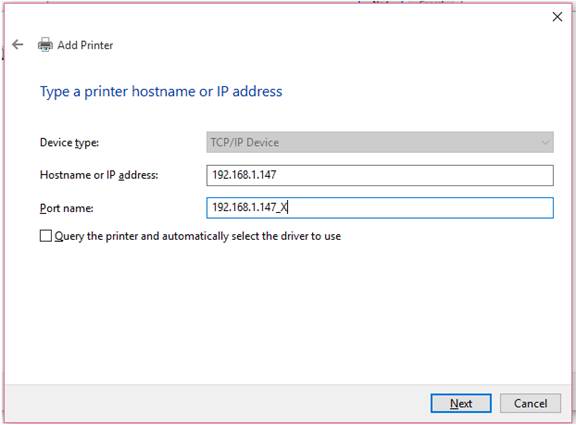
Step 6 Next page you will be asked for IP address of your device. Put in the print server’s IP Address and on the Port Name, add some text. For example, 192.168.1.147_X. Also remember NOT to tick the “Query the printer and automatically select the driver to use”.
Step 7 You then will be shown a page with Detecting TCP/IP Port. Wait a few minutes depends on your network configuration. It will show you that the system cannot find any devices. Don’t worry, this is as expected. Then you will be shown the page like next page.
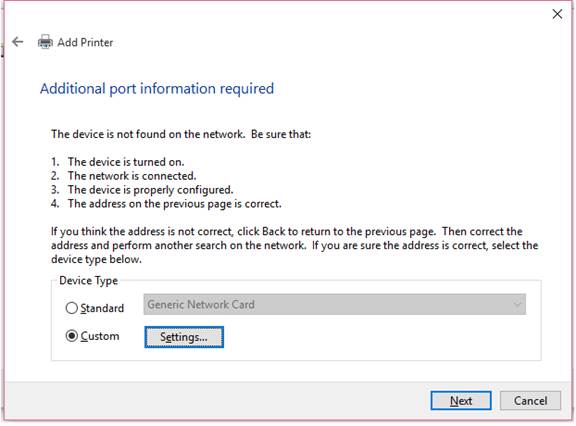
Select “Custom” then click “Settings…”
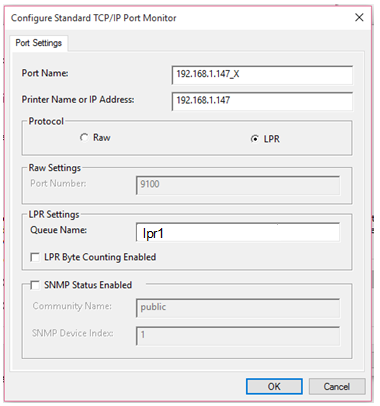
Step 8 Please type the IP address of your Print Server in Hostname or IP address. The print server’s IP should in the same subnet with your router. As default, the Protocol is Raw. You can keep it still or select LPR. The two protocols support different printing languages. You can try one first, if can’t print, delete it and try another one.
Step 9 Click Next.
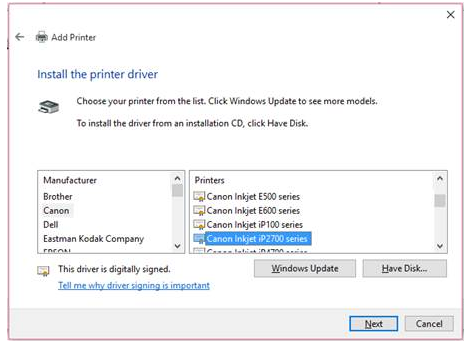
Step 10 You will be asked to select your printer driver. Select based on your printer model and type from Windows standard drivers. Or you can use from your printer CD/DVD setup kit. After that, click Next.
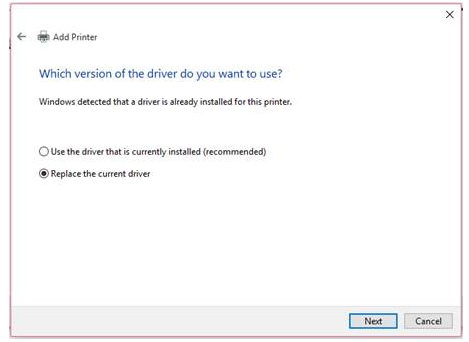
Step 11 Then you will be asked whether you would like to use current driver or replace it. This is only happen when you already have printer driver before. I assume that you have installed previously. So, select to replace.
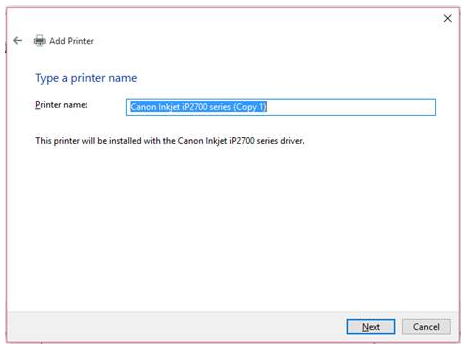
Step 12 Then put the name of your printer here.
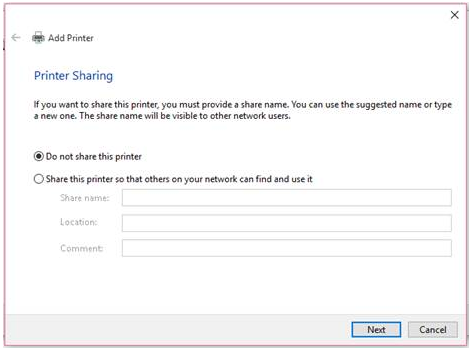
Step 13 Click “do not share this printer”.
Step 14 Set this printer as default by ticking the selection “Set as the default printer” or not. Also if you want to do Print test, just press the button “Print a test page”.
How to install a Standard TCP/IP Printer on Windows 10?
The print server works on AD-Hoc mode with the SSID WLAN-PS by default, but due to Windows 10 is unable to connect Ad-hoc wireless network, you may use other computer to setup TL-WPS510U in order to connect to your main router and then finish the rest installing part on Windows10. Since Windows 10 supports TCP/IP printing, it is compatible with our Print Servers, like TL-PS110U/TL-PS110P/TL-PS310U/TL-WPS510U. Here is the configuration guide.
Before the installation, please make sure the printer works fine if it is connected to computer directly.
Step 1 Configure the print server as usual. Example looks below (sample is using IP 192.168.1.147).
Step 2 Open Device & Printers on Control Panel, or Press Window Button, then type “Printer” then Enter.
Step 3 Click “Add a printer”. Then it will automatically search for devices. Instead, click “The Printer that I want isn’t listed”.
Step 4 Then it will show Add Printer page. Select “Add a local printer or network printer with manual settings”. Then next.
Step 5 On the next page, you will be asked for printer port. In this case, select “Create a new port”, and then select “Standard TCP/IP Port”. Then next.
Step 6 Next page you will be asked for IP address of your device. Put in the print server’s IP Address and on the Port Name, add some text. For example, 192.168.1.147_X. Also remember NOT to tick the “Query the printer and automatically select the driver to use”.
Step 7 You then will be shown a page with Detecting TCP/IP Port. Wait a few minutes depends on your network configuration. It will show you that the system cannot find any devices. Don’t worry, this is as expected. Then you will be shown the page like next page.
Select “Custom” then click “Settings…”
Step 8 Please type the IP address of your Print Server in Hostname or IP address. The print server’s IP should in the same subnet with your router. As default, the Protocol is Raw. You can keep it still or select LPR. The two protocols support different printing languages. You can try one first, if can’t print, delete it and try another one.
Step 9 Click Next.
Step 10 You will be asked to select your printer driver. Select based on your printer model and type from Windows standard drivers. Or you can use from your printer CD/DVD setup kit. After that, click Next.
Step 11 Then you will be asked whether you would like to use current driver or replace it. This is only happen when you already have printer driver before. I assume that you have installed previously. So, select to replace.
Step 12 Then put the name of your printer here.
Step 13 Click “do not share this printer”.
Step 14 Set this printer as default by ticking the selection “Set as the default printer” or not. Also if you want to do Print test, just press the button “Print a test page”.
Инструкция и руководство для
TP-Link TL-PS110U V2 на русском
10 страниц подробных инструкций и пользовательских руководств по эксплуатации
TP-Link TL-PS110U Print Server set up
Обзор принт-сервера TP-Link TL PS110U
TP-Link USB Print Server
Принт сервер TP-LINK TL PS110U Windows 10
Print Server TPLINK TL-PS110U . USB2.0 Port Fast Ethernet (10/100)
how to print server tl-ps310u
Cara setting print server TP-LINK PS110P
TPLINK TL-PS110P Parallel Port Print Server
Руководство по быстрой установке TL.
Руководство по быстрой установке
Руководство по быстрой установке
Однопортовый USB2.0 принт-сервер
Однопортовый LPT (параллельный порт)
принт-сервер
REV: 1.0.0
71065177

A. для полноценного использования вам потребуются, B. проводная сеть с принте-сервером, C. подключение устройства
D. настройка устройства
A. Для полноценного использования Вам потребуются:
¾ Один PC на основе Windows с компакт-диском для установки
¾ Один кабель для принтера
B. Проводная сеть с принте-сервером:
C. Подключение устройства:
1. Отключите питание принтера.
2. Подключите принт-сервер к принтеру (кабель поставляется с
3. Включите питание принтера.
4. Включите питание принт-сервера.
5. Подождите 10 секунд пока принт сервер пройдет тестирование
D. Настройка устройства:
1. Чтобы получить доступ к принте-серверу по сети у Вашего
компьютера должен быть совместимый IP адрес например
192.168.0.100.
2. Вставьте установочный диск в CD ROM (идет в комплекте с
принт-сервером), после чего дождитесь появления окна.

. Выберите пункт Setup Wizard для начала настройки принт.
3. Выберите пункт Setup Wizard для начала настройки принт-сервера.
4. В сведущем окне нажмите Next, после чего, мастер подключения
автоматически откроет настройки принт-сервера.
5. В окне Select A Print Server, выберете принт-сервер который вы
хотите настроить и нажмите кнопку Next.

. В окне Change Settings, выберите No или Yes: Нажмите кн.
6. В окне Change Settings, выберите No или Yes:
Нажмите кнопку No, если вы хотите, чтобы принт-сервер сохранил все
вшитые в него настройки в том числе IP адрес по умолчанию. И нажмите
Next. В таком случае его IP адрес будет:
Маска подсети: 255.255.255.0
Нажмите кнопку Yes, если вы хотите изменить IP-адрес принт-сервера, а
затем нажмите кнопку Next.
IP-адрес принт-сервера должен быть в одной и той же подсети, с Вашим

сетевым адаптером. .
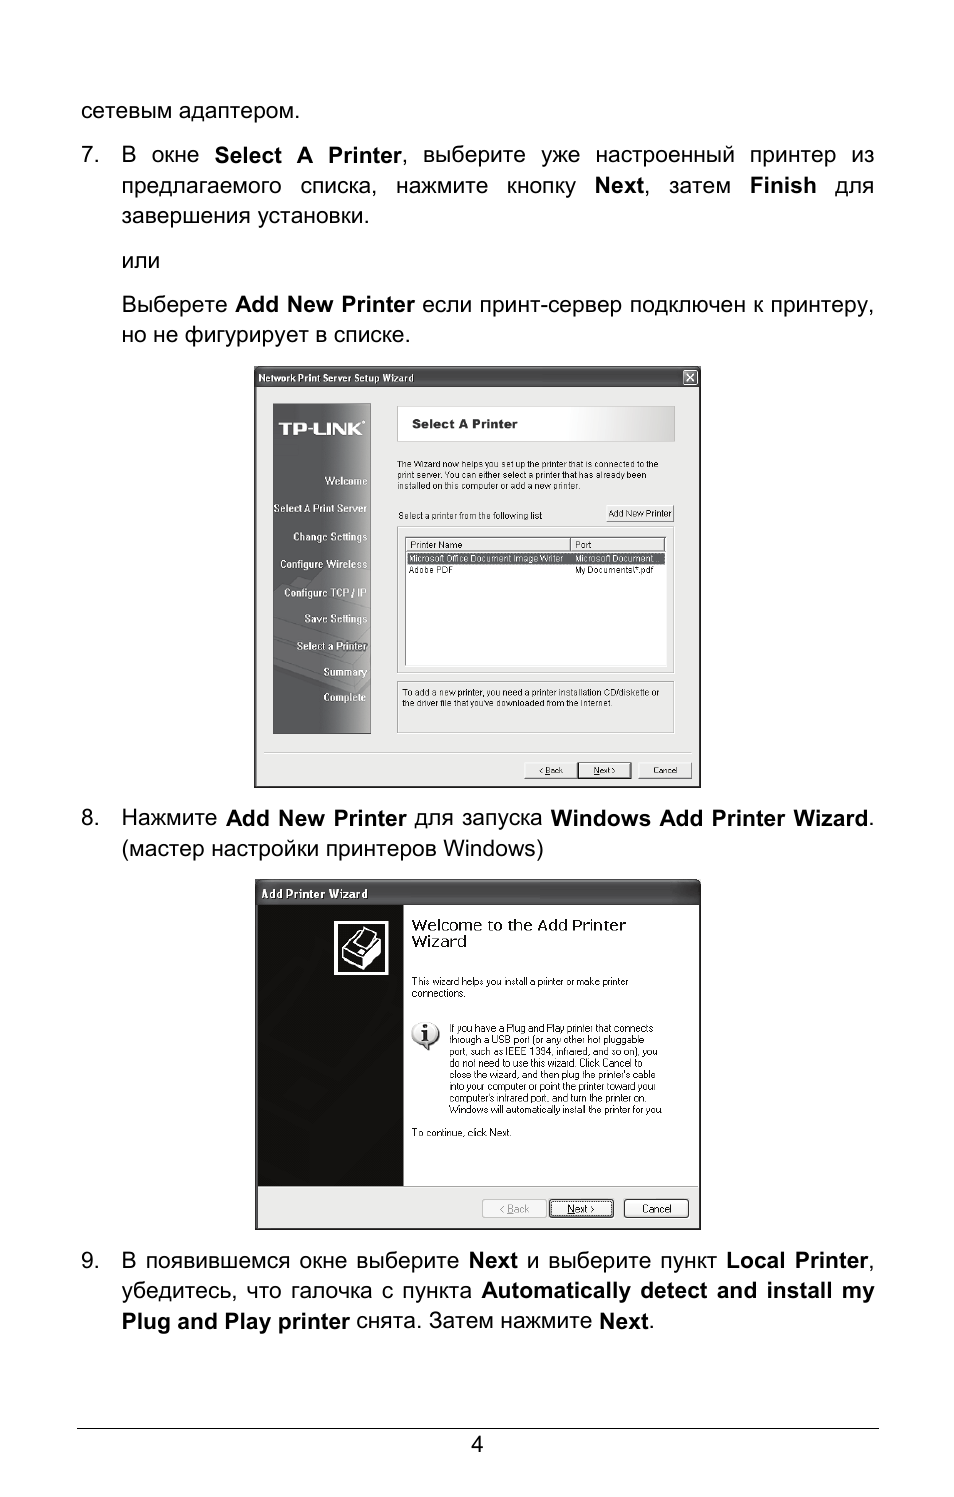
7. В окне Select A Printer, выберите уже настроенный принтер из
предлагаемого списка, нажмите кнопку Next, затем Finish для
завершения установки.
Выберете Add New Printer если принт-сервер подключен к принтеру,
но не фигурирует в списке.
8. Нажмите Add New Printer для запуска Windows Add Printer Wizard.
(мастер настройки принтеров Windows)
9. В появившемся окне выберите Next и выберите пункт Local Printer,
убедитесь, что галочка с пункта Automatically detect and install my
Plug and Play printer снята. Затем нажмите Next.
. Убедитесь в том, что выбран пункт Use the following port и.
10. Убедитесь в том, что выбран пункт Use the following port и в нем
выбран тип LPT1: (Recommended Printer Port). После чего нажмите
Next.
11. Выберите Manufacturer (производитель) и Printer (принтер) из
представленного списка драйверов. После чего нажмите Next.
12. Если у Вас уже был установлен драйвер принтера, Вам будет задан

вопрос, использовать старый драйвер или установить новый. .
вопрос, использовать старый драйвер или установить новый.
Нажмите Next. Введите имя принтера, а также выберите будет ли он
использоваться по умолчанию. После чего нажмите Next.
13. Затем выберите хотите ли Вы сделать принтер общим для всех
пользователей сети и нужно ли напечатать тестовую страничку
(пожалуйста выберите No). Выберите соответствующие кнопки и
нажмите Next и Finish.
14. В мастере установки, завершите установку, выбрав из спискавновь
установленный принтер и нажмите на кнопку Next → Finish.
15. Далее в Windows, зайдите start (пуск) → setting (настройка) →
Printers and Faxes (принтеры и факсы) и выделите вновь
установленный принтер (один клик левой клавишей мышки).
16. Кликните правой кнопкой мышки на выделенном значке и выберите
Properties (свойства) → Ports (порты) и проверьте что порт
принт-сервера прописан.


