- tmux Integration
- Introduction
- Usage
- Limitations
- Configuration
- Best Practices
- Tmux ������� mac os
- Vim and Tmux on your Mac
- Install Vundle
- Configure Vundle
- Add Solarized Color Theme
- Onto Tmux!
- More Tmux
- How to Use tmux (a Terminal Multiplexer)
- What is tmux?
- Install tmux
- Debian or Ubuntu:
- CentOS:
- Mac OSX:
- Creating, Detaching, and Attaching tmux Sessions
- tmux Commands
- Getting Help with tmux by Reviewing Keyboard Shortcuts
- Manage tmux Windows
- Manage tmux Panes
- Manage tmux Sessions
- Create a tmux Configuration File
- Servers in Tmux
- More Information
tmux Integration
iTerm2 is integrated with tmux, allowing you to enjoy a native user interface with all the benefits of tmux’s persistence.
Introduction
Normally, when you use tmux, multiple virtual windows are displayed in a single «physical» window. You can manipulate the environment by issuing commands to tmux. This poses a few problems:
- Some keystroke must be dedicated to tmux to enter its command mode (^B, by default, which means moving the cursor to the left in emacs or an interactive shell becomes more difficult).
- You have to ssh to the remote host more than once to get more than one view of your tmux session’s window.
- You have to learn tmux commands.
- To adjust split panes, you have to enable mouse reporting, even if you don’t want it otherwise.
- Some built-in features of your terminal emulator don’t work as well as they would if you weren’t using tmux: for instance, you can’t access tmux’s scrollback history as easily or quickly as you can in a normal terminal window. Also, tmux’s find feature isn’t as good as iTerm2’s.
For many users, a terminal multiplexer would be a great way to work, but they don’t want to accept the drawbacks.
iTerm2’s tmux integration solves these problems.
When you run «tmux -CC», a new tmux session is created. An iTerm2 window opens and it acts like a normal iTerm2 window. The difference is that when iTerm2 quits or the ssh session is lost, tmux keeps running. You can return to the host you were ssh’ed into and run «tmux -CC attach» and the iTerm2 windows will reopen in the same state they were in before. A few use cases come to mind:
For users who do most of their work in ssh:
- Restore the environment you had at work when you get home.
- No more anxiety about letting System Update reboot!
- Collaborate with another user by having two people attach to the same tmux session.
Usage
You should be able to use tmux as always. Just add the -CC argument to its invocation. In practice, this means running one of these commands:
When you run tmux -CC, what you’ll see on that terminal is a menu:
- If you press esc, the tmux windows will close and the tmux client will exit.
- If you press esc and nothing happens, then the tmux client may have crashed or something else has gone wrong. Press «X» to force iTerm2 to exit tmux mode. You may need to run «stty sane» to restore your terminal’s state if the tmux client did crash.
- If you want to report a bug, press L and reproduce the issue. The tmux protocol commands will be written to the screen.
- If you want to run a tmux command that isn’t available through the menus, you can press C. A dialog box opens and you can enter a command. For example, «new-window».
In general, you don’t need to run commands to perform the most common actions. The following iTerm2 actions affect tmux:
- Close a session, tab, or window: Kills the tmux session or window.
- Split a pane: Splits the tmux window using the split-window command.
- Resize a split pane: Resizes tmux split panes using the resize-pane command.
- Resize a window: Tells tmux that the client size has changed, causing all windows to resize. Windows are never larger than the smallest attached client. A gray area on the right or bottom of a window indicates that a physical window is larger than the maximum allowed tmux window size. One consequence of this rule is that all tmux windows/tabs will contain the same number of rows and columns.
- Create a window or tab using the Shell->tmux menu: Creates a new tmux window.
- Detach using Shell->tmux->Detach: Detaches from the tmux session. All tmux windows are closed. You can get them back with tmux -CC attach.
Limitations
There are a few limitations of tmux integration which are related to the design of tmux.
- A tab with a tmux window may not contain non-tmux split panes.
- A tab with split panes may have «empty» areas. This is because tmux wants every tmux window to be the same size, but our split pane dividers are not exactly one cell by one cell in size.
Configuration
Check Preferences > General > tmux for configuration settings. You can also adjust whether to open the tmux Dashboard when connecting to a session with a large number of windows. You can open the tmux Dashboard by selecting the menu item Shell > tmux > Dashboard.
See also the tmux section of General Preferences.
Best Practices
For practical tips on how to configure iTerm2 for use with tmux integration in the real world, please see tmux Integration Best Practices.
iTerm2 by George Nachman. Website by Matthew Freeman, George Nachman, and James A. Rosen.
Источник
Tmux ������� mac os

Vim and Tmux on your Mac
Setting up your computer for Vim and Tmux often comes with a few issues. Here’s how to manage plugins for Vim and use Tmux to boost your productivity, as well as settle a few common issues.
- Vundle — Plugin management for Vim
- Solarized color scheme
- Tmux — Terminal multiplexer
We’ll also figure out some issues Mac and Tmux have with showing 256 color themes.
Install Vundle
You can install Vundle by cloning it:
Configure Vundle
Once installed, you can configure it.
And follow the installation directions by editing your
Once this is setup, you can open a new instance of vim and run :BundleInstall :
You’ll get a confirmation «Done» message on the bottom of your screen if all goes well.
Add Solarized Color Theme
Next, we’ll add the Solarized color theme. Vundle makes this really easy. Simply add the Github repository name in
Now that we’ve added the solarized theme, we need to have Vundle install it.
Now open up your Terminal (iTerm2 or Terminal app). If you’re on a Mac, you may see something. ugly. I had a terrible background and the colors were completley off. I didn’t have 256 color enabled.
Here’s what I saw: 
To fix that, I finally came across this StackOverflow question, which had the answer waiting.
.vimrc settings from above to the following:
Once you start up a new instance of Vim, you should see your new, colored vim!

Onto Tmux!
Let’s up our game and get Tmux into the mix. We can use Tmux to open up multiple «panes» within our shell.
First, install it. On your Mac, you can use Homebrew:
Ubuntu or Debian users can user apt-get :
Great. Now, colors are also an issue when running Vim within Tmux. Let’s fix that. Create or edit the file
Now we’re ready to use Tmux. Start up a new Tmux session:
Next, split the screen vertically so we have 2 panes with this keyboard shortcut:
You can switch between panes with this shortcut:
You can then open up separate files in each! (Or do . anything really).

More Tmux
Tmux has Windows, and within the Windows it has Panes. Each Window consists of a set of 1-n Panes.
Tmux also has Sessions. A collection of Windows/Panes live within a Session. You can detach from a Session, leaving it running in the background. You can later re-attach to it, and continue working. This is how people pair program.
Источник
How to Use tmux (a Terminal Multiplexer)

What is tmux?
Tmux is a terminal multiplexer. It creates a host server on your Linode and connects to it with a client window. If the client is disconnected, the server keeps running. When you reconnect to your Linode after rebooting your computer or losing your Internet connection, you can reattach to the tmux session and the files you were working with will still be open, and the processes you had running will still be active.
By attaching multiple sessions, windows, and panes to a tmux server, you can organize your workflow and easily manage multiple tasks and processes.
Install tmux
Debian or Ubuntu:
Install tmux on CentOS by using the apt package manager:
CentOS:
Install tmux on CentOS by using the yum package manager:
Mac OSX:
Install tmux on Mac OS X by using Homebrew:
Creating, Detaching, and Attaching tmux Sessions
Start a new tmux session with the following command:
The commands tmux new or tmux new-session can be used as well. You can create a new session with a specific name by running tmux new -s $name , replacing $name with a unique name for your session.
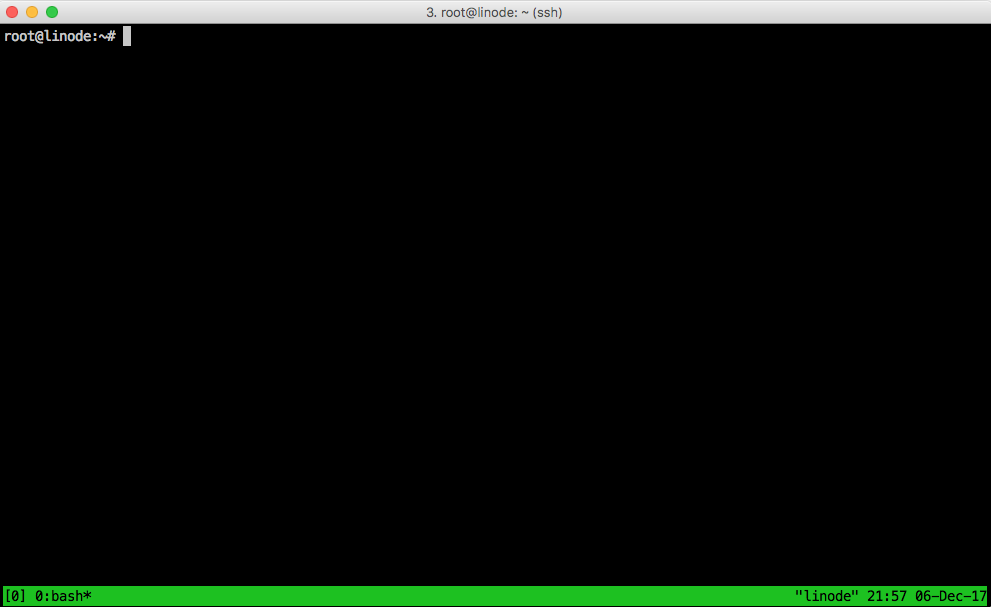
Running any of the above commands will result in a new session being created with one window and one page. At this point, your terminal window should have a green menu bar at the bottom, similar to the one below:

Detach from the session:
This will return you to the basic terminal.
To attach to the last session you used, run:
The command tmux a can be used as well. To attach to a specific session, run tmux attach -t $name , replacing $name with the unique name given to the session you wish to use.
Once a session has been started, it will continue to run as long as the Linode is running or until you stop the session.
tmux Commands
There are three ways to issue commands to tmux:
shortcuts: tmux uses what is called a prefix key, which is CTRL+b by default. tmux will interpret the keystroke following the prefix as a tmux shortcut. For example: to detach from your session using a shortcut: press CTRL+b , release both keys and then press d .
command mode: Enter command mode by pressing the prefix followed by : . This will open a command prompt at the bottom of the screen, which will accept tmux commands.
command line: Commands can also be entered directly to the command line within a tmux session. Usually these commands are prefaced by tmux . The tmux attach command used in the previous section was an example of this type of command.
Most tmux tasks can be accomplished using any of these three methods.
Getting Help with tmux by Reviewing Keyboard Shortcuts
At any time, you can display tmux keyboard shortcuts by entering your prefix followed by ? :
Manage tmux Windows
When a tmux session starts, a single window is created by default. It is possible to attach multiple windows to the same session and switch between them as needed. This can be helpful when you want to run multiple jobs in parallel.
| Command | Result |
|---|---|
| Prefix + c | Create a new window |
| Prefix + p | Switch to the previous window |
| Prefix + n | Switch to the next window |
| Prefix + 0-9 | Switch to a window using it’s index number |
| Prefix + w | Choose a window from an interactive list |
| exit | Close a window |
| Prefix + & | Force kill-all processes in an unresponsive window |
| Prefix + % | Split windows horizontally |
| Prefix + “ | Split windows vertically |
| Prefix + M-n | Switch between windows. Switching to a window that has a content alert, an activity or a bell |
| Prefix + M-p | Switch back to a previous window that has a content alert, an activity or a bell |
By default, tmux names each window according to the process that spawned it (most commonly bash). To give windows names that are easier to remember and work with, you can rename a window with Prefix + ,.
Manage tmux Panes
Each window can be divided into multiple panes. This is useful when you want outputs from multiple processes visible within a single window.
| Command | Result |
|---|---|
| Prefix + « | Split the active pane horizontally |
| Prefix + % | Split the active pane vertically |
| Prefix + arrow key | Switch to another pane |
| Prefix + ALT+arrow | Resize the active pane |
| Prefix + z | Zoom in on the active pane. Press the same combination again to exit zoom mode |
| exit | Close the active pane |
| Prefix + x | Force kill an unresponsive process in a pane |
| Prefix + k | To move the pane above |
| Prefix + j | To move the pane below |
| Prefix + h | To move the left panes |
| Prefix + l | To move the right pane |
| Prefix + q | Display pane numbers |
| Prefix + o | Toggle / jump to the other pane |
| Prefix + > | swap current pane with the pane from the left |
| Prefix + < | swap current pane with the page from the right |
| Prefix + ! | move the pane out of current window |
| Prefix + ; | Go to the last used pane |
| Prefix + M-1 | Predefined layout to switch to even-horizontal layout |
| Prefix + M-2 | Predefined layout to switch to even-vertical layout |
| Prefix + M-3 | Predefined layout to switch to main-horizontal layout |
| Prefix + M-4 | Predefined layout to switch to main-vertical layout |
| Prefix + M-5 | Predefined layout to switch to a tiled layout |
| Prefix + space | Predefined layout to switch to the next layout |
| Prefix + C-o | To move all panes, rotating the window up |
| Prefix + M-o | To move all panes, rotating the window down |
| tmux bind-key k resize-pane -U [i] | To move the divider up i lines (for horizontal divider) |
| tmux bind-key k resize-pane -D [i] | To move the divider down i lines (for horizontal divider) |
| tmux bind-key k resize-pane -L [i] | To move the divider left i columns (for vertical divider) |
| tmux bind-key k resize-pane -R [i] | To move the divider right i columns (for vertical divider) |
| C-a C-up, C-a C-down, C-a C-left, C-a C-right | To resize panes by 1 row/column |
| C-a M-up, C-a M-down, C-a M-left, C-a M-right | To resize panes by 5 rows/columns |
Manage tmux Sessions
Sometimes even multiple windows and panes aren’t enough and you need to separate the layouts logically by grouping them into separate sessions. Open the command prompt with Prefix then :, then start a new session:
| Command | Result |
|---|---|
| Prefix + ( | Switch to the previous session |
| Prefix + ) | Switch to the next session |
| Prefix + s | Display an interactive session list |
| Prefix + d | detach from the current session |
| Prefix + $ | rename a session in tmux |
| Prefix + L | Select the most recently used session (or the last session) |
| tmux ls | List all available sessions |
| tmux attach -t 0 | Zoom in on the active pane. Press the same combination again to exit zoom mode |
| tmux kill-server | Destroy all sessions and kill all processes |
Create a tmux Configuration File
As you get comfortable with tmux, you may want to change some of the defaults. Using a text editor, create a configuration file in your user’s home directory:
When you have saved your changes to this file, load the new configuration. Enter the tmux command mode by pressing Prefix then :, then use the following command:
With the mouse option enabled you can use the pointer to interact with tmux panes, windows and status bar. For example you can click on a window name in the status bar to switch to it or you can click and drag a pane line to resize it.
Other configuration options are available in the tmux manual.
Servers in Tmux
Whenever you launch tmux, a server is initiated. You can connect to a tmux server under a specific socket name by using the command tmux -L . For example, to connect to a server with the socket name “linode_socket”, run the following command:
This attaches a new session. If a session already exists and want to attach to it, run the following command instead:
More Information
You may wish to consult the following resources for additional information on this topic. While these are provided in the hope that they will be useful, please note that we cannot vouch for the accuracy or timeliness of externally hosted materials.
This page was originally published on Wednesday, December 6, 2017.
Источник


