- Ты еще не используешь tmux на полную! (Наверное)
- Содержание
- Что такое tmux
- Запуск и начало новой сессии
- Открытие нового окна
- Переходы между окнами
- Разделение окон и создание панелей
- Передвижение между панелями
- Передвижение между сессиями
- [Практическое использование] Переадресация отображаемого содержания в tmux
- [Практическое использование] Отображение названия ветки Git в статус-баре
- [Практическое использование] Отображение пути текущей операции
- [Практическое использование] Вызов сниппета
- Ссылка на настройки .tmux.conf
- Совместимость версий tmux
- How to Use tmux (a Terminal Multiplexer)
- What is tmux?
- Install tmux
- Debian or Ubuntu:
- CentOS:
- Mac OSX:
- Creating, Detaching, and Attaching tmux Sessions
- tmux Commands
- Getting Help with tmux by Reviewing Keyboard Shortcuts
- Manage tmux Windows
- Manage tmux Panes
- Manage tmux Sessions
- Create a tmux Configuration File
- Servers in Tmux
- More Information
Ты еще не используешь tmux на полную! (Наверное)
Привет, Хабр! Представляю вашему вниманию перевод статьи «(たぶん)君はまだtmuxの真の力を引き出せていない».
Содержание
Что такое tmux
tmux — терминальный мультиплексор. Когда работаешь на машине, использующей SSH, исполняешь увесистую программу, но хочешь без прекращения исполнения перейти к другой задаче и т.д., то tmux может очень пригодиться.
Но возможности tmux на этом на этом не заканчиваются. Есть различные удобные варианты использования tmux, что я и хочу продемонстрировать на примерах ниже.
Базовая идея похожа на моды в Vim. С помощью prefix’a (зарезервированные key bindings или привязка клавиш) можно изменить мод, по умолчанию используется привязка ctrl + b.
Запуск и начало новой сессии
Если ваша ОС — Ubuntu или Debian, вы можете установить tmux командой `sudo apt-get install tmux`. На MacOS — brew install tmux.
Команда для запуска:
Если хотите запустить tmux и сразу дать название новой сессии, используйте эту команду:

Открытие нового окна
Создав сессию в tmux, вы также можете создавать новые окна. Стандартная связка — «ctrl +b + c». Если вы сохранили свой prefix, можете использовать связку «prefix + c». Скорее всего, значение “c” — create, отсюда и такая связка.
Переходы между окнами
Можно также свободно переключаться между созданными окнами. Стандартные связки для этого — «prefix + p» (p — previous) и «prefix + n» (n — next).
Использовать prefix не всегда удобно, поэтому я для себя кастомизировал связки клавиш для перехода между окнами: shift + rightKey для следующего окна и shift + leftKey для предыдущего.
Разделение окон и создание панелей
Разделение окон в tmux похоже на разделение в vim. Вы делите окно на несколько панелей, тем самым в одном окне можно открыть vim, в другом htop, а в третьем выполнять программу.
Без привязки клавиш, команды для разделения окна — prefix + «split-window -h», prefix + «split-window -v».
Так как прописывать это каждый раз не особо хочется, я сделал для себя хоткеи в виде prefix + «-«, prefix + «|».
Передвижение между панелями
Стандартные команды для передвижения между панелями сложноваты, не очень удобны в обращении, поэтому я и в этом случае назначил свои хоткеи: ctrl + shift + upKey, ctrl + shift + downKey, ctrl + shift + rightKey, ctrl + shift + leftKey.
Передвижение между сессиями
С помощью связки клавиш ctrl + t можно вызвать список сессий, а клавишами ↑ ↓ выбрать нужную сессию.
[Практическое использование] Переадресация отображаемого содержания в tmux
По сути, tmux является своего рода виртуальным терминалом, содержащимся в директории /dev/pts/
Другими словами, если мы определим
Таким образом можно выводить на разные панели stderr и stdout программы, которые вы пишете, а также использовать терминал как лог операций.
[Практическое использование] Отображение названия ветки Git в статус-баре
Это лайфхак, который использует возможность чтения Shellscript и Python script из .tmux.conf — файла конфигурации tmux.
Статус-бар можно настроить следующей командой:
#
tmux_hook — это файл, который я создал для отображения времени и текущей ветки Git, но он, по сути, может вернуть любую текстовую информацию. Например, если правильно настроить, можно в статус-баре отображать даже таймлайн своего твиттера.
[Практическое использование] Отображение пути текущей операции
Часто, прыгая по терминалу, хочется понять, в какой ты директории, в каком пути она содержится.
Не хочется для этого лишний раз прописывать pwd, поэтому можно отобразить путь текущей операции в том же месте, где отображается путь до текущей панели.

[Практическое использование] Вызов сниппета
Несмотря на то, что tmux является менеджером сессий с функцией разделения терминала, он может выполнять некоторые функции IDE (круто, не правда ли?). Вы можете забиндить свои хоткеи на специальную настройку send-keys и вызвать их в терминале.
Например, если настроить send-keys как на моем примере ниже, можно просто нажать prefix + 1 и вывести команды import, необходимые для работы с python.
Ссылка на настройки .tmux.conf
Совместимость версий tmux
Иногда случается, что некоторые настройки tmux не работают — в этом случае, его версия может быть либо слишком новой, либо слишком старой.
Все вышеописанное и конфиг, на который я оставил ссылку, — для tmux версии 2.8 и выше. Если у вас что-либо не работает, проверьте, подходит ли вам данная версия.
Если вы соберетесь самостоятельно что-то отлаживать, то прежде всего стоит обратиться к man tmux — самой надежной документации по tmux на данный момент.
Ссылка на оригинал данной статьи тут
Мы будем очень рады, если вы расскажете нам, понравилась ли вам данная статья, понятен ли перевод, была ли она вам полезна?
Источник
How to Use tmux (a Terminal Multiplexer)

What is tmux?
Tmux is a terminal multiplexer. It creates a host server on your Linode and connects to it with a client window. If the client is disconnected, the server keeps running. When you reconnect to your Linode after rebooting your computer or losing your Internet connection, you can reattach to the tmux session and the files you were working with will still be open, and the processes you had running will still be active.
By attaching multiple sessions, windows, and panes to a tmux server, you can organize your workflow and easily manage multiple tasks and processes.
Install tmux
Debian or Ubuntu:
Install tmux on CentOS by using the apt package manager:
CentOS:
Install tmux on CentOS by using the yum package manager:
Mac OSX:
Install tmux on Mac OS X by using Homebrew:
Creating, Detaching, and Attaching tmux Sessions
Start a new tmux session with the following command:
The commands tmux new or tmux new-session can be used as well. You can create a new session with a specific name by running tmux new -s $name , replacing $name with a unique name for your session.
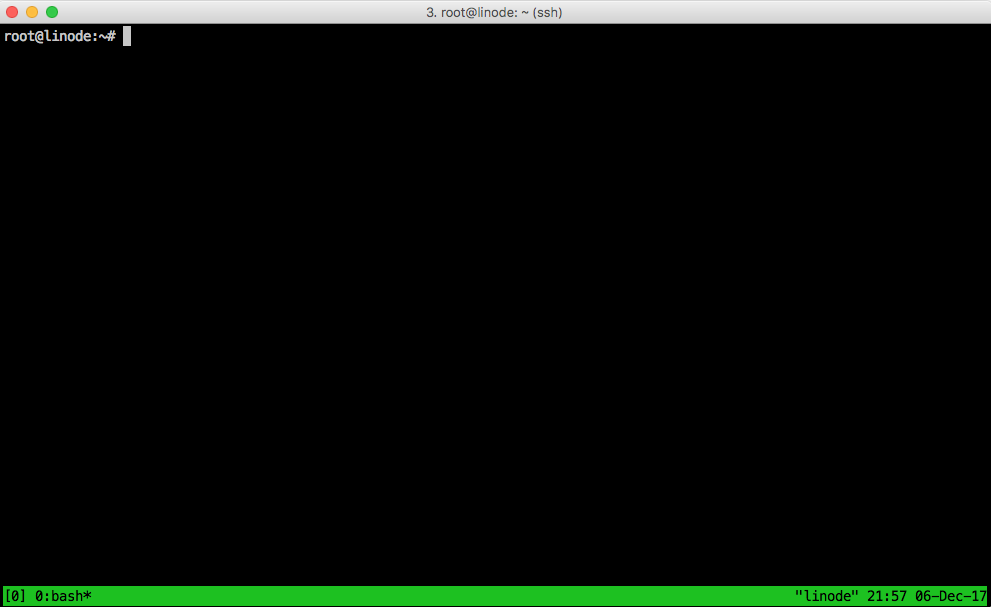
Running any of the above commands will result in a new session being created with one window and one page. At this point, your terminal window should have a green menu bar at the bottom, similar to the one below:

Detach from the session:
This will return you to the basic terminal.
To attach to the last session you used, run:
The command tmux a can be used as well. To attach to a specific session, run tmux attach -t $name , replacing $name with the unique name given to the session you wish to use.
Once a session has been started, it will continue to run as long as the Linode is running or until you stop the session.
tmux Commands
There are three ways to issue commands to tmux:
shortcuts: tmux uses what is called a prefix key, which is CTRL+b by default. tmux will interpret the keystroke following the prefix as a tmux shortcut. For example: to detach from your session using a shortcut: press CTRL+b , release both keys and then press d .
command mode: Enter command mode by pressing the prefix followed by : . This will open a command prompt at the bottom of the screen, which will accept tmux commands.
command line: Commands can also be entered directly to the command line within a tmux session. Usually these commands are prefaced by tmux . The tmux attach command used in the previous section was an example of this type of command.
Most tmux tasks can be accomplished using any of these three methods.
Getting Help with tmux by Reviewing Keyboard Shortcuts
At any time, you can display tmux keyboard shortcuts by entering your prefix followed by ? :
Manage tmux Windows
When a tmux session starts, a single window is created by default. It is possible to attach multiple windows to the same session and switch between them as needed. This can be helpful when you want to run multiple jobs in parallel.
| Command | Result |
|---|---|
| Prefix + c | Create a new window |
| Prefix + p | Switch to the previous window |
| Prefix + n | Switch to the next window |
| Prefix + 0-9 | Switch to a window using it’s index number |
| Prefix + w | Choose a window from an interactive list |
| exit | Close a window |
| Prefix + & | Force kill-all processes in an unresponsive window |
| Prefix + % | Split windows horizontally |
| Prefix + “ | Split windows vertically |
| Prefix + M-n | Switch between windows. Switching to a window that has a content alert, an activity or a bell |
| Prefix + M-p | Switch back to a previous window that has a content alert, an activity or a bell |
By default, tmux names each window according to the process that spawned it (most commonly bash). To give windows names that are easier to remember and work with, you can rename a window with Prefix + ,.
Manage tmux Panes
Each window can be divided into multiple panes. This is useful when you want outputs from multiple processes visible within a single window.
| Command | Result |
|---|---|
| Prefix + « | Split the active pane horizontally |
| Prefix + % | Split the active pane vertically |
| Prefix + arrow key | Switch to another pane |
| Prefix + ALT+arrow | Resize the active pane |
| Prefix + z | Zoom in on the active pane. Press the same combination again to exit zoom mode |
| exit | Close the active pane |
| Prefix + x | Force kill an unresponsive process in a pane |
| Prefix + k | To move the pane above |
| Prefix + j | To move the pane below |
| Prefix + h | To move the left panes |
| Prefix + l | To move the right pane |
| Prefix + q | Display pane numbers |
| Prefix + o | Toggle / jump to the other pane |
| Prefix + > | swap current pane with the pane from the left |
| Prefix + < | swap current pane with the page from the right |
| Prefix + ! | move the pane out of current window |
| Prefix + ; | Go to the last used pane |
| Prefix + M-1 | Predefined layout to switch to even-horizontal layout |
| Prefix + M-2 | Predefined layout to switch to even-vertical layout |
| Prefix + M-3 | Predefined layout to switch to main-horizontal layout |
| Prefix + M-4 | Predefined layout to switch to main-vertical layout |
| Prefix + M-5 | Predefined layout to switch to a tiled layout |
| Prefix + space | Predefined layout to switch to the next layout |
| Prefix + C-o | To move all panes, rotating the window up |
| Prefix + M-o | To move all panes, rotating the window down |
| tmux bind-key k resize-pane -U [i] | To move the divider up i lines (for horizontal divider) |
| tmux bind-key k resize-pane -D [i] | To move the divider down i lines (for horizontal divider) |
| tmux bind-key k resize-pane -L [i] | To move the divider left i columns (for vertical divider) |
| tmux bind-key k resize-pane -R [i] | To move the divider right i columns (for vertical divider) |
| C-a C-up, C-a C-down, C-a C-left, C-a C-right | To resize panes by 1 row/column |
| C-a M-up, C-a M-down, C-a M-left, C-a M-right | To resize panes by 5 rows/columns |
Manage tmux Sessions
Sometimes even multiple windows and panes aren’t enough and you need to separate the layouts logically by grouping them into separate sessions. Open the command prompt with Prefix then :, then start a new session:
| Command | Result |
|---|---|
| Prefix + ( | Switch to the previous session |
| Prefix + ) | Switch to the next session |
| Prefix + s | Display an interactive session list |
| Prefix + d | detach from the current session |
| Prefix + $ | rename a session in tmux |
| Prefix + L | Select the most recently used session (or the last session) |
| tmux ls | List all available sessions |
| tmux attach -t 0 | Zoom in on the active pane. Press the same combination again to exit zoom mode |
| tmux kill-server | Destroy all sessions and kill all processes |
Create a tmux Configuration File
As you get comfortable with tmux, you may want to change some of the defaults. Using a text editor, create a configuration file in your user’s home directory:
When you have saved your changes to this file, load the new configuration. Enter the tmux command mode by pressing Prefix then :, then use the following command:
With the mouse option enabled you can use the pointer to interact with tmux panes, windows and status bar. For example you can click on a window name in the status bar to switch to it or you can click and drag a pane line to resize it.
Other configuration options are available in the tmux manual.
Servers in Tmux
Whenever you launch tmux, a server is initiated. You can connect to a tmux server under a specific socket name by using the command tmux -L . For example, to connect to a server with the socket name “linode_socket”, run the following command:
This attaches a new session. If a session already exists and want to attach to it, run the following command instead:
More Information
You may wish to consult the following resources for additional information on this topic. While these are provided in the hope that they will be useful, please note that we cannot vouch for the accuracy or timeliness of externally hosted materials.
This page was originally published on Wednesday, December 6, 2017.
Источник


