- Upgrading Windows 10 Build with Setup.exe Command-Line Switches
- Windows 10 Setup.exe Command-Line Options
- How to Create an Up-to-Date Windows 10 Install ISO Image?
- Using Windows 10 Compatibility Check Before Upgrading Build
- How to Automate Windows 10 In-Place Upgrade from the Command Prompt?
- Windows Server installation and upgrade
- Installation
- Migration (recommended for Windows Server 2016)
- Cluster OS Rolling Upgrade
- License Conversion
- Upgrade
- Upgrading to Windows Server 2016
- License conversion
- Upgrading to Windows Server 2012 R2
- License conversion
- Upgrading to Windows Server 2012
- License conversion
- Upgrading from Windows Server 2008 R2 or Windows Server 2008
Upgrading Windows 10 Build with Setup.exe Command-Line Switches
The setup.exe installer in a Windows 10 install image has quite a large number of the command-line parameters that administrators may be interested in to automate and manage a Windows 10 silent and unattended build upgrade on user computers using SCCM, MDT, or other deployment tools. In this article we’ll show how to use Windows 10 setup.exe parameters during compatibility check and upgrading to the latest Windows 10 build.
Windows 10 Setup.exe Command-Line Options
To upgrade a Windows 10 build, a Windows install program setup.exe is used. When you run it, a graphical Windows 10 update wizard appears. However, this program has a great number of command-line parameters you can use to automatic OS upgrade on users’ computers. The general syntax and parameters of Setup.exe are listed below:

You can get the detailed information about all setup.exe command-line options and their features for Windows 10 on the documentation page: https://docs.microsoft.com/en-us/windows-hardware/manufacture/desktop/windows-setup-command-line-options
How to Create an Up-to-Date Windows 10 Install ISO Image?
To upgrade your Windows 10 build, you must get an installation ISO image with the latest Windows 10 version. Today it is Windows 10 2004 (May 2020 Update).
You can create an ISO image with the current Windows 10 build using the Media Creation Tool.
- Download the Media Creation Tool (https://www.microsoft.com/en-us/software-download/windows10);
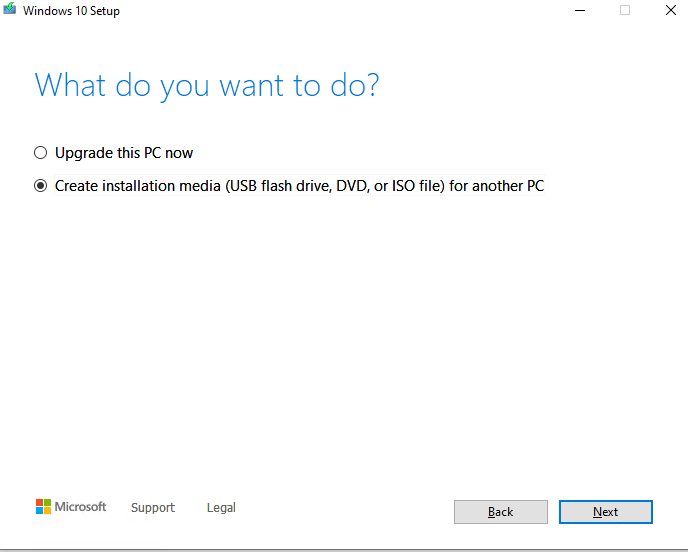
- Run the MediaCreationTool2004.exe and specify that you want to Create installation media (USB flash drive, DVD, or ISO file) in the wizard;

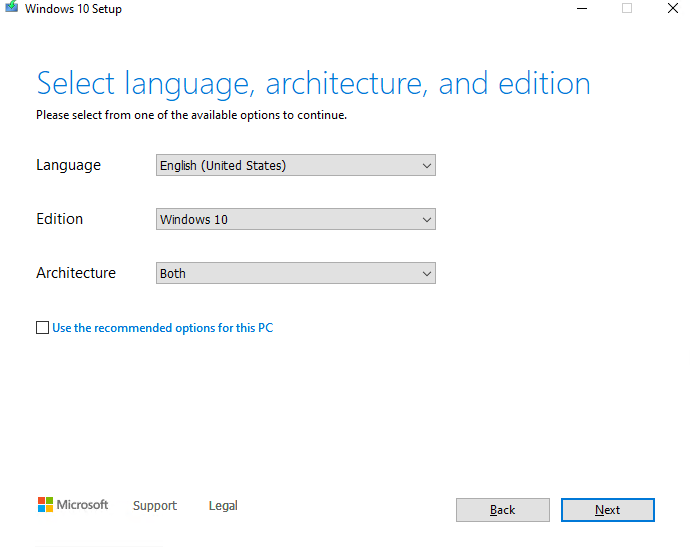
- Select the language, edition and architecture of the Windows 10 image you want to create;
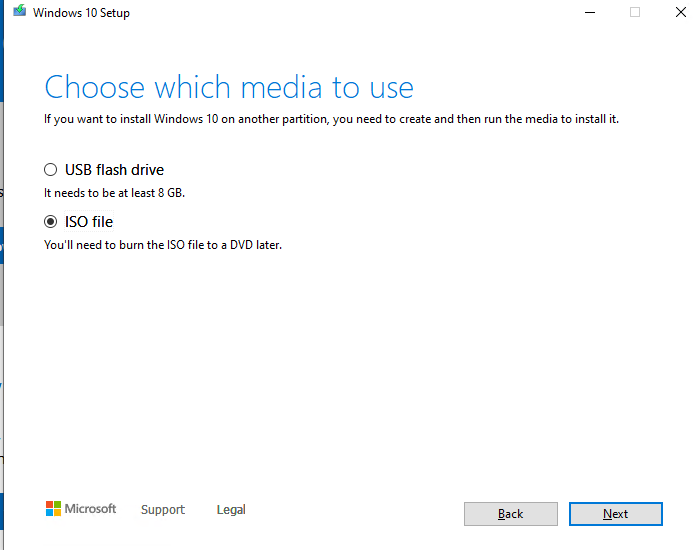
- Check the ISO file and enter the file name for it;
- Wait till Media Creation Tool has downloaded Windows 10 installation image to your local drive.

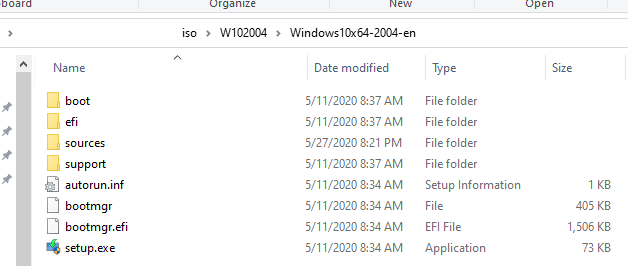
Extract the contents of the ISO image to your file server.
Using Windows 10 Compatibility Check Before Upgrading Build
Before upgrading OS on your computer, you can check if your Windows 10 may be upgraded to the build the new ISO image contains. To do it, run this command:
start /wait setup.exe /Auto Upgrade /Quiet /NoReboot /DynamicUpdate Disable /Compat ScanOnly

The parameters you can use:
- /Auto Upgrade – automatic upgrade mode
- /Quiet – hides the upgrade wizard dialog windows
- /NoReboot – disables the computer restart
- /DynamicUpdate Disable — sets that you don’t need to download the latest updates through Windows Update (you can download them later automatically using wuauserv or manually)
- /Compat ScanOnly – performs the compatibility check only (without performing build upgrade).
Scanning for the compatibility with a new Windows 10 build will take some time.
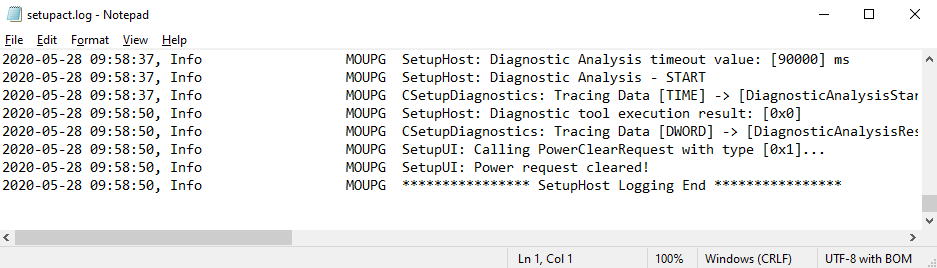
You can track the compatibility check process in the file C:\$Windows.
BT\Sources\Panther\setupact.log. If the scan check is over, you will see the following line in it:
You can view the compatibility analysis results in C:\$Windows.
BT\Sources\Panther\setuperr.log. Find the last line that looks like this:
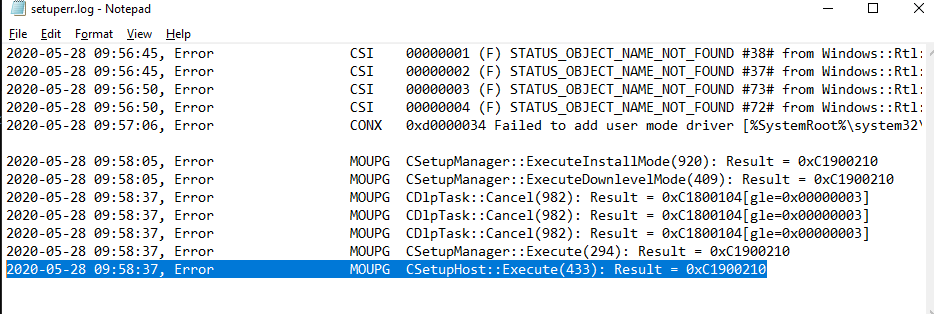
This is the check result code.
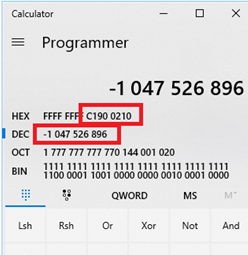
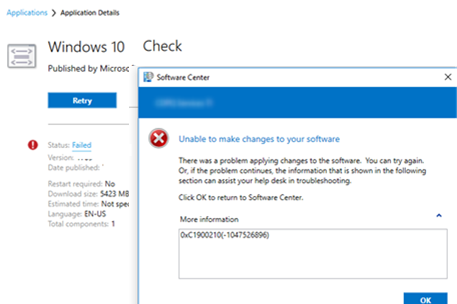
You can also get an error code for the upgrade compatibility check in the command prompt:
For example, the setup.exe command has returned -1047526896. Copy and paste the decimal code to the calculator in the programmer mode. To get the hexadecimal error code, copy the value from the Hex box, remove all Fs in the beginning and add 0x instead. In my case, I have got 0xC1900210.
The most typical Windows 10 compatibility check error codes are:
- 0xC1900210 – no problems found;
- 0xC1900208 – a compatibility problem found;
- 0xC1900204 and 0xC190010E – automatic build upgrade impossible (wrong Windows edition or architecture);
- 0xC1900200 – the computer doesn’t meet minimum Windows 10 hardware requirements;
- 0xC190020E – not enough disk space;
- 0xC1420127 – a problem when unmounting the image WIM file.
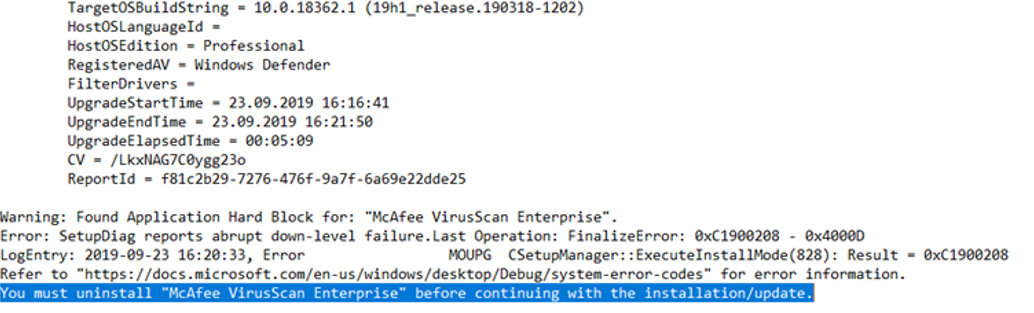
In my case, there was the following error in setuperr.log:
Check the SetupDiagResults.log created by SetupDiag. The log shows that there are two reasons that prevent my computer from upgrading the Windows 10 build:
- CompatBlockedApplicationAutoUninstall — an incompatible app was found, and I have to uninstall it prior to the upgrade.
- FindAbruptDownlevelFailure — the information about the last error when writing entries to the log has been suddenly interrupted.
In the end, there is the recommendation to uninstall the McAfee antivirus before the upgrade:
If you have SCCM, you can centrally collect the values of error level status from user computers with a simple package and advertisement with the command: setup.exe /Compat ScanOnly
How to Automate Windows 10 In-Place Upgrade from the Command Prompt?
If no compatibility problems have been found that prevent your Windows 10 build from upgrading, you can run the upgrade on a computer using a simple command-line script. Create a BAT file run_win10_upgrade.bat with the following code in the shared network share containing the extracted Windows 10 ISO image:
start /wait .\ W102004\Windows10x64-2004\setup.exe /auto upgrade /DynamicUpdate disable /showoobe None /Telemetry Disable
The /migratedrivers all parameter is used to force migrate all drivers. If the parameter is not set, the installer will itself make a decision on each driver individually.
You can use other setup.exe options when upgrading Windows 10.
Starting from Windows 10 1607, you can set the installation parameters in the Setupconfig.ini file. This file must be placed in the folder with setup.exe and contain the text like this matching the command above:
To run Windows 10 upgrade using the parameter file, the following command is used:
Windows Server installation and upgrade
Applies to: Windows Server 2016, Windows Server 2012 R2, Windows Server 2012, Windows Server 2008 R2, Windows Server 2008
Extended support for Windows Server 2008 R2 and Windows Server 2008 ends in January 2020. Learn about your upgrade options.
Is it time to move to a newer version of Windows Server? Depending on what you are running now, you have lots of options to get there.
Installation
If you want to move to a newer version of Windows Server on the same hardware, one way that always works is a clean installation, where you just install the newer operating system directly over the old one on the same hardware, thus deleting the previous operating system. That is the simplest way, but you will need to back up your data first and plan to reinstall your applications. There are a few things to be aware of, such as system requirements, so be sure to check the details for Windows Server 2016, Windows Server 2012 R2, and Windows Server 2012.
Moving from any pre-release version (such as Windows Server 2016 Technical Preview) to the released version (Windows Server 2016) always requires a clean installation.
Migration (recommended for Windows Server 2016)
Windows Server migration documentation helps you migrate one role or feature at a time from a source computer that is running Windows Server to another destination computer that is running Windows Server, either the same or a newer version. For these purposes, migration is defined as moving one role or feature and its data to a different computer, not upgrading the feature on the same computer. This is the recommended manner in which to move your existing workload and data to a more recent version of Windows Server. To get started, check the server role upgrade and migration matrix for Windows Server.
Cluster OS Rolling Upgrade
Cluster OS Rolling Upgrade is a new feature in Windows Server 2016 that enables an administrator to upgrade the operating system of the cluster nodes from Windows Server 2012 R2 to Windows Server 2016 without stopping the Hyper-V or the Scale-Out File Server workloads. This feature allows you to avoid downtime which could impact Service Level Agreements. This new feature is discussed in more detail at Cluster operating system rolling upgrade.
License Conversion
In some operating system releases, you can convert a particular edition of the release to another edition of the same release in a single step with a simple command and the appropriate license key. This is called license conversion. For example, if your server is running Windows Server 2016 Standard, you can convert it to Windows Server 2016 Datacenter. In some releases of Windows Server, you can also freely convert among OEM, volume-licensed, and retail versions with the same command and the appropriate key.
Upgrade
If you want to keep the same hardware and all the server roles you have set up without flattening the server, upgrading is an option—and there are lots of ways to do it. In the classic upgrade, you go from an older operating system to a newer one, keeping your settings, server roles, and data intact. For example, if your server is running Windows Server 2012 R2, you can upgrade it to Windows Server 2016. However, not every older operating system has a pathway to every newer one.
Upgrade works best in virtual machines where specific OEM hardware drivers are not needed for a successful upgrade.
You can upgrade from an evaluation version of the operating system to a retail version, from an older retail version to a newer version, or, in some cases, from a volume-licensed edition of the operating system to an ordinary retail edition.
Before you get started with an upgrade, have a look at the tables on this page to see how to get from where you are to where you want to be.
For information about the differences between the installation options available for Windows Server 2016 Technical Preview, including the features that are installed with each option and the management options available after installation, see Windows Server 2016.
Whenever you migrate or upgrade to any version of Windows Server, you should review and understand the support lifecycle policy and timeframe for that version and plan accordingly. You can search for the lifecycle information for the particular Windows Server release that you are interested in.
Upgrading to Windows Server 2016
For details, including important caveats and limitations on upgrade, license conversion between editions of Windows Server 2016, and conversion of evaluation editions to retail, see Supported Upgrade Paths for Windows Server 2016.
Note: Upgrades that switch from a Server Core installation to a Server with a Desktop installation (or vice versa) are not supported. If the older operating system you are upgrading or converting is a Server Core installation, the result will still be a Server Core installation of the newer operating system.
Quick reference table of supported upgrade paths from older Windows Server retail editions to Windows Server 2016 retail editions:
| If you are running these versions and editions: | You can upgrade to these versions and editions: |
|---|---|
| Windows Server 2012 Standard | Windows Server 2016 Standard or Datacenter |
| Windows Server 2012 Datacenter | Windows Server 2016 Datacenter |
| Windows Server 2012 R2 Standard | Windows Server 2016 Standard or Datacenter |
| Windows Server 2012 R2 Datacenter | Windows Server 2016 Datacenter |
| Hyper-V Server 2012 R2 | Hyper-V Server 2016 (using Cluster OS Rolling Upgrade feature) |
| Windows Server 2012 R2 Essentials | Windows Server 2016 Essentials |
| Windows Storage Server 2012 Standard | Windows Storage Server 2016 Standard |
| Windows Storage Server 2012 Workgroup | Windows Storage Server 2016 Workgroup |
| Windows Storage Server 2012 R2 Standard | Windows Storage Server 2016 Standard |
| Windows Storage Server 2012 R2 Workgroup | Windows Storage Server 2016 Workgroup |
License conversion
You can convert Windows Server 2016 Standard (retail) to Windows Server 2016 Datacenter (retail).
You can convert Windows Server 2016 Essentials (retail) to Windows Server 2016 Standard (retail).
You can convert the evaluation version of Windows Server 2016 Standard to either Windows Server 2016 Standard (retail) or Datacenter (retail).
You can convert the evaluation version of Windows Server 2016 Datacenter to Windows Server 2016 Datacenter (retail).
Upgrading to Windows Server 2012 R2
For details, including important caveats and limitations on upgrade, license conversion between editions of Windows Server 2012 R2, and conversion of evaluation editions to retail, see Upgrade Options for Windows Server 2012 R2.
Quick reference table of supported upgrade paths from older Windows Server retail editions to Windows Server 2012 R2 retail editions:
| If you are running: | You can upgrade to these editions: |
|---|---|
| Windows ServerВ 2008В R2 Datacenter with SP1 | Windows Server 2012 R2 Datacenter |
| Windows ServerВ 2008В R2 Enterprise with SP1 | Windows Server 2012 R2 Standard or Windows Server 2012 R2 Datacenter |
| Windows ServerВ 2008В R2 Standard with SP1 | Windows Server 2012 R2 Standard or Windows Server 2012 R2 Datacenter |
| Windows Web ServerВ 2008В R2 with SP1 | Windows Server 2012 R2 Standard |
| Windows Server 2012 Datacenter | Windows Server 2012 R2 Datacenter |
| Windows Server 2012 Standard | Windows Server 2012 R2 Standard or Windows Server 2012 R2 Datacenter |
| Hyper-V Server 2012 | Hyper-V Server 2012 R2 |
License conversion
You can convert Windows Server 2012 Standard (retail) to Windows Server 2012 Datacenter (retail).
You can convert Windows Server 2012 Essentials (retail) to Windows Server 2012 Standard (retail).
You can convert the evaluation version of Windows Server 2012 Standard to either Windows Server 2012 Standard (retail) or Datacenter (retail).
Upgrading to Windows Server 2012
For details, including important caveats and limitations on upgrade, and conversion of evaluation editions to retail, see Evaluation Versions and Upgrade Options for Windows Server 2012.
Quick reference table of supported upgrade paths from older Windows Server retail editions to Windows Server 2012 retail editions:
| If you are running: | You can upgrade to these editions: |
|---|---|
| Windows Server 2008 Standard with SP2 or Windows Server 2008 Enterprise with SP2 | Windows Server 2012 Standard, Windows Server 2012 Datacenter |
| Windows Server 2008 Datacenter with SP2 | Windows Server 2012 Datacenter |
| Windows Web Server 2008 | Windows Server 2012 Standard |
| Windows ServerВ 2008В R2 Standard with SP1 or Windows ServerВ 2008В R2 Enterprise with SP1 | Windows Server 2012 Standard, Windows Server 2012 Datacenter |
| Windows ServerВ 2008В R2 Datacenter with SP1 | Windows Server 2012 Datacenter |
| Windows Web ServerВ 2008В R2 | Windows Server 2012 Standard |
License conversion
You can convert Windows Server 2012 Standard (retail) to Windows Server 2012 Datacenter (retail).
You can convert Windows Server 2012 Essentials (retail) to Windows Server 2012 Standard (retail).
You can convert the evaluation version of Windows Server 2012 Standard to either Windows Server 2012 Standard (retail) or Datacenter (retail).
Upgrading from Windows Server 2008 R2 or Windows Server 2008
As described in Upgrade Windows Server 2008 and Windows Server 2008 R2, the extended support for Windows Server 2008 R2/Windows Server 2008 ends in January of 2020. To ensure no gap in support, you need to upgrade to a supported version of Windows Server, or rehost in Azure by moving to specialized Windows Server 2008 R2 VMs. Check out the Migration Guide for Windows Server for information and considerations for planning your migration/upgrade.
For on-premises servers, there is no direct upgrade path from Windows Server 2008 R2 to Windows Server 2016 or later. Instead, upgrade first to Windows Server 2012 R2, and then upgrade to Windows Server 2016.
As you are planning your upgrade, be aware of the following guidelines for the middle step of upgrading to Windows Server 2012 R2.
You can’t do an in-place upgrade from a 32-bit to 64-bit architectures or from one build type to another (fre to chk, for example).
In-place upgrades are only supported in the same language. You can’t upgrade from one language to another.
You can’t migrate from a Windows Server 2008 server core installation to Windows Server 2012 R2 with the Server GUI (called «Server with Full Desktop» in Windows Server). You can switch your upgraded server core installation to Server with Full Desktop, but only on Windows Server 2012 R2. Windows Server 2016 and later do not support switching from server core to Full Desktop, so make that switch before you upgrade to Windows Server 2016.
For more information, check out Evaluation Versions and Upgrade Options for Windows Server 2012, which includes role-specific upgrade details.


