- How to take and annotate screenshots on Windows 10
- Take a screenshot
- Annotate snips with Snip & Sketch
- Toggle between full screen mode and Windows mode in Windows Media Center
- Toggle switches
- Is this the right control?
- Examples
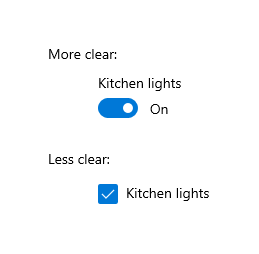
- Choosing between toggle switch and check box
- Toggle switches in the Windows UI
- Create a toggle switch
- Toggled
- On/Off labels
- How to toggle a screen on and off?
- 1 Answer 1
- How to rotate screen on Windows 10
- How to rotate screen using Settings
- How to rotate screen using keyboard shortcut
- How to rotate screen using graphics control panel
- How to rotate screen disabling rotation lock on Windows 10
- More Windows 10 resources
- Halo: MCC’s live service elements make it better, not worse
- Microsoft’s Surface Duo is not ‘failing up’
- Here’s what you can do if Windows 10 update KB5001330 is causing issues
- These are the best PC sticks when you’re on the move
How to take and annotate screenshots on Windows 10
Sometimes the easiest way to make a copy of something is to take a snapshot of your screen. While you can already capture your screen using your keyboard’s PrtScn button, you can now press Windows logo key + Shift + S to open the new modern snipping experience (also called the snipping bar), then drag the cursor over the area you want to capture.
Here are some common ways to take and annotate screenshots in Snip & Sketch on Windows 10.
Take a screenshot
Option 1: Using the Snip & Sketch app
Press the Start button and enter Snip & Sketch in the search field.
Press the New button to start snipping with the snipping bar.
The snipping bar allows you to capture the following types of snips:
Rectangular snip. Drag the cursor around an object to form a rectangle.
Free-form snip. Draw a free-form shape around an object.
Full-screen snip. Capture the entire screen.
Once you snip an area of your screen — the snipped image is added to your clipboard and you can paste it immediately in another app. A screen prompt will also allow you to annotate, save or share it using the Snip & Sketch app.
Option 2: With the Print Screen key
While the PrtScn key already captures your full screen and sends it to your clipboard, opening the snipping bar provides you with more snipping tools you can use for precise snipping. For better control of your screen capturing options, you can opt to have your PrtScn key open the new snipping bar instead of having to type Windows logo key + Shift + S.
To turn on the new snipping feature keyboard shortcut Select Start > Settings > Ease of Access > Keyboard
Option 3: With the Window logo key + Shift + S shortcut
Pressing the S key + Windows logo + Shift keys down initiates the snipping bar at any time.
Annotate snips with Snip & Sketch
Opening images for editing with Snip & Sketch
To open an image from Snip & Sketch, select Open File or drag and drop an image from apps like File Explorer or Photos in the Snip & Sketch window.
Annotating images with Snip & Sketch
Snip & Sketch provides a few tools for annotating images, namely pen, pencil and highlighter. Once you click a tool to select it, you can click it again to change its color or thickness.
The tools work better with a pen device, but they can also be used with mouse or touch if you select the Touch Writing button icon.
Use the Eraser tool to remove specific strokes or click it twice to get the option to erase all ink.
Use the ruler or protractor tools and draw straight lines or arches.
Press the ruler/protractor button again to hide the ruler/protractor
Reside or rotate the ruler/protractor by using two finger touch gestures (if the Touch Writing button is selected) or with the mouse wheel.
Use the crop tool to crop the annotated image.
To undo cropping, select the crop tool again and press Cancel to restore the image to its full original area.
Panning the view
Some of the images you annotate might be larger than the size of the Snip & Sketch window. You can use the scroll bars to pan the view, but you can also pan the view with touch input (if the Touch Writing button is not selected) or by dragging with your mouse button while holding the Ctrl key down.
Zoom in and out of screenshots to make them easier to mark up using the magnifying glass icon. You can also zoom in and out of screenshots by pressing the Ctrl key down and tapping the + or — buttons.
Sharing and saving snips
Snip & Sketch copies the annotated snip to your clipboard when you open it and every time you make edits. Snip & Sketch allows you to save the annotated image to a file, share it or open with another app, or print it on paper or to a pdf file.
Using keyboard in Snip & Sketch
While annotating is best done using a pen or mouse — Snip & Sketch provides a lot of keyboard shortcuts you can use. Access keys are activated if you press and hold the Alt key.
Toggle between full screen mode and Windows mode in Windows Media Center
This article helps a user to switch over from full mode to windows mode and the other way around by pressing [Alt] and [Enter] keys at a time.
Original product version: В Windows XP
Original KB number: В 556062
Just press Alt and Enter keys together to toggle between full screen mode and windows mode.
Community Solutions Content Disclaimer
MICROSOFT CORPORATION AND/OR ITS RESPECTIVE SUPPLIERS MAKE NO REPRESENTATIONS ABOUT THE SUITABILITY, RELIABILITY, OR ACCURACY OF THE INFORMATION AND RELATED GRAPHICS CONTAINED HEREIN. ALL SUCH INFORMATION AND RELATED GRAPHICS ARE PROVIDED «AS IS» WITHOUT WARRANTY OF ANY KIND. MICROSOFT AND/OR ITS RESPECTIVE SUPPLIERS HEREBY DISCLAIM ALL WARRANTIES AND CONDITIONS WITH REGARD TO THIS INFORMATION AND RELATED GRAPHICS, INCLUDING ALL IMPLIED WARRANTIES AND CONDITIONS OF MERCHANTABILITY, FITNESS FOR A PARTICULAR PURPOSE, WORKMANLIKE EFFORT, TITLE AND NON-INFRINGEMENT. YOU SPECIFICALLY AGREE THAT IN NO EVENT SHALL MICROSOFT AND/OR ITS SUPPLIERS BE LIABLE FOR ANY DIRECT, INDIRECT, PUNITIVE, INCIDENTAL, SPECIAL, CONSEQUENTIAL DAMAGES OR ANY DAMAGES WHATSOEVER INCLUDING, WITHOUT LIMITATION, DAMAGES FOR LOSS OF USE, DATA OR PROFITS, ARISING OUT OF OR IN ANY WAY CONNECTED WITH THE USE OF OR INABILITY TO USE THE INFORMATION AND RELATED GRAPHICS CONTAINED HEREIN, WHETHER BASED ON CONTRACT, TORT, NEGLIGENCE, STRICT LIABILITY OR OTHERWISE, EVEN IF MICROSOFT OR ANY OF ITS SUPPLIERS HAS BEEN ADVISED OF THE POSSIBILITY OF DAMAGES.
Toggle switches
The toggle switch represents a physical switch that allows users to turn things on or off, like a light switch. Use toggle switch controls to present users with two mutually exclusive options (such as on/off), where choosing an option provides immediate results.
To create a toggle switch control, you use the ToggleSwitch class.
Is this the right control?
Use a toggle switch for binary operations that take effect right after the user flips the toggle switch.
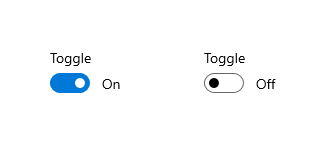
Think of the toggle switch as a physical power switch for a device: you flip it on or off when you want to enable or disable the action performed by the device.
To make the toggle switch easy to understand, label it with one or two words, preferably nouns, that describe the functionality it controls. For example, «WiFi» or «Kitchen lights.»
Examples
| XAML Controls Gallery |
|---|


 Source: Windows Central
  Source: Windows Central


