- Ethical hacking and penetration testing
- InfoSec, IT, Kali Linux, BlackArch
- How to redirect all traffic through the Tor network
- How to use Tor as a transparent proxy
- Proxies or iptables for traffic redirection
- Programs to redirect all traffic through Tor
- Services for finding IP address leaks
- orjail
- orjail Troubleshooting
- torctl
- Anonsurf
- TOR Router
- TorIptables2
- autovpn
- Tor browser
- Tutorials for setting up and using Tor
- Направляем весь трафик через Tor в Linux.
- Что такое Tor ?
- Установка и настройка Tor.
- Перенаправление трафика.
- ПОВОРАЧИВАЕТ ТРАФИК НА ПК(OC LINUX).
- Утечка DNS и Windows 10.
- Да здравствует Exit node!
Ethical hacking and penetration testing
InfoSec, IT, Kali Linux, BlackArch
How to redirect all traffic through the Tor network
This article is about the capabilities and limitations of the Tor network, as well as about several programs that will increase your anonymity by hiding the real IP. This article is recommended for reading even if you use a Linux distribution that can enable anonymous mode with a couple clicks.
How to use Tor as a transparent proxy
The Tor network is primarily intended to ensure anonymity of users when accessing the Internet by hiding their real IP address. The data transmitted over the network is encrypted, but on the exit node that makes a direct request to the site and receives a response from it, the traffic is in its original state (that is, the traffic that is encrypted by third-party means, for example, HTTPS, it is encrypted, and the traffic transmitted in plain text, available for the exit node in plain text).
The Tor network is primarily designed to access websites, for this reason, and also to avoid collecting user fingerprints (for example, the version of the operating system by the features of network packets), the Tor network supports a very limited set of transmitted traffic. For example, through the Tor network, you can make a request to a website (TCP protocol), but it is impossible to transmit UDP packets or raw packets (everything is forbidden except for a full connection to websites).
The Tor network is suitable for:
- hiding IP from a website you are connecting to
- site blocking bypass
- DNS queries through Tor (DNS is needed to obtain the IP addresses of websites – your browser and system constantly send these queries). In this case, UDP packets are not used, and the data is transmitted in encrypted form
- for scanning open ports by creating a full connection (slower and more noticeable compared to the half-open connection method)
For this reason, when we say “redirect all traffic through Tor” we really mean “redirect all traffic supported by this network through Tor”.
A significant part of the traffic simply cannot be sent through the Tor network, for example, ping, some traceroute methods, scanning with half-open connections, DNS queries via UDP protocol, etc. Based on this, another question arises – what to do with traffic that cannot be transmitted through Tor network: send to the target host bypassing the Tor network or block?
Proxies or iptables for traffic redirection
When configuring the system to use Tor, you can choose different implementation options: proxies or iptables.
When setting up a proxy, you need to remember that Tor works as a SOCKS proxy – not all programs support this protocol. But the most unpleasant thing may be that if system-wide proxy settings are set, then some programs can ignore these settings and connect to remote hosts directly, bypassing proxies and Tor.
In this sense, the iptables program is a more reliable and universal option, which, if configured correctly, will ensure that a particular type of traffic cannot exit the system except through the Tor network, or it will be blocked.
Programs to redirect all traffic through Tor
So, as we already learned, we need to solve a number of problems for working correctly with Tor:
- redirect traffic correctly
- block network packets that cannot be forwarded through Tor
- configure the lookup of DNS queries through Tor
- take care of IPv6 traffic or block it
- quickly restore the system to its original state, since the Tor network is slow and not always needed
For this reason, there are many programs from different authors that implement the described functionality.
Services for finding IP address leaks
The main criteria for choosing a tool to ensure the anonymity of your operating system is the functionality and quality of ensuring anonymity (reliability of redirecting and blocking traffic). You can rate the level of anonymity using the following services:
- Identification of the use of anonymization tools: https://2ip.ru/privacy/
- Search for leaks of your IP or other data important for anonymity: https://whatleaks.com/
- Checking your IP, location and Internet service provider, there is support for IPv6 addresses: https://w-e-b.site/?act=myip
- Service for searching proxy headers and open ports, typical for anonymization tools: https://w-e-b.site/?act=proxy-checker
- Check if you use the Tor network: https://check.torproject.org/ (ATTENTION: be very careful with this service – it does not support IPv6. If traffic routing is not configured on your computer, this service will write that Tor is used, although all IPv6 traffic can go directly, revealing your IPv6 address!)
- Search for various leaks: http://www.doileak.com/
- DNS Leak Search: https://dnsleaktest.com/
- What every web browser knows about you: https://webkay.robinlinus.com/
To check the IPv6 address on the command line and whether IPv6 protocol is blocked:
To check your IP address on the command line:
To check the DNS server used:
orjail
Although all the programs discussed below are slightly different, let’s start with the most unusual of them. It is called orjail. The program at the time of launch creates its own network environment for the program to be launched, and in this environment the program can access the Internet only through the Tor network.
Install orjail on Kali Linux
Install orjail on BlackArch
If you want the PROGRAM to go online through Tor, then run a command of the form:
For example, the following command shows the external IP of your computer:
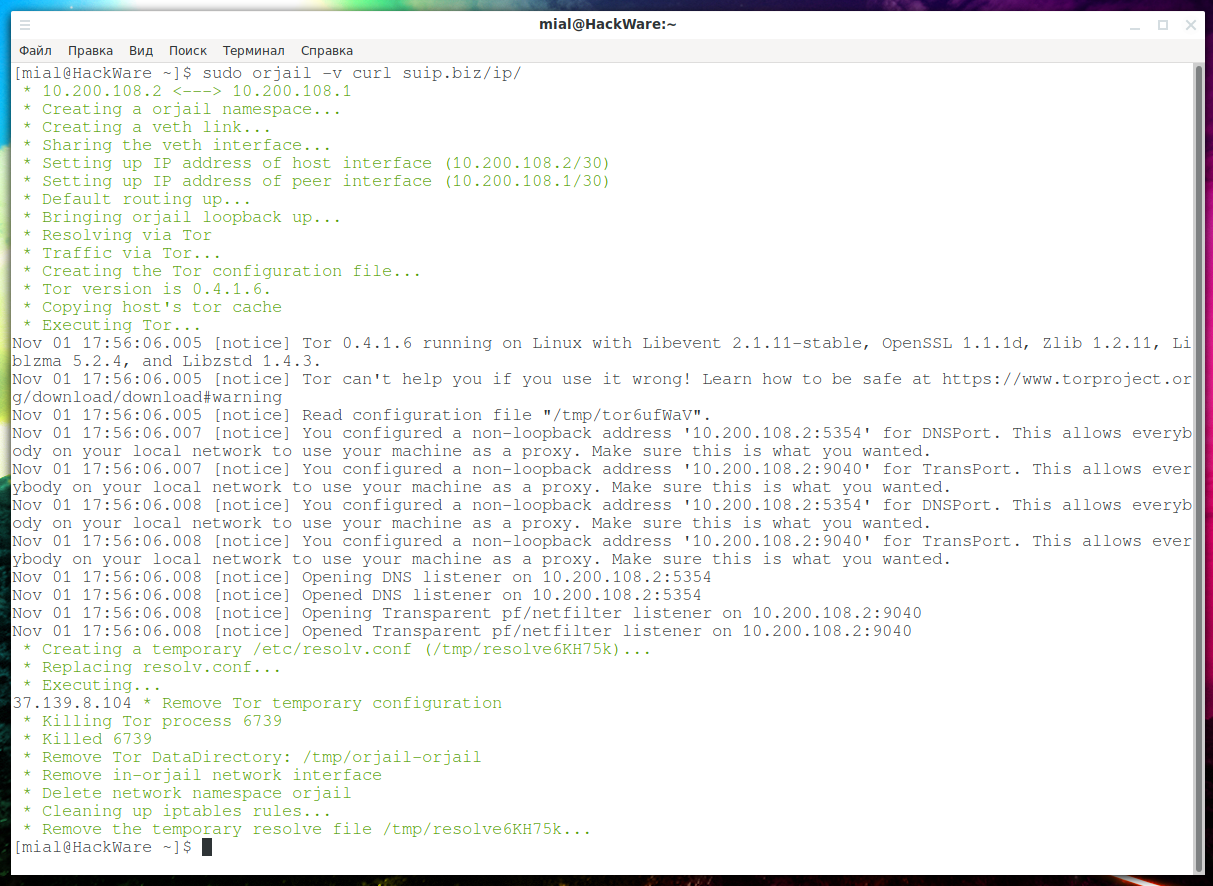
Now run the same command with orjail:

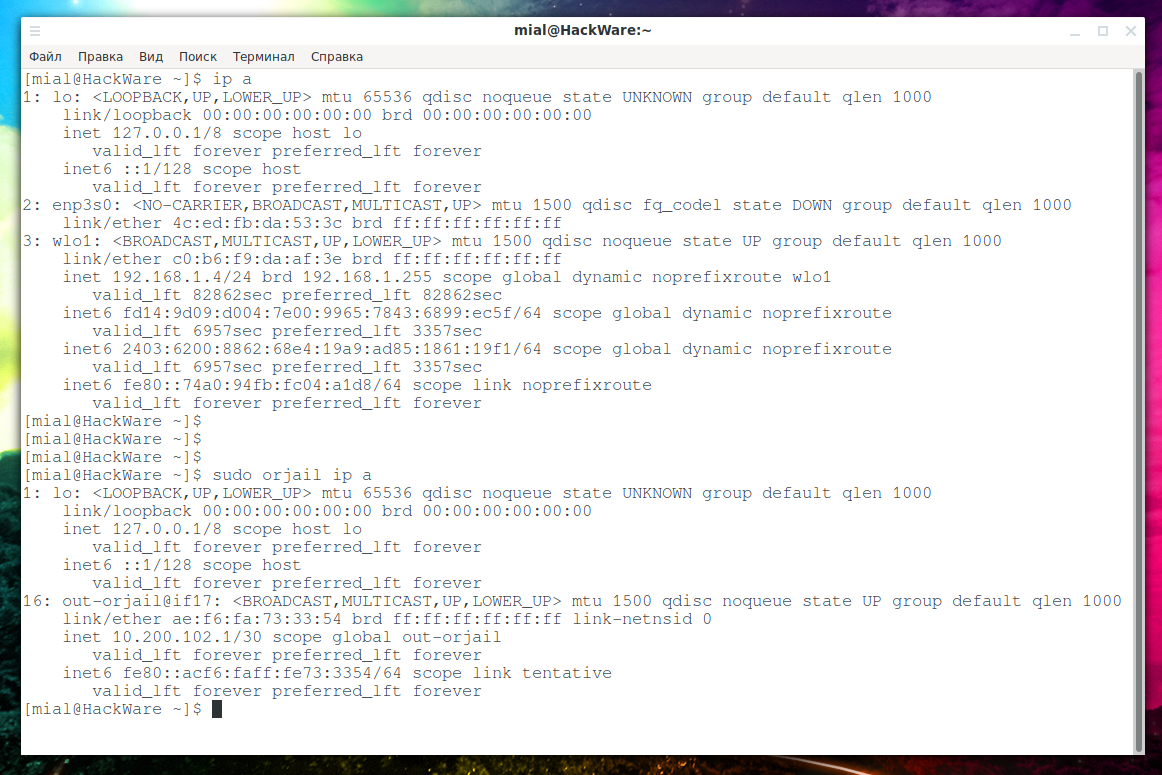
Note that the Tor service does not have to be running. The orjail program itself creates virtual network interfaces, starts a new instance of the Tor service itself, and when the main program exits, it stops Tor and removes the temporary network interfaces.
To see this clearly, view information about your network interfaces:
Now look at what programs launched with orjail see:
They are in a completely different environment!
You can run programs with a graphical user interface:
But be careful with web browsers: orjail is rather a super fast solution when you need to bypass web sites blocking or change your IP. In more serious situations, use Tor Browser – this is safer.
If you run orjail with the -v option, you can see all the processes in progress:
Please note that orjail is not able to work with the IPv6 protocol! The fact is that only IP addresses are assigned to the temporary network interfaces that are created. I think adding support for IPv6 is not difficult, but at the moment IPv6 traffic just does not go anywhere.
As we already know, it is impossible to transmit UDP protocol packets through Tor, however, orjail can perform DNS queries:
Server from which the DNS response is received is something like:
That is, DNS queries are processed on the Tor network.
orjail Troubleshooting
Error ‘User root: invalid name or no home directory.’
You may encounter an error:
where instead of “root” will be your username.
So the error looks when displaying debugging information:
To fix, open the orjail file (if you have already installed it, this file is located on the path /usr/sbin/orjail), find the line there
And replace with:
Error ‘./usr/sbin/orjail: line 563: /tmp/torpVKzn4: Access denied’
Instead of /tmp/torpVKzn4 there can be any arbitrary name.
To fix, open the orjail file again (if you have already installed it, this file is located on the path /usr/sbin/orjail), find the line there
and replace with
torctl
Further programs are very similar, they all use Tor + iptables, but everything is slightly different.
Let’s start with the most versatile torctl program.
This program is written for BlackArch, but it is quite easy to port to other distributions.
Install torctl on Kali Linux
Install torctl in BlackArch
To find out your current IP, do:
To start Tor as a transparent proxy:
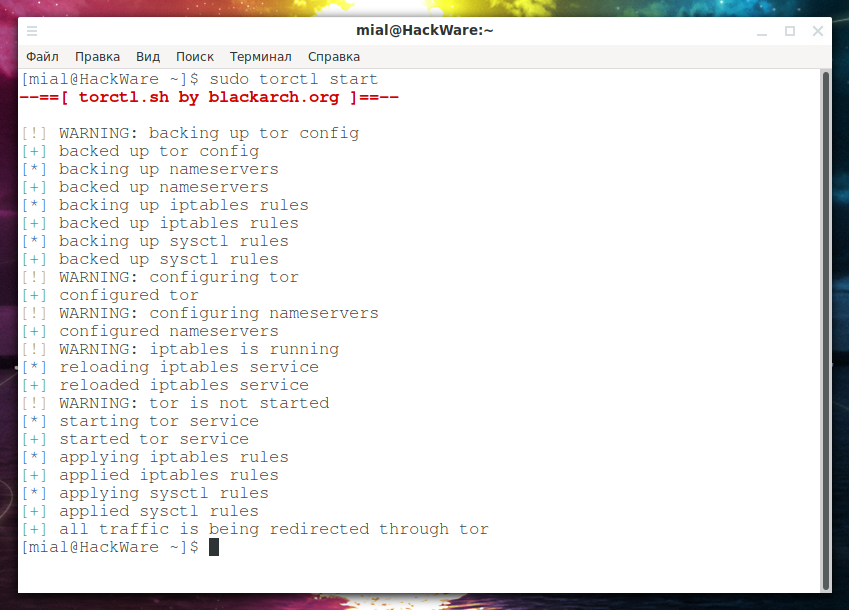
To check the status of services:
If you want to change the IP on the Tor network:
To work with the Internet directly, without Tor, run:
To change the MAC address on all network interfaces, run the command:
To recover the original MAC addresses:
The following command will add the torctl service to startup, that is, immediately after turning on the computer, all traffic will be sent through Tor:
To remove a service from startup, do:
You can also enable automatic memory cleaning every time you turn off the computer:
To disable this function:
This script knows about the existence of IPv6 traffic and successfully blocks it. DNS queries are redirected through Tor.
Anonsurf
If you are familiar with Parrot Linux, then AnonSurf should also be familiar to you — it enables anonymity mode in the system. AnonSurf optionally closes programs that can compromise anonymity, redirects traffic and DNS queries through Tor, and blocks IPv6.
AnonSurf is too integrated in Parrot Linux and on other systems I would recommend choosing some other option, fortunately, there is a choice. I also don’t like the fact that the program tries to start/stop some services without checking their availability and displays errors if they are missing – because of the excess of unnecessary information, you can skip something really important. However, the following shows how to install AnonSurf on Kali Linux. Most of the functionality has been saved, but the “dns — Replacing Your DNS with OpenNIC DNS Servers” command will not work!
Install AnonSurf on Kali Linux
Display your external IP address:
Redirecting all traffic through the Tor network:
Stopping traffic redirect through Tor:
Nipe is a script that makes the Tor network your default gateway.
This Perl script allows you to directly send all your traffic from your computer to the Tor network, through which you can anonymously access the Internet, without worrying that your IP will be monitored IP or your identity will be revealed.
Nipe currently only supports IPv4, but work is underway to add support for IPv6.
TOR Router
TOR Router allows you to use the Tor network as a transparent proxy and send all your traffic, including DNS queries, through Tor. The Tor network will become the default gateway for all Internet connections, which will increase privacy/anonymity with minimal effort. The script will work on any system using systemd (if you want to use this tool as a service) and tor.
TOR Router does not change system files, as other tools for routing your traffic, due to minimal impact on the system, in the case of a mistake in the TOR Router service or after uninstalling this tool, your Internet connection will not be affected.
Currently, Tor-router only supports IPv4 traffic, but the author plans to add support for IPv6.
TorIptables2
TorIptables2 script is an anonymizer that configures iptables and tor to redirect all services and traffic, including DNS, through the Tor network.
I already talked about this script in more detail in the article “Free easy way to hide IP in Linux”.
I would not recommend using the last three scripts until IPv6 is added to them, otherwise you can accidentally mess up a lot…
autovpn
This program is added as a bonus – autovpn also allows you to quickly change the IP address, but instead of Tor uses a random public OpenVPN from the specified country. More details in the article “Free easy way to hide IP in Linux”.
Let’s look at a few more uses for the Tor network.
Tor browser
Tor Browser is a fully configured and portable browser for browsing websites through the Tor network. The advantages of this option are additional measures for anonymity.
Cons follow from the pros: the more measures for anonymity, the more inconvenient to use.
Tutorials for setting up and using Tor
An article on fine-tuning Tor is also being prepared. Thanks to fine-tuning, you can, for example, exclude nodes from certain countries from the traffic path, or vice versa to make the exit node always located in a specific country or countries – thanks to this, you can make sure that you always have the IP of the desired country.
Источник
Направляем весь трафик через Tor в Linux.
Проснулся я с утра и решил. Направлю весь трафик на своем VDS сервере через сеть Tor.
Что такое Tor ?
Сеть Tor-это группа добровольцев-серверов, которая позволяет людям улучшить свою приватность и безопасность в Интернете. Пользователи Tor используют эта сеть путем подключения через серию виртуальных туннелей, а не создание прямого подключения, что позволяет обеим организациям и индивидами, обмениваться информацией через публичные сети, не раскрывая их конфиденциальности. По сути это большая сеть VPN туннелей. В основе лежит распределенная система узлов — так называемых нод, между которыми в зашифрованном виде передаются данные. Для соединения обычно используется три сервера, которые образуют временную цепочку. Каждый сервер выбирается случайным образом, при этом он знает только то, от какого звена
получил данные и кому они предназначаются. Мало этого — цепочки постоянно меняются. Даже в случае перехвата данных на одном из серверов отследить полный маршрут пакетов (в том числе и их отправителя) не представляется возможным. Перед отправлением пакет последовательно шифруется тремя ключами: сначала для третьей ноды, потом для второй и, в конце концов, для первой. Когда первая нода получает пакет, она расшифровывает «верхний» слой шифра и узнает, куда отправить пакет дальше. Второй и третий сервер поступают аналогичным образом.
Как серьезно бы ни защищались данные, как изощренно не выбирался и запутывался маршрут, где-то на выходе данные все равно нужно расшифровывать. Ведь только так их можно доставить до места назначения. Эта операция осуществляется на последней ноде в цепочке — так называемой выходной нодой (Exit Node). Если на таком узле установить снифер, то данным ничего больше не останется, как прямиком попасть в логи :). ВАЖНО, не забывайте Tor не панацея и не обеспечивает вам 100% анонимность !
Установка и настройка Tor.
В Debian установить Tor очень просто, он уже есть с пакете .deb .
apt-get install tor
Для настройки используются два файла torcc и torsocks.conf .
По умолчанию Tor используется как SOCKS прокси, но мы не пойдем этим путем. Не будем использовать программы типа Proxifier и т.п. В нашем случае у нас есть VDS сервер с установленным OpenVPN к которому мы подключаемся по VPN и вот на нем то мы весь трафик и направим в сеть Tor. Для начала в файле etc/tor/torcc добавим строчки :
VirtualAddrNetworkIPv4 10.192.0.0/10 #Когда Tor необходимо назначить виртуальный (неиспользуемый) адрес из-за MAPADDRESS команда от контроллера или функции AutomapHostsOnResolve,
Tor выбирает неназначенный адрес из этого диапазона. (По умолчанию: 127.192.0.0 /10)
AutomapHostsOnResolve 1 # Разрешаем резольвит через тор.
TransPort 9040 #Транзитный порт для трафика.
TransListenAddress 10.0.1.1 # Адресу для прослушивания прозрачных прокси соединений. В моем случае адрес туннеля.
DNSPort 5353 #DNS порт, суда будет направлять dns запросы в сеть тор.
DNSListenAddress 10.0.1.1 # Привязка к этому адресу для прослушивания DNS-подключений.
Так же можно использовать только определены страны в качестве ExitNodes :
Или наоборот запретить определены страны :
В файле torsocks.conf может закомментировать строчки, что бы не открывать лишних портов и т.д:
# Default Tor address and port. By default, Tor will listen on localhost for
# any SOCKS connection and relay the traffic on the Tor network.
Перенаправление трафика.
Первым делом не забудьте разрешить форвардинг в ядре в файле /etc/sysctl.conf раскомментируем строчку:
Чтобы не перезагружаться сообщаем ядру о включении форвардинга:
echo 1 > /proc/sys/net/ipv4/conf/all/forwarding
Так же нам надо удалить правила в iptables по MASQUERADE или тому подобные правила POSTROUTING , если они у вас есть.
iptables -t nat -D POSTROUTING -s 10.0.1.0/24 -o eth0 -j MASQUERADE
Ну а теперь самое интересное, заворачиваем весь трафик из туннеля в Tor :
iptables -t nat -A PREROUTING -i tun0 -p tcp —syn -j REDIRECT —to-ports 9040
iptables -t nat -A PREROUTING -i tun0 -p udp —dport 53 -j REDIRECT —to-ports 5353
Вариант номер два:
iptables -t nat -A PREROUTING -i tun0 -p tcp -j DNAT —to-destination 10.0.1.1:9040
# …и DNS-трафика в отдельности
$ sudo iptables -t nat -A PREROUTING -i tun0 -p udp —dport 53 -j DNAT —to-destination 10.0.1.1:53

ПОВОРАЧИВАЕТ ТРАФИК НА ПК(OC LINUX).
VDS и т.д. это хорошо. Но что делать если мы хотим просто на компьютере завернуть трафик в Тор.
Для начала нам потребуются немного другие настройки :
VirtualAddrNetworkIPv4 10.192.0.0/10 #Когда Tor необходимо назначить виртуальный (неиспользуемый) адрес из-за MAPADDRESS команда от контроллера или функции AutomapHostsOnResolve,
Tor выбирает неназначенный адрес из этого диапазона. (По умолчанию: 127.192.0.0 /10)
AutomapHostsOnResolve 1 # Разрешаем резольвит через тор.
TransPort 9040 #Транзитный порт для трафика.
DNSPort 5353 #DNS порт, суда будет направлять dns запросы в сеть тор.
Сохраняем, перезапускаем Tor:
service tor restart
Настройте системный DNS-резольвер для использования DNSPort Tor в интерфейсе loopback /etc/resolv.cofig :
Ну а теперь сделаем REDIRECT пакетов на порты Тора :
iptables -t nat -A OUTPUT -p udp -m udp —dport 53 -j REDIRECT —to-ports 5353
iptables -t nat -A OUTPUT -p tcp -m tcp —tcp-flags FIN,SYN,RST,ACK SYN -j REDIRECT —to-ports 9040
Хотел бы обратить внимание что с начало надо запустить Tor, а потом выставлять правила iptables. Иначе просто Tor не установит соединение.
Не плохая инструкция по транспорт-прокси : https://trac.torproject.org/projects/tor/wiki/doc/TransparentProxy
Для ленивых :
TorIptables2 — cкрипт Tor Iptables который настраивает iptables и tor для перенаправления всех служб и трафика, включая DNS, через сеть Tor.
Домашняя страница: https://github.com/ruped24/toriptables2
Автор: Rupert Edwards
-h, —help показать справку и выйти.
-l, —load Эта опция загрузит правила tor iptables.
-f, —flush Эта опция сбросит правила iptables за стандартные.
Утечка DNS и Windows 10.
К сожалению в Windos 10 сделали очень плохую штуку, dns запросы отправляются на все доступные интерфейсы в не зависимости от таблиц маршрутизации. От какова ответ приходит быстрей, тот dns сервер и используется. По этому в настройках сетевого соединения приходиться в ручную писать DNS сервер, например вашего туннеля 10.0.1.1 . Можно бороться и другими методами, исполосовать свой dns сервер который находятся где нибудь за бугришем ))).
Да здравствует Exit node!
Если вам вдруг захотелось присоединиться к данному проекту и стать Exit node ,то дальше будут статья для вас. Сам я не пробовал и взял этот кусок полностью с сайта Xaker.ru без изменений :
Для Tor’а важно, чтобы часы были установлены точно. В противном случае —
синхронизируем с публичными серверами времени. Забегая вперед скажу, что для
запуска Tor лучше создать отдельного пользователя — делается это командой
adduser. Я создал себе пользователя toruser: uid=111(toruser) gid=10(wheel)
groups=0(wheel),10(wheel). Теперь нужно создать файл конфигурации. Tor
использует для хранения своих данных папку .tor в домашней директории
пользователя (/home/toruser). Создаем папку .tor, создаем в ней файл torrc и
открываем его в текстовом редакторе.
Нас интересует несколько параметров :
ControlPort – на этом порту Tor будет принимать подключения для
управления Tor-сервером (т.е. можно подключиться удаленно для конфигурации Tor’а,
опция важна для тех, кто использует графические оболочки типа Vidalia или Tork).
Устанавливаем его в 9051.
DirPort – на этом порту Tor будет принимать данные от сервера
директорий. Устанавливаем в 9030.
ExitPolicy – определяет, какой трафик мы будем принимать и форвардить.
Имеет формат «ExitPolicy Accept | reject address:port». По умолчанию политика
Означает, что мы будем резать трафик, направленный на вышеперечисленные
порты, а весь остальной будем пропускать. В принципе можно ее и не
переопределять и оставить дефолтной, ну это уж на твой выбор. Я использовал
ExitPolicy accept *:80, accept *:443, accept *:110, accept *:143,
accept *:993, accept *:995, reject *:*
HashedControlPassword – хеш пароля для доступа и конфигурации
Tor-сервера (чтобы никакой злобный хакер не смог переконфигурировать наш
сервер), создается при помощи команды: tor —hash-password.
Nickname – имя нашего сервера.
ORPort – порт, ожидающий подключения от других нодов.
SocksListenAddress — адрес, по которому Tor будет ждать подключений от
приложений, работающих через SOCKS. Формат: SocksListenAddress IP[:PORT]
Установим IP в 127.0.0.1, а порт оставим дефолтным (9050). Это понадобится нам,
если мы захотим использовать Tor в связке с Privoxy или другими прокси.
Log notice stdout – выводить сообщения в консоль
Сохраняем изменения и закрываем файл. Можно приступать к запуску. Открываем
консоль, логинимся под toruser и запускаем Tor, передав в качестве параметра
путь до конфиг-файла:
$ tor -f /home/toruser/.tor/torrc
И смотрим выдаваемые сообщения. Как только сервер сможет подсоединиться к
сети, он попытается определить доступность своих портов снаружи. Это может
занять до 20 минут. В логах появятся сообщения вида «Self-testing indicates your
ORPort is reachable from the outside. Excellent». Если таковых нет, это значит,
что сервер недоступен из Сети — тогда следует перепроверить файрволл.
Как только сервер определит доступность, он загрузит на сервер директорий
(базу нод) свой дескриптор. Это позволит клиентам узнать адрес, порты, ключи и
другую информацию о нашем сервере. Можно зайти на
сервера, чтобы убедиться, что он будет использоваться клиентами. Правда,
обновляется он не моментально — иногда может потребоваться некоторая время,
чтобы эта информация в базе обновилась.
Вот и появился наш сервер в списке. Посмотрим на строчку ниже HelloHacker.
Что мы видим: s Exit Fast Running V2Dir Valid. Exit — означает, что мы являемся
Надо понимать, что работая в качестве Exite Node’ы, человек серьезно
подставляет себя. Ведь именно его IP светиться во время взломов и т.д. В
процессе написания статьи через мой сервер дважды пытались провести атаку
типа SQL-injection. Так что держи ухо востро, за такие вещи можно запросто
схлопотать от правоохранительных органов или от провайдера. Вот лишь
В 2006 г. спецслужбы Германии осуществили захват шести компьютеров,
работавших нодами сети Tor на основании того, что они были незаконно
использованы для доступа к детской порнографии.
В 2007 г. Национальная полиция Швеции арестовала известного эксперта по компьютерной
безопасности Дена Эгерстада по обвинению в неправомерном доступе к
компьютерной информации. 22-летний сотрудник компании Deranged Security
опубликовал на своем рабочем сайте пароли к электронной почте посольств,
негосударственных организаций, коммерческих фирм и правительственным
агентств разных стран. По его словам, он в качестве эксперимента создал 5
выходных серверов Tor и перехватывал через них незашифрованный трафик.
В 2007 г. немецкая полиция арестовала в Дюссельдорфе Александра Янссена, организовавшего у себя на компьютере сервер Tor, через который неизвестный отправил ложное
сообщение о теракте. Несмотря на то, что вскоре г-н Янссен был отпущен,
он решил отказаться от дальнейшего использования своего компьютера в
Источник


