- Установка tp-link AC600 на Кали
- Magnit
- Magnit
- Magnit
- ghostphisher
- Installing TP-Link Archer T2UH (AC600) on VMWare for Kali Linux
- TP-Link AC600 Wireless High Gain Dual Band USB Adapter (Archer T2UH)
- Edit description
- Initial Research
- The Fix
- Kali Linux Downloads — Virtual Images
- Want to download Kali Linux custom images? We have generated several Kali Linux VMware, VirtualBox and ARM images which…
- Instructions: Installation (don’t plug in your adapter yet)
- Installation: This is where most people following the video get stuck.
- But wait, there’s more: Renaming the Driver
- and…. more. It’s the last step, promise. (Manage ifupdown)
- NOTE: IF YOU DO NOT SEE THE WiFi ICON
- Re-enable the Adapter After VM Suspension/Shut Down
- Check if it works.
- Conclusion
- Tp link ac600 kali linux
- Install TP-Link AC600 Archer T2U Nano WiFi USB Adapter In Linux
- Introduction
- Install TP-Link AC600 Archer T2U Nano WiFi USB Adapter In Linux
- 1. Install TP-Link AC600 Archer T2U Nano on Fedora
- 2. Install TP-Link AC600 Archer T2U Nano on Ubuntu
- 3. Install TP-Link AC600 Archer T2U Nano on openSUSE
- Connect to 5G Wireless network in Linux
Установка tp-link AC600 на Кали
Magnit

Magnit
Еще нашел установку такими командами:
rm -rf /etc/Wireless/RT2870STA/
mkdir -p /etc/Wireless/RT2870STA/
cp ./MODULE/conf/RT2870STA.dat /etc/Wireless/RT2870STA/RT2870STA.dat
chmod 777 -R /etc/Wireless/RT2870STA
insmod ./UTIL/os/linux/mt7650u_sta_util.ko
insmod ./MODULE/os/linux/mt7650u_sta.ko
insmod ./NETIF/os/linux/mt7650u_sta_net.ko
lsmod | grep «mt7650»
ifconfig ra0 up
На строке
insmod ./UTIL/os/linux/mt7650u_sta_util.ko
получаю такой ответ:
insmod: ERROR: could not load module ./UTIL/os/linux/mt7650u_sta_util.ko: No such file or directory
на др insmod получаю такие же ответы
Magnit
/Downloads/Archer_T2U_V2_Linux/Driver# lsusb
Bus 002 Device 001: ID 1d6b:0002 Linux Foundation 2.0 root hub
Bus 001 Device 003: ID 0e0f:0002 VMware, Inc. Virtual USB Hub
Bus 001 Device 002: ID 0e0f:0003 VMware, Inc. Virtual Mouse
Bus 001 Device 001: ID 1d6b:0001 Linux Foundation 1.1 root hub

ghostphisher
местный
Надеемся не на виртуальную машину все это делаем?
И мануал этот применяем?
Источник
Installing TP-Link Archer T2UH (AC600) on VMWare for Kali Linux

Feb 23, 2017 · 6 min read
I’m sure for the majority of everyone reading this article (including myself), we have struggled to get Kali Linux working with the Archer T2UH on Kali. You’ve probably Googled endlessly many blogs, sites, and YouTube videos to try to get your adapter working. Well, (hopefully), your search ends here.
After 6 hours of researching and troubleshooting, I have finally gotten my T2UH working.
Just for clarification, this is the dongle I have ordered on Amazon to hook up to Kali.
TP-Link AC600 Wireless High Gain Dual Band USB Adapter (Archer T2UH)
Edit description
Initial Research
Initially, I have followed this YouTube video:
For those who have tried all the solutions mentioned in the comments such as:
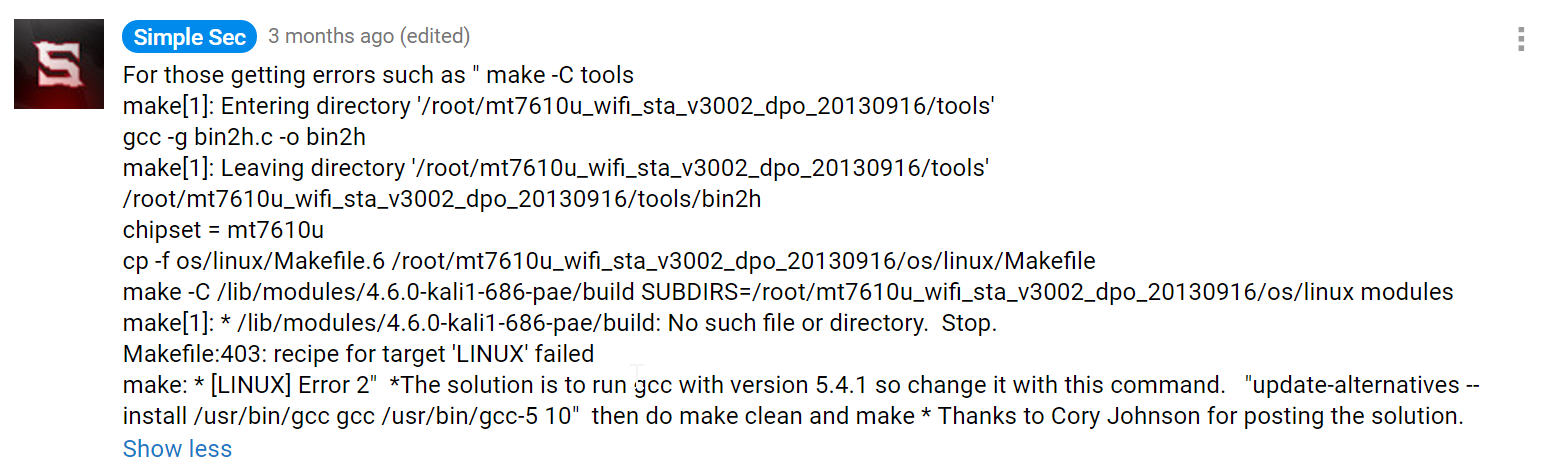

The Fix
After endlessly going through forum after forum, the quickest and easiest fix is to just download the VM from Kali here (download the VMWare or the VirtualBox depending on what you are using):
Kali Linux Downloads — Virtual Images
Want to download Kali Linux custom images? We have generated several Kali Linux VMware, VirtualBox and ARM images which…
After this, simply extract the .zip file that you have downloaded and follow the same instructions in the video. For those who don’t want to watch the video, simply follow these steps.
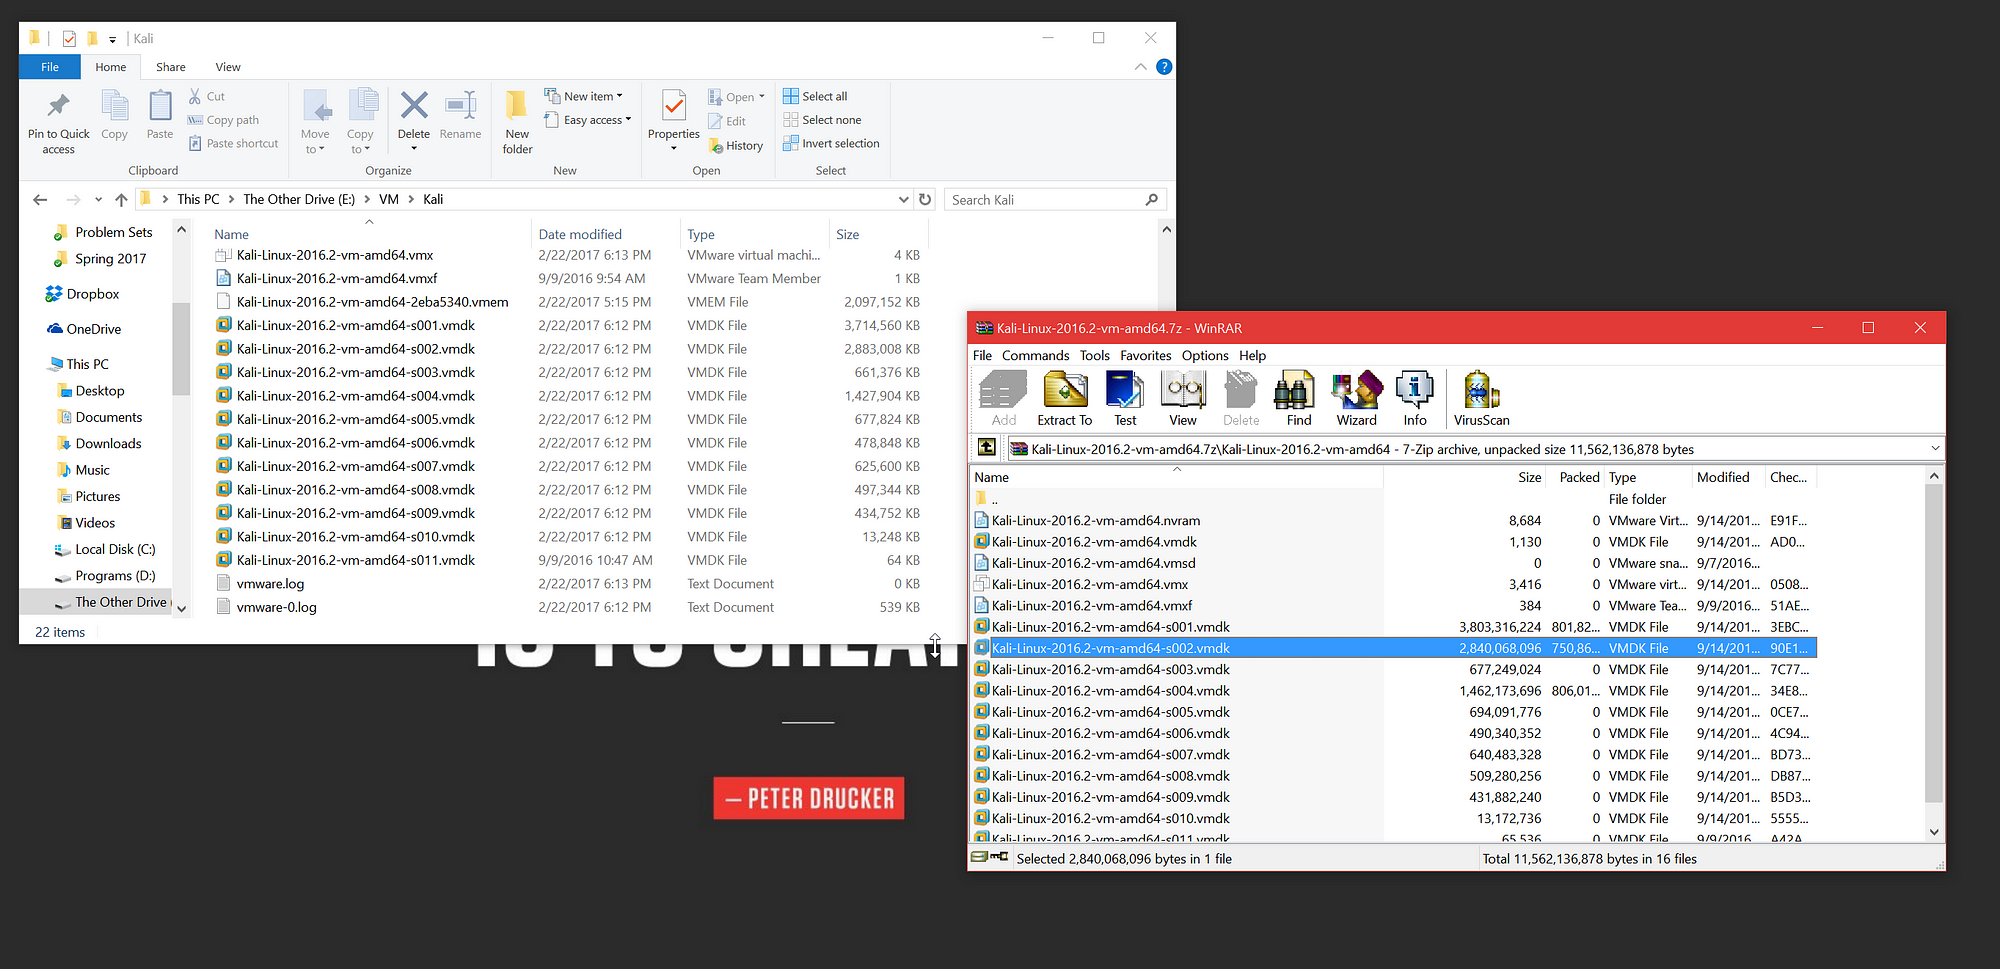
After this, to log into Kali, your username at default should be “root” as the username, and “toor” as the password.
Instructions: Installation (don’t plug in your adapter yet)
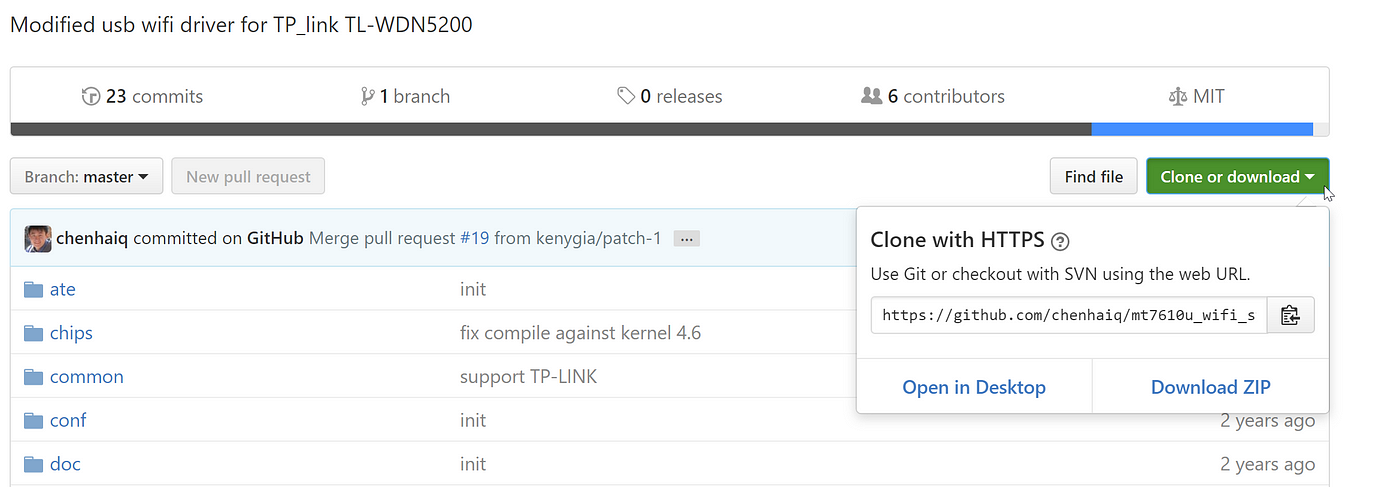
cd Downloads/mt7610u_wifi_sta_v3002_dpo_20130916-master
make
make install
Installation: This is where most people following the video get stuck.
Now, this is where those who are trying to get this working on VMWare get stuck. The next command typed is:
This command essentially tells the WiFi adapter to enable itself. After the driver installation, this error usually shows up after typing in that terminal command.
SIOCSIFFLAGS: Operation not permitted
This is to enable the WiFi adapter for use in Kali. However, we must first have the adapter plugged in as well as allow the VMWare access to this adapter. For this go to your VMWare program, and on the top left menu bar (with Kali running), go to:
You should notice that your adapter is now disconnected in from your PC, and actually directly connected to Kali. You can also observe this in the terminal by typing:

Now, we have to change our connection settings. By default, VMWare usually shares the same internet connection as your actual PC’s OS (maybe it’s through Ethernet, or even through WiFi) via NAT.
Our goal right now is to change this to bridged. Go to:
Now, set it to these settings:

Click okay to confirm settings.
But wait, there’s more: Renaming the Driver
Lastly, we have to change the config file for our network manager, and also rename our driver file.
- Open terminal.
- Type in these commands:
- sudo -i nautilus
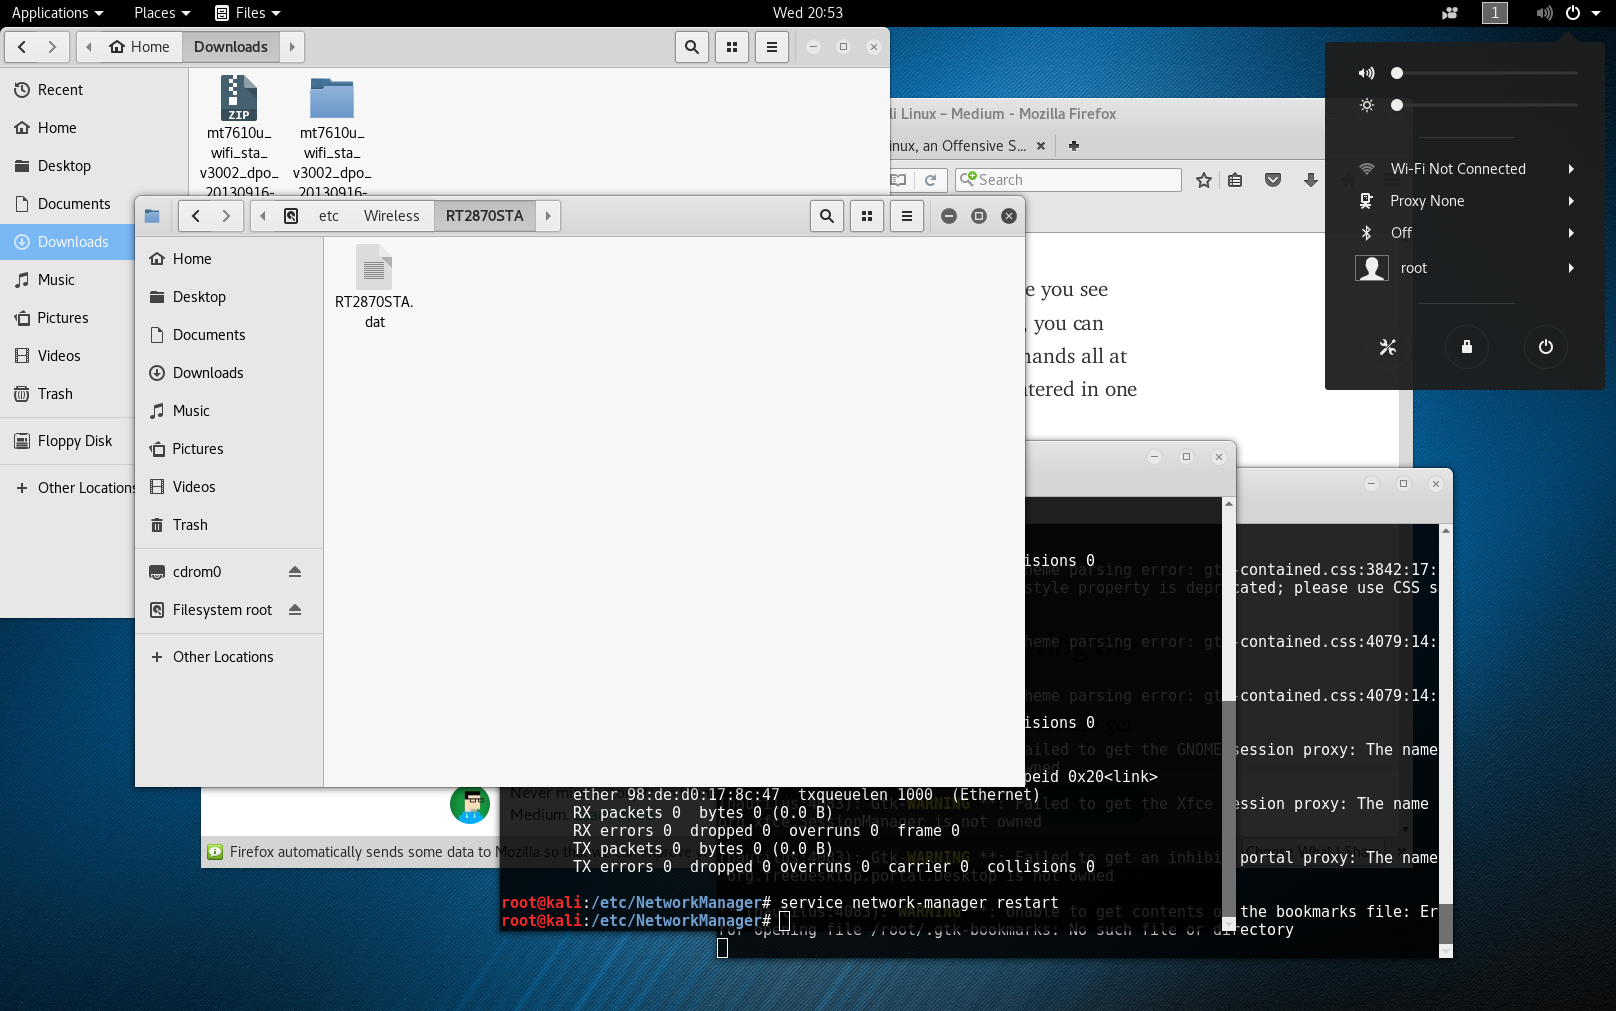
- The above command enables you to access the root directory of the OS. You should now see “Filesystem root” mounted as one of the devices on the sidebar of the file explorer. Go into it. Now, go to /etc/Wireless

Now, we need to make a copy of this same folder you see above. However, we have to rename this folder from “RT2860STA” to “RT2870STA”. Likewise, rename RT2860STA.dat inside the new folder and rename it to RT2870STA.dat.


and…. more. It’s the last step, promise. (Manage ifupdown)
- Open up a brand new terminal, and type in these commands:
- cd /etc/NetworkManager/
- nano NetworkManager.conf
- Now, this is where you go down to “managed=false” and change it to “managed=true”
- Press ctrl+o followed by an enter to save, and then ctrl+x to exit out of the text editor.
- From here, restart the network manager by typing this command (in the same terminal!):
- service network-manager restart
Now, it’s time to test this. Try:
once more. If it shows no error and gives you another input line, then congrats! You can check that it’s up by typing in:
You should see something like this:

Notice how ra0 is not broadcasting and up and running. Your WiFi adapter should be up. Click the power button on the top right of the Kali desktop and you should see there is a new button to connect to WiFi.
NOTE: IF YOU DO NOT SEE THE WiFi ICON
If you don’t see it, a quick restart of the network manager will aid in fixing the issue.
- Unplug the adapter, replug the adapter.
- Open up Terminal
- Type in these commands:
- cd /etc/NetworkManager/
- service network-manager restart
- Now, try typing ifconfig ra0 up once more.
- If it gives you “SIOCSIFFLAGS: Operation not permitted”, just press the up arrow on your keyboard and press enter (this conveniently just inputs the same command as what you have typed previously). Try this a good 3–5 times to see if it budges.
- If all goes well, you should be able to see the WiFi logo. If not, unplug/replug and repeat these steps starting from step 2.
Re-enable the Adapter After VM Suspension/Shut Down
Everytime you restart or shut down the VM instance that is running, you will have to just repeat a variation of the above note.
- Try out the note above.
- If this doesn’t work, disconnect and reconnect the adapter through VM>Removable Devices>Ralink WiFi>/Disconnect/Connect
- Check if Ralink is listed after typing in the terminal command “lsusb”
- If it is, reattempt “ifconfig ra0 up”. If you get an error, retry another couple times.
- If this doesn’t work, unplug and replug, then restart the network manager (steps 4 and 5 of the note)
- Repeat these steps in any variation until you don’t get the SIOCSIFFLAGS error.
Check if it works.
Connect to your network. Check that your internet is working by going to the terminal and typing something to access such as:
If you are seeing responses, you are set!

Conclusion
Although this seems like a lot of work for the initial setup, every time you boot back into Kali, re-enabling the adapter isn’t too bad. You’ll get the hang of what your computer likes and doesn’t like after a while.
Best of luck to everyone, and remember to follow this Medium 😉
Источник
Tp link ac600 kali linux
TP-Link Archer T2U Plus a.k.a AC600 High-Gain
TP-Link Archer T2U Plus a.k.a AC600 High Gain is a very affordable dual band wireless adapter compatible with kali linux and supports monitor mode , soft AP mode,packet injection etc. it supports both 2.4 GHz and 5GHz band and has a 5dBi Antenna for better signal reception.2357:0120

Why should i buy this adapter ?
This adapter has a Realtek RTL8821AU Chipset at its heart. RTL8821AU has plenty of developer support in linux community and has driver for Kali linux , Parrot OS , Black Arch .etc Archer T2U Plus is on sale under 15 USD
1000 INR , which is a very affordable price for Beginners in Pentesting. 2357:0120 is the USB ID.
Driver for Debian Based Linux Distros (Ubuntu/Kali Linux)(x86_64)
- Update the package information :
sudo apt install build-essential libelf-dev linux-headers-$(uname -r)
- Download the Driver files using git :
git clone https://github.com/aircrack-ng/rtl8812au.git
- Navigate to the Downloaded directory :
sudo make dkms_install if the installation is aborted , execute this command »’sudo dkms remove 8812au/5.6.4.2_35491.20191025 —all»’ , if errors pop up »’Usage: remove / —all»’
- Check the wireless interfaces by typing iwconfig .

Driver for Raspberry Pi (Raspbian OS / Kali)(ARM)
- Update the package information :
For Raspbian OS
sudo apt-get install raspberrypi-kernel-headers
For Kali for ARM
sudo apt-get install build-essential libelf-dev kalipi-kernel-headers
- Download the Driver files using git :
git clone https://github.com/aircrack-ng/rtl8812au.git
- Navigate to the Downloaded directory :
For Raspberry (RPI)
- Then run this step to change platform in Makefile, For RPI 1/2/3/ & 0/Zero:
sed -i ‘s/CONFIG_PLATFORM_I386_PC = y/CONFIG_PLATFORM_I386_PC = n/g’ Makefile
sed -i ‘s/CONFIG_PLATFORM_ARM_RPI = n/CONFIG_PLATFORM_ARM_RPI = y/g’ Makefile
But for RPI 3B+ & 4B you will need to run those below which builds the ARM64 arch driver:
sed -i ‘s/CONFIG_PLATFORM_I386_PC = y/CONFIG_PLATFORM_I386_PC = n/g’ Makefile
sed -i ‘s/CONFIG_PLATFORM_ARM64_RPI = n/CONFIG_PLATFORM_ARM64_RPI = y/g’ Makefile
In addition, if you receive an error message about unrecognized command line option ‘-mgeneral-regs-only’ (i.e., Raspbian Buster), you will need to run the following commands, then retry building and installing:
export ARCH=arm
sed -i ‘s/^MAKE=»/MAKE=»ARCH=arm\ /’ dkms.conf

- Check the wireless interfaces by typing iwconfig .
Источник
Install TP-Link AC600 Archer T2U Nano WiFi USB Adapter In Linux
In this brief guide, I will explain how to install TP-Link AC600 Archer T2U Nano WiFi USB adapter in Fedora, Ubuntu and openSUSE Linux distributions and how to connect to 5G Wireless Internet connection.
Introduction
A few days ago, I switched to Jio Fiber 5G broadband connection. The Internet provider gave me a dual band router that supports both 2.4 GHz and 5 GHz channel.
Unfortunately, the built-in WiFi network interface in my Laptop doesn’t support 5 GHz channel. It is bit old Dell Laptop that supports 2.4 GHz channel only.
After doing a lot of web search, I bought TP-Link AC600 USB WiFi Adapter (Archer T2U Nano) from Amazon.
Compared to other WiFi USB network adapters, the TP-Link AC600 Archer T2U model has many advantages. It is tiny, compact and high speed WiFi adapter that supports 2.4 GHz and 5 GHz band.
It is capable to provide 433 Mbps speed on 5GHz (ideal for HD streaming and online gaming) and 200Mbps on 2.4GHz (perfect for normal web browsing).
Archer T2U nano adapter supports 64/128-bit WEP, WPA/WPA2, and WPA-PSK/WPA2-PSK encryption standards. So your wireless connections are safe from intruders.
Another notable advantage of Archer T2U nano WiFi USB adapter is it supports WiFi roaming. It automatically connects to the suitable WiFi network near you.
If you are ever looking for a dual-band WiFi router for faster speed and extended range, TP-Link AC600 Archer T2U Nano WiFi USB adapter is undoubtedly good choice.
Even though Archer T2U nano adapter has some good features, it has one drawback. It supports Windows and Mac OS only. There is no official drivers for Linux.
Fortunately, I came across an unofficial driver for Archer T2U Nano on GitHub and it works out of the box on Fedora and Ubuntu systems.
Install TP-Link AC600 Archer T2U Nano WiFi USB Adapter In Linux
As stated already, Archer T2U nano works well both on Fedora, Ubuntu and openSUSE Linux distributions. First, we will see how to install TP-Link AC600 Archer T2U Nano wifi adapter on Fedora.
1. Install TP-Link AC600 Archer T2U Nano on Fedora
First, check if the TP-Link Archer T2U is detected on your Fedora system by listing the USB devices using command:
Sample output:
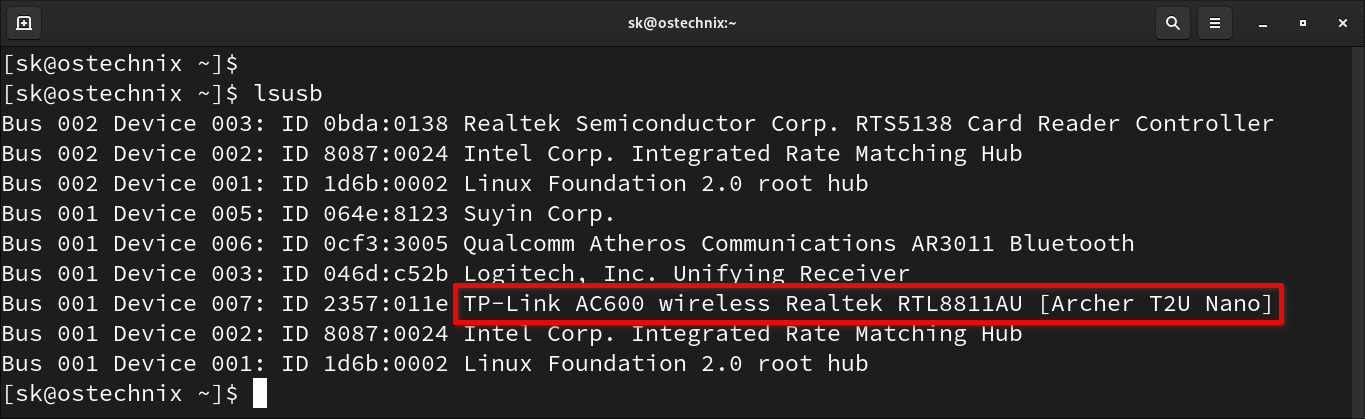
List USB devices in Linux
As you can see, TP-Link AC600 Archer T2U nano model wireless card is detected. Let us go ahead and install Archer T2U nano driver in Linux.
Before installing the Archer T2U nano driver, make sure you have installed the correct Kernel header files using command:
If your Kernel and Kernel headers’ version are different, the TP-Link WiFi card driver will not work. So it is mandatory to install the correct Kernel header files .
Next install the dkms package which is used automatically recompile and install a kernel module when a new kernel gets installed or updated.
To install dkms in Fedora, run:
Since we are going to compile the drivers from source, we need to install make and git :
Next, git clone the rtl8812au GitHub repository:
Sample output:
The rtl8812au GitHub repository contains RTL8812AU/21AU and RTL8814AU drivers with monitor mode and frame injection.
The above command clones the contents of rtl8812au GitHub repository in a local directory named rtl8812au . Cd into the cloned directory:
Run the following command to compile and install TP-Link AC600 Archer T2U Nano WiFi USB adapter in your Fedora system:
Sample output:
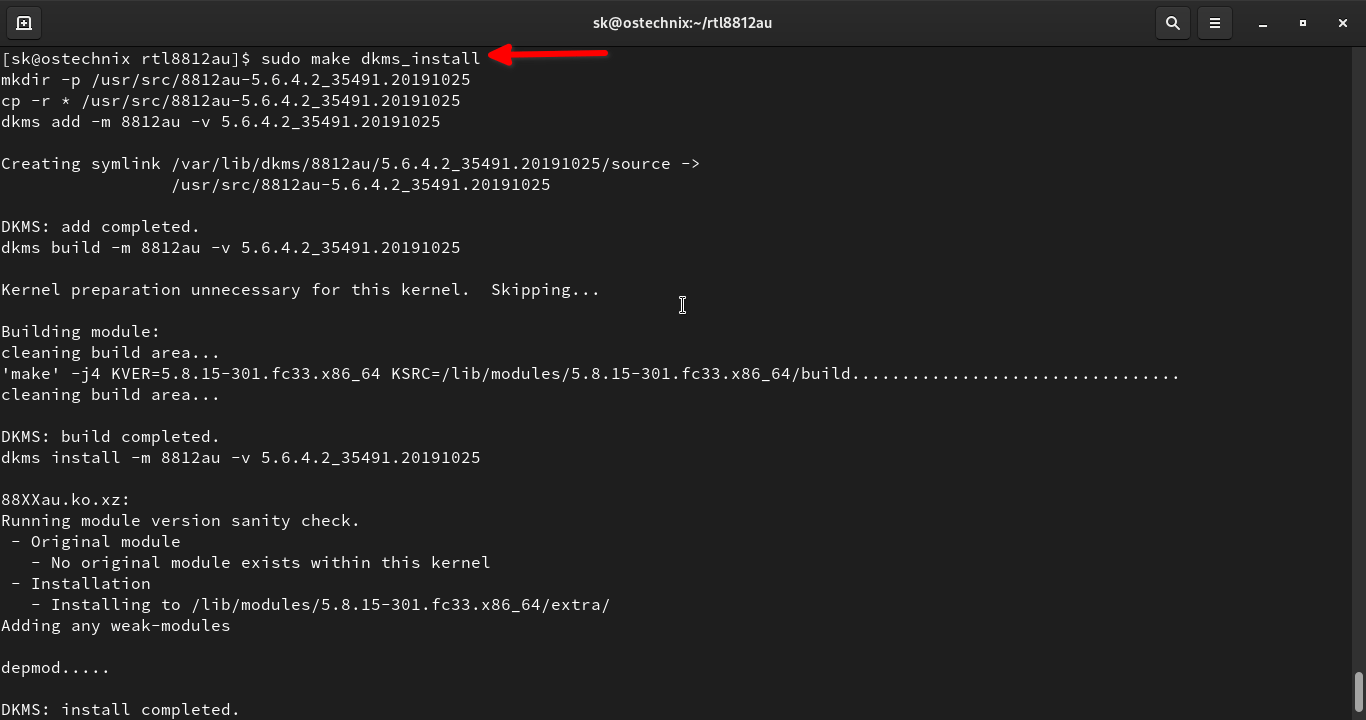
Install TP-Link AC600 Archer T2U Nano WiFi USB adapter in Fedora Linux
Once the driver is installed, remove the USB adapter and plug in again. The LED in the Archer T2U nano adapter will start to blink.
You can verify if the Archer T2U nano driver (i.e. RTL8812AU ) is installed and loaded with command:
If you see an output like below, congratulations! TP-Link AC600 (Archer T2U Nano) Wireless adapter has been successfully installed!
2. Install TP-Link AC600 Archer T2U Nano on Ubuntu
Installing TP-Link AC600 Archer T2U nano wifi USB adapter in Ubuntu is same as above.
Install the necessary dependencies and Kernel headers in Ubuntu Linux with command:
Git clone the rtl8812au GitHub repository:
Cd into the cloned directory:
Finally, install TP-Link AC600 Archer T2U Nano WiFi USB adapter in Ubuntu using command:
Unplug the TP-Link Archer T2U nano adapter and plug it again. The LED will start to blink. Verify if the driver is installed and loaded using command:
If the TP-Link AC600 WiFi USB adapter is installed, you will see the following output:
3. Install TP-Link AC600 Archer T2U Nano on openSUSE
Install Kernel headers and all necessary prerequisites on your openSUSE machine:
Git clone the rtl8812au GitHub repository:
Cd into the cloned directory:
Run the following command to install TP-Link AC600 Archer T2U Nano WiFi USB adapter in openSUSE:
Remove he TP-Link Archer T2U nano adapter and plug it again. The LED will start to blink. Verify if the driver is installed and loaded using command:
If the TP-Link AC600 WiFi USB adapter is installed correctly, you will see the following output:
Connect to 5G Wireless network in Linux
Open System Settings in your Linux machine. Under WiFi section, you will see there are two WiFi adapters listed. One is built-in WiFi interface and another one is TP-Link AC600 Archer T2U nano USB WiFi adapter.
Click the TP-Link card and you will see the list of available 5G wireless connections. Choose a 5G network in the list and click Connect.
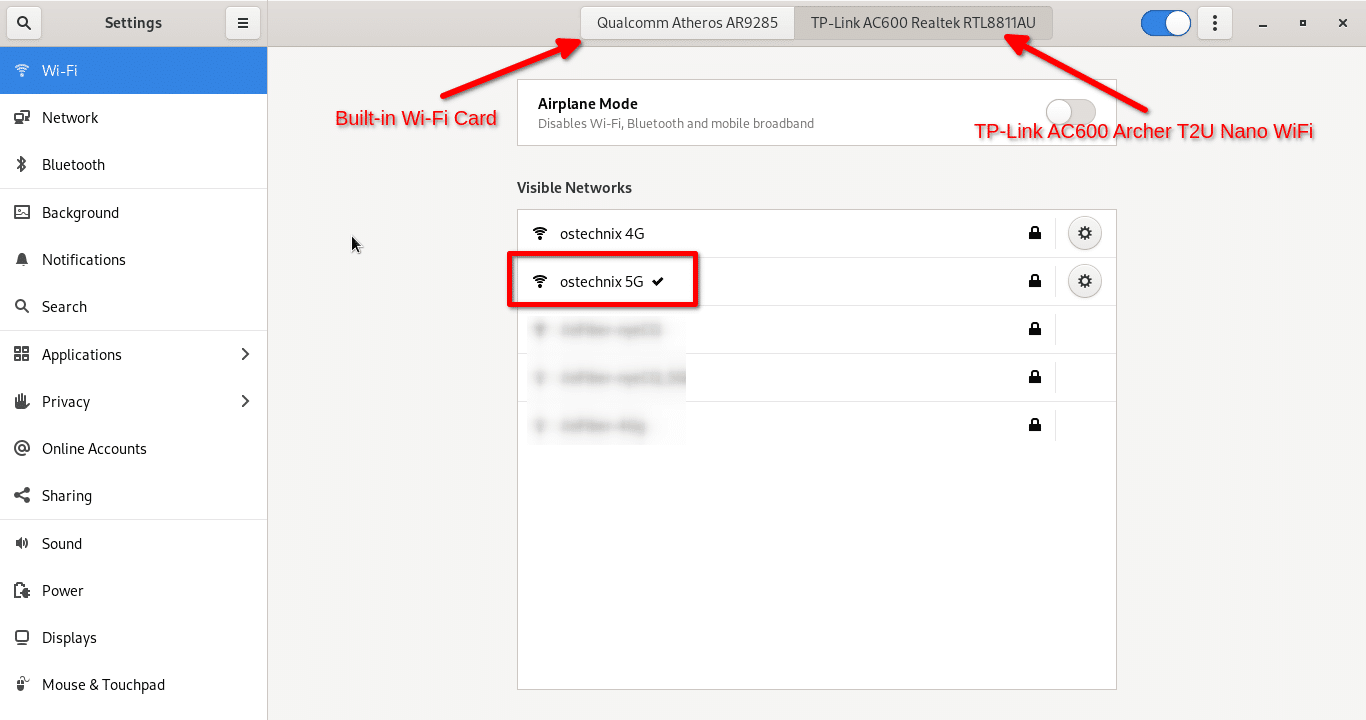
Connect to 5G Wireless network in Linux
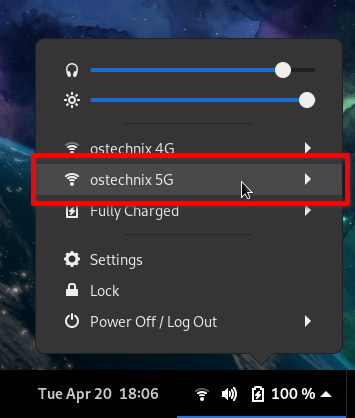
Alternatively, you can connect to 5G WiFi network from the Gnome Top bar menu as well. Open the pop out menu from the Top bar, and click «Select Network» option.
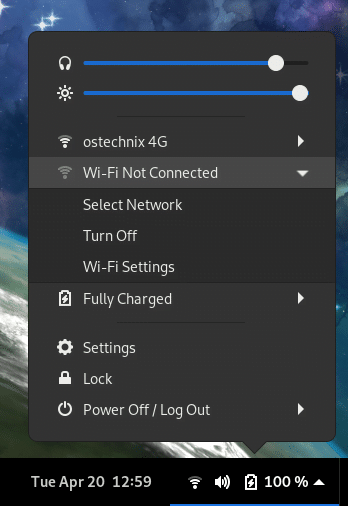
Select WiFi network from topbar menu in Linux
Choose the 5G wifi network in the list and click Connect.
Connect to 5G wifi network
That’s it. Start using High Speed 5G Internet connection in your laptop/desktop.
To view the list of WiFi connections from the command line, run:
Here is my Internet speed on 2.4 GHz and 5 GHz Wireless adapters.
Internet speed on 2.4 GHz (onboard WiFi):

Internet speed on 2.4 GHz WiFi in Linux
Internet speed on 5 GHz (TP-Link AC600 Archer 2TU Nano WiFi USB adapter):

Internet speed on 5 GHz (TP-Link AC600 Archer 2TU Nano) WiFi in Linux
I have been using TP-Link AC600 Archer T2U Nano WiFi USB adapter in my Dell Laptop for the past few days. So far it works just fine and I don’t have any issues with it.
If you want to connect to 5G networks in your legacy Laptop or Desktop, just buy TP-Link AC600 Archer T2U Nano WiFi USB adapter or any other 5G supported WiFi adapter and enjoy High Speed Internet connectivity.
Источник


