- Tracert linux red hat
- Трассировка в Linux
- Для CentOS и RedHat
- Для Debian и Ubuntu
- Ping, traceroute, and netstat: The network troubleshooting trifecta
- More Linux resources
- Traceroute
- Netstat
- Conclusion
- How to Install and Use Traceroute in Linux RHEL 6/7, CentOS 6/7, Oracle Linux 6/7
- Related Posts
- Мониторинг сети в Linux (ping, traceroute, mtr)
- Утилита ping
- Утилита traceroute
- Утилита MTR
Tracert linux red hat
 Командой tracert мы инициируем отправку пакетов данных тому получателю, который указали – это может быть адрес сайта, имя компьютера в сети или IP-адрес. При этом пакеты проходят через все промежуточные системы (обычно это специальные сетевые устройства – машрутизаторы) между нашим компьютером и получателем. Таким образом, мы устанавливаем маршрут до пункта назначения и, что гораздо более важно – определяем время отклика (значение в миллисекундах) каждого промежуточного узла.
Таким образом можно установить, в каком месте цепочки находится проблема. Если пакеты не доходят до самого пункта назначения – значит, проблема в нем. Если цепочка обрывается на середине – проблема в каком-то из промежуточных маршрутизаторов. При этом с другого компьютера или по другому маршруту (если такой существует) наш отвалившийся сайт может быть доступен. Если пакеты не выходят за пределы сети нашего провайдера – стало быть, там и проблема.
Трассировка в Linux
В linux за трассировку отвечает пакет traceroute. Первое что сделаем это поставим пакет.
Для CentOS и RedHat
yum install -y traceroute
Для Debian и Ubuntu
apt-get install traceroute -y

Как сделать трассировку в Ubuntu-Debian-CentOS с помощью traceroute-01
Сделаем трассировку до Яндекса. traceroute ya.ru. Видим пошло построение маршрута.

Как сделать трассировку в Ubuntu-Debian-CentOS с помощью traceroute-02
Как видите команда очень похожа на команду из операционной системы Windows. Данная команда очень сильно вам поможет в решении сетевых проблем, так что трассировка вам в помощь.
Источник
Ping, traceroute, and netstat: The network troubleshooting trifecta
Posted: February 11, 2020 | by Jason Frisvold

I’ve spent a career building networks and servers, deploying them, troubleshooting them, and caring for applications. When there’s a network problem, be it outages or failed deployments (or you’re just plain curious about how things work), three simple tools come to mind: ping , traceroute , and netstat .
More Linux resources
The ping command is one of the most well-known tools available. Simply put, ping sends an «are you there?» message to a remote host. If the host is, in fact, there, ping returns a «yup, I’m here» message. It does this using a protocol known as ICMP, or Internet Control Message Protocol. ICMP was designed to be an error reporting protocol and has a wide variety of uses that we won’t go into here.
Ping uses two ICMP message types: type 8 (Echo Request) and type 0 (Echo Reply). When you issue a ping command, the source sends an ICMP Echo Request to the destination. If the destination is available and is allowed to respond, then it replies with an ICMP Echo Reply. Once the message returns to the source, the ping command displays a success message as well as the Round Trip Time (RTT). The RTT can be an indicator of the latency between the source and the destination.
Note: ICMP is typically a low-priority protocol, meaning that the ICMP RTT is not guaranteed to match the RTT for a higher-priority protocol such as TCP.

When the ping command completes, it displays a summary of the ping session. This summary tells you how many packets were sent and received, how much packet loss there was, and statistics on the RTT of the traffic. Ping is an excellent first step for identifying whether or not a destination is «alive.» Keep in mind, however, that some networks block ICMP traffic, so a failure to respond is not a guarantee that the destination is offline.
Here is an example:
The example above shows a ping session to google.com. From the output, you can see the IP address being contacted, the sequence number of each packet sent, and the round-trip time. In this case, six packets were sent with an average RTT of 14ms.
One thing to note about the output above and the ping utility, in general, is that ping is strictly an IPv4 tool. If you’re testing in an IPv6 network you’ll need to use the ping6 utility. Ping6 behaves roughly identical to the ping utility with the exception that it uses IPv6.
Traceroute
Traceroute is a finicky beast. This tool is meant to identify the path between a source and a destination point. The reality is mostly true, with a couple of caveats. Let’s start by explaining how traceroute works:

Think of traceroute as a string of ping commands. At each step along the path, traceroute identifies the hop’s IP as well as the latency to that hop. But how is it finding each hop? Turns out, it’s using a bit of trickery.
Traceroute uses UDP or ICMP, depending on the OS. On a typical *nix system it uses UDP and sends traffic to port 33434 by default. On a Windows system, traceroute uses ICMP. As with ping , traceroute can be blocked by not responding to the protocol/port being used.
When you invoke traceroute , you identify the destination you’re trying to reach. The command begins by sending a packet to the destination, but it sets the packet’s time to live (TTL) to one. This behavior is significant because the TTL value determines how many hops a packet is allowed to pass through before an ICMP Time Exceeded message is returned to the source. The trick here is to start the TTL at one and increment it by one after the ICMP message is received:
Traceroute displays the ICMP message’s source address as the name of the hop and moves on to the next hop. When the source address finally matches the destination address, traceroute knows that it has reached the destination. It then outputs the full route from the source to the destination with the RTT for each hop. As with ping , the RTT values shown are not necessarily representative of the real RTT to a service such as HTTP or SSH. Traceroute, like ping , is considered to be lower priority compared to other traffic, so RTT values aren’t guaranteed.
There is a second caveat with traceroute that you should be aware of: Traceroute shows you the path from the source to the destination, but this does not mean that the reverse is true. In fact, there is no current way to identify the path from the destination to the source without running a second traceroute from the destination. Keep this in mind when troubleshooting path issues.
Netstat
Netstat is an indispensable tool that shows you all of the network connections on an endpoint. That is, by invoking netstat on your local machine, all of the open ports and connections are shown. This output includes connections that are not completely established as well as connections that are being torn down:
The output above shows several different ports in a listening state as well as a few established connections. For listening ports, if the source address is 0.0.0.0, it is listening on all available interfaces. If there is an IP address instead, then the port is open only on that specific interface.
The established connections show the source and destination IPs as well as the source and destination ports. The Recv-Q and Send-Q fields show the number of bytes pending acknowledgment in either direction. Finally, the PID/Program name field shows the process ID and the name of the process responsible for the listening port or connection.
Netstat also has a number of switches that can be used to view other information, such as the routing table or interface statistics. Both IPv4 and IPv6 are supported: There are switches to limit to either version, but both are displayed by default.
In recent years, netstat has been superseded by the ss command. You can find more information on the ss command in this article by Ken Hess.
Conclusion
As you can see, these tools are invaluable when troubleshooting network issues. As a network or systems administrator, I highly recommend becoming intimately familiar with these tools. Having them available might save you a lot of time troubleshooting later.
[ Want more on networking topics? Check out the Linux networking cheat sheet. ]
Источник
How to Install and Use Traceroute in Linux RHEL 6/7, CentOS 6/7, Oracle Linux 6/7
Traceroute command is a network diagnostic tool for displaying the route packets take to network host or destination. It shows how long each hop will takes and how many hops that the packet requires to reach the specify destination. In linux, traceroute command is used while in windows and dos environment, they used tracert command. In this post i will show you how to install and how to use traceroute command to diagnose your IP network related issues. This steps has been tested on RHEL 6/7, CentOS 6/7 and Oracle Linux 6/7.
1. If your linux VPS or dedicated server does not installed with traceroute, it will return this warning :
Or you can verify the traceroute install or not by issue which command :
2. To install traceroute, run the following command :
3. Verify the command install or not :
4. How to use traceroute command :
a. Find the network path from my centos6 server to google.com :
1 is the internet gateway on the network this traceroute was done (ADSL modem local IP)
2 is the ISP the origin computer is connected to.
My PPPoE modem WAN IP details : 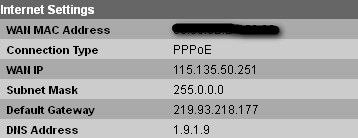
b. Find the network path from my centos6 server to google.com and do not resolve IP addresses to their domain names :
c. Find the network path from my centos6 server to google.com and set the number of seconds to wait for response to a probe to 0.1 seconds (Default is 5.0) :
d. Find the network path from my centos6 server to google.com and set the number of probes per each hop to 5 (Default is 3) :
5. Display basic command line options help for more usage :
Related Posts

Webmin is a free software that is used by system administrators for system administration and…

Wget is a free network utility to download files from the Web using http and…

What is the correct way to reboot a CentOS/RHEL Linux server? I would recommend to…

Security-Enhanced Linux (SELinux) is an implementation of security policies for operating systems that provides a…

Tcpdump is a packet sniffer that able to capture traffic that passes through a machine.…
Источник
Мониторинг сети в Linux (ping, traceroute, mtr)
Существует несколько хороших утилит, позволяющих искать неисправности в сети на уровне TCP/IP. Большинство из них выдает низкоуровневую информацию, поэтому для того чтобы пользоваться ими, нужно хорошо понимать принципы работы протоколов TCP/IP и маршрутизации. В этой статье мы рассмотрим основные инструменты поиска неисправностей в сети: утилитами ping, traceroute и mtr.
Утилита ping
Проверка доступности компьютера
Утилита ping предназначена для того, чтобы при помощи отправки ICMP пакетов убедиться в работоспособности хоста. Команда ping посылает запрос (ICMP ECHO_REQUEST) конкретному компьютеру и фиксирует поступающие ответы (ICMP ECHO_RESPONSE). Её можно применять для работоспособности отдельных компьютеров и сегментов сети. В обработке ее запроса участвуют таблицы маршрутизации, физические компоненты сетей и сетевые шлюзы, поэтому для достижения успешного результата сеть должна быть в более или менее рабочем состоянии. Если команда не работает, можно быть совершенно уверенным в том, что более сложные средства тем более не функционируют. Однако это правило неприменимо в сетях, где брандмауэры блокируют эхо-запросы ICMP. Убедитесь в том, что брандмауэр не препятствует работе команды ping, прежде чем подозревать, что зондируемый компьютер игнорирует эту команду. В конце концов, отключите на короткое время брандмауэр для проверки работоспособности сети.
Если не задан аргумент «число пакетов», команда ping работает в бесконечном цикле. Чтобы прервать работу команды, нужно нажать специальную клавиатурную комбинацию .
Например, пропингуем neoserver.ru (это имя хоста):
Информация о компьютере neoserver.ru включает его IP-адрес, порядковый номер ответного ICMP-пакета и полное время прохождения пакета. Полученные результаты свидетельствуют о том, что компьютер neoserer.ru работает и подключен к сети.
Min — минимальное время ответа хоста, кторому был отправлен запрос.
Avg — среднее время ответа хоста, кторому был отправлен запрос
Max — максимальное время ответа хоста, кторому был отправлен запрос.
Ещё вы увидите TTL — определяет максимальное количество хопов (то есть прыжок, участок между маршрутизаторами), которые пакет может пройти. Наличие этого параметра не позволяет пакету бесконечно ходить по сети.
В ОС Linux, как уже было сказано выше, команда ping без дополнительных параметров будет пинговать заданный хост бесконечно. Чтобы отправить, например, 10 запросов, необходимо добавить ключ -с:
В итоге, мы видим, что было отпралено 10 запросов и выведен результат.
Другие примеры задействования разын ключей:
Не резолвить имена адресов, выводить только ip-адреса
Завершение работы ping по заданному времени (тут 5 секунд)
Установить размер отправляемых пакетов в 1000 байт
Увеличить интервал времени пинга на 3 секунды
Утилита traceroute
Каждый пакет проходит на своем пути определенное количество узлов, пока достигнет своей цели. И, как мы уже знаем, каждый пакет имеет свое время жизни. Это количество узлов, которые может пройти пакет перед тем, как он будет уничтожен. Этот параметр записывается в заголовке TTL, каждый маршрутизатор, через который будет проходить пакет уменьшает его на единицу. При TTL=0 пакет уничтожается, а отправителю отсылается сообщение Time Exceeded.
Команда traceroute linux использует UDP пакеты. Она отправляет пакет с TTL=1 и смотрит адрес ответившего узла, дальше TTL=2, TTL=3 и так пока не достигнет цели. Каждый раз отправляется по три пакета и для каждого из них измеряется время прохождения. Пакет отправляется на случайный порт, который, скорее всего, не занят. Когда утилита traceroute получает сообщение от целевого узла о том, что порт недоступен трассировка считается завершенной.
Синтаксис утилиты не сложный:
Адресом узла может служить как IP адрес, так и доменное имя. Основные опции:
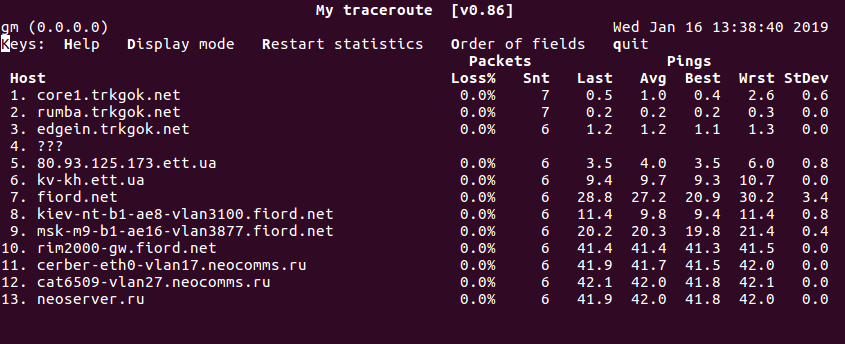
Для примера, выпоним трасировку к ресурсу yandex.ru:
В итоге, пакет прошел через 6 узлов перед тем, как дойти до указанного хоста. На каждый узел отправлялось по три пакета и для каждого из них было засечено время прохождения. И если на одном из узлов возникнет проблема, теперь вы будете знать на каком.
Иногда, вместо одного узла вы можете видеть звездочки. Это значит, что шлюзы либо не высылают нам ICMP с сообщением «time exceeded», либо у их сообщений слишком маленький TTL и оно нас не достигает. В точности нельзя сказать, что происходит на самом деле, но ясно, что по какой-то причине хост не захотел нам отвечать:
Бывает, что трассировка с помощью UDP не работает, это может произойти потому, что фаервол блокирует все лишние пакеты. Можно воспользоваться ICMP с помощью опции -I:
Рассмотреных выше простых примеров, вполне достаточно для первичной диагностики сети как для обычныз пользователей, так и для начинающих администраторов.
Утилита MTR
MTR – это альтернатива программе traceroute. Объединяя функции ping и traceroute, mtr позволяет постоянно опрашивать удаленный сервер и отслеживать изменения задержки и производительности с течением времени.
Синтаксис утилиты также несложный:
Вывод похож на traceroute, но mtr имеет существенное преимущество – ее вывод постоянно обновляется. Это позволяет собирать средние показатели, а также отслеживать тенденции и изменения производительности сети. Как и с утилитой ping, mtr будет работать бесконечно. Чтобы прервать работу команды, нужно нажать специальную клавиатурную комбинацию .
Источник


