- Transfer Files From Android To Mac With Bluetooth File Exchange
- Transfer Android Files to Mac via Bluetooth
- How to Transfer Photos from Samsung to Mac for Backup? 4 Ways in 2021
- Way 1: How to Transfer Photos from Samsung to Mac with Android Assistant
- #1 — How Do I Transfer Photos from Samsung to Mac with 1 Click
- #2 — How Do I Transfer Photos from Samsung to Mac Selectively or in Batches
- Way 2: How to Transfer Photos from Samsung to Mac with Android File Transfer
- Way 3: How to Transfer Photos from Samsung to Mac Using Smart Switch
- Way 4: How Do I Transfer Photos from Samsung to Mac with USB Cable
- Samsung File Transfer for Mac — How to Transfer Samsung Files on Mac?
- Part 1. Easily Transfer Files with Professional Samsung File Transfer for Mac
- The Key Features of Samsung Messages Backup for Mac
- How to Perform Samsung File Transfer on Mac with Samsung Messages Backup?
- Part 2. Official Samsung to Mac Transfer — Samsung Smart Switch
- Part 3. Using A USB Cable with The Help of Android File Transfer
- Wrapping Up
Transfer Files From Android To Mac With Bluetooth File Exchange


There are lots of ways to move your files between a Mac and Android device. The easiest way is using Bluetooth File Exchange right from the menu bar on your Mac.
There are lots of ways to move your files between Mac and Android devices. The easiest way is using Bluetooth File Exchange right from the menu bar on your Mac.
Transfer Android Files to Mac via Bluetooth
First, you’ll turn on Bluetooth on both devices. On the Mac, go to System Preferences > Bluetooth and make sure it shows “Bluetooth: On.” If not, click Turn Bluetooth On. You should see the phrase “Now discoverable as” and then the name of your computer in quotes.
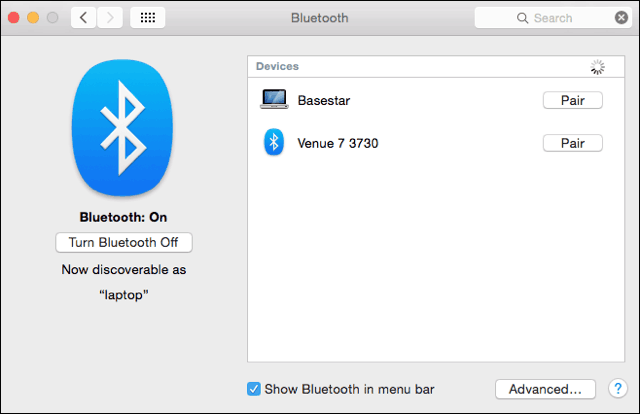
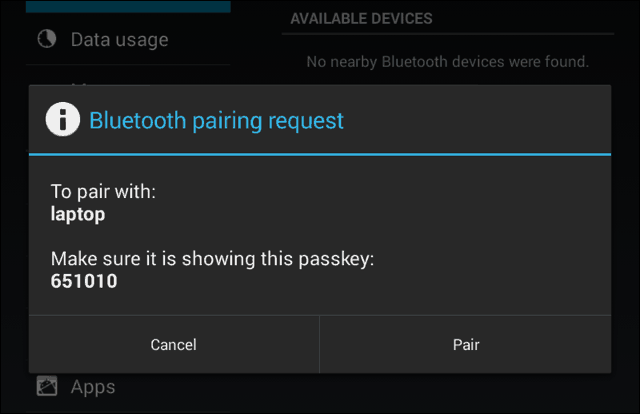
Next, on your Android device, go to Settings > Bluetooth. You should see your Mac listed. In this example, it’s Basestar. Make sure the pairing codes match and click “Pair” on each device. Your Mac and your Android device now make a lovely couple.
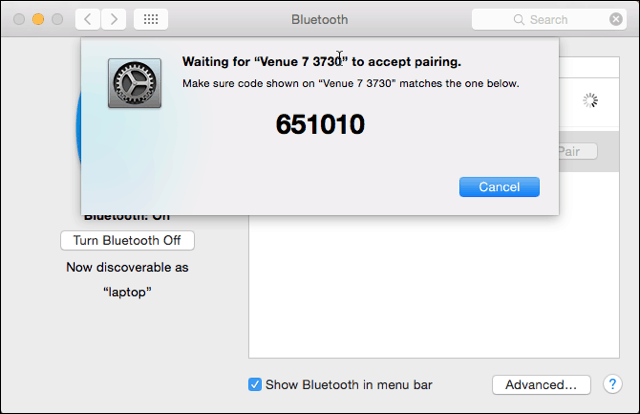
Tap on Pair on your Android device too.
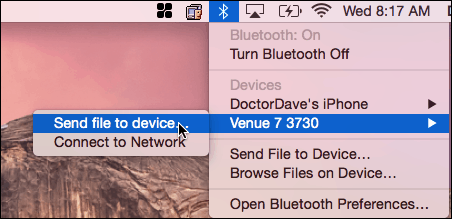
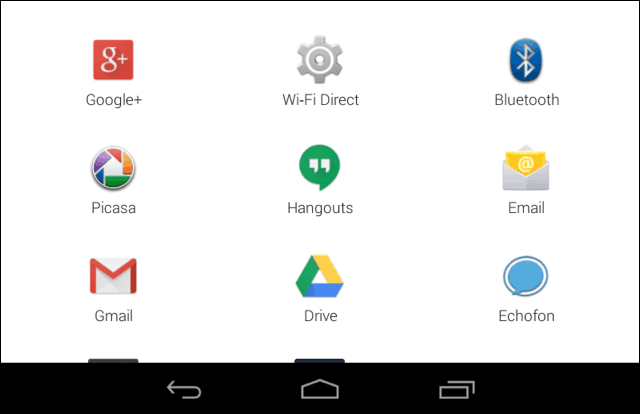
After you pair your phone or tablet to your Mac, click on the Bluetooth icon on your Mac’s menu bar. Your Android device will show up, from which you can click Send File to Device. On your Android device, accept the file.
If you want to send files to your Mac, you’ll enable Bluetooth Sharing. Go to System Preferences > Sharing. In the sharing preference pane, check the box for On next to “Bluetooth Sharing.” From here, you can set where you want the downloads to go and what to do when you get a transfer request. In this example, it goes to the Downloads folder.
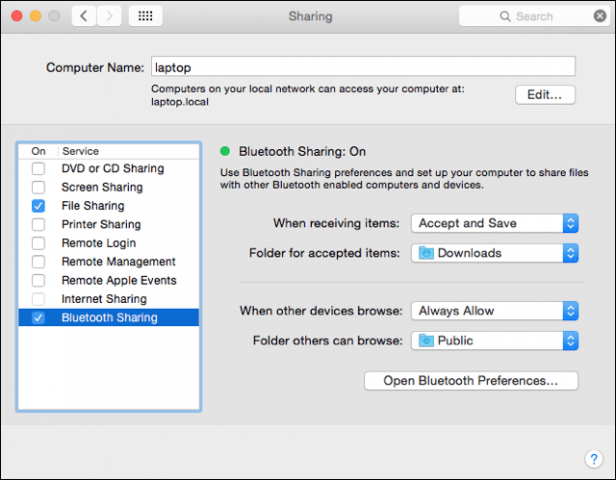
After setting up Bluetooth Sharing on your Mac, go to your Android device and click the share icon. The file will go to the folder you specified in Bluetooth Sharing on your Mac. Again in this example, it’s the Downloads folder.
Now you can move files between your Mac and Android device without cables and third-party software.
Источник
How to Transfer Photos from Samsung to Mac for Backup? 4 Ways in 2021

The Samsung Galaxy S10/S10 Plus/S10e is equipped with a camera without any obvious weakness, which is irresistible to any photo-minded smartphone user. They are willing to buy a Samsung Galaxy S10, S10e or S10 Plus to try out its excellent camera to record every moment in their life! However, how do Mac users transfer photos from Samsung to Mac in order to protect these wonderful photos from being lost? If you’ve tried it, you should know that Samsung phone can usually communicate better with your PC, but you can’t simply connect Samsung Galaxy to your Mac and start transferring photos.
This is because there is no direct way for your Samsung device, which is an Android phone, to communicate with an Mac computer. But that doesn’t mean it’s impossible to transfer photos from Samsung to Mac. This article will share with you some simple ways to transfer photos from Samsung Galaxy S10/S10+/S10e/S9, Note 9/Note 8/Note 7, etc. to your Mac for backup.
![]()
Way 1: How to Transfer Photos from Samsung to Mac with Android Assistant
To better protect the photos you have taken with your Samsung mobile phone, it is highly recommended to use the Samsung to Mac Transfer tool — Coolmuster Android Assistant for Mac (or Coolmuster Android Assistant for Windows PC users) to transfer photos from Samsung to Mac (or PC) computer for local backup. This program is designed to make it very easy to move data from Android device to your computer. You can do so in a single click quickly and conveniently.
Look at other features that offer by the Coolmuster Android Assistant:
> Backup Samsung and other Android phone contacts, SMS, call logs, photos, videos, music, app, eBooks, documents, etc. on PC or Mac;
> Import contacts, SMS, photos, videos, music, apps, etc. from PC or Mac to Android phone, including Samsung devices;
> Back up and restore all Samsung files to Mac or PC with one click;
> Delete, add, unduplicate and edit Samsung phone data on computer (See how to edit Samsung contacts);
> Apply to various Android brands: Samsung, Xiaomi, Google Pixel, HTC, Huawei, Sony, ZTE, Motorola, OPPO and so on;
> Supported Samsung devices: Samsung Galaxy S10/S10 Plus/S10e/S9/S9 Plus/S8/S7/S6/S5, Note 9/Note 9 Plus/Note 8/Note 7/Note 6/Note 5/Note 4, Samsung J3/J3 Pro, Samsung Galaxy A9/A8/A7/A5, Samsung Galaxy Tab S4/S3/S2, Galaxy Tab A, and more;
> Supported Mac OS: Mac OS X 10.7 or later.
Download it to have a try:


Coolmuster Android Assistant for Mac offers users to transfer photos from Samsung to Mac in 2 ways: transferring photos selectively (in batches) or transferring overall photos with one click. Now, please check the steps to transfer photos from Samsung to Mac with it.
#1 — How Do I Transfer Photos from Samsung to Mac with 1 Click
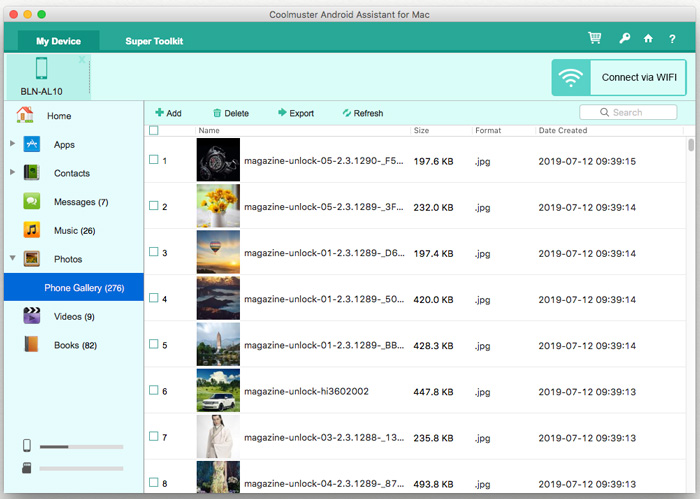
Step 1: Connect Samsung phone to computer
Launch Coolmuster Android Assistant for Mac on your Mac, and connect the Samsung device to the computer via a USB cable. Make sure you have enabled USB debugging on your phone at first. Once your phone is connected successfully, you might see the interface as below.
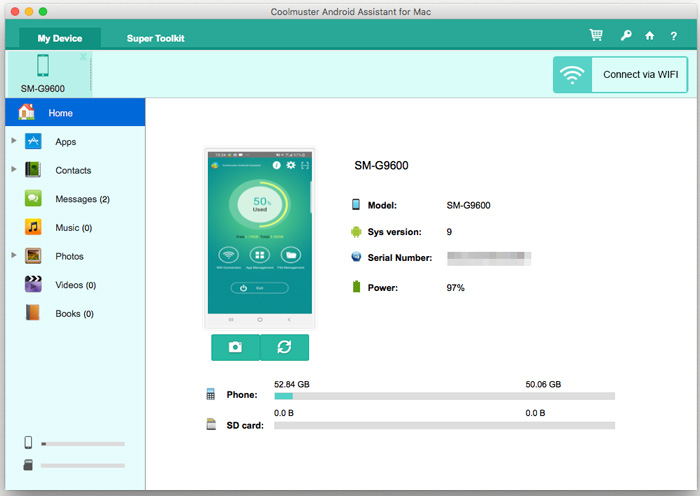
Step 2: Select photos for backup
Click «Super Toolkit» from the top menu and then choose «Backup» option. Then, all the phone content are displayed in list. You can check the categories that you would like to backup. Here, you should tick off «Phone Gallery» for backup.
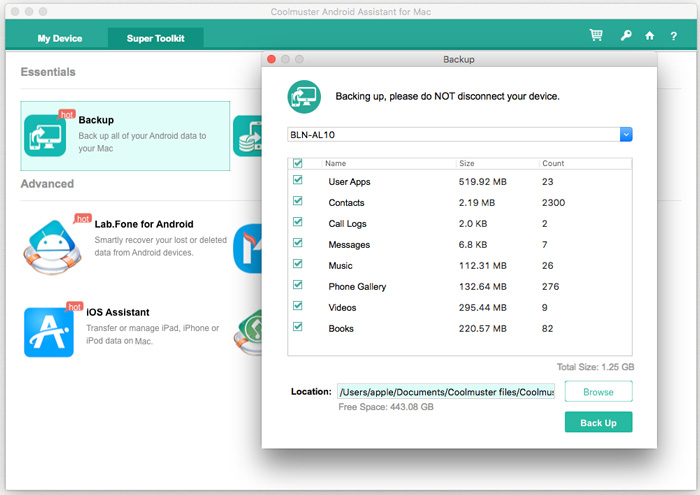
Step 3: Backup Samsung phone on Mac
After you have selected the photos you want to backup, you can click on the «Backup» button to move all photos from your Samsung phone to computer. You can select a location to store the backed up data by clicking on the «Browse» button.
Tip: Don’t have a USB cable around? See how to transfer photos from Android to Mac wirelessly.
#2 — How Do I Transfer Photos from Samsung to Mac Selectively or in Batches
Step 1: Connect Samsung phone to computer
Connect your Samsung device to Mac computer with a USB cable after launching the program, then follow the onscreen prompts to have your Samsung device recognized.
Step 2: Select photos and start to backup
Go to «Photos» > «Photo Gallery» to preview and choose one or more pictures that you want to back up from Samsung to Mac. And click «Export» button to download photos from Samsung phone to Mac immediately.
So this is how to download photos from Samsung phone to Mac computer using Coolmuster Android Assistant for Mac, you can open and edit the photos as you like after that. It is quite simple and useful.
Way 2: How to Transfer Photos from Samsung to Mac with Android File Transfer
Android File Transfer is another way for you to transfer Samsung photos to Mac, which allows you to transfer files between your Mac and your Android device with ease. Now let’s see how to download photos from Samsung Galaxy to Mac using Android File Transfer.
Here is how it works:
Step 1. Download Android File Transfer and install it on your Mac. Then drag the app to «Application«.
![]()
Step 2. Click «Get started» on Mac to launch it app and connect your Samsung phone to your Mac via a USB cable. Once connected, please move on to the next step.
![]()
Step 3. Now you can search for the image file folders from your Samsung device, such as «DCIM» and «Pictures«.
![]()
Step 4. Locate the photos you want and drag them to the desktop or your preferred folder on Mac.
![]()
So this is how to download photos from Samsung phone to Mac with Android File Transfer app.
You May Also Like:
Way 3: How to Transfer Photos from Samsung to Mac Using Smart Switch
The Smart Switch is an application introduced by Samsung that is designed to transfer data from one phone to another. Apart from that, it also has a backup feature that allows you to easily back up your Samsung data to your PC or Mac. Now you can follow the steps below to see how to back up your Samsung photos to your Mac using the Smart Switch.
Here is how it works:
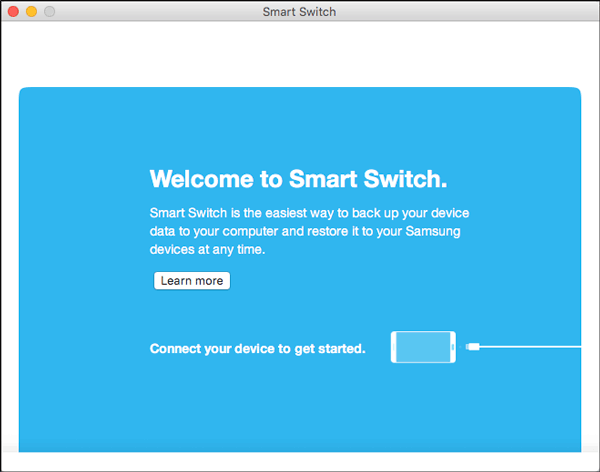
Step 1. Go to the official web page of Smart Switch and scroll down to find the «Transfer content from a PC or Mac to your new Galaxy phone» option. Click on «DOWNLOAD FOR PC OR MAC» to get the application on your computer.
Step 2. After successfully downloading and installing the Smart Switch on your Mac, launch the program. Then, connect your Samsung phone to this Mac via a USB cable.
Step 3. Click on the «Backup» pane on the Smart Switch home page to start backing up your Samsung files to your Mac.
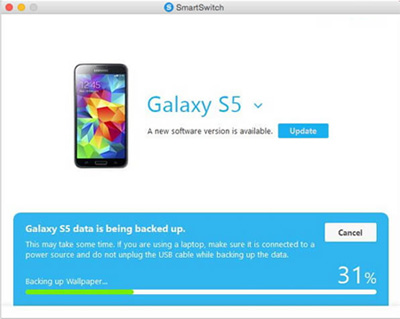
Note: You can change the location of the backup, the type of data to be backed up or other settings by selecting «More > Preferences» on the Smart Switch program interface.
Way 4: How Do I Transfer Photos from Samsung to Mac with USB Cable
The last option to back up your Samsung photos to Macbook is using USB cable transfer, which enables you to transfer not only photos, but also your music and videos from Samsung Galaxy S10/S10 Plus/S10e/S9/S9 Plus/S8/S7/S6, Galaxy Note 8/7/6/5/4, etc. to Mac or PC for backup.
Here’s how to download photos from Samsung Galaxy to Mac by a USB cable:
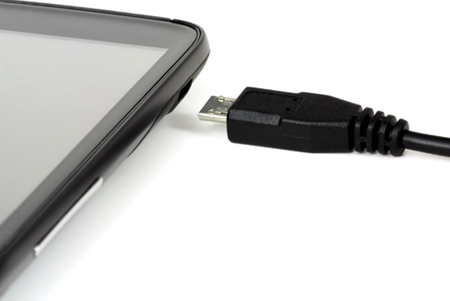
Step 1: Connect your Samsung phone to the Mac computer with a USB cable, and unlock your Samsung device.
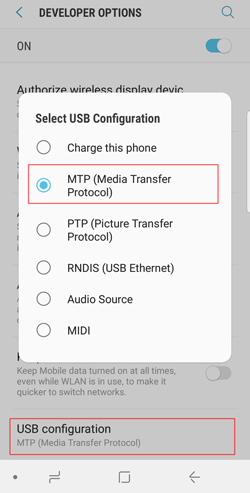
Step 2: Swipe down from the top of Samsung phone screen to connect your phone as a media device. To do so, please change the USB connection type to «MTP (Media Transfer Protocol)» or «PTP (Picture Transfer Protocol)«. Thus the Mac will detect the connected Samsung phone soon.
Step 3: On your Mac computer, please open your Samsung device and go to «DCIM» > «Camera«, or any other folders that contains the images you want to backup.
Step 4: Preview and choose the pictures you want and drag them to your Mac. You can create a folder to save the pictures as required.
There will be a progress bar showing you how many photos have been transferred. This is how to transfer photos from Samsung S6/S7/S8/S9/S10 to Mac using USB cable.
Summary — A Simple Comparison of These 4 Ways
OK, those are the different methods to help you backup your Samsung photos on Mac. Just make a comparison and pick out your favorite one.
Источник
Samsung File Transfer for Mac — How to Transfer Samsung Files on Mac?
In this year, Samsung released Samsung Galaxy S10 and clamed to bring out its first 5G mobile phone in this summer. It attracts more and more users with Samsung phone upgrading every year. When it comes to backup Samsung files to the computer, most of Samsung users find it easy to transfer files to Windows computer/PC, but some users look for Samsung file transfer for Mac.
That is why we post this article. We hope Mac users can find an effective way to transfer files with these Samsung to Mac transfer tools.
Part 1. Easily Transfer Files with Professional Samsung File Transfer for Mac
Samsung Messages Backup is one of the best Professional Samsung file transfer tools on the market. Its Mac version can help users to manage their Samsung phone on the computer conveniently. With no technical background required, you can use this program easily.
The Key Features of Samsung Messages Backup for Mac
— Support to transfer contacts, call logs, SMS, photos, videos, music, books, and apps between Android phone and Mac.
— Support almost all Android phones on the market, including Samsung Galaxy, LG, Sony, Huawei, Xiaomi, HTC and so on (the latest Samsung Galaxy S10 is also included).
— Support to edit contacts and send/read SMS on the computer.
— Preview and delete files in batches.
— 100% clean & safe. No data leaking out, no data loss.


How to Perform Samsung File Transfer on Mac with Samsung Messages Backup?
Please download the Mac version and launch the program on your Mac.
#1. Select what you like to transfer on Mac
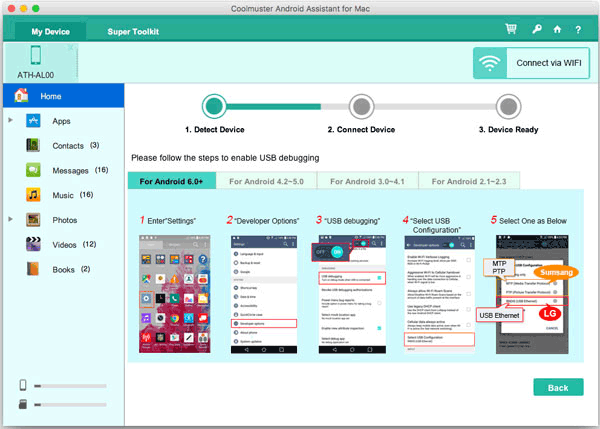
Step 1. Connect Samsung phone to Mac via a USB cable. You can see the interface as below to show you a brief tutorial to enable USB debugging on your Samsung phone. Please go with it.
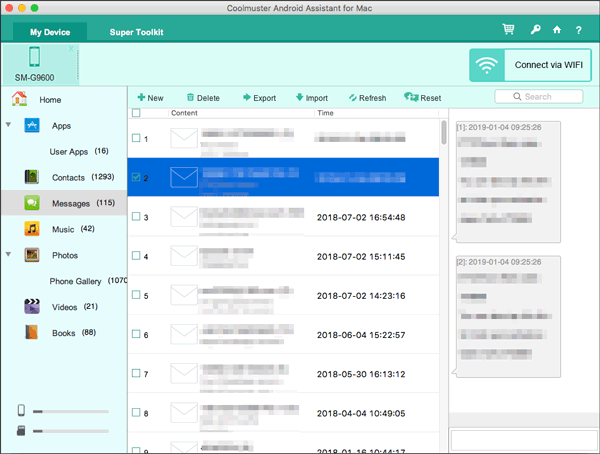
Step 2. Follow the prompts to make the program recognize your Samsung phone. Once done, you can enter the main interface as below. All the detected files are sorted in different folders on the left panel.

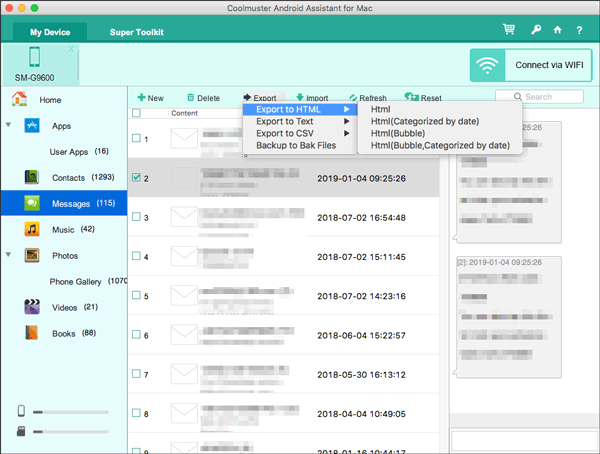
Step 3. Please open the folder that contains your wanted files. Preview the items on the interface and select the files that you want to transfer to Mac by ticking on the boxes. You can choose a part of files or all the items as you need.
Step 4. Click Export to transfer the chosen files from Samsung to Mac.
If you like to transfer music from Mac to Samsung, you can click Import to select files from a local folder and go with the simple prompts to transfer files to Samsung phone.
#2. One click backup your Samsung phone on Mac
Step 1. After entering the main interface, please go to Super Toolkit on the top menu bar. On this interface, you can see two features for one-click backup and restore.
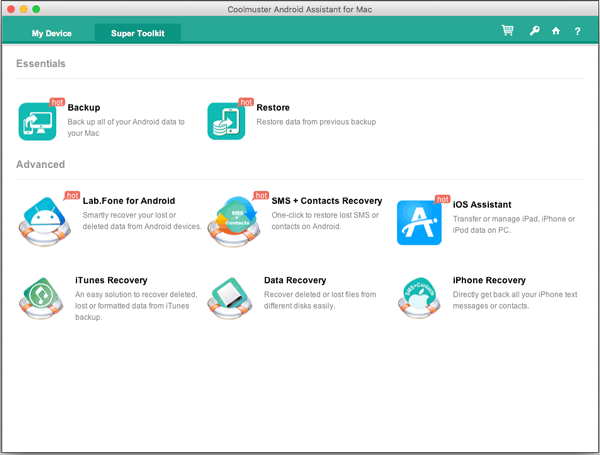
Step 2. Tap on the Backup button, tick on the contents you want to backup and choose a local folder to store the backups. Then click Back Up to start the process.
If you need to restore Samsung phone from a backup by one click, you can tap on Restore and select the backup record on your Mac. Then click Restore to retrieve files to your Samsung Galaxy.

Read Also:
Part 2. Official Samsung to Mac Transfer — Samsung Smart Switch
Samsung Smart Switch is a popular Samsung file transfer for Samsung users. The program developed its Mac version to help Mac users transfer Samsung files. With it, you can transfer contacts, call logs, messages, videos, photos, notes, calendars, device settings, and other files on Mac. The software supports Blackberry, iOS, and Android devices.
It allows you to sync contacts and calendars to the computer, backup & restore your whole Samsung device, or selectively backup a part of files to your Mac. However, it may be a little hard for some users to find out a file to transfer from the internal memory, because it does not support to preview the files before data transferring.
Here are the steps to transfer files with Samsung Smart Switch on Mac:
Step 1. Connect Samsung phone to your Mac via a USB cable.
Step 2. Launch the program on the Mac. You need to unlock your phone if it is locked. If it prompts you whether to allow access to the phone data, just click ALLOW on your Samsung Galaxy. Then, the program will recognize your Samsung Galaxy.
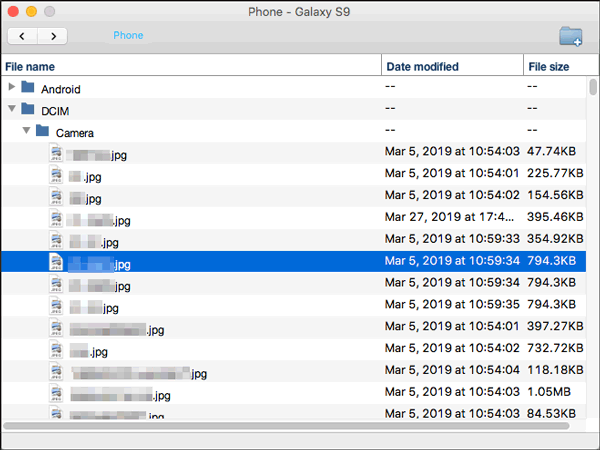
Step 3. On the main interface, you can click on the name of your phone, and you can see a folder beside the Internal memory, just open it.
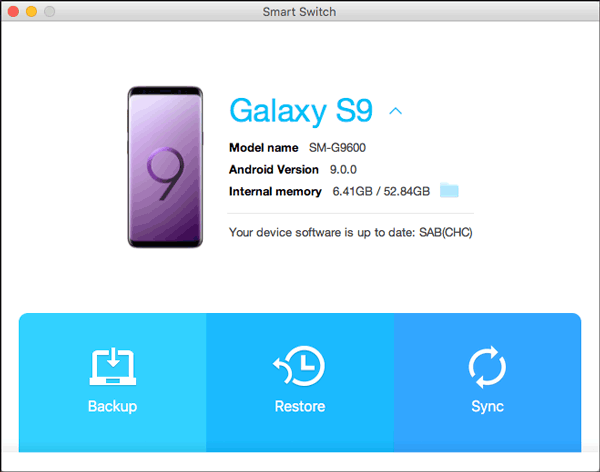
Step 4. After open the internal memory, you can see a list of files. Please go to the folder that contains your wanted contents. Simply choose the items, drag them to a local folder. And the files you have chosen are now transferred to the Mac.
Part 3. Using A USB Cable with The Help of Android File Transfer
When it comes to transfer 10 pieces of photos, several media files or documents to the Mac, you can use Android File Transfer to help you find out your wanted Samsung files on the Mac. All you need is a USB cable and downloading Android File Transfer on your Mac.
However, contacts, call logs and text messages are not supported in this way. What’s more, it may be a bit hard for some users to find out their wanted files for transferring.
Here’s how:
Step 1. Download Android File Transfer on the Mac. Once done, drag it to the Applications folder.
Step 2. Connect Samsung device to the Mac via a USB cable. Please make sure that your device is unlocked. The software will detect your phone automatically. After that, you can see the name of your phone on the program interface on Mac.
Step 3. Click your device’s name, you can see a list of files. Now please open a folder and select the items that you want to copy, drag them to a local folder. You can even drag and drop a folder from Samsung to the Mac. And the files you have chosen are now transferred to the computer.
![]()
Wrapping Up
This article covers two free tools (Smart Switch & Android File Transfer) and a professional Samsung file transfer software for Mac users to transfer files. However, the free tools are not user-friendly when you need to find out the files from a list of folders to copy to the Mac. Samsung Messages Backup can help you choose files much more effectively. Why not have a try:
Источник


