- Как передавать файлы между Android и Linux
- Linux не видит Android телефон
- Передача файлов с/на телефон без провода
- Настройка автоматического подключения телефона
- Настройка автоматического монтирования флешек телефона
- How to Transfer Android Files to a Linux Desktop
- Keeping your android device synced with linux isn’t hard
- What You’ll Need
- Installing the GNOME Shell Extension
- Set Up Your GNOME Desktop to Connect
- Install KDE Connect
- Connecting Android and Linux
- Sending Files
- Sending From Linux to Android
- How to Install Android File Transfer for Linux on Ubuntu
- Installing Android file transfer for Linux
- Karim Buzdar
- How to Install Android File Transfer for Linux
- Install Android File Transfer on Ubuntu
Как передавать файлы между Android и Linux
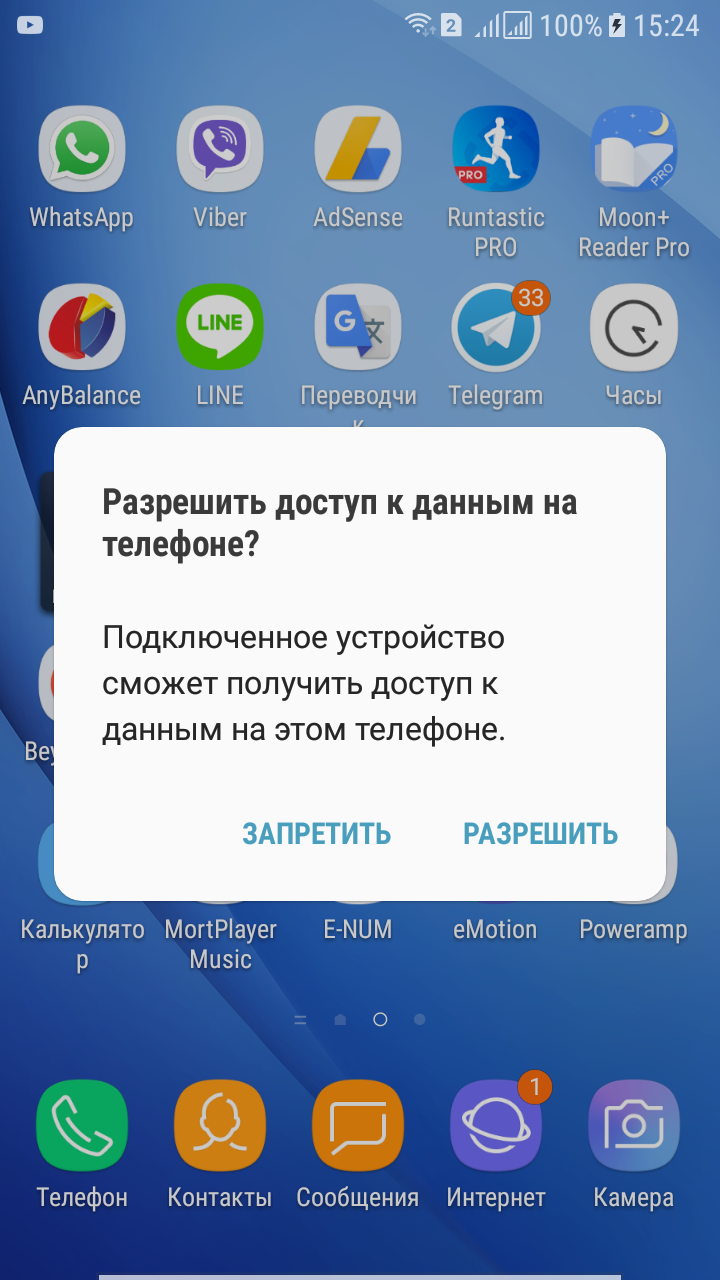
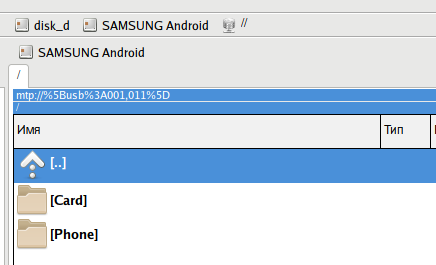
В настоящее время многие дружественные к пользователю дистрибутивы уже настроены на загрузку файлов на телефон Android с Linux и для скачивания фотографий и любых других файлов с телефона на Linux. Поэтому достаточно подключить телефон к компьютеру по USB кабелю, затем в телефоне разрешить обмен данными по USB и в Linux вы увидите содержимое телефона, а также его карты памяти прямо в файловом менеджере (проводнике).
Тем не менее эта функциональность присутствует не на всех версиях Linux, либо вы можете столкнуться с проблемами, что что-то не работает. Эта инструкция поможет вам настроить с нуля обмен файлами между Android и Linux, а также разобраться в возможных проблемах, почему Linux не видит телефон.
Linux не видит Android телефон
Если вы подключили Android телефон к Linux, но ничего не происходит и, в особенности, телефон не спрашивает разрешение на передачу данных, то начните с самого простого — попробуйте использовать другой USB провод. Некоторые кабели просто не способны передавать данные, так как там отсутствуют необходимые для этого контакты. Также выполните такие простые действия как перезагрузка компьютера и перезагрузка телефона.

Если там будет показано что-то вроде:
То есть если будет строка «No raw devices found.», значит нужно обратить внимание на кабель.
Если появится сообщение об ошибке (команда не найдена), то в Debain и производных (Ubuntu, Linux Mint, Kali Linux) установите необходимые пакеты:
В Arch Linux и производных:
Передача файлов с/на телефон без провода
Прежде всего, отметим, что вам не нужен USB для передачи файлов с телефона и на телефон. Вы можете передавать файлы с/на Android устройства используя Wi-Fi сеть вашего устройства — то есть вам не нужно настраивать роутер или что-то ещё. Просто установите приложение Airdroid на ваше устройство Android. Затем активируйте Мобильную точку доступа Wi-Fi на вашем устройстве и откройте программу Airdroid.
Теперь с вашего компьютера подключитесь к точке доступа, которую создал ваш телефон. На компьютере в любом веб-браузере откройте URL адрес, которую вам даст Airdroid. Будут запрошены разрешения, нажмите Подключить.
Вот и всё! Работает на любом операционной системе, у которой есть веб-браузер, то есть везде.
Настройка автоматического подключения телефона
В настоящее время окружения рабочего стола сами монтируют телефон при его подключению к Linux. Если этого не происходит, значит не хватает каких-то необходимых пакетов.
В Debain и производные (Ubuntu, Linux Mint, Kali Linux) проверьте и, в случае отсутствия, устаовите:
- libmtp9
- fuse
- gvfs
- gvfs-fuse
- gvfs-backends
В Arch Linux и производных установите:
Обратите внимание, что в репозиториях Arch Linux также присутствует пакет fuse3 — можете попробовать установить его вместо fuse2.
Подключите телефон к компьютеру и на телефоне разрешить обмен данными:
Если установка пакетов не помогла, попробуйте перезагрузить компьютер, также проверьте файл fuse.conf:
Найдите строку с #user_allow_other и убедитесь, что она раскомментирована, то есть выглядит так:
Настройка автоматического монтирования флешек телефона
Если вы отключили автоматическое монтирование устройств на уровне системы, то вы можете настроить автоматическое монтирования телефона с помощью правил udev.
В выводе команды mtp-detect найдите значение idVendor и idProduct.

Можно использовать следующие команды для ускорения процесса
Создайте файл с udev правилом:
в нём разместите следующее содержимое:
К примеру, мои данные:
Тогда моё правило выглядит так:
Чтобы это правило вступило в силу без перезагрузки компьютера выполните:
Отредактируйте файл fuse.conf:
Найдите строку с #user_allow_other и раскомментируйте её, чтобы получилось:
Источник
How to Transfer Android Files to a Linux Desktop
Keeping your android device synced with linux isn’t hard
:max_bytes(150000):strip_icc()/JackWallen-56a71ed248bb42a48cf703edd2a2c3b4.jpg)
Android runs on the Linux kernel, so it would make perfect sense that the two should be able to pair with one another out of the box. That is, unfortunately, not the case. The good news is it’s actually quite easy to pair these two systems, with the help of two third-party tools.
Once you have these tools installed, you’ll be able to transfer files from your Android device, to your Linux desktop, like a pro.
What You’ll Need
You’ll obviously need an Android device and a Linux desktop to make this happen. The Linux machine will need to be running the GNOME Desktop Environment. On your Android device, you’ll need the KDE Connect app (found in the Google Play Store).
Installing the GNOME Shell Extension
To make the connection between Android and Linux, a GNOME Extension must be first installed. To do this, follow these steps:
Install a necessary dependency with the command:
sudo apt install chrome-gnome-shell
Point your web browser to the GSConnect GNOME Shell Extension page.
If prompted, select Click here to install browser extension.
:max_bytes(150000):strip_icc()/androidlinuxa-5c65b38b46e0fb00015e77fd2-0f2ef29c9f634447b329c6b10e7613f8.jpg)
When prompted, press Add.
:max_bytes(150000):strip_icc()/androidlinuxb-5c65b3ba46e0fb000178c0a02-a0723dd2b2604df2944ef9e9019896c2.jpg)
Slide the On/Off slider so it’s in the On position.
:max_bytes(150000):strip_icc()/androidlinuxc-5c65b3e546e0fb0001cec2242-09001d0daf464a33a730f2bc231dfb10.jpg)
When prompted, press Install.
:max_bytes(150000):strip_icc()/androidlinuxd-5c65b40dc9e77c00017552662-ee2256b19fa5419bab927c0e8f5cc2f2.jpg)
The GSConnect extension is ready to use.
Set Up Your GNOME Desktop to Connect
Before you connect your phone to transfer files, you’ll need to do a bit of configuration on your Linux desktop.
Connect your Android device to your computer with the proper USB cable.
Select the GNOME System Tray in the upper right corner of the desktop.
:max_bytes(150000):strip_icc()/androidlinuxe-5c65b471c9e77c0001e75bf9.jpg)
You should now see a new entry in the drop-down, labeled Mobile Devices.
Select it to expand that entry. Then, select Mobile Settings.
Your Android device should appear in the GSConnect window.
Install KDE Connect
On your Android device, install KDE Connect with the following steps:
Open up the Google Play Store on your Android device.
Search for KDE Connect.
Locate and tap the entry by the KDE Community.
Tap Install.
Allow the installation to complete.
Connecting Android and Linux
Once both components are installed, go back to your Android device, open KDE Connect and tap GSConnect (under AVAILABLE DEVICES).
In the next window, tap REQUEST PAIRING. This will send a pair request to the GNOME desktop. A popup will appear on the desktop. Press Accept to OK the pairing.
:max_bytes(150000):strip_icc()/kdeconnect-pair-33ab32f599304438813902c29573c96d.jpg)
With the connection made, tap Filesystem expose in KDE Connect and then tap OK and Allow. Then tap Share and Receive and (when prompted) tap OK and Allow.
Sending Files
You should now see an entry (in the KDE Connect) app, labeled Send Files. Tap that entry to open the default Android file manager.
:max_bytes(150000):strip_icc()/kdeconnect-send-file-296a4205295b4741849f953526fc72bb.jpg)
From within the file manager, tap any one of the files and it will automatically be sent to your GNOME desktop. All files sent from Android to Linux will be found in your Downloads folder.
Sending From Linux to Android
You can also send files from Linux to Android, by opening the GNOME file manager, right-clicking the file to be transferred, and choose Send To Mobile Device > PHONE NAME (where PHONE NAME is the name of your Android device). All files sent from Linux to Android will be found in the Android Downloads folder.
Источник
How to Install Android File Transfer for Linux on Ubuntu
We often need to exchange a large amount of data including documents, mp3 files, videos, pictures among Linux and Android devices. Although using wireless technology, you can transfer data between them but transferring via USB cable is a reliable and fast way. For Linux users, we have a tool available known as Android File Transfer that can help us to transfer our data between Android devices and Linux based systems using a USB cable.
Android File Transfer is an MTP client tool that is used to transfer files from android devices to Linux OS and from Linux OS to Android devices. It is similar to Android File Transfer that is available for Mac OS and has a very minimalistic and easy to use interface.
Android file transfer for Linux supports the following features:
- Download/Upload files and directories
- Create new directories
- Supports drag and drop feature
- Delete files from Android device
- A dialog box to view the progress of file transfer
Installing Android file transfer for Linux
Step 1: Connect your Android device with your computer using a USB cable. When prompted on Android device for allowing access to the device data, tap on Allow to allow access.
Step 2: Launch Terminal by pressing Ctrl+Alt+T key shortcut. Then you will need to update our system by adding the PPA to your list of software sources. For this, run the following command in Terminal:

Step 3: Once completed, run the following command in Terminal to update the repository.

Step 4: After your local repository is updated, run the following command in Terminal to install Android file transfer:

Step 5: Once the installation is completed, you can launch the Android file transfer from the Ubuntu Dash menu. When it will launch, you will see the following interface. You can use it to upload, download and remove files from your Android device.

So, that was we all need for installing Android file transfer for Linux. It was a very quick and straightforward method that you can use to transfer files from your Android to Ubuntu or vice versa. Advertisement
Karim Buzdar
About the Author: Karim Buzdar holds a degree in telecommunication engineering and holds several sysadmin certifications. As an IT engineer and technical author, he writes for various web sites. You can reach Karim on LinkedIn
Источник
How to Install Android File Transfer for Linux
If you struggle to mount your Android phone on Ubuntu you should give Android File Transfer for Linux a try.

This free, open source app is a clone of Google’s Android File Transfer app for macOS.
This one is built with Qt (meaning it looks decent on Linux) and its simple UI makes it easy to transfer files and folders to and from your Android smartphone and your Ubuntu machine.
Now, chances are a few of you will be scratching your head wondering what this app does that Nautilus, the default file manager in Ubuntu, doesn’t.
And the answer is nothing.
When I connect my Nexus 5X (and remember to select the MTP option) to my Ubuntu system I can browse, open and manage files on it using Nautilus, as though my phone was a regular USB drive, thanks to GVfs:
But this doesn’t work for everyone.
Some people encounter issues with this (and other MTP implementations), such as directories not loading, directory creation that doesn’t “stick”, and issues using a device inside of a media player app like Rhythmbox.
And it’s for those people whom Android File Transfer for Linux is designed.
Consider it an alternative way to mount MTP devices on Linux. If what you use currently works then stick with it. But if other methods don’t work for you, give this a try.
The app features:
- A straightforward user interface
- Drag and drop support (Linux to Phone)
- Batch downloading (Phone to Linux)
- Transfer progress dialogs
- FUSE wrapper
- No file size limits
- Optional CLI tool
If there’s a ‘downside’ to using this app it’s that you can only see file and folder names, not a thumbnail preview or any other data.
Install Android File Transfer on Ubuntu
That’s enough waffle about this alternative way to mount your Android phone, on to the nitty gritty of installing it.
A PPA is available for users on Ubuntu 14.04 LTS and 16.04 LTS.
To add the PPA to your list of software sources run this command:
Then, to install Android File Transfer for Linux on Ubuntu, run:
If you use Ubuntu 18.04 LTS or later (or a different Linux distribution entirely) download the AppImage below:
App Images provide a ‘standalone’ runtime that does not need to be installed. To “run” it, give it the permissions in this screenshot:
Before running Android File Transfer do make make sure that no other devices (such as Nautilus) mount your phone first.
If you phone is mounted via another method the app will report “no MTP device found”. To fix, unmount your device from Nautilus (or whichever app is using it) then relaunch Android File Transfer.
Home » Apps » How to Install Android File Transfer for Linux
Источник


