- How to Transfer Data from iPhone to Windows Phone
- Method 1. To transfer different data from iPhone to Windows phone respectively
- Portion 1. Transfer contacts to Windows phone
- Portion 2. Transfer messages to Windows phone
- Portion 3. Transfer calendar to Windows phone
- Portion 4. Transfer media files including photos, audios and videos to Windows phone
- Method 2. To transfer data from iPhone to Windows phone with dr.fone
- The main features of dr.fone – PhoneTransfer are listed below:
- The referenced tutorial is offered in the following passages:
- Step 1. Download and install the dr.fone
- Step 2. Connect your phones to your computer
- Step 3. Choose the file types for transferring
- Step 4. Start the transferring process
- Method 3. To transfer data from iPhone to Windows phone with the SHAREit
- Transfer files between iPhone and your computer
- Transfer files between iPhone and your Mac
- Transfer files between iPhone and your Windows PC
- How to Transfer files from iPhone to PC
- Method 1. Transfer Files from iPhone to PC with iTunes File Sharing
- To copy files from iPhone to PC with iTunes File Sharing using USB:
- Method 2. Copy Files from iPhone to PC with iPhone Transfer Software
- To transfer files from iPhone to PC:
- Method 3. Import Files from iPhone to PC Using iCloud
- To download files from iPhone to PC:
- Method 4. Sync Files from iPhone to PC Using iCloud Drive
- To copy files from iPhone to PC with iCloud Drive:
- Method 5. Transfer Files from iPhone to PC via Dropbox
- To move files from iPhone to PC with Dropbox:
- Method 6. Transfer Photos from iPhone to Windows via File Explorer
- To transfer photos from iPhone to PC:
- Bonus Tip: How to Transfer Files from PC to iPhone
- The Bottom Line
How to Transfer Data from iPhone to Windows Phone
![]()
After buying a new Windows phone, you may want to transfer all the important data from your old iPhone to your new Windows phone. So in this article, you will surely find the very method that you like.
Method 1. To transfer different data from iPhone to Windows phone respectively
It may seams trouble at first sight, but it is useful when there are just a few different kinds of important data on your old iPhone.
Portion 1. Transfer contacts to Windows phone
For the Gmail or other emails, you can simply log in the account on your new Windows phone to get access to the contacts without hassle. But for the contacts on the iPhone itself, you can do like this:
- 1. Download the iTunes on your computer and launch it.
- 2. Connect your iPhone to your computer.
- 3. Go to the “iPhone” > “Info” > “Outlook”, and then check the item of “Sync Contacts”.
- 4. Then, you can choose the contacts that you want, and click on the “Apply” button to start the syncing process.
- 5. After that, all the selected contacts will appear on your Outlook account, which is easy to get if you log in it on your Windows phone.
Portion 2. Transfer messages to Windows phone
It is a pity that there is no way to transfer the messages directly from your iPhone to your Windows phone. But you can use some third party tools to help you. Or you can transfer the messages in the formats of PDF or CSV to your computer first, and then transfer to your new phone. However, you can not get those files as messages on your new phone.
Portion 3. Transfer calendar to Windows phone
The calendar carries so much important information about birthday or some other big event that it is of signification to transfer it to the new Windows computer.
- 1. Download and install the iTunes on your computer.
- 2. Launch the iTunes. And connect your iPhone to your computer with a USB cable.
- 3. Choose the “iPhone” option, and tap on the “Info” option and then check the “Sync Calendar with” option and click on the “Outlook” button.
- 4. Then choose the calendar that you want to transfer to your Windows phone, and tap on the “Apply” button to start the process.
- 5. Soon, you will find the calendar selected transferred to your Outlook account.
- 6. Log in the Outlook with your Windows phone, and download the calendar.
Portion 4. Transfer media files including photos, audios and videos to Windows phone
The common way to transfer the photos between two phones is to use a computer as a transit point. You can transfer the photos from your iPhone to your computer first and then again from your computer to your Windows phone. By doing this, it is a bonus that those photos can be stored on your computer permanently unless you delete them. And you can transfer the audios and the videos in this way.
Pro of Method 1:
1. You can choose the specific items that you want.
Cons of Method 1:
1. It is time-consuming.
2. It is workable for just a few kinds of data.
Method 2. To transfer data from iPhone to Windows phone with dr.fone
dr.fone is now2days popular in the world. You will find many people on the Internet using this nice tool. As its name implies, the dr.fone – Phone Transfer specializes in transferring the data between different phones or tablets.
The main features of dr.fone – PhoneTransfer are listed below:
- 1. It supports many devices including iOS devices, Android devices, and Windows devices.
- 2. It is compatible with both the Windows computer and the Mac computer.
- 3. The interface of it is intuitive and the operation on it is simple.
- 4. It enables its users to transfer all kinds of data with a few clicks, including messages, contacts, calendars, photos, audios, videos.
- 5. It enables its users to create a backup for all kinds of data on their devices.
- 6. It enables its users to erase their phones for security purposes.
The referenced tutorial is offered in the following passages:
Step 1. Download and install the dr.fone
Before transferring the data, you need to download the dr.fone on your computer. Remember, there are two versions of this tool. You need to choose the suitable version for your computer. And then install it on your computer.

Step 2. Connect your phones to your computer
With two suitable USB cables, connect your phones to your computer. Make sure their positions are right. Or you can exchange them by the button of “Flip” in the middle.

Step 3. Choose the file types for transferring
On the little box, you can choose the files that you want to transfer with the help of this tool. There are messages, contacts, calendar, photos, music, videos and so on.
Step 4. Start the transferring process
After choosing the files, you need to click on the “Start Transfer” button to start the process. And in a few minutes, you will get all the desired files on your new Windows phone.

Pros of Method 2: 1. It is easy to use.
2. There are many other functions of this tool.
Cons of Method 2:
1. It is not a free application.
Method 3. To transfer data from iPhone to Windows phone with the SHAREit
The SHAREit is a free app for both the Windows phone and the iPhone. It can help you transfer the contacts, photos, videos, and music between two phones. The different thing is this app is for the phones only, so you need to connect your phones with the WIFI.

Step 1. Download the SHAREit on both of your phones (for iPhone & for Windows Phone).
Step 2. Launch the SHAREit on both phones. Connect your phones to the same stead network.
Step 3. Click on the “Send” button on your iPhone and the “Receive” button on your Windows phone.
Step 4. Choose one kind of file on your iPhone, and then click on the “Transfer” button. And then repeat the operation until you transfer all kinds of files.
Pro of Method 3: 1.It is free.
Cons of Method 3:
1.You can not transfer the messages and calendar with this tool.
2.You need to repeat the operations for many times if you want to transfer several kinds of different files.
Track locations, messages, calls, and apps.
Do it remotely and 100% discreetly.
Transfer files between iPhone and your computer
You can use iCloud Drive to keep your files up to date and accessible on all your devices, including Windows PCs. You can also transfer files between iPhone and other devices by using AirDrop and sending email attachments.
Alternatively, you can transfer files for apps that support file sharing by connecting iPhone to a Mac (with a USB port and OS X 10.9 or later) or a Windows PC (with a USB port and Windows 7 or later).
Transfer files between iPhone and your Mac
Connect iPhone to your Mac.
You can connect using USB, or if you set up Wi-Fi syncing, you can use a Wi-Fi connection.
In the Finder sidebar on your Mac, select your iPhone.
Note: To use the Finder to transfer files, macOS 10.15 or later is required. With earlier versions of macOS, use iTunes to transfer files.
At the top of the Finder window, click Files, then do one of the following:
Transfer from Mac to iPhone: Drag a file or a selection of files from a Finder window onto an app name in the list.
Transfer from iPhone to Mac: Click the disclosure triangle beside an app name to see its files on your iPhone, then drag a file to a Finder window.
To delete a file from iPhone, select it below an app name, press Command-Delete, then click Delete.
Transfer files between iPhone and your Windows PC
Connect iPhone to your Windows PC.
You can connect using USB, or if you set up Wi-Fi syncing, you can use a Wi-Fi connection.
In iTunes on your Windows PC, click the iPhone button near the top left of the iTunes window.
Click File Sharing, select an app in the list, then do one of the following:
Transfer a file from your iPhone to your computer: Select the file you want to transfer in the list on the right, click “Save to,” select where you want to save the file, then click Save To.
Transfer a file from your computer to your iPhone: Click Add, select the file you want to transfer, then click Add.
To delete a file from iPhone, select the file, press the Delete key, then click Delete.
File transfers occur immediately. To view items transferred to iPhone, go to On My iPhone in the Files app  on iPhone. See View files and folders in Files on iPhone.
Important: Syncing has no effect on file transfers, so syncing doesn’t keep transferred files on iPhone up to date with the files on your computer.
How to Transfer files from iPhone to PC
Six proven ways to help you transfer files from iPhone to PC. Whether you want to transfer photos, videos, music, PDFs, or documents, you can get things done using one of the tips below. The ways to transfer files from PC to iPhone are also provided.
File transfer between an iPhone and a computer is needed often in our daily lives. We may find ourselves need to transfer files from iPhone to PC or transfer files from PC to iPhoneВ at one time or another due to reasons like making a backup of precious data, enriching device content, or purely file sharing. The files we want to transfer may be photos, videos, contacts, messages, PDFs, Excel files, Word documents, or other items.В
Here I’d like to show you sixВ effective ways to transfer files from iPhone to computer in detail.В The most suitable way for you varies depending on the specific file type you want to copy.В Read on and carry out the solution that fits your needs best. Given that you may need to transfer files between your iPhone and your computer, the ways to transfer files from PC to iPhone are also provided.
Method 1. Transfer Files from iPhone to PC with iTunes File Sharing
Applies To: Documents created by Keynotes, Numbers, Pages, or other apps that work with File Sharing
iTunes File Sharing is mainly designed to share files between your computer and a supported app on your iPhone/iPad. If you are sure the files you want to transfer are created by an app that works is compatible with File Sharing, you can transfer content from iPhone to computer using this feature.
iTunes File Sharing allows you to transfer files from iPhone to PC using a USB cable or over a Wi-Fi connection. If you prefer to send files over Wi-Fi, you need to set up Wi-Fi syncing first according to the guide provided by Apple.
To copy files from iPhone to PC with iTunes File Sharing using USB:
Step 1. Connect your iPhone your computer and launch iTunes if it doesn’t run automatically.
Step 2. In the iTunes window, click the «Device» tab and select «File Sharing».
Step 3. Select the app shown in the list from which you want to transfer files to PC.
Step 4. Select the files you want to move to computer and click «Save to».
Step 5. Select a location to save the items and click «Save to» to start transferring files from your iPhone to the computer.
![]()
Method 2. Copy Files from iPhone to PC with iPhone Transfer Software
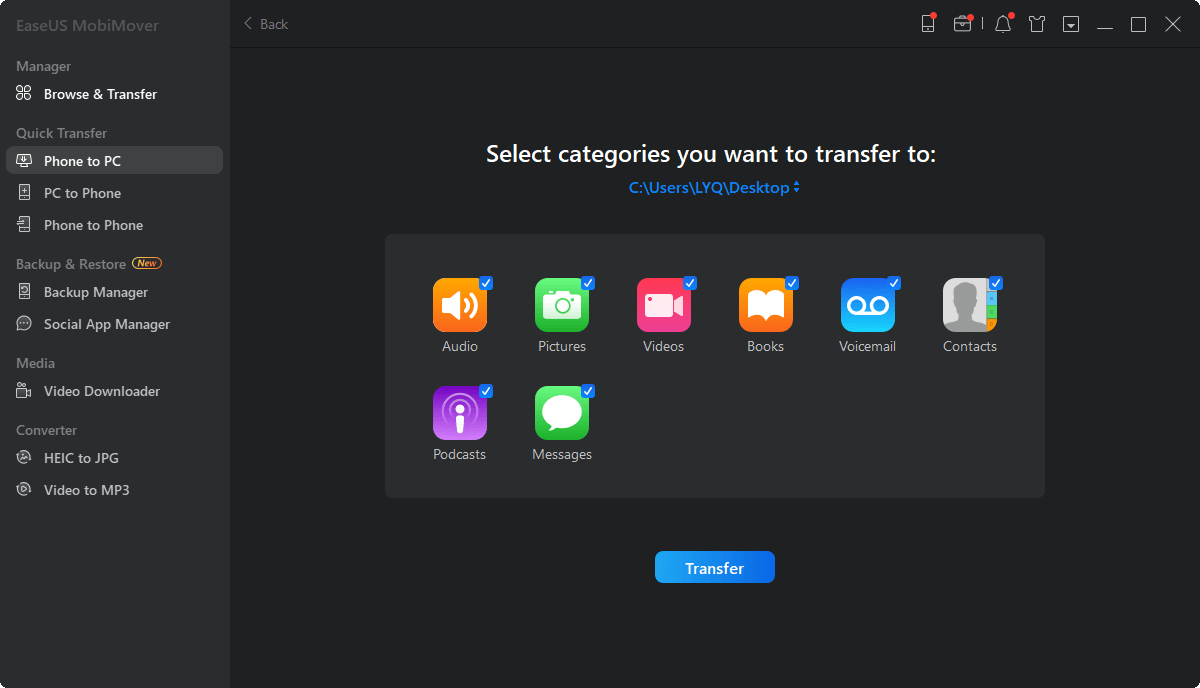
Applies To: Photos, Videos, Audio Files, Contacts, Messages, Podcasts, Books.
As professional iOS data transfer software, one of the main features of EaseUS MobiMoverВ is to transfer files between iPhone and computer, be it a PC or Mac. With it, you can not only transfer files from iPhone to PC but also add contents to your iPhone from computer. Besides, you are able to transfer data from one iOS device to another using this tool. Whether you want to transfer all supported files at once or copy items selectively, it will help.
To transfer files from iPhone to PC:
Step 1.В Connect your iPhone to your PC with a USB cable.В Then launch EaseUS MobiMover and go toВ «Phone to PC» > «Next».

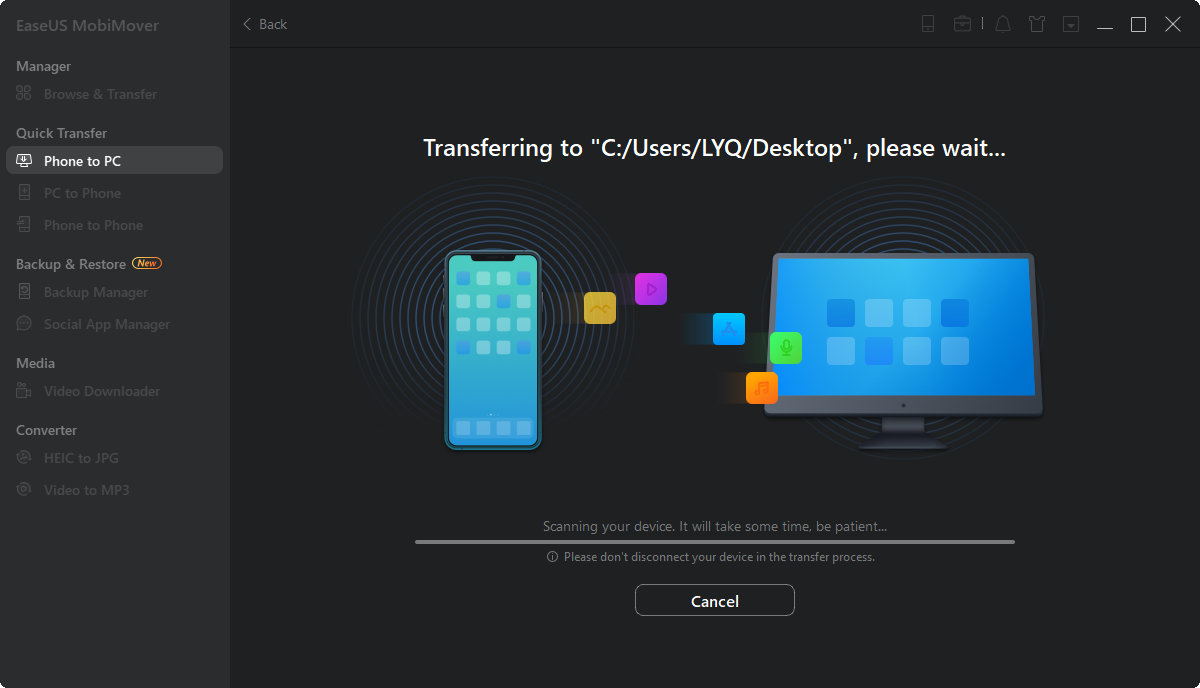
Step 2.В Check the types of files you want to transfer andВ click «Transfer». You can specify a location to keep the transferred items in advance. Otherwise, they will be placed on Desktop by default.
Step 3.В Wait for the transfer process to finish. When it has done, go to the selectedВ folder to check the items.
Don’t hesitate to use the reliable software to transfer files from iPhone to PC. It’s a versatile tool that supports Apple devices like iPhone, iPad, and iPod and has extra amazing features like video download and iPhone unlock.
Method 3. Import Files from iPhone to PC Using iCloud
Applies To: Photos, Contacts, Calendars, Reminders, Notes, and more
If you want to transfer files from iPhone to computer wirelessly, using iCloud to sync data from your iOS device to a PC or Mac is what you will like. The requirements for using iCloud include the same Apple ID on the devices, stable network connection, and enough iCloud storage space. Make sure the requirements are met and then follow the steps below to transfer files from your photo library, contact list, and more to the computer using iCloud.
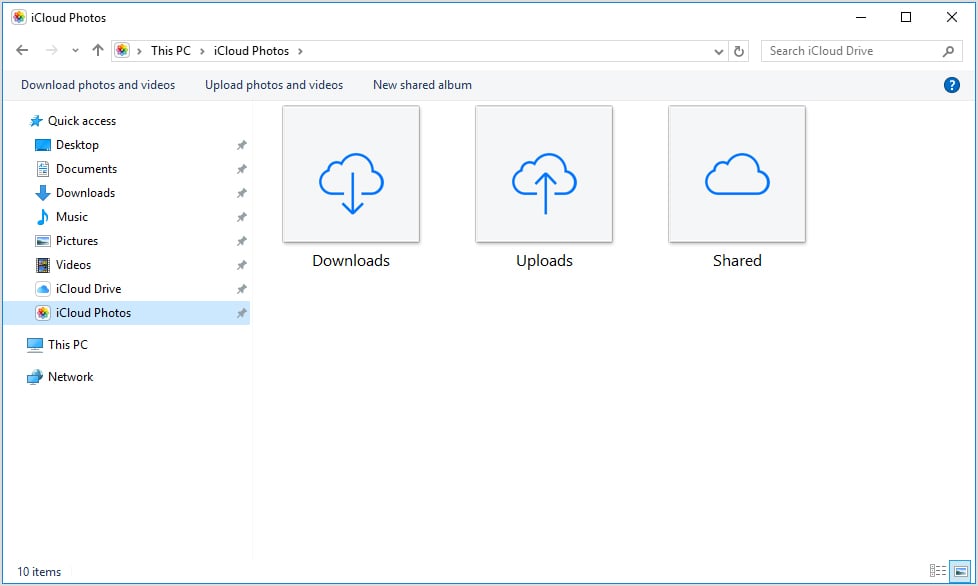
To download files from iPhone to PC:
If you have installed iCloud for Windows:
Step 1. Open «Settings» on your iPhone and go to [your name] > «iCloud».
Step 2. Toggle on the option accordingly. For example, if you want to transfer photos from iPhone to PC, select the «Photos» option and turn on «iCloud Photos».
Step 3. Open iCloud for Windows on your computer and turn on the corresponding option. Then you can access the files on your iPhone from PC.
![]()
If you didn’t install iCloud for Windows:
Step 1. Open «Settings» on your iPhone, go to [your name] > «iCloud» and turn on the option according to the file you want to transfer.
Step 2. On your PC, go to iCloud.com and sign in with the Apple ID you use on the iPhone.
Step 3. Select the category you intend to copy.
Step 4. Choose the items you want to transfer and then download them to your PC.
![]()
Method 4. Sync Files from iPhone to PC Using iCloud Drive
Applies To: Excel, Word, PowerPoint Files
As you may know, iCloud Drive is an option in iCloud and is helpful to sync documents across your devices on which iCloud Drive is enabled. To transfer files from iPhone to PC using iCloud Drive, you first need to add the items to iCloud Drive on your iPhone and then access or download them on the computer. Here are the details:
To copy files from iPhone to PC with iCloud Drive:
Step 1. On the iOS device, go to the «Settings» app and select [your name] > «iCloud».
Step 2. Scroll down to enable «iCloud Drive».
Step 3. Open the «Files» app and select «Browse» > «iCloud Drive». Search for the files you attempt to copy to your PC and upload them to iCloud Drive.
Step 4. If you have downloaded and set up iCloud for Windows, go to the iCloud Drive folder in File Explorer to access the files from your iPhone. If not, go to iCloud.com, sign in with your Apple ID, choose «iCloud Drive» among the options and then select and download the files to your PC.
While using iCloud services, you may encounter issues like «iCloud Drive not syncing». If you do, stay calm and follow the troubleshooting guide to solve the problem.
Method 5. Transfer Files from iPhone to PC via Dropbox
Applies To: Photos, Videos, Audios, Documents.
Dropbox, like iCloud, is a cloud service that helps you transfer files without using a USB cable. Instead, you need to download and install the Dropbox app on both your source device and target device to upload and download the files you want to share.
To move files from iPhone to PC with Dropbox:
Step 1. Download and install Dropbox on your devices and sign in with the same account.
Step 2. To transfer files from iPhone to PC, upload the items to Dropbox on your iOS device first. If you transfer a file from PC to iPhone, upload the file to Dropbox from PC.
Step 3. Go to Dropbox on your PC and then you can see the files you just uploaded. Select the items and download them to your computer.
![]()
Method 6. Transfer Photos from iPhone to Windows via File Explorer
Applies To: Photos and Videos in Camera Roll
If the content you are looking to copy is photos and videos in your iPhone camera roll, the easiestВ way for you is to use Windows File Explorer. It allows you to transfer photos and videos from iPhone to PC directly via a USB cable.В No third-party software is needed.
To transfer photos from iPhone to PC:
Step 1. Connect the iOS device to PC with a USB cable.
Step 2. Unlock the iPhone and trust the computer.
Step 3. Go toВ «This PC» >В «[your iPhone name]» > «Internal Storage» > «DCIM» > «100APPLE».
Step 4. Manually copy the photos and videos you want to transfer from your iPhone to PC.
![]()
If you need to, you can also learn other ways on how to transfer photos from iPhone to PC.
Bonus Tip: How to Transfer Files from PC to iPhone
You may currently need to copy files from iPhone to PC. But there will be times when you will need to transfer files from PC to iPhone. Speaking of file transfer from PC to iPhone, all of the ways above are also applicable to get it done. In addition, you can use iTunes syncing to transfer photos, movies, music, books, and more from PC to iPhone.
To transfer files from PC to iPhone with iTunes syncing:
Step 1. Connect the iPhone to the computer with a USB cable.
Step 2. After iTunes recognizes the iPhone, click «Device» and select the category you want to transfer.
Step 3. Check the «Sync [category]» option and select the items you want to copy.
Step 4. Click «Apply» to start syncing files from PC to iPhone.
![]()
The Bottom Line
«How to transfer photos from iPhone to PC?»
«How to transfer files from iPhone to PC without iTunes?»
I believe you are so clear about the answers now. If you are an iPhone user, learning these tips will do great help whenever iOS data transfer is needed. Whether you want to transfer files from PC to iPhone or vice versa, these solutions are applicable.
All the tips aboveВ can also be applied to transfer files from iPhone to Mac or copy files from iPad to computer. Command them and you will help yourself out in many iOS data transfer situations.
о™љо™љо™љо™љо™љ
4.5 out of 5 stars, based on 10 votes
EaseUS MobiMover allows you to easily transfer all data from your iPhone to your PC. The app is available for both Windows and Macs so irrespective of which platform you use, you are covered.

EaseUs MobiMover solves this problem as it allows you to transfer data from an iPhone to a Mac, Mac to an iPhone, or from one iPhone to another iPhone fast.

EaseUS MobiMover is a program that allows you to share files between your iOS device and your PC in an easy manner. This is very useful, since both operative systems are not compatible.

EaseUS MobiMover for Mac and PC is a powerful tool for transferring data from your Apple mobile device to your computer, managing the variety of files that you create, and moving those huge videos quickly.

Related Articles — ALSO ON EaseUS SOFTWARE


