- Transfer photos and videos from your iPhone, iPad, or iPod touch
- iCloud Photos
- Import to your Mac
- Import to your PC
- How to Transfer Photos from iPhone to PC Windows 7
- Method 1. Transfer Photos from iPhone to PC with EaseUS MobiMover
- Method 2. Copy Photos from iPhone to PC Windows 7 with AutoPlay
- Method 3. Import Photos from iPhone to PC Running Windows 7 via File Explorer
- Method 4. Transfer Photos from iPhone to Computer with iCloud
- Method 5. Export Photos from iPhone to Computer viaВ Email
- The Bottom Line
- How to Transfer Photos from Phone to Computer
- 5 ways to Transfer Photos Between Phone and Computer
- Introduction
- How to Transfer All Photos from iPhone to PC: TouchCopy
- Try TouchCopy free ▼
- Copy camera roll photos from iPhone to PC: Windows Photos App
- Transferring All Photos from iPhone to Mac: TouchCopy
- Try TouchCopy free ▼
- Copy camera roll photos from iPhone to Mac: Mac Photos App
- How to Transfer Photos from Android phone to PC over WiFi
- Try Droid Transfer free ▼
- How to Transfer Photos from Android phone to computer over a USB Connection
- Transferring photos from Android phone to Mac: Android File Transfer
- Syncing photos between computer and phone
Transfer photos and videos from your iPhone, iPad, or iPod touch
Learn how to transfer photos and videos from your iPhone, iPad, or iPod touch to your Mac or PC. You can also make your photos available on all your devices with iCloud Photos.
iCloud Photos
iCloud Photos keeps your photos and videos safe, up to date, and available automatically on all of your Apple devices, on iCloud.com, and even your PC. When you use iCloud Photos, you don’t need to import photos from one iCloud device to another. iCloud Photos always uploads and stores your original, full-resolution photos. You can keep full-resolution originals on each of your devices, or save space with device-optimized versions instead. Either way, you can download your originals whenever you need them. Any organizational changes or edits you make are always kept up to date across all your Apple devices. Learn how to set up and use iCloud Photos.
The photos and videos that you keep in iCloud Photos use your iCloud storage. Before you turn on iCloud Photos, make sure that you have enough space in iCloud to store your entire collection. You can see how much space you need and then upgrade your storage plan if necessary.
Import to your Mac
You can use the Photos app to import photos from your iPhone, iPad, or iPod touch to your Mac.
- Connect your iPhone, iPad, or iPod touch to your Mac with a USB cable.
- Open the Photos app on your computer.
- The Photos app shows an Import screen with all the photos and videos that are on your connected device. If the Import screen doesn’t automatically appear, click the device’s name in the Photos sidebar.
- If asked, unlock your iOS or iPadOS device using your passcode. If you see a prompt on your iOS or iPadOS device asking you to Trust This Computer, tap Trust to continue.
- Choose where you want to import your photos. Next to «Import to,» you can choose an existing album or create a new one.
- Select the photos you want to import and click Import Selected, or click Import All New Photos.

- Wait for the process to finish, then disconnect your device from your Mac.
Import to your PC
You can import photos to your PC by connecting your device to your computer and using the Windows Photos app:
- Make sure that you have the latest version of iTunes on your PC. Importing photos to your PC requires iTunes 12.5.1 or later.
- Connect your iPhone, iPad, or iPod touch to your PC with a USB cable.
- If asked, unlock your iOS or iPadOS device using your passcode.
- If you see a prompt on your iOS or iPadOS device asking you to Trust This Computer, tap Trust or Allow to continue.
If you have iCloud Photos turned on, you need to download the original, full resolution versions of your photos to your iPhone before you import to your PC. Find out how.
When you import videos from your iOS or iPadOS device to your PC, some might be rotated incorrectly in the Windows Photos app. You can add these videos to iTunes to play them in the correct orientation.
If you’re having trouble importing photos from your iOS or iPadOS device to Windows 10, try these steps:
- On your iOS or iPadOS device, open the Settings app. Tap Camera, then tap Formats.
- Tap Most Compatible. From now on, your camera will create photos and videos in JPEG and H.264 formats.
How to Transfer Photos from iPhone to PC Windows 7
By transferring photos from your iPhone to your computer, you can make a copy of important images, share precious pictures with your friends, or print beautiful photos. Whatever your purposes of exporting iPhone photos to PC, here areВ five methods to do it.В
Method 1. Transfer Photos from iPhone to PC with EaseUS MobiMover
By far, the easiest way to transfer pictures from iPhone to a PC running Windows 7/8/10 is to use anВ iPhone data transfer toolВ such as EaseUS MobiMover. With which you can transferВ entire iPhone photos to your PC, or you can export just a selection of pictures from your iPhone. The whole process doesn’t require an internet connection, so you don’t have to worry that your internet is unstableВ or there is no internet available.
To transfer photos from iPhone to PC running Windows 7/9/10:
Step 1. Connect your iPhone to PC running Windows 7 or later. Run EaseUS MobiMover, choose «Phone to PC» and click the «Next» button on the screen. This mode allows you to transfer data from iPhone to PC in one click.В

Step 2. MobiMover supports transferring audio, videos, pictures, books, contacts, messages, etc. from iPhone to PC. Here, choose «Pictures» only. MobiMover will save the files on your desktop by default. You can customize the path as you need.В
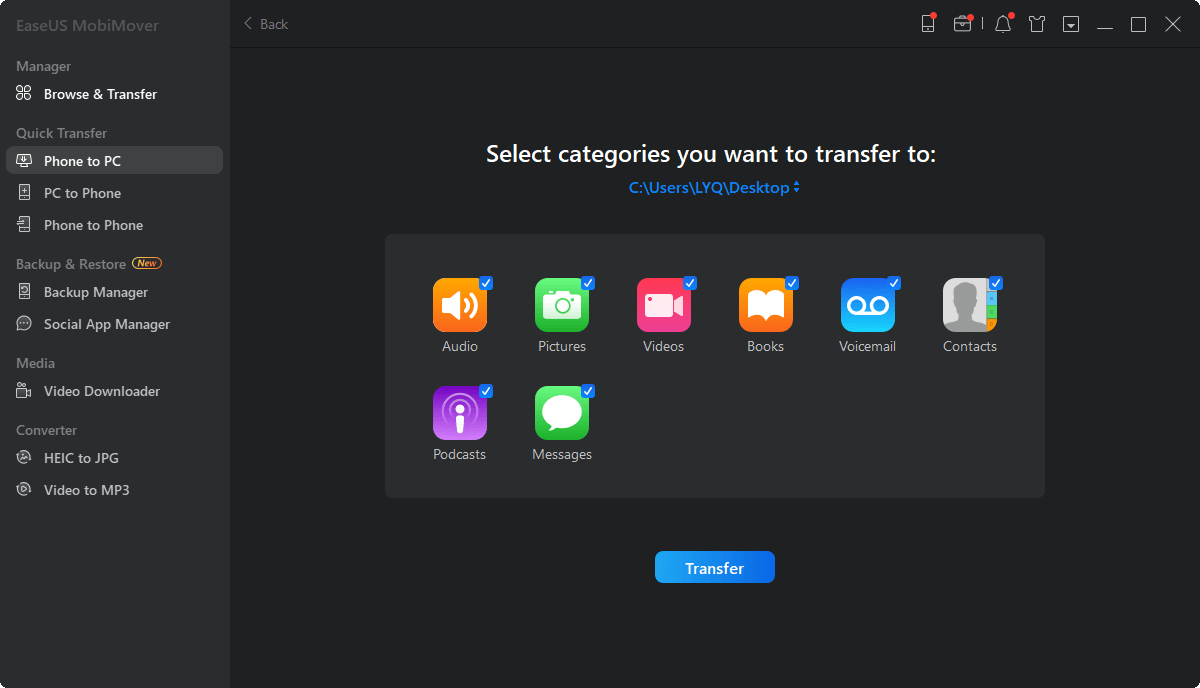
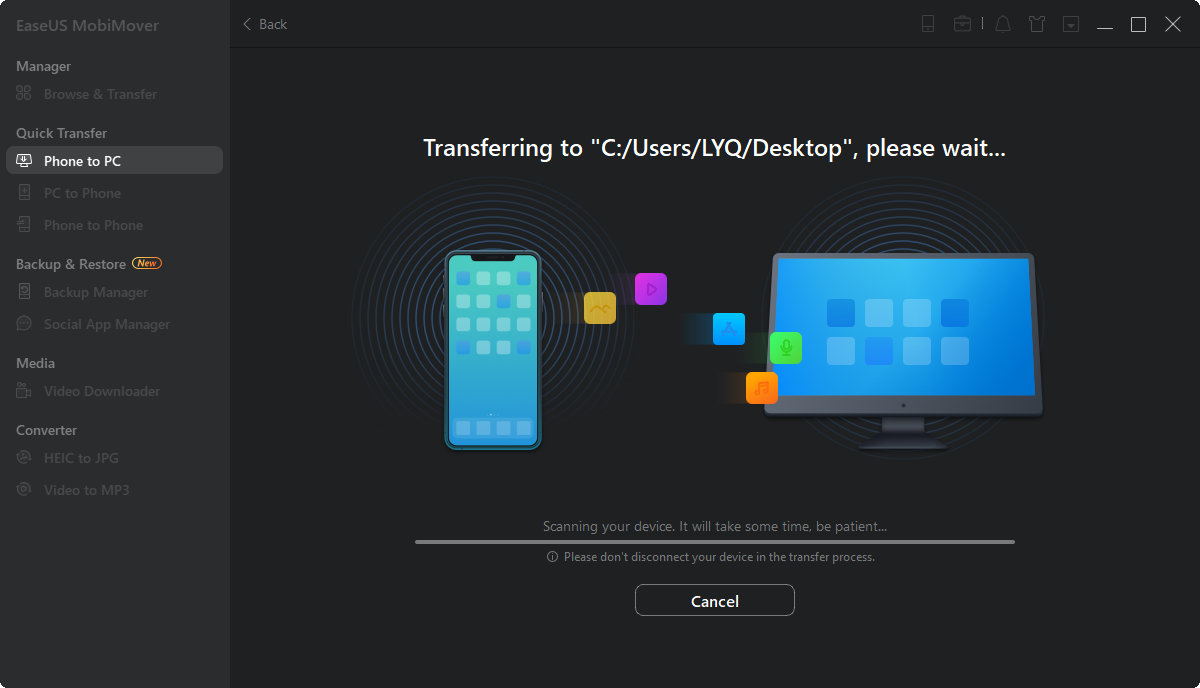
Step 3.В Now, click the «Transfer» button to start transferring photos from your iPhone to PC.В The transfer time depends on the file size. Wait patiently
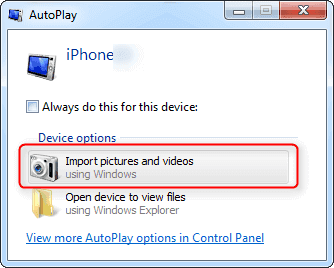
Method 2. Copy Photos from iPhone to PC Windows 7 with AutoPlay
If you don’t like using a third-party transfer tool, you can use Windows’s built-in feature — AutoPlay to transfer photos from your iPhone to your computer. To use this method, there are some additional things you should do.
- Download and install iTunes on your computer so that AutoPlay can read your iPhone data.В
- Prepare a USB cable.
- Unlock your iPhone using your password.
If everything goes smoothly, you can follow the steps below to finish the rest of the steps.
Step 1. Plug your iPhone into your PC using a USB cable.
Step 2. A prompt will appear on your iPhone asking you to «Trust This Computer,» tap «Trust.»
Step 3. The AutoPlay window will appear on your computer. Quickly click on it.
Step 4. Click «Import pictures and videos.» If AutoPlay fails to work,В fix «AutoPlay not working on Windows» here.
Step 5. Then, all of your pictures will be imported to your computer. You can findВ them in a folder called «My Pictures.» If you want to change the default location to store the transferred pictures, you can click «Import Setting» in the left corner bottom and then follow its on-screen instructions to do it.
Method 3. Import Photos from iPhone to PC Running Windows 7 via File Explorer
File Explorer is another free option to download pictures from your iPhone to your PC. As with the AutoPlay method shown above, you’ll need to download and install iTunes (the latest version) so that your Windows 7 computer can read your iPhone’s content. Then, follow these steps.
Step 1. Open Files Explorer by going to «This PC» > «Apple iPhone» > «Internal Storage» > DICM.
Step 2. Open the «DICM» folder, and then you’ll see all of your pictures and videos.
Step 3. Choose the pictures you want and copy them to another folder on your computer.В
![]()
Method 4. Transfer Photos from iPhone to Computer with iCloud
iCloud is a wireless option to export iPhone photos to a PC running Windows 7. Here are a few things you should know about using this method.В
- This method requires you to enable iCloud Photos on your iPhone. If you don’t, go to Settings > [your name] > iCloud > Photos > iCloud Photos. From here, you can enable and disable iCloud Photos.В
- Once you’ve enabled iCloud Photos on your iPhone, every new picture you take will be automatically synced to your iCloud photos when your iPhone connects to a WiFi network.В
- Every iCloud account comes with 5GB of storage, which can exceed easily if you transfer photos and videos that are in large size. If you have many photos to transfer, don’t forget to upgrade your iCloud storage plan. (Prices start at $0.99 a month for 50GB)
iCloud is a great feature to use if you want to access your iPhone photos on other devices. If you prefer to use it, here are the steps.
Step 2. Sign in to your iCloud account.
Step 3. Make sure the «Photos» option is enabled, then click «Option.»
Step 4. Check the box next to «iCloud Photo Library» and «Download new photos and videos from my PC.»
Step 5. Click «Done.»
![]()
Method 5. Export Photos from iPhone to Computer viaВ Email
Apart from the methods listed above, you can also transfer photos from an iPhone to a computer in an old-fashioned way by using email. But this method only works when you have several photos to transfer since your email has a size limit for attachment.В
Step 1. Open the Photos app on your iPhone.В
Step 2. Go to your Camera Roll.
Step 3. Select the photos (not more than five) you wish you transfer.
Step 4. Click the export icon in the bottom left corner.
Step 5. From the suggestedВ options, choose «Mail.»
Step 6. Enter the detailed information by following its on-screen instructions.В
Step 7. Then, you can sign in to your email account on the computer and download pictures to your PC.
![]()
The Bottom Line
In addition to the methods we mentioned in this guide, there are many other different ways out there that can help you export photos from iPhone to PC. For example, you can also do the same thing via social apps, such as WhatsApp, Instagram, Skype, and Facebook. To use them, all you need is to add your photos to any of these apps and open them on your computer. Then, you can download them all to your computer.В
о™љо™љо™љо™љо™љ
4.5 out of 5 stars, based on 10 votes
EaseUS MobiMover allows you to easily transfer all data from your iPhone to your PC. The app is available for both Windows and Macs so irrespective of which platform you use, you are covered.

EaseUs MobiMover solves this problem as it allows you to transfer data from an iPhone to a Mac, Mac to an iPhone, or from one iPhone to another iPhone fast.

EaseUS MobiMover is a program that allows you to share files between your iOS device and your PC in an easy manner. This is very useful, since both operative systems are not compatible.

EaseUS MobiMover for Mac and PC is a powerful tool for transferring data from your Apple mobile device to your computer, managing the variety of files that you create, and moving those huge videos quickly.

Related Articles — ALSO ON EaseUS SOFTWARE
How to Transfer Photos from Phone to Computer
5 ways to Transfer Photos Between Phone and Computer
Last Updated : 4th February 2021 | Author: Wide Angle Software Dev Team
![]()
Introduction
There are many reasons you may want to transfer photos from phone to your computer. From backing up your images for safekeeping, transferring a snap to edit on your computer, or simply to free up space on your phone — learning how to transfer photos from phone to computer is essential.
Quickly jump to the topic you need:
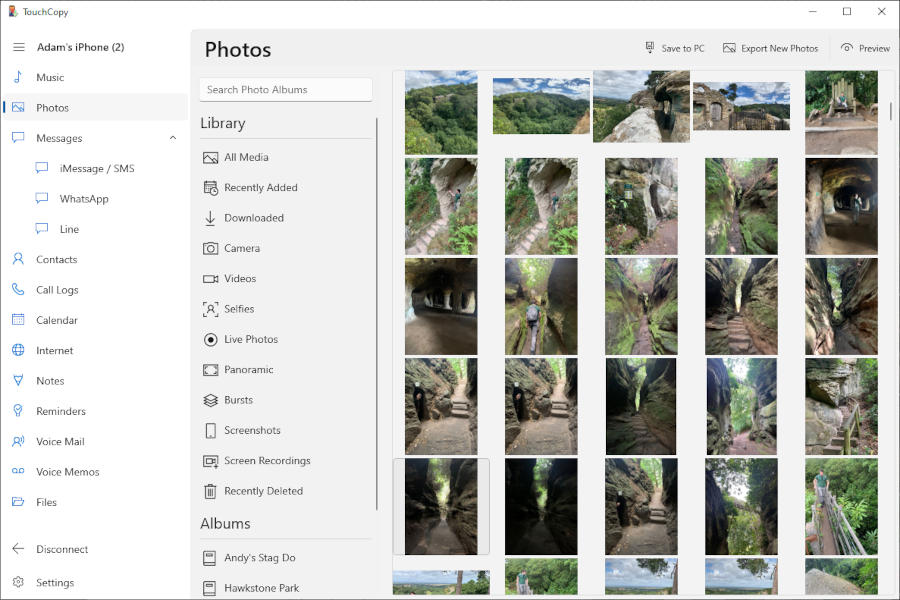
How to Transfer All Photos from iPhone to PC: TouchCopy
If you need to copy all photos on your iPhone, including photos on your camera roll, images added to your device by iTunes, as well as pictures included in your iPhone messages, we recommend using TouchCopy. TouchCopy also allows you to access all other data on your iPhone, including your music, contacts, and messages, and copy it to your PC. Let’s see how:
- Download TouchCopy on your PC and run it.
- Connect your iPhone to your PC using a USB cable.
- Click the «Photos» tab to view all of your iPhone’s photos on TouchCopy.
- Select the photos that you’d like to transfer, and hit «Copy to PC»!
Find out more TouchCopy Free Download (PC)
Try TouchCopy free ▼
Receive an email with a link so you can download the free trial on your computer:
Note: We respect your privacy. We won’t share your Email address with anyone else, or send you spam.
![]()
How to Transfer Photos from iPhone to PC with TouchCopy
The steps above will copy photos from your iPhone camera roll and photos added by iTunes. If you’re interested in copying pictures included in your text messages, iMessages and WhatsApp messages, try reading our How to transfer photos from iPhone messages article for more information.
Or if you like to regularly back up your iPhone photos to your PC, TouchCopy provides the fantastic option to scan the iPhone for any new photos taken that you have not backed up to the PC before. This way, you can easily save only the photos which are not yet stored on your computer to save yourself time and keep your photo library organised and up-to-date! Find out how TouchCopy can export new iPhone photos to PC >
Like what you see? Get the full version:
Copy camera roll photos from iPhone to PC: Windows Photos App
If you only need to copy pictures from your iPhone camera roll, you could use iTunes and the Windows Photos App. Here’s how:
- Firstly, ensure that you are running the latest version of iTunes on your PC.
- Connect your iPhone to your PC using a USB cable.
- Ensure that your iPhone is unlocked. You may also need to tap to allow the PC to access your device.
- Open the Windows Photos app, click Import > From a USB device, and follow the instructions to complete the transfer.
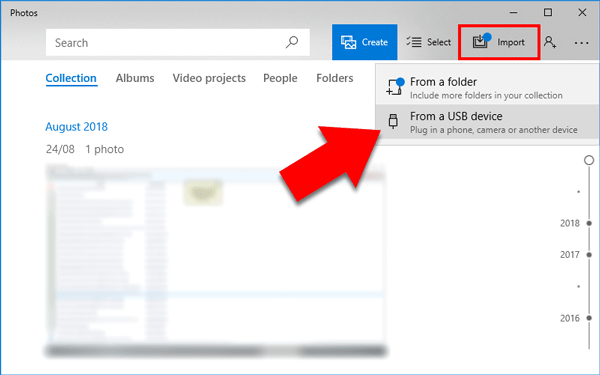
Import iPhone pictures on PC
Transferring All Photos from iPhone to Mac: TouchCopy
If you need to copy all photos from your iPhone to your Mac, including photos on your camera roll, images added to your device by iTunes, as well as pictures included in your iPhone messages, we recommend using TouchCopy. TouchCopy also allows you to access other data on your iPhone, including your music, contacts and messages, and copy it to your Mac. Let’s see how:
- Download TouchCopy on your Mac and run it.
- Connect your iPhone to your Mac using a USB cable.
- Click the «Photos» tab to view all of your iPhone’s photos on TouchCopy.
- Select the photos that you’d like to transfer, and click «Copy Photos»
- To also transfer photos included in your text messages, iMessages and WhatsApp messages, see the steps given here.
Try TouchCopy free ▼
Receive an email with a link so you can download the free trial on your computer:
Note: We respect your privacy. We won’t share your Email address with anyone else, or send you spam.
Like what you see? Get the full version:
How to Transfer Photos from iPhone to Mac with TouchCopy
Copy camera roll photos from iPhone to Mac: Mac Photos App
If you only need to copy photos from your iPhone camera roll, you could use iTunes and the Mac Photos App. Here’s how:
- Firstly, ensure that you are running the latest version of iTunes on your Mac.
- Connect your iPhone to your Mac using a USB cable.
- Ensure that your iPhone is unlocked. You may also need to tap to allow the PC to access your device.
- Open the Mac Photos app, select the iPhone photos that you wish to transfer, and click «Import Selected».
- To import all of the photos, simply click «Import all new items» instead.
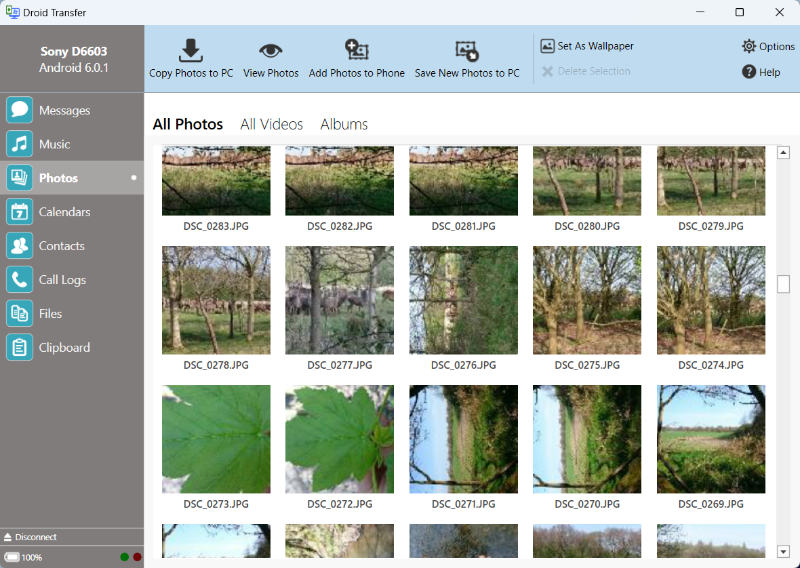
How to Transfer Photos from Android phone to PC over WiFi
If you’d like to transfer photos from your Android phone to your PC over Wifi, we recommend Droid Transfer. The app will also copy other data from your Android phone, including music, contacts and messages. Here’s how to transfer photos from phone to laptop or PC over WiFi:
- Download Droid Transfer on your PC and run it.
- Get the free Transfer Companion App on your Android phone from Google Play Store.
- Scan the Droid Transfer QR code with the Transfer Companion App.
- The computer and phone are now linked. Select the photos that you’d like to transfer, and hit «Copy Photos»!
How to transfer photos from phone to laptop — Droid Transfer Find out more
![]()
![]()
Try Droid Transfer free ▼
Receive an email with a link so you can download the free trial on your computer:
Note: We respect your privacy. We won’t share your Email address with anyone else, or send you spam.
Like what you see? Get the full version:
See it in action
If you regularly back up your Android photos to PC, we recommend using Droid Transfer’s «Save New Photos» feature. This will automatically scan the Android when you connect it for new photos which you haven’t backed up to the PC before. Then, you can easily and quickly save these photos to the computer. Find out how to save new photos from Android to PC with Droid Transfer >
How to Transfer Photos from Android phone to computer over a USB Connection
If you prefer transfer photos from your Android phone over USB, connect your phone to your computer with a USB cable.
Once connected, you’ll see your device name in the Windows File Explorer on your computer.
Double-click your device. Here you can access its internal storage. Your photos will be located in either the «DCIM» or «Pictures» folders.
Simply select the pictures you’d like to transfer, right-click and hit copy. Then, right-click and paste into a location on your computer.
![]()
How to Transfer Photos from Android to Computer — USB transfer
Transferring photos from Android phone to Mac: Android File Transfer
Transferring files from your Android phone to a Mac can be a little more difficult. For this type of transfer, we would recommend using Android File Transfer. Once installed on your Mac, you’ll be able to connect your Android phone to the Mac, and copy files from the device to the Mac.
Syncing photos between computer and phone
If you find yourself regularly transferring photos from your phone to your computer, you may want to consider using a cloud service. Cloud storage services store your data in «the cloud» (an external server). This is great, because you can then link your computer and multiple devices to your cloud account which allows you to access all of the data at any time, on any device. Thinking about photos specifically, you can set your phone up to store any photos you take in your cloud storage, so that they’re not taking up loads of space on your device.
There are many cloud services available, but some of the most popular are iCloud, Google Drive and Dropbox.
Check out our article for more information on how to transfer photos from iPhone to iPhone ->


