- How to Transfer Between iPhone and Windows Phone
- Part 1. How to Transfer Photos from Windows Phone to iPhone
- How to transfer photos from iPhone to windows phone in one click
- Step 1. Phone to Phone Transfer
- Step 2. Select Files
- Step 3. Start Transfer
- Part 2. Transfer iPhone Contacts to Windows Phone Easily
- Part 3. Bonus tip — Transfer Photo from iPhone to WinPhone
- MobileTrans Phone Transfer
- How to Transfer Data from iPhone to Windows Phone
- Method 1. To transfer different data from iPhone to Windows phone respectively
- Portion 1. Transfer contacts to Windows phone
- Portion 2. Transfer messages to Windows phone
- Portion 3. Transfer calendar to Windows phone
- Portion 4. Transfer media files including photos, audios and videos to Windows phone
- Method 2. To transfer data from iPhone to Windows phone with dr.fone
- The main features of dr.fone – PhoneTransfer are listed below:
- The referenced tutorial is offered in the following passages:
- Step 1. Download and install the dr.fone
- Step 2. Connect your phones to your computer
- Step 3. Choose the file types for transferring
- Step 4. Start the transferring process
- Method 3. To transfer data from iPhone to Windows phone with the SHAREit
- 3 Ways to Import Photos from iPhone to Windows 10 Quickly
- Part 1: Import photos from iPhone to Windows 10 using Dr.Fone — Phone Manager (iOS)
- Dr.Fone — Phone Manager (iOS)
- Part 2: Transfer photos from iPhone to Windows 10 using the Photos App
- Part 3: Transfer photos from iPhone to Windows 10 using Windows Explorer
How to Transfer Between iPhone and Windows Phone
I have purchased a new iPhone and previously I was using windows phone. Now the problem is that I have lots of my photos in my previous phone and I want to transfer photos between iPhone and windows phone. Is there any way to do that? Please helps me to solve out this problem.
As per some researches, iPhone is regularly getting famous and so many android or windows users give up their old phone and buy new iPhone. It is really good but when it comes to transfer your old windows phone data, then users face lots of issues. But this is true that you can transfer your old windows phone to new iPhone and there are some ways available to make it true. We are going to provide this guide today and you will be able to transfer from windows phone to iPhone very easily.
Part 1. How to Transfer Photos from Windows Phone to iPhone
So many Windows phone users wonder that how to transfer windows phone photos to iPhone. Instead of going to other ways I would love to share with you an easy and efficient way to transfer windows phone photos to iPhone. This way is MobileTrans — Phone Transfer which is Phone to Phone transfer software and also work as a backup software. This software is very easy to use and enables you to transfer your old windows phone photos, music and videos to iPhone very easily and quickly in few clicks only.
How to transfer photos from iPhone to windows phone in one click
Step 1. Phone to Phone Transfer
Download and install the phone transfer software on windows computer and launch the program. Once program is launched, click on “Phone Transfer” option on the home screen of phone transfer software.
![]()
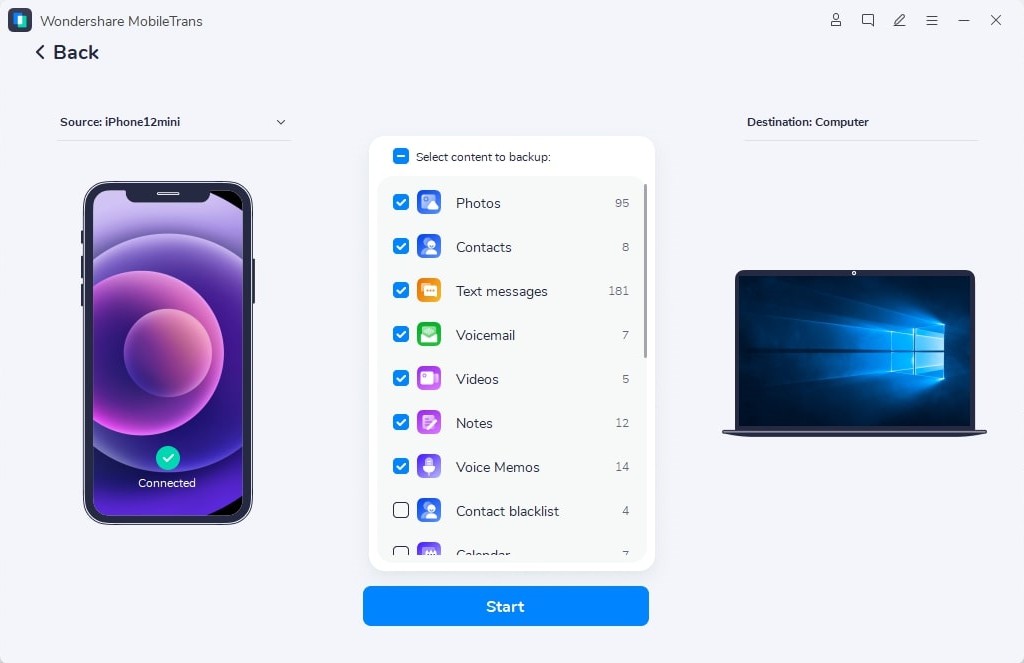
Step 2. Select Files
Connect your both windows phone and iPhone with computer. MobileTrans will detect both devices and show you on the interface. The left side device is the source and the right side is the destination device in which you want to transfer data. You can click on Flip button to change source and destination devices. Now check “Photos” option and click on «Start» button.
![]()
Step 3. Start Transfer
Now MobileTrans will start transfer photos from iPhone to windows phone automatically. Keep connected both devices with computer until process is completed. The process will complete in some time automatically. Click on the “Ok” button in the end to close the process completed window now.

Part 2. Transfer iPhone Contacts to Windows Phone Easily
While using MobileTrans users can easily backup iPhone to PC or directly transfer iPhone contacts to windows phone in one click. We have already discussed about the features of the MobileTrans. Now it’s a time to know how to backup iPhone contacts to windows PC and then transfer them to windows phone. You can follow steps now to backup iPhone contacts to PC using MobileTrans.
Step 1. Launch Wondershare MobileTrans on your computer first and then click on “Backup” option in the software interface.
![]()
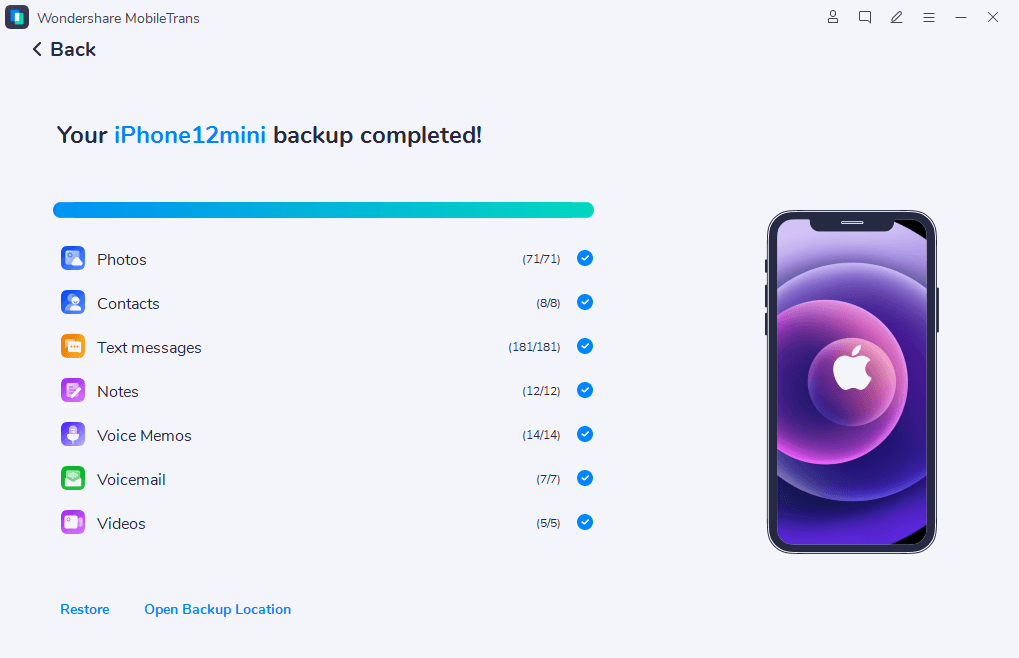
Step 2. Now choose “Contacts” option in the next screen and click on “Start” button.
Step 3. After choosing contacts and clicking on «Start» button it will start backing up data. You can see the backup process in the MobileTrans interface.
Step 4. After completing the backup process on your windows phone, tap on the People option and then tap on “Setting” button.
Note: You must have created an Microsoft account on your computer and synced your backup with it then only you can get your contacts on your windows phone.

Step 5. After entering in the Setting there will an option “Add an Account”. Tap on it.

Step 6. On the next screen you have to select “Microsoft Account” option.

Step 7. Here you have to enter your Microsoft account and password now. After entering these credentials and tap on Sign in button.

Step 8. After signing in, go back and open People app. Here you can see your all backed up contacts. It will be available on your windows phone.

Part 3. Bonus tip — Transfer Photo from iPhone to WinPhone
If you are thinking about backing up photos from your windows phone to iPhone directly, MobileTrans can help you. It can transfer all of your windows phone photos to iPhone easily and quickly. MobileTrans can make it true to transfer all types of data from iPhone to windows phone quickly without using iTunes, iCloud or any other apple software.

MobileTrans Phone Transfer
Transfer between iPhone and Windows Phone in 1 Click!
- Easily transfer photos, videos, calendar, contacts, messages and music from Android to iPhone/iPad.
- Backup and restore data on your device to a computer with one click.
- Takes less than 10 minutes to finish.
- Enable to transfer from HTC, Samsung, Nokia, Motorola, iPhone and more to new iPhone.
- Works perfectly with Apple, Samsung, HTC, LG, Sony, Google, HUAWEI, Motorola, ZTE, and more smartphones and tablets.
- Fully compatible with major providers like AT&T, Verizon, Sprint and T-Mobile.
- Fully compatible with Windows 10 or Mac 10.15
- Fully compatible with iOS 13 and Android 9.0
How to Transfer Data from iPhone to Windows Phone
![]()
After buying a new Windows phone, you may want to transfer all the important data from your old iPhone to your new Windows phone. So in this article, you will surely find the very method that you like.
Method 1. To transfer different data from iPhone to Windows phone respectively
It may seams trouble at first sight, but it is useful when there are just a few different kinds of important data on your old iPhone.
Portion 1. Transfer contacts to Windows phone
For the Gmail or other emails, you can simply log in the account on your new Windows phone to get access to the contacts without hassle. But for the contacts on the iPhone itself, you can do like this:
- 1. Download the iTunes on your computer and launch it.
- 2. Connect your iPhone to your computer.
- 3. Go to the “iPhone” > “Info” > “Outlook”, and then check the item of “Sync Contacts”.
- 4. Then, you can choose the contacts that you want, and click on the “Apply” button to start the syncing process.
- 5. After that, all the selected contacts will appear on your Outlook account, which is easy to get if you log in it on your Windows phone.
Portion 2. Transfer messages to Windows phone
It is a pity that there is no way to transfer the messages directly from your iPhone to your Windows phone. But you can use some third party tools to help you. Or you can transfer the messages in the formats of PDF or CSV to your computer first, and then transfer to your new phone. However, you can not get those files as messages on your new phone.
Portion 3. Transfer calendar to Windows phone
The calendar carries so much important information about birthday or some other big event that it is of signification to transfer it to the new Windows computer.
- 1. Download and install the iTunes on your computer.
- 2. Launch the iTunes. And connect your iPhone to your computer with a USB cable.
- 3. Choose the “iPhone” option, and tap on the “Info” option and then check the “Sync Calendar with” option and click on the “Outlook” button.
- 4. Then choose the calendar that you want to transfer to your Windows phone, and tap on the “Apply” button to start the process.
- 5. Soon, you will find the calendar selected transferred to your Outlook account.
- 6. Log in the Outlook with your Windows phone, and download the calendar.
Portion 4. Transfer media files including photos, audios and videos to Windows phone
The common way to transfer the photos between two phones is to use a computer as a transit point. You can transfer the photos from your iPhone to your computer first and then again from your computer to your Windows phone. By doing this, it is a bonus that those photos can be stored on your computer permanently unless you delete them. And you can transfer the audios and the videos in this way.
Pro of Method 1:
1. You can choose the specific items that you want.
Cons of Method 1:
1. It is time-consuming.
2. It is workable for just a few kinds of data.
Method 2. To transfer data from iPhone to Windows phone with dr.fone
dr.fone is now2days popular in the world. You will find many people on the Internet using this nice tool. As its name implies, the dr.fone – Phone Transfer specializes in transferring the data between different phones or tablets.
The main features of dr.fone – PhoneTransfer are listed below:
- 1. It supports many devices including iOS devices, Android devices, and Windows devices.
- 2. It is compatible with both the Windows computer and the Mac computer.
- 3. The interface of it is intuitive and the operation on it is simple.
- 4. It enables its users to transfer all kinds of data with a few clicks, including messages, contacts, calendars, photos, audios, videos.
- 5. It enables its users to create a backup for all kinds of data on their devices.
- 6. It enables its users to erase their phones for security purposes.
The referenced tutorial is offered in the following passages:
Step 1. Download and install the dr.fone
Before transferring the data, you need to download the dr.fone on your computer. Remember, there are two versions of this tool. You need to choose the suitable version for your computer. And then install it on your computer.

Step 2. Connect your phones to your computer
With two suitable USB cables, connect your phones to your computer. Make sure their positions are right. Or you can exchange them by the button of “Flip” in the middle.

Step 3. Choose the file types for transferring
On the little box, you can choose the files that you want to transfer with the help of this tool. There are messages, contacts, calendar, photos, music, videos and so on.
Step 4. Start the transferring process
After choosing the files, you need to click on the “Start Transfer” button to start the process. And in a few minutes, you will get all the desired files on your new Windows phone.

Pros of Method 2: 1. It is easy to use.
2. There are many other functions of this tool.
Cons of Method 2:
1. It is not a free application.
Method 3. To transfer data from iPhone to Windows phone with the SHAREit
The SHAREit is a free app for both the Windows phone and the iPhone. It can help you transfer the contacts, photos, videos, and music between two phones. The different thing is this app is for the phones only, so you need to connect your phones with the WIFI.

Step 1. Download the SHAREit on both of your phones (for iPhone & for Windows Phone).
Step 2. Launch the SHAREit on both phones. Connect your phones to the same stead network.
Step 3. Click on the “Send” button on your iPhone and the “Receive” button on your Windows phone.
Step 4. Choose one kind of file on your iPhone, and then click on the “Transfer” button. And then repeat the operation until you transfer all kinds of files.
Pro of Method 3: 1.It is free.
Cons of Method 3:
1.You can not transfer the messages and calendar with this tool.
2.You need to repeat the operations for many times if you want to transfer several kinds of different files.
Track locations, messages, calls, and apps.
Do it remotely and 100% discreetly.
3 Ways to Import Photos from iPhone to Windows 10 Quickly

Alice MJ
Apr 08, 2021 • Filed to: Backup Data between Phone & PC • Proven solutions
It is very common to hear about the transfer photos between iPhone and Mac systems. And you want to make it easy for iPhone to PC transfer. However, many iOS users have no clue how to transfer photos from iPhone/iPad to Windows 10 laptops or even about the process of windows 10 importing photos from the iPhone. Hence users need to know about the process through which they can easily transfer iPhone/iPad photos to Windows PC.
To follow these methods, you do not need to be equipped with anything special. Just follow the simple guide with each step carefully in this article and soon you will have your iPhone photos transferred to your Windows 10 PC.
Now without wasting any more time, we are moving towards exploring the methods with which you can import photos from iPhone to Windows 10.
Part 1: Import photos from iPhone to Windows 10 using Dr.Fone — Phone Manager (iOS)
We shall start with the most important method to import photos from iPhone to Windows 10, that is, using the Dr.Fone — Phone Manager (iOS), which is considered to be the easiest, safest as well as most attention-grabbing software kit. This software works like a complete package tool for all your transfer-related queries, issues, and tasks. What you need to do is to have access to the tool and follow some simple user-friendly steps, and soon you will be able to import photos from your iPhone device to Windows 10.
![]()
Dr.Fone — Phone Manager (iOS)
Transfer Photos from iPhone/iPad to Windows 10 without iTunes
- Transfer, manage, export/import your music, photos, videos, contacts, SMS, Apps, etc.
- Backup your music, photos, videos, contacts, SMS, Apps, etc. to computer and restore them easily.
- Transfer music, photos, videos, contacts, messages, etc from one smartphone to another.
- Transfer media files between iOS devices and iTunes.
- Fully compatible with all iOS versions that run on iPhone, iPad, or iPod touch.


Below are the required steps with details and relevant screenshots, just go through them to know more about the process.
Step 1: Open the interface by visiting the Official site of Dr.Fone — Phone Manager (iOS). After launching the tool out of various options you need to select the «Phone Manager» mode.
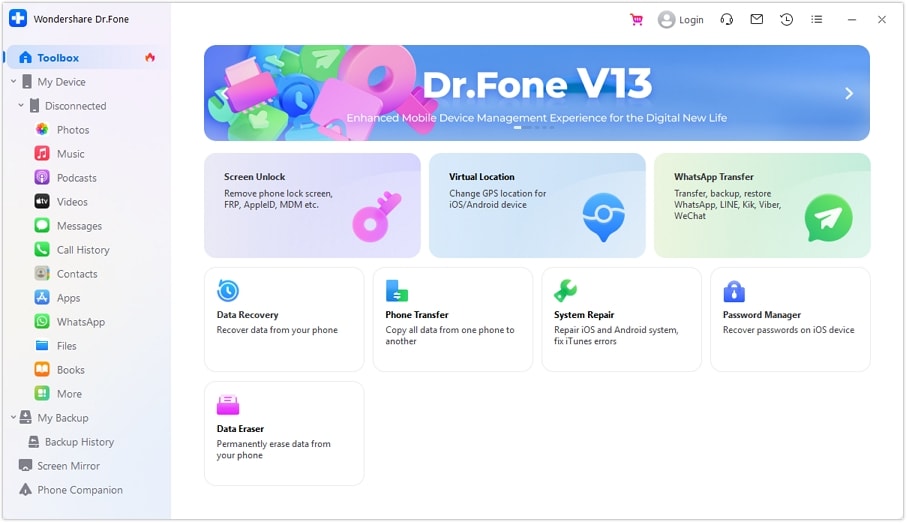
Step 2: Now Connect iPhone to Windows 10, which will prompt the main connection window under the toolkit.
![]()
Step 3: From the home page, click on Photos Tab, list of photos available on your iPhone device will appear, select the desired photos and then choose «Export to PC».
![]()
Step 4: Select the final folder under Windows 10 to save the photos, OK that. And soon you will have a progress bar that reflects the transfer process. And after that, your photos will be transferred to Windows 10 from your iPhone.
Using Dr.Fone — Phone Manager (iOS) not only saves your time as well as it is one of the most valuable in terms of keeping the quality intact, which is performing windows 10 import photos from iPhone. So you can go with the process, leaving all worries aside.
Part 2: Transfer photos from iPhone to Windows 10 using the Photos App
The next method we are mentioning here is using Photos App which can assist in the purpose of importing photos from iPhone to Windows 10. Photos app under Windows 10 PC is considered as the organizer for photos-related tasks, so you can also take the help of this app service from Microsoft.
The required steps which will lead you to successfully transfer iPhone photos to your Windows 10 PC are as follows.
Step 1: First, connect iPhone to PC. After that open the Start menu > there either type or directly select Photos application > an authority page will appear, just grant the permission to connect.

Step 2: When the Photos Application gets opened up, you need to look at the top right side, here, use the import option from the right corner at the top (You can take the help of the screenshot below to get an idea).

Step 3: A dialog box will show up, from where you need to select from which device you want to transfer, in this case, select the iPhone.

Step 4: After selecting the iPhone device, there will be a short scan that will go on > once done with that a pop-up confirmation window will appear. Here use continue to import all or else select the ones you wish to import > then choose to continue option.

Step 5: Choose a location to save the photos and press OK to complete the transfer process.
Doing so will save your precious photos/media files to the desired location on Windows 10 PC that you can access any time at your convenience. As well as this way you can double ensure that the photo media is saved cautiously.
If you go through the above process then understanding how to transfer photos from iPad to laptop windows 10 becomes an easy task for you. With the help of this Photos application for Windows 10 PC, you can easily and comfortably transfer or import iPhone photos to Windows 10.
Part 3: Transfer photos from iPhone to Windows 10 using Windows Explorer
All the windows users must have heard about Windows Explorer, but only a few know that it can assist Windows 10 to import photos from iPhone. But the question is how to transfer photos from iPad to pc windows 10? Well, do not worry, we are here to explain the complete process with relevant screenshots to you in a better way.
So, let us start understanding the process in-depth with the help of detailed steps:
Step 1: Launch the Windows explorer either using the start menu
or with the help of Windows Key + E, this will automatically prompt to open up the windows explorer
Connect your phone to the pc > allow as trusted device > Choose Apple iPhone on the explorer window

Step 2: Then move towards the internal storage device> there visit DCIM folder

For all photos > you can either use the shortcut keys such as ctrl-A+ ctrl-C or else visit Home menu > and select all
Step 3: Now open the folder in your windows 10 where you want to save the photos and press Ctrl- V (or paste)
Otherwise, you can select as per the requirement. Then choose the location where you want to keep safe your iPhone photos and paste them there.
Following the above steps will enable you to use your Windows Explorer service to import photos from iPhone to Windows 10, so just follow them and get access to your valuable photos from your PC also.


