- How to Transfer Contacts from Lumia to Android
- Part 1: Transfer Contacts from Lumia to Android using Outlook
- Step 1: Sync contacts from your Nokia Lumia to your Outlook account
- Step 2: Import the Outlook contacts to your Android phone
- Part 2: Transfer music, image and video using MobileTrans — Phone Transfer
- MobileTrans — Phone Transfer
- Steps to transfer other data from Lumia to Android
- Wondershare MobileTrans The World’s #1 Phone to Phone Transfer Solution
- Transfer Data between Phones Selectively
- WhatsApp Transfer, Backup & Restore
- Backup from Phone to Computer
- Restore a Backup to Mobile Devices
- Transfer Pictures from PC to Android
- Easy Ways to Transfer Pictures from PC to Android (Samsung, Huawei, Xiaomi, OnePlus, Google Pixel, LG. )
- Part 1. How to Transfer Pictures from PC to Android with a USB Cable?
- Part 2. How to Transfer pictures from PC to Android with Syncios Free Android Backup Tool
- On Windows Computer:
- On Mac OS Computer:
- Part 3. How to Transfer pictures from PC to Android with Google Photos
- 1. Upload photos on computer to Google Photo Website
- 2. Download photos on Google to Android phone.
- Part 3. Video Tutorial — Sync Photos between Android phone and PC
- Summary
How to Transfer Contacts from Lumia to Android
Just when you are happy and rejoicing on having got a new phone for yourself, you find out that transferring contact and other data from your old Lumia device to your new phone running on Android isn’t easy. Here we will discuss a much simpler method to transfer contacts from Lumia to Android in this article.
Part 1: Transfer Contacts from Lumia to Android using Outlook
Transferring contacts from a Lumia to an Android is a very extensive process. Also, it requires you to have some technical knowhow. The process comprises of three steps:
- • In the first step, contacts from the Lumia device have to be exported to an Outlook account and downloaded in the form of a .csv file.
- • Then in the second step, this .csv file needs to be uploaded to Google contacts. Once the contacts have been stored in the Gmail account, you need to sign in to your Android device using the same Google account to have all his contacts synced to his Android device.
Follow these instructions to learn step by step:
Step 1: Sync contacts from your Nokia Lumia to your Outlook account
1. Go to the “People” app on the Windows phone, scroll to the bottom to locate “…” and then go to “Settings.”
![]()
2. From the screen that appears, locate “Accounts” and select “Add an Account”.
![]()
3. From the following screen, go to “Microsoft Account” and enter your Outlook account password and sign in.
![]()
4. All the contacts in your Lumia will be synced with your Outlook account.
5. To get these contacts on your laptop or computer, go to your web browser and type in https://login.live.com . Sign in using your Microsoft account username and password.
![]()
6. Once you have logged in, locate “People” in your account.
![]()
7. The address book will open up and you will notice that all contacts from your Lumia will now be in your Microsoft account.
![]()
8. Go to Manage->Export to Outlook.com and other services. You will be required to enter a location where you wish you save the .csv file you are just about to create. Enter your desired location and hit the enter key and a .csv file will be downloaded to that location.
![]()
Step 2: Import the Outlook contacts to your Android phone
1. Open up your browser and type in www.gmail.com. Sign in to Gmail using your email and password.
2. Go to Gmail->Contacts.
![]()
3. From the menu bar at the top locate “More” (next to Add contact). Go to More, from the drop down menu that opens, select “Import”.
![]()
4. Click “Choose File” and locate the .csv file you just saved. After selecting the file, hit “Open”.
![]()
5. Your contacts will now be saved to your Gmail account. Now, sign in to your Android device using the same Gmail account you saved you contacts to. The syncing option is already enabled when you sign into your account for the first time.
Part 2: Transfer music, image and video using MobileTrans — Phone Transfer
MobileTrans — Phone Transfer is a wonderful and cost effective data transfer tool for us to transfer our contacts, music, videos, messages and more cross different platforms. In order to transfer contacts from Lumia to Android, you are supposed to know MobileTrans at first, since it can help you easily get it done.
MobileTrans — Phone Transfer
Transfer music, image and video from Lumia to Android in 1 click!
- • Easily transfer photos, videos, calendar, contacts, messages and music from device to device.
- • Backup and restore data on your device to a computer with one click.
- • Transfer data to Nokia phones without rewriting your original data.
- • Support Transferring data across the platforms like Android to iOS, iOS to Android.
- • Works perfectly with Apple, Samsung, HTC, LG, Sony, Google, HUAWEI, Motorola, ZTE, Nokia and more smartphones and tablets.
Steps to transfer other data from Lumia to Android
Step 1: Open Wondershare MobileTrans, select «Phone Transfer» mode on the interface.
![]()
Step 2: Connect your both phone to the computer, then the program will recognize it automatically. Set your lumia as source phone and android phone as destination phone.
![]()
Step 4: Select the music, images and videos and click Start. The data will be transferred to the Android phone in a few seconds.
Wondershare MobileTrans
The World’s #1 Phone to Phone Transfer Solution
Wondershare MobileTrans is a desktop application that helps 50,000,000+ users to transfer data from one phone to another, transfer WhatsApp and other social apps and restore data from cloud backups. Move everything with one click and save your time!
![]()
Transfer Data between Phones Selectively
Wondershare MobileTrans is the best desktop software to transfer contacts between iPhone and Android, as well as other types of data, including photos, apps, songs, messages, videos, and more. In addition to being perfectly compatible with thousands of iOS and Android devices, it works with Windows phones as well.
WhatsApp Transfer, Backup & Restore
Transferring WhatsApp to a new phone now only needs a single click with Wondershare MobileTrans, whether you’re switching to an iPhone or an Android. It also helps you keep your chat history safe by backing up your WhatsApp data to a computer. To get back your messages or chat history, just restore the WhatsApp backup to your device.
Backup from Phone to Computer
Backup iOS and Android devices to your computer with the help of our intuitive Wondershare MobileTrans interface in a few clicks, no iTunes or iCloud required. What’s more, you’re able to select the type of data to back up on Mac or PC as per your preference. Wondershare MobileTrans will never overwrite your backup files.
Restore a Backup to Mobile Devices
Whenever you back up your iPhone or Android with Wondershare MobileTrans, you can later restore the backup data from the computer to your phone without overwriting your data. Additionally, Wondershare MobileTrans allows you to restore backups from iTunes to your mobile devices without reset. You can even restore your iTunes backup to Android.
Transfer Pictures from PC to Android
 > How-Tos > Android> Transfer Pictures from PC to Android
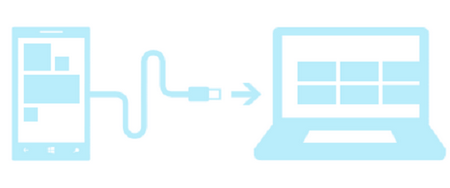
Easy Ways to Transfer Pictures from PC to Android (Samsung, Huawei, Xiaomi, OnePlus, Google Pixel, LG. )
![]()
You must be excited about so many funny or beautiful pictures when you’re browsing your Facebook, Imgur, Tumblr or some other social networks on your computer. You know it is now common to backup and restore via a cloud account, so did the photos from a windows an Android to computer. While it did take efforts to restore or transfer the photo on Windows computer to your Android phone. And if it is a Mac book to an Android phone, it becomes tougher. In this article, we give you 2 extraordinarily simple ways to have a batch photo copy on Windows or Mac computer to your Android phone like Samsung, Huawei, Xiaomi, Google Pixel. This is the ever straightforward way to get this done. Let’s start it!
Part 1. How to Transfer Pictures from PC to Android with a USB Cable?
Step 1 Plug your Android phone into the computer with a USB cable.
Step 2 Find the external hard drive for your Android phone on your computer and open it.
Step 3 Select the photos you want to move on your computer and copy.
Step 4 Find picture folders you need.
Normally, the camera pictures are stored in DCIM folder. You could save your copied pictures in this photo folder.
Part 2. How to Transfer pictures from PC to Android with Syncios Free Android Backup Tool
Syncios Mobile Manager
Syncios Free Android Manager is an easy-to-use and powerful iOS and Android mobile manager, which is well-designed for users who want to manage device contents on PC.
- Support to transfer, edit, backup, manage, view mobile data such as contacts, apps, photos, music, ringtone, videos, SMS messages, eBooks and more.
- Help to organize every iOS devices/Android’s file.
- Handy tools: One-Click Backup/Restore, HEIC Converter, Photo Compression, Ringtone Maker.
- Fully compatible with latest Android and iOS devices.
On Windows Computer:
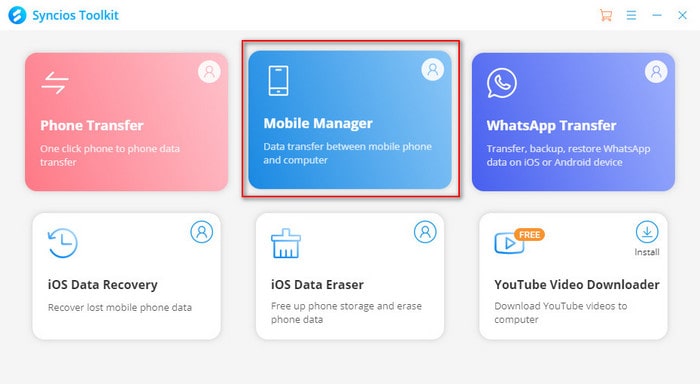
Step 1 Run Syncios Free Android Manager for Windows and get your Android phone (Samsung Galaxy Note 10) connected.
To get started, install and run the Syncios Free Android Manager for free on your computer, and open «Mobile Manager» program on the main interface. Then plug your Android phone into computer.
After your Android Phone got connected, it will be shown in the primary window with photos and more files categorized.
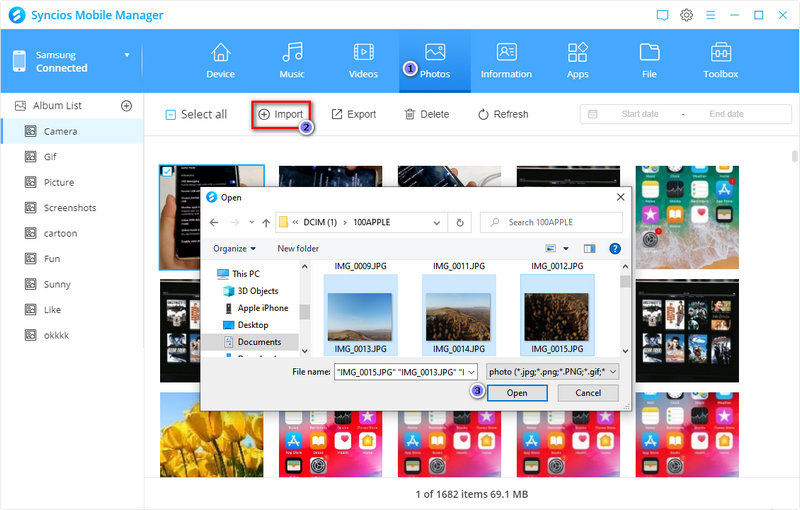
Step 2 Select pictures from PC and Import to Android phone
Click Photos tab on the left panel of Syncios, you’ll see all the photos on your device,
Click Camera or other photo folder on the right panel of the program.
Click Import button. You then will be guide to the local PC path, where you stored the photos files. And choose pictures from PC to sync with.
Now, you can see these photos have successfully synced and listed on Syncios. After that, you can disconnect the phone and check the photos on your Android phone.
Tips: On Syncios Manager for Windows version, you can use tool like Photo Compression and HEIC Converter under «Toolbox» column to compress photos or convert HEIC photos to JPG photos easily.
On Mac OS Computer:
Step 1 Free download and install Syncios Manager for Mac on your Mac OS computer and launch. Similarly, connect your Android phone (Samsung) to the laptop port until Syncios Manager completely recognized it.
Step 2 Different from the interface layout of Windows version, you can review the features menu above. Among them, tap Photos and get access to your Android photo management.
Directly tap the Import icon to access the photos folder on the Mac, choose certain photos to sync to your Android phone.
After the photos copied to your Android phone, you can preview all the new and old Android photos on Syncios. If there are some you want to remove, tap the Delete button to instruct it.

Part 3. How to Transfer pictures from PC to Android with Google Photos
1. Upload photos on computer to Google Photo Website
Step 1 Open the Google Photos website on a computer.This will open a page with your Android’s photos if they are backed up. If this is your first time to open with website, you do need to log in with your Google Account.
Step 2 Click UPLOAD. This blue button is in the top-right side of the page. Clicking it prompts a File Explorer (Windows) or Finder (Mac) window to open. Click a folder with photos in it on the left side of the File Explorer or Finder window.
Step 3 Click and drag your mouse across a group of pictures you want to select, or hold down Ctrl (Windows) or Command (Mac) and click each picture you want to select individually.
High quality — Uploads the photo(s) in high quality resolution at a reduced file size. This does not count against your Google Drive storage limit.
Original — Uploads the photo(s) in the original resolution, which may be higher than the «High quality» option. This counts against your Google Drive storage limit.
Step 4 Click CONTINUE. This option is in the bottom-right corner of the quality window. Doing so will prompt the photo(s) to begin uploading to your Google Photos account.

2. Download photos on Google to Android phone.
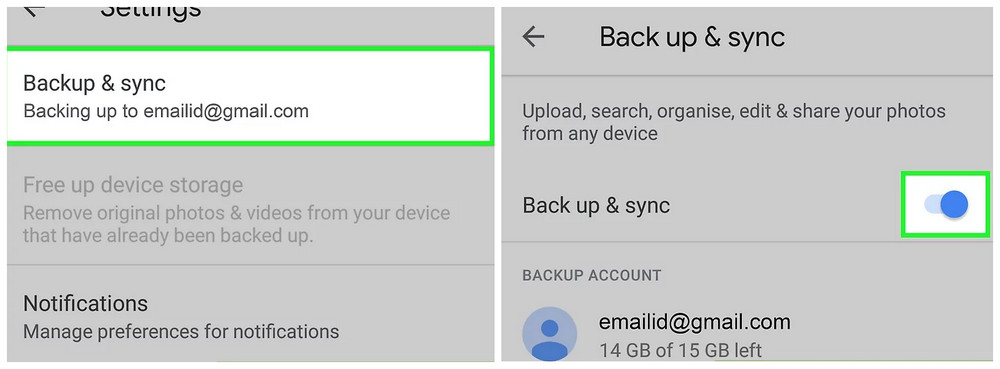
Step 5 Open Google Photos on your Android. Tap the icon with three bars in the top-left corner of the screen. A pop-out menu will appear. And then tap Settings >>> Back up & sync which is near the top of the Settings menu.
Step 6 Make sure the switch is set to «On». If it isn’t, tap the switch to turn on backup for your photos. This will enable synchronization between your Google Photos account and the Google Photos app, which will put the photo(s) you just uploaded to Google Photos on your Android.
Part 3. Video Tutorial — Sync Photos between Android phone and PC
—>Supported OS: Android 3.0 above
Supported Android Devices: Samsung, Sony, Huawei, Xiaomi, Motorola, Nubia, Meizu, Vivo, LG, Lenovo, Nexus, HTC, Vivo, Oppo, etc.
Supported Backup Files: contacts, messages, apps, music, videos, photos.
Summary
No matter if you own a Windows or Mac laptop, you can have both Syncios Manager free versions as you need. And manageable mobile data cover contacts, messages, apps, music, videos, photos. So you can be free to back up and restore data regularly. There are also some handy tools offered when you manage your phone data like Andio converter, Ringtone Maker and more. You can have it once and benefit from it forever.


