- Troubleshooting Windows Installer
- Windows Installer
- Setting Windows Installer service to Automatic
- Using the System File Checker
- Re-register Windows Installer
- Program Install and Uninstall troubleshooter
- Is Your PC Healthy?
- Wally’s Answer Rating
- Fix problems that block programs from being installed or removed
- What it fixes
- «The Windows Installer service could not be accessed» when you try to install Office
- Symptoms
- Cause
- Resolution
- Method 1: Use the Msconfig tool to confirm that the installer service is running
- Method 2: Re-register Windows Installer
- Method 3: Try the methods that are listed in Microsoft Knowledge Base Article 319624
- Method 4: Reinstall Windows Installer
- More Information
Troubleshooting Windows Installer
Reader Question:
“Hi Wally, Where can I get the latest version of Windows Installer for Windows 7 Home Edition?“
— Travis J., Australia
Before addressing any computer issue, I always recommend scanning and repairing any underlying problems affecting your PC health and performance:
- Step 1 : Download PC Repair & Optimizer Tool (WinThruster for Win 10, 8, 7, Vista, XP and 2000 – Microsoft Gold Certified).
- Step 2 : Click “Start Scan” to find Windows registry issues that could be causing PC problems.
- Step 3 : Click “Repair All” to fix all issues.
Setting up weekly (or daily) automatic scans will help prevent system problems and keep your PC running fast and trouble-free.
Wally’s Answer: Windows Installer should be working just fine on your computer so you don’t need to install it or find an upgrade either. It comes preinstalled with Microsoft Windows. It does not need to be installed separately on Windows 7. Windows installer was developed by Microsoft as a framework for setup files or stand-alone executable installers.
Windows Installer
Windows Installer is a component of the Microsoft Windows operating system. It is used by Windows to install, remove, and maintain software. The setup file of software typically contains the software files and instructions to the installer. These setup files are commonly known as MSI files. Windows 7 and Windows 8 already come with a suitable version of Windows Installer.
Setting Windows Installer service to Automatic
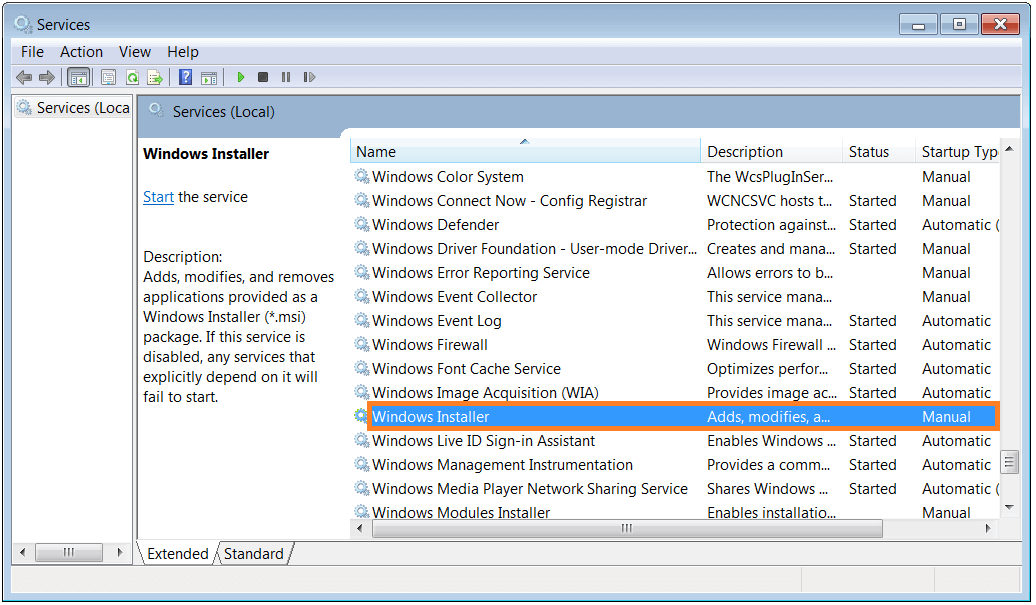
If you have been getting the 1723 error then you can make sure that Windows Installer is working properly by following these simple steps:
- Use Windows_Key+R to open the Run dialog box.
- Type services.msc > Press Enter
- Find Windows Installer in the first Column

- By default the Status column is blank, and the Startup Type column is set to Manual. If you have been getting errors like the 1723 error, then you can try setting it to Automatic.
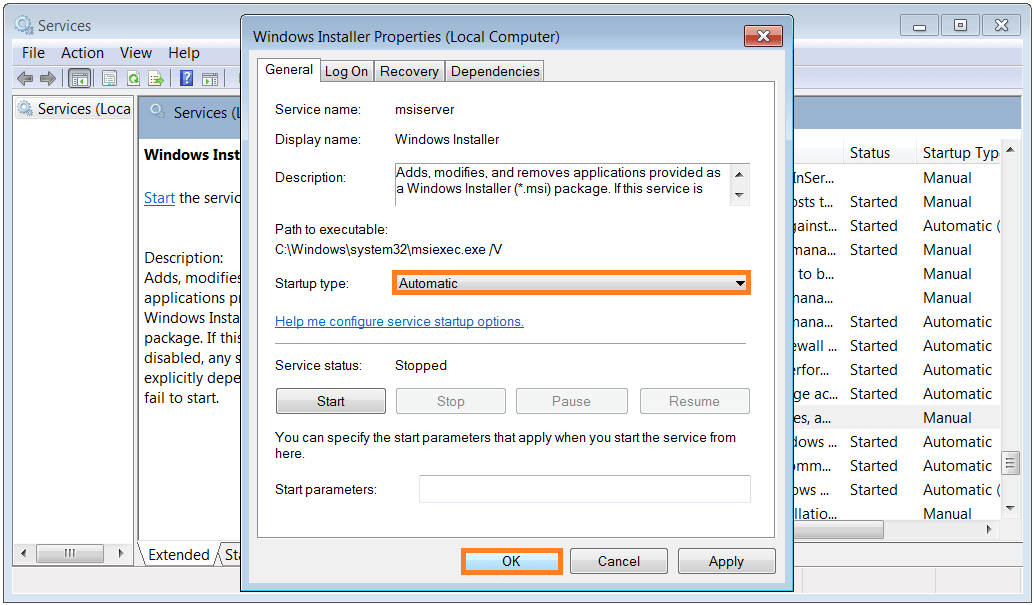
- Right-click Windows Installer and click Properties.
- In the Windows Installer Properties dialog box >General tab > change Startup type to Automatic > Click OK > Restart your Computer
Using the System File Checker
The sfc or system file checker command can be used to ensure the integrity of all important system files of your Windows installation. It will even replace any protected files if it finds an issue with them.
- Click Start > type CMD
- Right-click CMD > click Run as Administrator
- In command prompt type sfc/scannow > press Enter
- Restart when scan is over
Re-register Windows Installer
If using the sfc/scannow command did not fix your problem then try to unregister and then re-register the windows installer.
- Use Windows_Key+R to open the Run dialog box.
- Type msiexec /unreg > Press Enter
- Use Windows_Key+R to open the Run dialog box again.
- Type msiexec /regserver > Press Enter
Program Install and Uninstall troubleshooter
If none of the above solutions worked for you then you can use a Windows Installer cleanup utility called the Program Install and Uninstall troubleshooter.

This utility from Microsoft should repair problems related to corrupt registry keys or other problems that might be causing installation issues. These issues are usually caused by registry problems. Use a reliable registry cleaning software to automatically scan your computer’s registry and avoid such problems in the future.
I Hope You Liked This Blog Article! If You Need Additional Support on This Issue Then Please Don’t Hesitate To Contact Me On Facebook.
Is Your PC Healthy?
I always recommend to my readers to regularly use a trusted registry cleaner and optimizer such as WinThruster or CCleaner. Many problems that you encounter can be attributed to a corrupt and bloated registry. Happy Computing! 
Wally’s Answer Rating
Summary: Every Windows Wally blog post is evaluated on these three criteria. The average of all three elements determines an «Overall Rating» for each blog post.
Fix problems that block programs from being installed or removed
Note: Use these steps for Windows programs. If you’re having problems with an app you got from Microsoft Store, go to Fix problems with apps from Microsoft Store.
The Program Install and Uninstall troubleshooter helps you automatically repair issues when you’re blocked from installing or removing programs. It also fixes corrupted registry keys.
First, you’ll need to download the troubleshooter.
If you see the File Download box when you start downloading, select Run or Open.
The troubleshooter provides steps for you to follow. If a program isn’t listed in the uninstall options, you’ll be asked for that program’s product code. To access the code, you’ll need a tool for reading MSI files—which is typically available to IT professionals. You’ll find the product code in the property table of the MSI file.
What it fixes
The troubleshooter helps fix problems that:
Corrupt registry keys on 64-bit operating systems.
Corrupt registry keys that control the update data.
Prevent new programs from being installed.
Prevent existing programs from being completely uninstalled or updated.
Block you from uninstalling a program through Add or Remove Programs (or Programs and Features) in Control Panel.
If you’re trying to remove malware, you can use Windows Security (or another antivirus tool), or you can use the Windows Malicious Software Removal tool.
«The Windows Installer service could not be accessed» when you try to install Office
Office 365 ProPlus is being renamed to Microsoft 365 Apps for enterprise. For more information about this change, read this blog post.
Symptoms
When you try to install Microsoft Office, you may receive an error message that is similar to the following:
«The Windows Installer Service could not be accessed.»
Cause
This problem may occur if the Windows Installer files are damaged or missing.
Resolution
To resolve this problem, use one of the following methods.
Method 1: Use the Msconfig tool to confirm that the installer service is running
Click Start, and then click Run. (The screen shot for this step is listed below).

In the Open box, type msconfig, and then click OK. (The screen shot for this step is listed below). 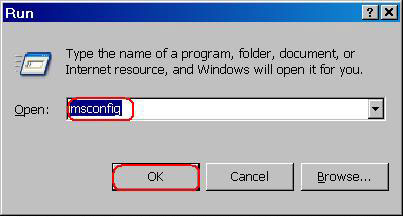
On the Services tab, click to select the check box that is next to Windows Installer. (The screen shot for this step is listed below). 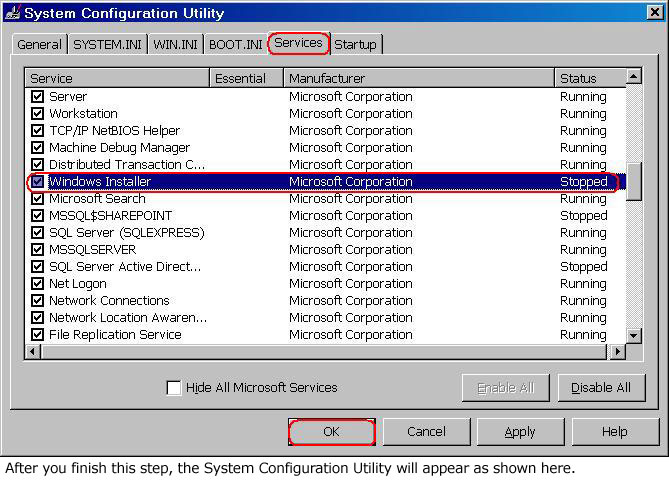
Click OK, and then click RestartВ to restart the computer. (The screen shot for this step is listed below). 
Install Office again. When you are prompted to enter the product key, type the product key, and then click Next.
Office will be installed, and you will not be prompted for the product key when the programs start.
Method 2: Re-register Windows Installer
This section, method, or task contains steps that tell you how to modify the registry. However, serious problems might occur if you modify the registry incorrectly. Therefore, make sure that you follow these steps carefully. For added protection, back up the registry before you modify it. Then, you can restore the registry if a problem occurs. For more information about how to back up and restore the registry, see How to back up and restore the registry in Windows.
Note Because there are several versions of Microsoft Windows, the following steps may be different on your computer. If they are, see your product documentation to complete these steps.
To re-register Windows Installer, follow these steps.
Note If you cannot complete the following steps, go to method 3.
Click Start, and then click Search. (The screen shot for this step is listed below).

Click All files and folders. (The screen shot for this step is listed below).

In the File name box, type Msiexec.exe, and then click Search. (The screen shot for this step is listed below).

After the search is complete, make a note of the location of the Msiexec.exe file. The location of the file should be similar to the following example: C:\Windows\System32 (The screen shot for this step is listed below).

On the File menu, click Close to close the SearchВ dialog box. (The screen shot for this step is listed below).

Click Start, and then click Run. (The screen shot for this step is listed below).

In the Open box, type regedit, and then click OK. (The screen shot for this step is listed below).

Locate and then click the following registry key: HKEY_LOCAL_MACHINE\SYSTEM\CurrentControlSet\Services\MSIServer(The screen shot for this step is listed below).

In the right pane of the Registry Editor window, double-click ImagePath. (The screen shot for this step is listed below).

In the Edit String dialog box that appears, make sure that the string in the Value data box contains the correct path for the Msiexec.exe file that you determined in step 4.
Note The following is an example of the correct path, where drive is the drive where Windows is installed:
drive:\Windows\System32\msiexec.exe /V
If the Value data box does not contain the correct path, make changes to correct the path, and then click OK to close the Edit String dialog box. (The screen shot for this step is listed below).

On the File menu, click ExitВ to quit Registry Editor. (The screen shot for this step is listed below).

Start your computer in Safe mode, and then register the Msiexec.exe file. To do this, follow these steps:
Shut down your computer, and then restart your computer.
Restart your computer and press the F8 key on your keyboard. On a computer that is configured for booting to multiple operating systems, press the F8 key when you see the Boot menu.
Use the ARROW keys to select Safe Mode, and then press ENTER.
If the Boot menu appears again, and the words «Safe Mode» appear in blue at the bottom, select the installation that you want to start, and then press ENTER.
Log on to the computer.
Click Start, click Run, type msiexec /regserver in the Open box, and then click OK. (The screen shot for this step is listed below).

Shut down your computer, and then restart your computer normally.
If you still cannot install Microsoft Office successfully and you receive an error message that is similar to the message listed in the «Symptoms» section, go to Method 3.
Method 3: Try the methods that are listed in Microsoft Knowledge Base Article 319624
Try the methods that are listed in the following Microsoft Knowledge Base article:
319624 «Windows Installer Service could not be accessed» error message when installing application
Method 4: Reinstall Windows Installer
Note This method applies to Microsoft Windows 95, Microsoft Windows 98, Microsoft Windows Millennium Edition (Me), and Microsoft Windows NT 4.0. For Microsoft Windows 2000, Microsoft Windows XP, and Microsoft Windows Server 2003, either reapply the latest service pack or repair the operating system.
To reinstall the Windows Installer, follow these steps.
Click Start, and then click Run. (The screen shot for this step is listed below).
In the Open box, type cmd, and then click OK. (The screen shot for this step is listed below). 
At the command prompt, type the following lines. Press ENTER after you type each line.
(The screen shot for this step is listed below).

ren msi.dll msi.old
(The screen shot for this step is listed below).

ren msiexec.exe msiexec.old
(The screen shot for this step is listed below).

ren msihnd.dll msihnd.old
(The screen shot for this step is listed below).

At the command prompt, type exit, and then press ENTER. (The screen shot for this step is listed below).

Restart your computer.
Update the Windows Installer files to the latest version. To do so, visit one of the following Microsoft Web sites, and then download and install Windows Installer 2.0.
Note Windows Installer 2.0 is included with Microsoft Windows XP. You do not have to perform this step if you are using Windows XP.
After the installation of the Windows Installer is complete, shut down and restart your computer normally before you install Microsoft Office.
More Information
For more information about how to restart Windows in Safe mode, see Advanced startup options (including safe mode).


