- Установка OpenVPN на Mac OS X, Tunnelblick
- Создание VPN подключения
- Удаление VPN подключения
- Tunnel vpn mac os
- Verifying Downloads
- User Contributions
- Download Integrity
- Downloading and Installing on macOS Mojave and Higher
- TunnelBear — мой выбор VPN для Mac и iOS
- Влад Гороховский
- Влад Гороховский
- Что такое VPN
- TunnelBear для Mac
- Скорость подключения
- Как пользоваться TunnelBear на Mac
- Если вы готовы выжать из сервиса максимум, то обратите внимание на следующее моменты:
- TunnelBear для iOS и Android
- В итоге
Установка OpenVPN на Mac OS X, Tunnelblick
Создание VPN подключения
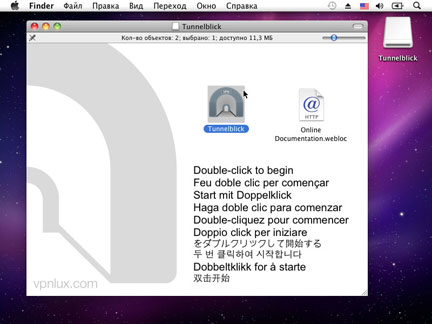
 Шаг 1. Скачайте Tunnelblick с http://code.google.com/p/tunnelblick/ и откройте контейнер. Дважды щелкните по иконке приложения.
- Шаг 2. Щелкните Открыть.
- Шаг 3. Введите ваш Mac OS Пароль и щелкните OK.
- Шаг 4. Щелкните Launch после успешной инсталяции.
- Шаг 5. Щелкните I have configuration files.
- Шаг 6. Щелкните OpenVPN Configuration(s).
- Шаг 7. Щелкните Open Private Configurations Folder.
- Шаг 8. Переместите конфигурационные файлы (см. ссылка mac OpenVPN конфиг в панели пользователя) в открытую папку и щелкните Done.
- Шаг 9. Щелкните по иконке Tunnelblick в строке меню и выберите наименование вашего подключения с приставкой Connect.NB! Мы прежде всего рекомендуем использовать UDP соединение, если оно стабильно, в обратном случае используйте TCP.
- Шаг 10. Введите ваш Mac OS пароль.
- Шаг 11. Для разъединения щелкните по иконке Tunnelblick icon в строке меню и выберите наименование вашего подключения с приставкой Disconnect.NB! Никогда не сохраняйте конфигурационные файлы на компьютерах общего пользования! Если кто-либо подключится по сохраненным данным, ваше соединение будет разорвано!
 Шаг 1. Скачайте Tunnelblick с http://code.google.com/p/tunnelblick/ и откройте контейнер. Дважды щелкните по иконке приложения.
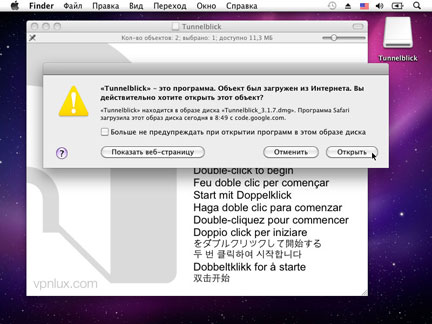 Шаг 2. Щелкните Открыть.
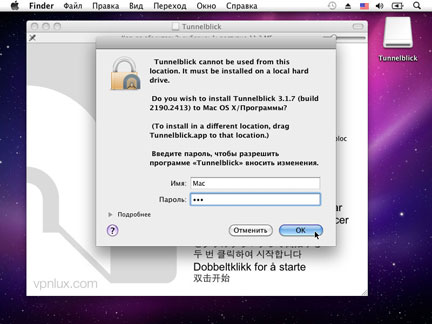 Шаг 3. Введите ваш Mac OS Пароль и щелкните OK.
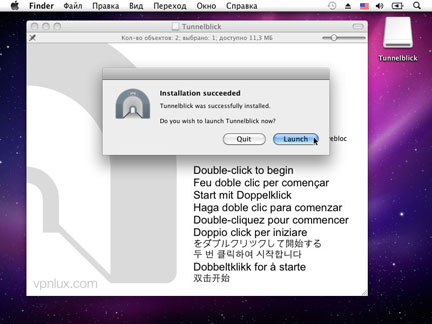 Шаг 4. Щелкните Launch после успешной инсталяции.
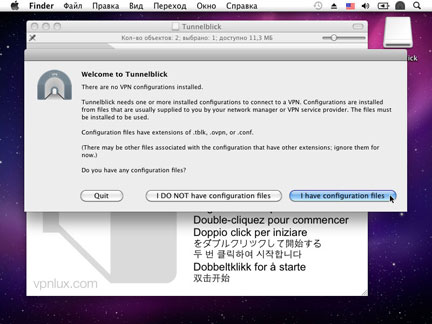 Шаг 5. Щелкните I have configuration files.
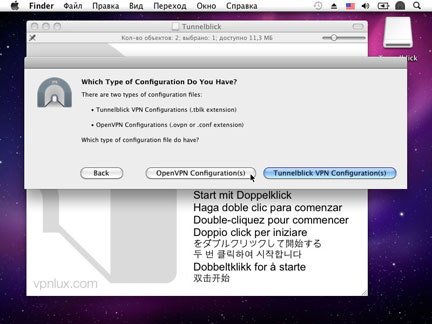 Шаг 6. Щелкните OpenVPN Configuration(s).
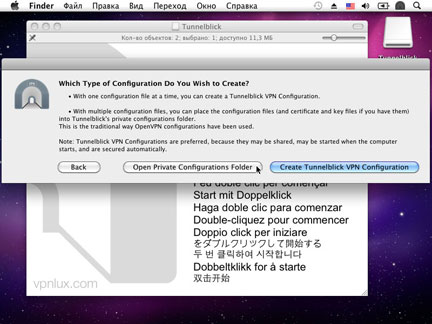 Шаг 7. Щелкните Open Private Configurations Folder.
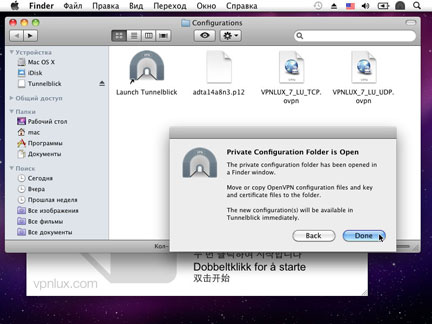 Шаг 8. Переместите конфигурационные файлы (см. ссылка mac OpenVPN конфиг в панели пользователя) в открытую папку и щелкните Done.
 Шаг 9. Щелкните по иконке Tunnelblick в строке меню и выберите наименование вашего подключения с приставкой Connect.NB! Мы прежде всего рекомендуем использовать UDP соединение, если оно стабильно, в обратном случае используйте TCP.
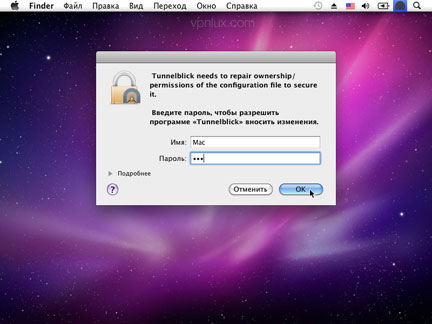 Шаг 10. Введите ваш Mac OS пароль.
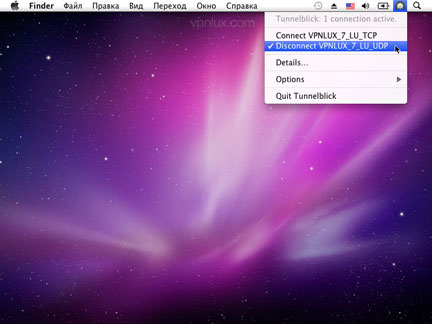 Шаг 11. Для разъединения щелкните по иконке Tunnelblick icon в строке меню и выберите наименование вашего подключения с приставкой Disconnect.NB! Никогда не сохраняйте конфигурационные файлы на компьютерах общего пользования! Если кто-либо подключится по сохраненным данным, ваше соединение будет разорвано!
Удаление VPN подключения
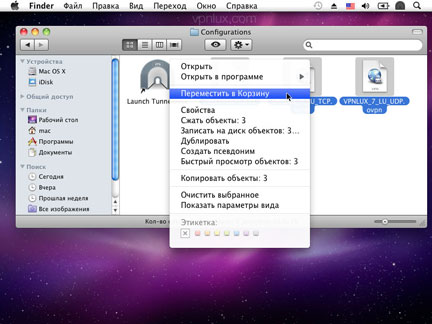
- Шаг 1. Найдите папку конфигураций Tunnelblick (путь по умолчанию: Library/Application Support/Tunnelblick), выделите конфигурации vpnlux, щелкните правой кнопкой мыши и выберите Переместить в Корзину, после чего Очистите Корзину.
 Шаг 1. Найдите папку конфигураций Tunnelblick (путь по умолчанию: Library/Application Support/Tunnelblick), выделите конфигурации vpnlux, щелкните правой кнопкой мыши и выберите Переместить в Корзину, после чего Очистите Корзину.
- Что такое ВПН? VPN — технология используется для создания на вашем компьютере во время соединения с интернетом специального защищенного зашифрованного туннеля, по которому передаются данные во время работы.
Услуги Мы предоставляем различные пакеты услуг VPN от одиночного соединения до двойных связок. В каждом пакете Вы сможете пользоваться всеми доступными технологиями VPN, такими как L2TP VPN, PPTP VPN и OpenVPN.
Преимущества VPN Решение купить сервис VPN позволит вам в дальнейшем пользоваться сайтами в Интернете, не оставляя следов своего пребывания, пользоваться торрентами, посещать сайты, запрещенные для просмотра в вашей стране проживания, обходить ограничения корпоративных сетевых экранов.
КонтактыE-mail: support vpnlux.com
Jabber: vpnlux_supportradio.pm
Источник
Tunnel vpn mac os
To be notified of new releases, use Tunnelblick’s built-in update mechanism or subscribe to the Tunnelblick Announce Mailing List.
Beta versions are suitable for many users. See Stable vs. Beta for details.
As a Free Software project, Tunnelblick puts its users first. There are no ads, no affiliate marketers, no tracking — we don’t even keep logs of your IP address or other information. We just supply open technology for fast, easy, private, and secure control of VPNs.
| Beta | Tunnelblick 3.8.7beta02 (build 5730, macOS 10.10+, Universal, notarized) released 2021-09-01 Release Notes SHA1: a3af1397bc94525eb4958df14117deb7b13f4924 MD5: 4ce17de0b11555956161e318dc6596fb SHA256: f5d38cb9608fac0f60df777f3dcfcfc4a33a6a4df04a48d3bef6713160356d5b GnuPG v2 signature |
| Stable | Tunnelblick 3.8.6a (build 5711, macOS 10.10+, Universal, notarized) released 2021-09-01 Release Notes SHA1: a5ac61e13d312ae22723b47b57fc4c394d35d3ec MD5: d2eaf7966bf6910e473e233059188cf8 SHA256: 636c52eaba89a0fc7549160892fabb62f4d11bb34d959872f2c0ab93765e0835 GnuPG v2 signature |
| Older | See the Deprecated Downloads page. Includes versions for earlier versions of macOS and OS X. |
| Uninstaller | The Tunnelblick Uninstaller has been replaced by an «Uninstall» button on the «Utilities» panel of Tunnelblick’s «VPN Details» window as of Tunnelblick 3.8.5beta02. |
| Please read Uninstalling Tunnelblick before using Tunnelblick Uninstaller. | |
| Tunnelblick Uninstaller 1.12 (build 5090, macOS and OS X 10.7.5+, Intel-64 only, works on M1 using Rosetta) released 2018-06-26 Release Notes SHA1: c4503360e032877e1ab0c2742872250c646ba983 MD5: 0b8c3f0898ca88f4bbe90fe61271d7ab SHA256: 62b528da3212fd78146c6bcf03d88f4f8653845068b61f4f62029a3af791ef42 GnuPG v2 signature |
Verifying Downloads
You should verify all downloads. Even though https:, the .dmg format, and the application’s macOS digital signature provide some protection, they can be circumvented.
Verifying Hashes
Comparing the SHA256, SHA1, and MD5 hashes of your downloaded file with the official published ones will provide additional assurance that the download is legitimate and has not been modified. You can compare the hashes with programs included with macOS without the need to install additional software.
To compute the hashes of a file you’ve downloaded, type the following into /Applications/Utilities/Terminal:
shasum -a 256 path-to-the-file
openssl sha1 path-to-the-file
openssl md5 path-to-the-file
Then compare the computed hashes with the values shown near the link for the downloaded file.
(Don’t type ‘path-to-the-file‘ — type the path to the file, that is, the sequence of folders that contain the file plus the file name (e.g. /Users/janedoe/Desktop/Tunnelblick_3.7.2a_build_4851.dmg). An easy way to get it into Terminal is to drag/drop the file anywhere in the Terminal window. The pointer will turn into a green and white plus sign («+») to indicate the path will be dropped. So you would type ‘ shasum -a 256 ‘ — with a space after the «256» — and then drag/drop the disk image file anywhere in the Terminal window.)
For additional assurance that the hashes displayed on this site have not been compromised, the hashes are also available in the description of each «Release» on Tunnelblick’s GitHub site, which is hosted and administered separately from this site.
Verifying GnuPG Signatures
Recent Tunnelblick disk images are also signed with GnuPG version 2.
To prepare for verifying signatures, you should download and install GnuPG 2.2.3 or higher, and then add the Tunnelblick Security GnuPG public key (key ID 6BB9367E, fingerprint 76DF 975A 1C56 4277 4FB0 9868 FF5F D80E 6BB9 367E) to your trusted GnuPG keyring by typing the following into /Applications/Utilities/Terminal:
gpg —import TunnelblickSecurityPublicKey.asc .
To verify the signature of a file, download the corresponding signature file and then type the following into /Applications/Utilities/Terminal:
gpg —verify path-to-the-signature-file path-to-the-disk-image-file
The result should be similar to the following:
gpg: Signature made Sat Dec 16 19:17:03 2017 EST
gpg: using RSA key B4D96F0D6A58E335A0F4923A2FF3A2B2DC6FD12C
gpg: Good signature from «Tunnelblick Security » [ultimate]
User Contributions
These downloads have been contributed by users and usually help deal with special circumstances. They are not endorsed or checked by the Tunnelblick project, and you use them at your own risk. To contribute a download, send it to the developers or post it on the Tunnelblick Discussion Group.
Before using these scripts, please read Tunnelblick and VPNs: Privacy and Security. (Actually, everyone using a VPN should read that!)
Note: these scripts are executed as root. Instructions for using scripts.
| Scripts to Unload Cisco Tun Kext: user-contributed-001-pre-post.zip |
| SHA1: d3b09a2284de2862be7d55059581a85698930b28 MD5: f6f484864697607ee5c7206a5b056b12 |
| Contributed by «petiepooo». These scripts unload the Cisco AnyConnect tun kext before a Tunnelblick connection is started, and reload the Cisco tun kext after a Tunnelblick connection is stopped. (The Cisco kext interferes with Tunnelblick’s operation of tun connections.) |
| Scripts to Mount/Unmount a Volume: user-contributed-002-mount-unmount-volume.zip |
| SHA1: eb69727620fa8c46633d9ccf9f86c4b258fea7e6 MD5: 5b3b04bea43403b2a709aaa4c92d7473 |
| Contributed by John Griffis. These scripts mount a volume after a configuration is connected and unmount it when the configuration is disconnected. Scripts must be edited before use (in any plain-text editor) to specify details of the volume to be connected. For a note about connecting to a CIFS account, see this discussion. |
| Scripts to Monitor Connection Time and Bandwidth Use: user-contributed-003-monitor-uptime-and-bandwidth.zip |
| SHA1: 384b370967e722eacb2f3a782e8c326d87174003 MD5: 2c23ed5c31a1238843fb5ea36fd5dd74 |
| Contributed by «vkapovit». |
| These scripts provide a mechanism for the user to be alerted when the VPN has been up for more than 20 minutes or when bandwidth has exceeded 100MB. See this discussion for details. Requires Growl. Includes compiled binaries; use at your own risk. |
| Scripts to Launch and Kill a Program: user-contributed-004-launch-kill-program.zip |
| SHA1: 977aa7cc55f3e191b50057fe766c426af01808eb MD5: beccc55286b398fe0a8bcb798e25a883 |
| Contributed by «anonymous». |
| These scripts cause a program to be launched when a VPN is connected and then killed when the VPN is disconnected. It can be used with a torrent program, for example, so that the program is only active when the VPN is connected. Note that there may be a short time after the VPN has been disconnected before the program is killed. |
Download Integrity
In June 2015 there was much discussion (and outrage) about SourceForge providing downloads that contain unwanted or malicious software; SourceForge has changed their policies to help avoid this. Tunnelblick binaries were hosted on SourceForge from the fall of 2013, when Google Code stopped hosting new binaries, until 2015-07-17, when they were moved from SourceForge to GitHub.
Tunnelblick protects against unwanted software insertions by publishing the SHA1 and MD5 hashes for each of our downloads. You should verify the hashes of all Tunnelblick downloads by following the instructions above.
Additional safeguards automatically protect updates performed by Tunnelblick’s built-in update mechanism:
- Updates are controlled by tunnelblick.net and all update data is transported via https:
- Update downloads contain digital signatures to verify they have not been modified. (This is in addition to the macOS digital signature of the Tunnelblick application itself.) See Digital Signatures.
Downloading and Installing on macOS Mojave and Higher
When you install any application, including Tunnelblick, after it has been downloaded normally, macOS Mojave and higher send information to Apple (they «phone home»). macOS Catalina and higher also «phone home» each time you launch any application, including Tunnelblick.
These behaviors are considered by some to be a violation of privacy.
You can avoid these behaviors, but you will be disabling security checks which macOS would normally do on a downloaded program, including checks that the program is correctly notarized and has been found to not contain malware.
To avoid having macOS Mojave and higher «phone home» when you install Tunnelblick, you can do the following to download Tunnelblick to your Desktop:
- Open the Terminal application located in /Applications/Utilities.
- Type (or copy/paste) » curl —output
/Desktop/Tunnelblick.dmg —location » into Terminal without the quotation marks (the space after » —location » is important).
This will download the file to your Desktop without the flag that indicates the file was downloaded from the Internet. When that flag is present, macOS Mojave and higher «phone home» when the downloaded file is double-clicked to install it; when the flag is not present, macOS Mojave doesn’t.
To avoid having macOS Catalina and higher «phone home» when you launch Tunnelblick (or other applications), see How to run apps in private.
Источник
TunnelBear — мой выбор VPN для Mac и iOS
C помощью VPN вы снимите все ограничения провайдеров, сохраните анонимность при посещении сайтов и сможете безопасно работать с публичными WiFi.
![]()
Влад Гороховский
Редактор. Пишу про софт и гаджеты, которые мне интересны. Делаю клавиатурный тренажер KeyKey для Mac.
![]()
Влад Гороховский

Я много путешествую и часто работаю за компьютером из публичных мест, поэтому VPN для меня — вопрос личной безопасности и приватности. С ним я спокоен за сохранность своих паролей; свободно захожу на заблокированные сайты; пользуюсь Prime аккаунтом на американском Amazon.
Все это без VPN было бы невозможно. Уже три года я пользуюсь VPN-провайдером TunnelBear. Рассказываю почему.
Что такое VPN
VPN — надёжный способ обезопасить работу с сети через публичные Wi-Fi. Объясню на пальцах: при помощь специальной программы вы подключаетесь к серверу в другой стране и уже этот сервер открывает сайты, загружает файлы и тому подобное. Если сервер в Цюрихе, то «интернет» будет уверен, что и вы физически в Цюрихе. Главное — ваша связь с сервером шифруется. Поэтом, провайдер, начальник и другие пользователи вашей сети не смогут увидеть ваш трафик.
 Принцип работы VPN-сервиса
TunnelBear для Mac
Сейчас на рынке VPN-огромное число бесплатных сервисов и сервисов с «вечной» подпиской за копейки. Такие сервисы зарабатывают на продаже ваших личных данных рекламодателям и черт ещё знает кому. И нужно быть очень наивным, чтобы в это не верить.
Приватность и безопасность — дело деликатное, поэтому выбирать VPN-сервис нужно как врача: с опытом и положительной репутацией.
Раньше я пользовался услугами американского encrypt.me (бывший Cloak), но в 2015-м перебрался на TunnelBear, разработанный в Канаде. Эти ребята не собирают и не хранят историю вашей интернет активности и в качестве доказательств ежегодно приглашают внешнего аудитора, чтобы проверять безопасность их инфраструктуры исходный код. Если интересно, то почитайте их политику конфиденциальности.
Ежемесячная подписка на TunnelBear стоит 9.99$, но выгоднее сразу покупать годовую за 50$. Обе подписки не имеют ограничений по установке, но одновременно можно использовать пять одновременных подключений с разных устройств. Я использую TunnelBear на семи компьютерах и телефонах, из которых практически постоянно к VPN подключены четыре.
Кстати, кроме macOS и iOS «медведь» поддерживает Windows и Android.
Читатели говорят, что в России сайт TunnleBear заблокирован . Но его клиент для iOS свободно можно скачать с App Store и зарегистрироваться оттуда.
Скорость подключения
Скорость в TunnelBear меня радует больше всего. Субъективно я не различаю разницы в скорости с VPN и без него. Поэтому я решил сделать замеры.
Скорость измерял на проводном подключении в 1 Гигабит, точка доступа Xiaomi MI WiFi Wireless Router 4А. Сначала потестил скорость с Киевом, Амстердамом и Франкфуртом без VPN. Затем с этими же серверами через VPN сервер в Германии.
 Скорость интернета с вкаченным VPN не падает ниже 370 мегабит
Конечно же VPM скорость подрезал, но минимальная скорость загрузки не опускалась ниже 379 Мегабит. Это где-то 30 МБ в секунду. Мне более чем достаточно.
На самом деле я пользуюсь не проводным подключением, а WiFi. Реальная скорость, которую выдает роутер Xiaomi колеблится в пределах 200–320 Мегабит. Поэтому я и не ощущаю никакой разницы при включении VPN.
Скорость подключения колеблется от сервера к серверу. Если в настройка TunnelBear выбрать автоматически подбор сервака, то он будет искать самый быстрый по Ping, но не скорости загрузки. Если вы хотите выжать максимум из скорости, то стоит в ручную подыскать сервер, с которым интернет из вашей локации будет самым быстрым. У меня это Германия.
 У TunnelBear сервера в 22-х странах, быстрейший и ближайший к вам сервер он может выбрать сам
Как пользоваться TunnelBear на Mac
Чтобы освоить VPN, не нужно даже стараться. Процесс сводится к нажатию кнопки ON/OFF в специальном клиенте. Я вам больше скажу: включив один раз TunnelBear, про него можно забыть. При смене сетей переподключение произойдёт автоматически. Можно поступить ещё проще — поставить плагин для Chrome, который шифрует только веб-трафик. Такой вариант я сделал для своей бабушки.
 Подключение к VPN происходит в два клика
Если вы готовы выжать из сервиса максимум, то обратите внимание на следующее моменты:
- При включении функции VigilantBear TunnelBear заблокирует HTTP-трафик в незнакомых сетях, пока он устанавливает безопасное подключение, пользуюсь постоянно;
- Если в списке серверов выбрать Auto, то TunnelBear автоматически подключится к ближайшему, а значит, быстрейшему серверу;
- Галочка TCP override позволит использовать TCP протокол вместо UDP. Эта техническая мамба-джамба означает, что TunnelBear сработает даже там, где провайдер блокирует VPN. Судя по гуглу, TunnelBear справляется даже с китайским «Золотым щитом»;
- Функция GhostBear маскирует ваш шифрованный трафик под обычную интернет активность. Такое шифрование сложнее определить и блокировать.
 В список исключений можно добавить безопасные сети, в которых трафик шифроваться не будет
  Опции Vigilant и GhostBear позволяют обходит блокировку VPN
TunnelBear для iOS и Android
Для настройки нужно загрузить бесплатный клиент, который установит SSL-сертификат. Такой сертификат позволит iOS-устройствам устанавливать VPN соединение автоматически, без необходимости запускать TunnelBear. Для этого просто активируйте пункт «Подключаться по запросу» в настройках.
 TunnelBear для iOS также умеет автоматически подключатся к самому быстрому серверу
В итоге
Мишка крут. Этот VPN работает гладко, как никогда, а на его скоростях можно спокойно смотреть онлайн-сериалы в 4K. При первой установке вам дают 7-девный пробный период. Затем 1 ГБ бесплатного трафика ежемесячно. Все что больше, уже по подписке.
Источник


