- Tunnelblick on macOS Catalina
- Installing System Extensions
- Installing Kexts on an M1 Mac Running macOS Big Sur 11.1
- Installing Kexts on an Intel Mac running macOS Big Sur
- Install Tunnelblick on macOS
- 1. Download Tunnelblick
- 2. Install Tunnelblick
- 3. Download the configuration you want
- 4. Connect to OVPN
- 5. Enter your credentials
- 6. Finished
- Tunnelblick для mac os
- Verifying Downloads
- User Contributions
- Download Integrity
- Downloading and Installing on macOS Mojave and Higher
Tunnelblick on macOS Catalina
Important: See The Future of Tun and Tap VPNs on macOS for information about changes to future versions of macOS.
If you are using macOS Catalina, you should use the latest version of Tunnelblick. You should allow Tunnelblick to automatically check for updates on the «Preferences» panel of Tunnelblick’s «VPN Details» window.
The following is the current status of issues that have been seen using the latest stable version of Tunnelblick on the latest version of macOS Catalina.
To report an issue, please follow the instructions at Tunnelblick Issues.
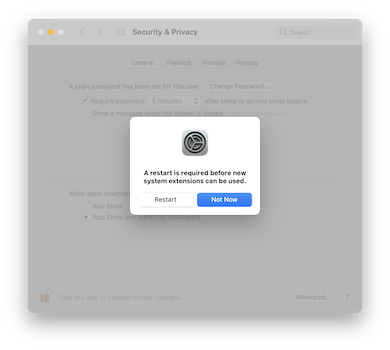
NEW macOS REQUIREMENT: Restarting the computer is required by macOS Catalina before connecting some configurations for the first time.
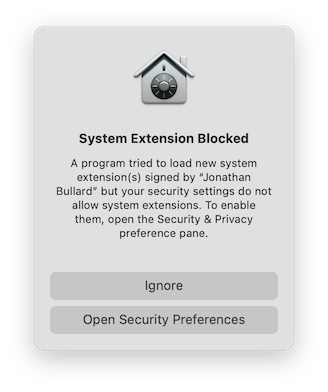
If a configuration requires a Tun or Tap system extension, the first time Tunnelblick asks macOS to load the appropriate system extension, macOS will tell the user that they must give permission to load system extensions signed by «Jonathan Bullard» in System Preferences : Security & Privacy : General. If the user gives such permission by clicking «Allow», macOS must restart the computer before the permission will be honored. After the permission has been given and the computer has been restarted, you may then connect all VPN configurations normally.
This only needs to be done one time. Once permission to load system extensions signed by «Jonathan Bullard» has been granted and the computer has been restarted, no further action is needed. Tunnelblick will be able to load Tun and Tap system extensions for any configuration without user interaction, and that ability will persist after computer restarts, «safe boots», and updates to Tunnelblick.
WON’T FIX: Sidecar does not work when a VPN is connected using Tunnelblick’s default for a configuration.
Sidecar does not work if IPv6 is disabled. By default, Tunnelblick disables IPv6 while a VPN is connected. This is done to prevent information leaks in common VPN setups (see A Glance through the VPN Looking Glass: IPv6 Leakage and DNS Hijacking in Commercial VPN clients).
Источник
Installing System Extensions
Important: See The Future of Tun and Tap VPNs on macOS for information about changes to future versions of macOS.
IMPORTANT: You only need to install Tunnelblick’s system extensions if you are
- Running on macOS Big Sur; and
- Using to a «Tap» VPN.
The process of installing Tunnelblick’s system extensions on recent versions of macOS requires one or more restarts of your computer.
The following describes the process when using Tunnelblick 3.8.5 beta03 (build 5630) and higher:
Installing Kexts on an M1 Mac Running macOS Big Sur 11.1
On an Apple Silicon (M1) Mac, the process of installing Tunnelblick’s system extensions requires three restarts of your computer.
- Use the button on Tunnelblick’s «Utilities» panel to install Tunnelblick’s Tun and Tap system extensions.
- After authorizing Tunnelblick to install the kexts, you will be prompted by macOS to open the Security & Privacy preference pane to allow the kexts to be loaded:
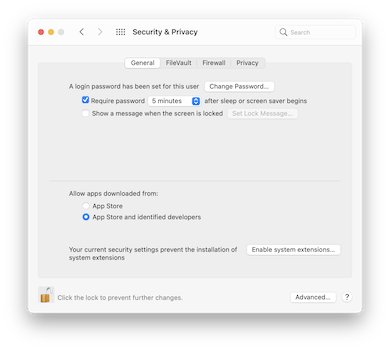
After opening the Security & Privacy preference pane, click the «Enable system extensions…» button:
You’ll see the following instructions:
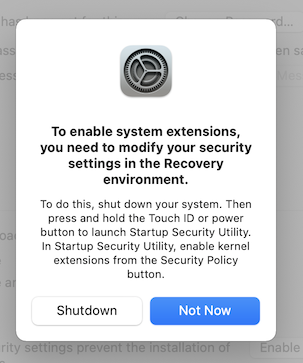
After authorizing the software, you will be prompted to restart your computer to be able to use the new system extensions:
Installing Kexts on an Intel Mac running macOS Big Sur
On an Intel Mac, the process of installing Tunnelblick’s system extensions requires one restart of your computer.
- Use the button on Tunnelblick’s «Utilities» panel to install Tunnelblick’s Tun and Tap system extensions.
- After authorizing Tunnelblick to install the kexts, you will be prompted by macOS to open the Security & Privacy preference pane to allow the kexts to be loaded:
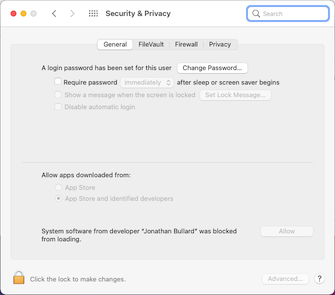
After opening the Security & Privacy preference pane, click the «Allow» button:
After authorizing the software, you will be prompted to restart your computer to be able to use the new system extensions:
Источник
Install Tunnelblick on macOS
1. Download Tunnelblick
To connect to OVPN you first need to download Tunnelblick.
2. Install Tunnelblick
Double-click on the file you downloaded in the previous step and go through the installation process.
3. Download the configuration you want
Double-click the downloaded file to import it into Tunnelblick.
If you see: 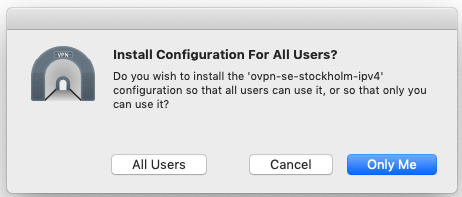
Choose Only Me. You might need to enter your password in order to allow Tunnelblick to install the configuration file. 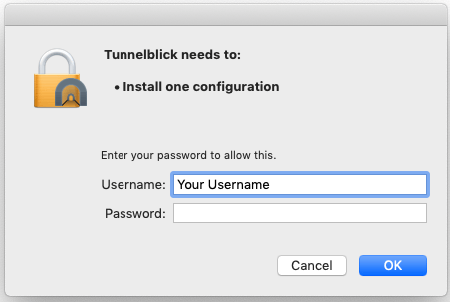
4. Connect to OVPN
The tunnelblick icon, which looks like a tunnel, should be visible on the upper right corner of your screen.
Click the icon connect to the configuration file you downloaded.
5. Enter your credentials
Enter the username and password you used when creating your OVPN account.
Select Save to keychain if you want Tunnelblick to remember your login credentials. 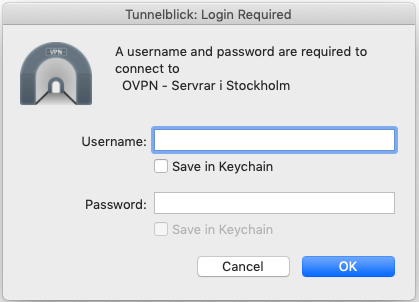
6. Finished
You should now be connected to OVPN and be able to browse the internet safely. To make sure everything was set up correctly, please check the dashboard to verify that you are connected.
Источник
Tunnelblick для mac os
To be notified of new releases, use Tunnelblick’s built-in update mechanism or subscribe to the Tunnelblick Announce Mailing List.
Beta versions are suitable for many users. See Stable vs. Beta for details.
As a Free Software project, Tunnelblick puts its users first. There are no ads, no affiliate marketers, no tracking — we don’t even keep logs of your IP address or other information. We just supply open technology for fast, easy, private, and secure control of VPNs.
| Beta | Tunnelblick 3.8.7beta02 (build 5730, macOS 10.10+, Universal, notarized) released 2021-09-01 Release Notes SHA1: a3af1397bc94525eb4958df14117deb7b13f4924 MD5: 4ce17de0b11555956161e318dc6596fb SHA256: f5d38cb9608fac0f60df777f3dcfcfc4a33a6a4df04a48d3bef6713160356d5b GnuPG v2 signature |
| Stable | Tunnelblick 3.8.6a (build 5711, macOS 10.10+, Universal, notarized) released 2021-09-01 Release Notes SHA1: a5ac61e13d312ae22723b47b57fc4c394d35d3ec MD5: d2eaf7966bf6910e473e233059188cf8 SHA256: 636c52eaba89a0fc7549160892fabb62f4d11bb34d959872f2c0ab93765e0835 GnuPG v2 signature |
| Older | See the Deprecated Downloads page. Includes versions for earlier versions of macOS and OS X. |
| Uninstaller | The Tunnelblick Uninstaller has been replaced by an «Uninstall» button on the «Utilities» panel of Tunnelblick’s «VPN Details» window as of Tunnelblick 3.8.5beta02. |
| Please read Uninstalling Tunnelblick before using Tunnelblick Uninstaller. | |
| Tunnelblick Uninstaller 1.12 (build 5090, macOS and OS X 10.7.5+, Intel-64 only, works on M1 using Rosetta) released 2018-06-26 Release Notes SHA1: c4503360e032877e1ab0c2742872250c646ba983 MD5: 0b8c3f0898ca88f4bbe90fe61271d7ab SHA256: 62b528da3212fd78146c6bcf03d88f4f8653845068b61f4f62029a3af791ef42 GnuPG v2 signature |
Verifying Downloads
You should verify all downloads. Even though https:, the .dmg format, and the application’s macOS digital signature provide some protection, they can be circumvented.
Verifying Hashes
Comparing the SHA256, SHA1, and MD5 hashes of your downloaded file with the official published ones will provide additional assurance that the download is legitimate and has not been modified. You can compare the hashes with programs included with macOS without the need to install additional software.
To compute the hashes of a file you’ve downloaded, type the following into /Applications/Utilities/Terminal:
shasum -a 256 path-to-the-file
openssl sha1 path-to-the-file
openssl md5 path-to-the-file
Then compare the computed hashes with the values shown near the link for the downloaded file.
(Don’t type ‘path-to-the-file‘ — type the path to the file, that is, the sequence of folders that contain the file plus the file name (e.g. /Users/janedoe/Desktop/Tunnelblick_3.7.2a_build_4851.dmg). An easy way to get it into Terminal is to drag/drop the file anywhere in the Terminal window. The pointer will turn into a green and white plus sign («+») to indicate the path will be dropped. So you would type ‘ shasum -a 256 ‘ — with a space after the «256» — and then drag/drop the disk image file anywhere in the Terminal window.)
For additional assurance that the hashes displayed on this site have not been compromised, the hashes are also available in the description of each «Release» on Tunnelblick’s GitHub site, which is hosted and administered separately from this site.
Verifying GnuPG Signatures
Recent Tunnelblick disk images are also signed with GnuPG version 2.
To prepare for verifying signatures, you should download and install GnuPG 2.2.3 or higher, and then add the Tunnelblick Security GnuPG public key (key ID 6BB9367E, fingerprint 76DF 975A 1C56 4277 4FB0 9868 FF5F D80E 6BB9 367E) to your trusted GnuPG keyring by typing the following into /Applications/Utilities/Terminal:
gpg —import TunnelblickSecurityPublicKey.asc .
To verify the signature of a file, download the corresponding signature file and then type the following into /Applications/Utilities/Terminal:
gpg —verify path-to-the-signature-file path-to-the-disk-image-file
The result should be similar to the following:
gpg: Signature made Sat Dec 16 19:17:03 2017 EST
gpg: using RSA key B4D96F0D6A58E335A0F4923A2FF3A2B2DC6FD12C
gpg: Good signature from «Tunnelblick Security » [ultimate]
User Contributions
These downloads have been contributed by users and usually help deal with special circumstances. They are not endorsed or checked by the Tunnelblick project, and you use them at your own risk. To contribute a download, send it to the developers or post it on the Tunnelblick Discussion Group.
Before using these scripts, please read Tunnelblick and VPNs: Privacy and Security. (Actually, everyone using a VPN should read that!)
Note: these scripts are executed as root. Instructions for using scripts.
| Scripts to Unload Cisco Tun Kext: user-contributed-001-pre-post.zip |
| SHA1: d3b09a2284de2862be7d55059581a85698930b28 MD5: f6f484864697607ee5c7206a5b056b12 |
| Contributed by «petiepooo». These scripts unload the Cisco AnyConnect tun kext before a Tunnelblick connection is started, and reload the Cisco tun kext after a Tunnelblick connection is stopped. (The Cisco kext interferes with Tunnelblick’s operation of tun connections.) |
| Scripts to Mount/Unmount a Volume: user-contributed-002-mount-unmount-volume.zip |
| SHA1: eb69727620fa8c46633d9ccf9f86c4b258fea7e6 MD5: 5b3b04bea43403b2a709aaa4c92d7473 |
| Contributed by John Griffis. These scripts mount a volume after a configuration is connected and unmount it when the configuration is disconnected. Scripts must be edited before use (in any plain-text editor) to specify details of the volume to be connected. For a note about connecting to a CIFS account, see this discussion. |
| Scripts to Monitor Connection Time and Bandwidth Use: user-contributed-003-monitor-uptime-and-bandwidth.zip |
| SHA1: 384b370967e722eacb2f3a782e8c326d87174003 MD5: 2c23ed5c31a1238843fb5ea36fd5dd74 |
| Contributed by «vkapovit». |
| These scripts provide a mechanism for the user to be alerted when the VPN has been up for more than 20 minutes or when bandwidth has exceeded 100MB. See this discussion for details. Requires Growl. Includes compiled binaries; use at your own risk. |
| Scripts to Launch and Kill a Program: user-contributed-004-launch-kill-program.zip |
| SHA1: 977aa7cc55f3e191b50057fe766c426af01808eb MD5: beccc55286b398fe0a8bcb798e25a883 |
| Contributed by «anonymous». |
| These scripts cause a program to be launched when a VPN is connected and then killed when the VPN is disconnected. It can be used with a torrent program, for example, so that the program is only active when the VPN is connected. Note that there may be a short time after the VPN has been disconnected before the program is killed. |
Download Integrity
In June 2015 there was much discussion (and outrage) about SourceForge providing downloads that contain unwanted or malicious software; SourceForge has changed their policies to help avoid this. Tunnelblick binaries were hosted on SourceForge from the fall of 2013, when Google Code stopped hosting new binaries, until 2015-07-17, when they were moved from SourceForge to GitHub.
Tunnelblick protects against unwanted software insertions by publishing the SHA1 and MD5 hashes for each of our downloads. You should verify the hashes of all Tunnelblick downloads by following the instructions above.
Additional safeguards automatically protect updates performed by Tunnelblick’s built-in update mechanism:
- Updates are controlled by tunnelblick.net and all update data is transported via https:
- Update downloads contain digital signatures to verify they have not been modified. (This is in addition to the macOS digital signature of the Tunnelblick application itself.) See Digital Signatures.
Downloading and Installing on macOS Mojave and Higher
When you install any application, including Tunnelblick, after it has been downloaded normally, macOS Mojave and higher send information to Apple (they «phone home»). macOS Catalina and higher also «phone home» each time you launch any application, including Tunnelblick.
These behaviors are considered by some to be a violation of privacy.
You can avoid these behaviors, but you will be disabling security checks which macOS would normally do on a downloaded program, including checks that the program is correctly notarized and has been found to not contain malware.
To avoid having macOS Mojave and higher «phone home» when you install Tunnelblick, you can do the following to download Tunnelblick to your Desktop:
- Open the Terminal application located in /Applications/Utilities.
- Type (or copy/paste) » curl —output
/Desktop/Tunnelblick.dmg —location » into Terminal without the quotation marks (the space after » —location » is important).
This will download the file to your Desktop without the flag that indicates the file was downloaded from the Internet. When that flag is present, macOS Mojave and higher «phone home» when the downloaded file is double-clicked to install it; when the flag is not present, macOS Mojave doesn’t.
To avoid having macOS Catalina and higher «phone home» when you launch Tunnelblick (or other applications), see How to run apps in private.
Источник


