- Установка OpenVPN на Mac OS X, Tunnelblick
- Создание VPN подключения
- Удаление VPN подключения
- Tunnelblick — OpenVPN клиент для Mac OS X
- Комментариев: 5
- OpenVPN Tunnelblick перестал работать в macOS Big Sur и как это исправить
- Как заставить работать OpenVPN Tunnelblick с Tap устройствами в macOS Big Sur?
- Installing System Extensions
- Installing Kexts on an M1 Mac Running macOS Big Sur 11.1
- Installing Kexts on an Intel Mac running macOS Big Sur
- Setting up Tunnelblick
- Setting Up and Installing Configurations
- Converting OpenVPN Configurations to Tunnelblick VPN Configurations
- Creating and Installing a Tunnelblick VPN Configuration
- Modifying a Tunnelblick VPN Configuration
- Files Contained in a Tunnelblick VPN Configuration
- The «Set Nameserver» Check Box and DNS & WINS Settings
- The OpenVPN —user and —group options and openvpn-down-root.so
Установка OpenVPN на Mac OS X, Tunnelblick
Создание VPN подключения
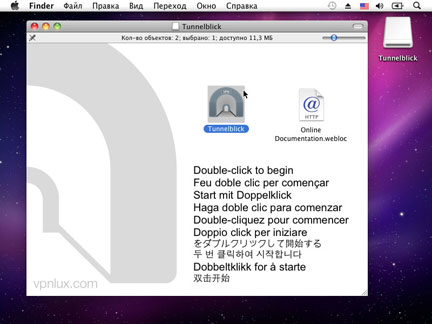
 Шаг 1. Скачайте Tunnelblick с http://code.google.com/p/tunnelblick/ и откройте контейнер. Дважды щелкните по иконке приложения.
- Шаг 2. Щелкните Открыть.
- Шаг 3. Введите ваш Mac OS Пароль и щелкните OK.
- Шаг 4. Щелкните Launch после успешной инсталяции.
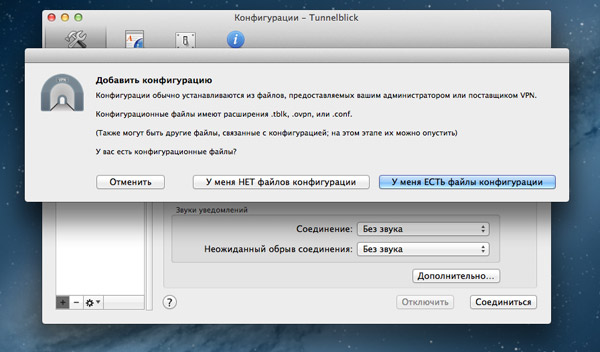
- Шаг 5. Щелкните I have configuration files.
- Шаг 6. Щелкните OpenVPN Configuration(s).
- Шаг 7. Щелкните Open Private Configurations Folder.
- Шаг 8. Переместите конфигурационные файлы (см. ссылка mac OpenVPN конфиг в панели пользователя) в открытую папку и щелкните Done.
- Шаг 9. Щелкните по иконке Tunnelblick в строке меню и выберите наименование вашего подключения с приставкой Connect.NB! Мы прежде всего рекомендуем использовать UDP соединение, если оно стабильно, в обратном случае используйте TCP.
- Шаг 10. Введите ваш Mac OS пароль.
- Шаг 11. Для разъединения щелкните по иконке Tunnelblick icon в строке меню и выберите наименование вашего подключения с приставкой Disconnect.NB! Никогда не сохраняйте конфигурационные файлы на компьютерах общего пользования! Если кто-либо подключится по сохраненным данным, ваше соединение будет разорвано!
 Шаг 1. Скачайте Tunnelblick с http://code.google.com/p/tunnelblick/ и откройте контейнер. Дважды щелкните по иконке приложения.
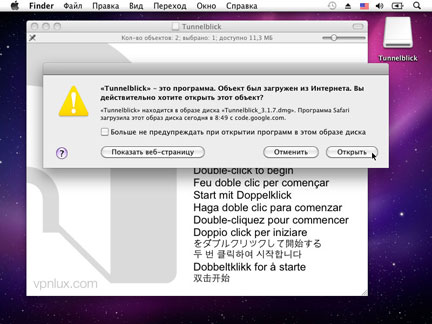 Шаг 2. Щелкните Открыть.
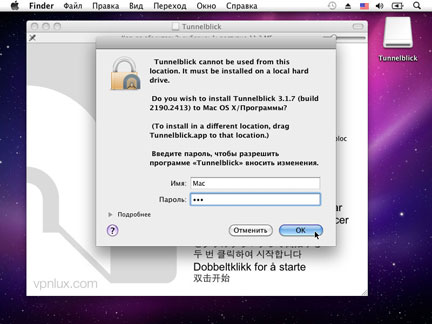 Шаг 3. Введите ваш Mac OS Пароль и щелкните OK.
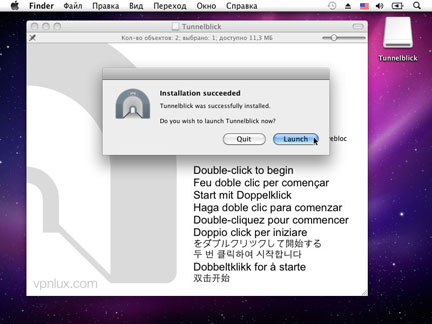 Шаг 4. Щелкните Launch после успешной инсталяции.
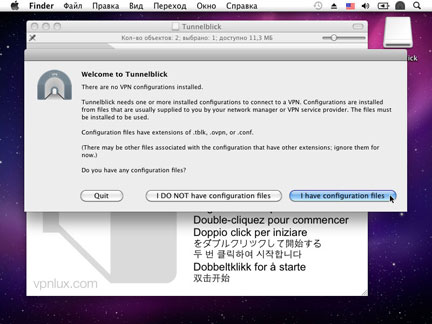 Шаг 5. Щелкните I have configuration files.
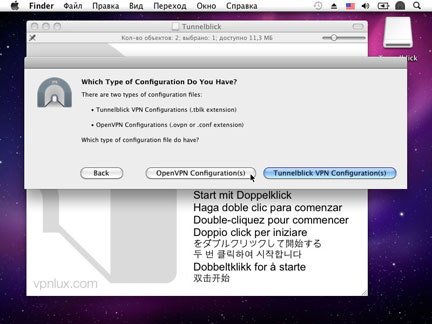 Шаг 6. Щелкните OpenVPN Configuration(s).
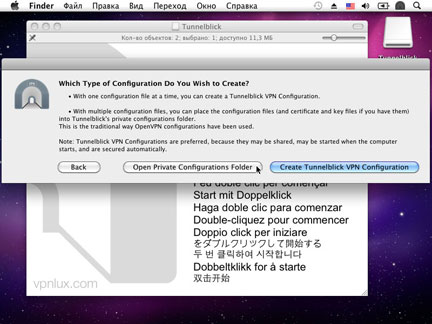 Шаг 7. Щелкните Open Private Configurations Folder.
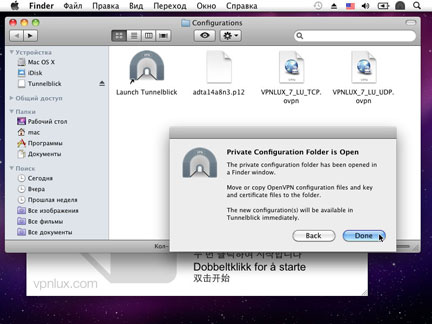 Шаг 8. Переместите конфигурационные файлы (см. ссылка mac OpenVPN конфиг в панели пользователя) в открытую папку и щелкните Done.
 Шаг 9. Щелкните по иконке Tunnelblick в строке меню и выберите наименование вашего подключения с приставкой Connect.NB! Мы прежде всего рекомендуем использовать UDP соединение, если оно стабильно, в обратном случае используйте TCP.
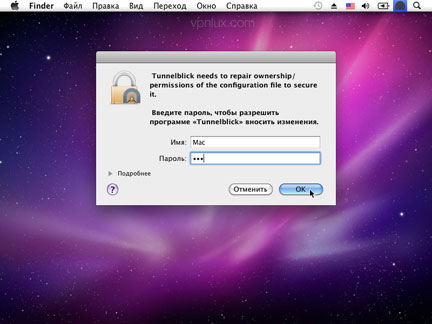 Шаг 10. Введите ваш Mac OS пароль.
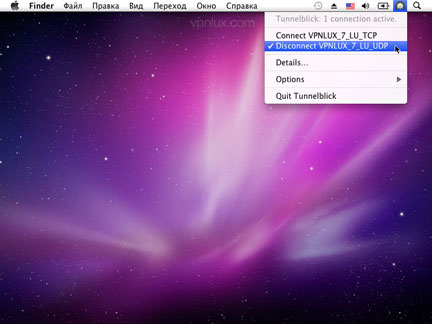 Шаг 11. Для разъединения щелкните по иконке Tunnelblick icon в строке меню и выберите наименование вашего подключения с приставкой Disconnect.NB! Никогда не сохраняйте конфигурационные файлы на компьютерах общего пользования! Если кто-либо подключится по сохраненным данным, ваше соединение будет разорвано!
Удаление VPN подключения
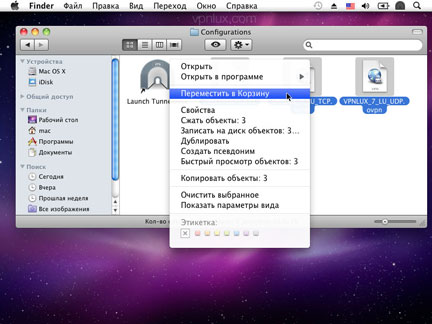
- Шаг 1. Найдите папку конфигураций Tunnelblick (путь по умолчанию: Library/Application Support/Tunnelblick), выделите конфигурации vpnlux, щелкните правой кнопкой мыши и выберите Переместить в Корзину, после чего Очистите Корзину.
 Шаг 1. Найдите папку конфигураций Tunnelblick (путь по умолчанию: Library/Application Support/Tunnelblick), выделите конфигурации vpnlux, щелкните правой кнопкой мыши и выберите Переместить в Корзину, после чего Очистите Корзину.
- Что такое ВПН? VPN — технология используется для создания на вашем компьютере во время соединения с интернетом специального защищенного зашифрованного туннеля, по которому передаются данные во время работы.
Услуги Мы предоставляем различные пакеты услуг VPN от одиночного соединения до двойных связок. В каждом пакете Вы сможете пользоваться всеми доступными технологиями VPN, такими как L2TP VPN, PPTP VPN и OpenVPN.
Преимущества VPN Решение купить сервис VPN позволит вам в дальнейшем пользоваться сайтами в Интернете, не оставляя следов своего пребывания, пользоваться торрентами, посещать сайты, запрещенные для просмотра в вашей стране проживания, обходить ограничения корпоративных сетевых экранов.
КонтактыE-mail: support vpnlux.com
Jabber: vpnlux_supportradio.pm
Источник
Tunnelblick — OpenVPN клиент для Mac OS X

Продолжаю знакомить своих подписчиков с защищенными канала связи. Недавно публиковался пост про установку OpenVPN сервера и клиента на роутер с прошивкой DD-WRT. Сегодня хочу рассказать о настройке OpenVPN клиента на macOS, что позволяет легко и безопасно связываться с удаленным офисом, собственным домом или любым сервером, на котором настроен OpenVPN.
Собственно, углубляться в подробные повествования тут особенно не нужно, настройку OpenVPN клиента для Windows я описывал ранее в блоге. В Mac OS X все еще проще. Есть замечательный бесплатный клиент — Tunnelblick.
- Первым делом создаем папку (где удобно) в которую положим наш файл конфигурации VPN соединения и ключи
- Создаем в этой папке сам файл конфигурации .ovpn (подробнее читайте OpenVPN клиент для Windows)
- Туда же положим клиентcкий ключ и сертификаты клиента и сервера (client.key, client.crt, ca.crt).
- Даем папке расширение .tblk
Остается только добавить созданную конфигурацию в программу Tunnelblick:
Хочу заметить, что Tunnelblick прекрасно воспринимает и стандартные настройки конфигурации, как это делалось в Windows, но разработчики рекомендуют использовать формат .tblk
Если считаете статью полезной,
не ленитесь ставить лайки и делиться с друзьями.
Комментариев: 5
Тоже пользуюсь на Маке этой прогой, удобнее openvpn-gui под windows
Подскажите, пожалуйста, как его удалить?
Корзина отказывается очищаться, говорит, у меня прав нет.
Удаляется как и любая программа на маке простым перемещением в корзину. Перед удалением проверьте не запущена ли программа, иначе не удалите.
Не правда ваша. Для удаления необходимо скачать скачать специальную программку с их сайта. Запускаете ее и она удаляет его.
Алексей, не вводите людей в заблуждение. Всё прекрасно удаляется без каких-то дополнительных скачиваний. Вы сперва выгрузите программу из памяти выбрав пункт «Выйти из Tunnelblick», после чего она спокойно удаляется из программ.
Источник
OpenVPN Tunnelblick перестал работать в macOS Big Sur и как это исправить

Каждая новая версия macOS всё сильнее ужесточает правила безопасности и затрудняет загрузку системных расширений. Я довольно давно пользуюсь OpenVPN туннелями и до macOS Sierra включительно, Tunneblick мог автоматически загружать свои системные расширения без лишних вопросов.
В High Sierra, Mojave или Catalina для подключения к VPN нужно было подтвердить разрешение на загрузку системных расширений Tunneblick в системных настройках macOS в разделе «Безопасность и конфиденциальность».
Дело в том, что Tunnelblick использует специальный драйвер для работы Tap VPN, так как в macOS нет встроенного драйвера устройства Tap. Для Tun подключений загружать свой собственный драйвер, как правило не требуется, так как в системе уже имеется встроенный драйвер устройства «utun» и большинство конфигурационных файлов OpenVPN с ним прекрасно работают.
С выходом macOS Big Sur нельзя разрешить загрузку сторонних системных расширений, в том числе и загрузку драйвера Tap Tunneblick, а без этого данный тип подключений не работает.
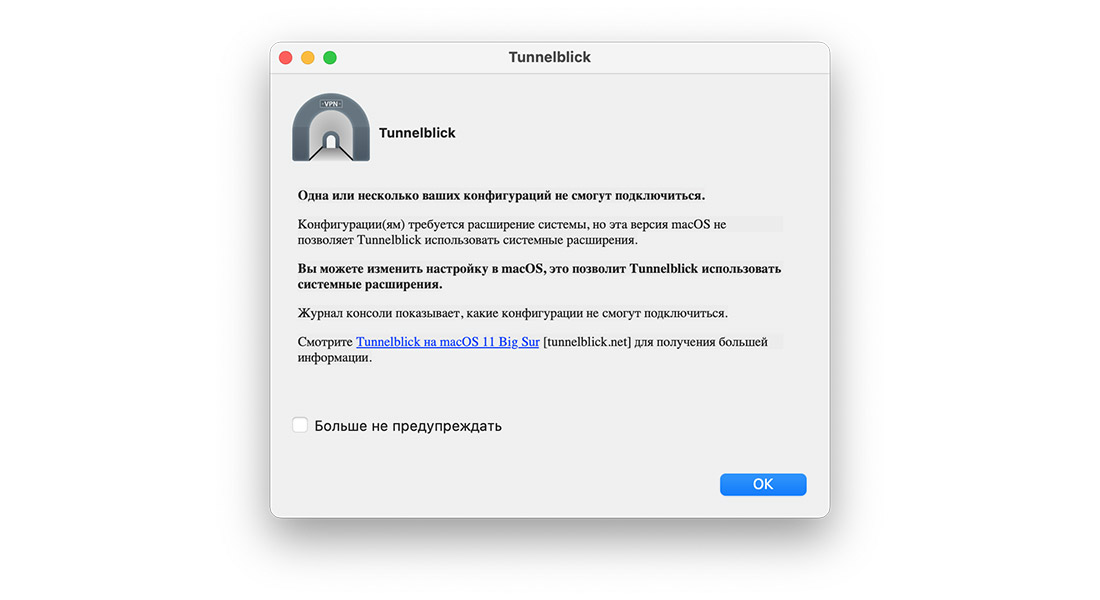
На сайте разработчика написано как можно обойти данное ограничение системы, но потребуется отключить функцию защиты целостности системы System Integrity Protection (SIP).
Что касается меня, то было решено перенастроить работу OpenVPN сервера на работу через Tun, тут главное разобраться с маршрутизацией трафика, однако у подобного изменения есть и свои недостатки по сравнению с мостом (Tap интерфейс). Подробнее о настройке OpenVPN сервера в режиме Tun расскажу в следующей статье.
Как заставить работать OpenVPN Tunnelblick с Tap устройствами в macOS Big Sur?
Сразу оговорюсь, что отключение защиты целостности системы SIP macOS Big Sur делает ваш компьютер менее безопасным и Tap OpenVPN будет работать только на Intel Mac. Для новых компьютеров Apple с чипом M1 нужно ждать следующих обновлений от разработчиков Tunnelblick.
Итак, проверить активирована ли функция защиты целостности в вашей системе можно следующей командой:
$ csrutil status
System Integrity Protection status: enabled.
Чтобы её отключить, перезагружаем компьютер в режиме восстановления (Command + R), запускаем Терминал и пишем следующую команду:
После чего перезагружаем компьютер в обычном режиме и Tunnelblick должен начать работать. Включить обратно функцию защиты целостности системы можно командой csrutil enable, загрузившись снова в режим восстановления.
Если считаете статью полезной,
не ленитесь ставить лайки и делиться с друзьями.
Источник
Installing System Extensions
Important: See The Future of Tun and Tap VPNs on macOS for information about changes to future versions of macOS.
IMPORTANT: You only need to install Tunnelblick’s system extensions if you are
- Running on macOS Big Sur; and
- Using to a «Tap» VPN.
The process of installing Tunnelblick’s system extensions on recent versions of macOS requires one or more restarts of your computer.
The following describes the process when using Tunnelblick 3.8.5 beta03 (build 5630) and higher:
Installing Kexts on an M1 Mac Running macOS Big Sur 11.1
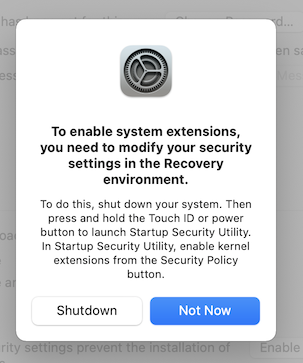
On an Apple Silicon (M1) Mac, the process of installing Tunnelblick’s system extensions requires three restarts of your computer.
- Use the button on Tunnelblick’s «Utilities» panel to install Tunnelblick’s Tun and Tap system extensions.
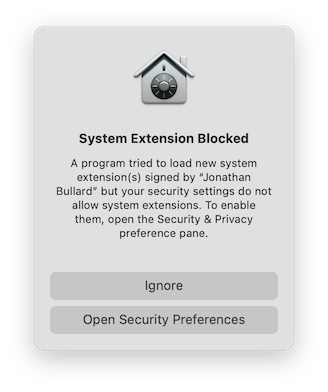
- After authorizing Tunnelblick to install the kexts, you will be prompted by macOS to open the Security & Privacy preference pane to allow the kexts to be loaded:
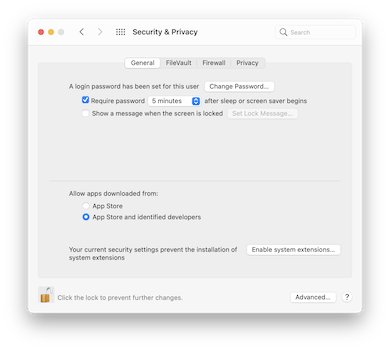
After opening the Security & Privacy preference pane, click the «Enable system extensions…» button:
You’ll see the following instructions:
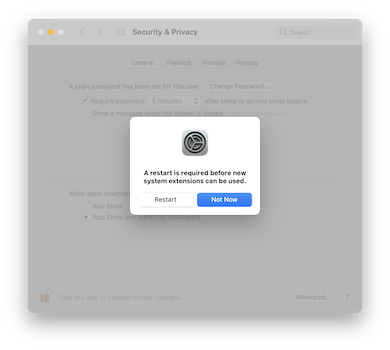
After authorizing the software, you will be prompted to restart your computer to be able to use the new system extensions:
Installing Kexts on an Intel Mac running macOS Big Sur
On an Intel Mac, the process of installing Tunnelblick’s system extensions requires one restart of your computer.
- Use the button on Tunnelblick’s «Utilities» panel to install Tunnelblick’s Tun and Tap system extensions.
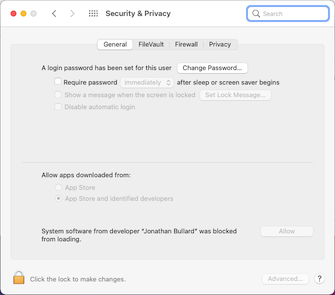
- After authorizing Tunnelblick to install the kexts, you will be prompted by macOS to open the Security & Privacy preference pane to allow the kexts to be loaded:
After opening the Security & Privacy preference pane, click the «Allow» button:
After authorizing the software, you will be prompted to restart your computer to be able to use the new system extensions:
Источник
Setting up Tunnelblick
Stop if you have a «Deployed» version of Tunnelblick. It comes already set up — you do no need to do anything more. Just start using it and enjoy!
Stop if you have purchased VPN service from a VPN service provider. They should provide you with configuration files and instructions on how to use them with Tunnelblick.
Stop if you have VPN service from a corporate or other network provided by your employer. Your network manager or IT department should provide you with configuration files and instructions on how to use them with Tunnelblick.
Stop if want details about the structure of a Tunnelblick VPN Configuration, see «.tblk» Details.
Setting Up and Installing Configurations
First, install Tunnelblick and launch it so it is running.
It is not enough to install Tunnelblick: you also need to tell Tunnelblick how to connect to a VPN.
You tell Tunnelblick how to connect to a VPN with a configuration file.
If you already have configuration files you can install them by dragging and dropping them onto the Tunnelblick icon in the menu bar.
After installing your configurations, continue with «Set Nameserver» Check Box and DNS & WINS Settings, below.
If you don’t have configuration files or you want more information about them continue reading.
Tunnelblick can use two types of configuration files:
Tunnelblick VPN Configurations. A Tunnelblick VPN Configuration contains all of the information Tunnelblick needs to connect to one or more VPNs. A Tunnelblick VPN Configuration contains one or more OpenVPN configuration files, and may contain key, certificate, and script files. Everything needed is contained within the Tunnelblick VPN Configuration. Tunnelblick VPN Configurations may also contain other information, including information about default preferences for the configuration and identification and version information for the configuration itself that make managing widespread distribution easier. For details, see Tunnelblick VPN Configurations Details.
OpenVPN configuration files. These are plain text files with extensions of .ovpn or .conf. These files usually contain only the configuration information; keys and certificates may be held in separate files. When installed, they are converted to Tunnelblick VPN Configurations. For more information about setting up Tunnelblick using OpenVPN configuration files, see Configuring OpenVPN.
Converting OpenVPN Configurations to Tunnelblick VPN Configurations
You can drag and drop OpenVPN configurations onto the Tunnelblick icon in the menu bar and they will be installed as Tunnelblick VPN Configurations.
Creating and Installing a Tunnelblick VPN Configuration
To create a Tunnelblick VPN Configuration:
- Create a folder anywhere (on your Desktop works well);
- If you have only one OpenVPN configuration file, name the folder with the name you want the configuration known by in Tunnelblick. (Otherwise, each configuration will be known in Tunnelblick by the name of the OpenVPN configuration file that it is based on);
- Copy all the files related to the configuration(s) into the folder (see Files Contained in a Tunnelblick VPN Configuration, below);
- Add an extension of «.tblk» at the end of the folder name. When you do this the icon for the folder will change to an icon for a Tunnelblick VPN Configuration.
- Drag and drop the folder’s new icon onto the Tunnelblick icon in the menu bar to install it.
When you install, you will be asked if you want each configuration to be private or shared. A private configuration may only be used when you are logged onto the computer. A shared configuration may be used by anyone who is logged into the computer. If the name you have given conflicts with the name of an existing installed configuration, you will be given the opportunity to change the name.
The process of installation will copy the .tblk to a special location on your computer (see File Locations) and make changes to it so it can be used securely. You can then delete the original .tblk you created, or move it somewhere convenient as a backup, or copy or move it to another computer and install it on that computer.
That’s it! You are done. The configuration(s) will be available immediately in Tunnelblick.
Modifying a Tunnelblick VPN Configuration
You can modify a Tunnelblick VPN Configuration two ways:
If you want to change the contents of an installed OpenVPN configuration file that is installed as a Private configuration, you should select the configuration in Tunnelblick’s VPN Details window, then click the «gear» button at the bottom of the list and select «Edit OpenVPN Configuration File. «. That will open the installed OpenVPN configuration file in TextEdit. Changes take effect as soon as the file is saved in TextEdit. Note that this does not modify your original .tblk; it modifies the installed copy only.
You can’t change the contents of an installed OpenVPN configuration file that is installed as a Shared configuration. (You can convert it to be a Private configuration, edit it, and then change it back to be Shared.)
- Modify your original .tblk to include the changes (rename it to not end in «.tblk», then make the changes, then rename it to end in «.tblk» again);
- Drag and drop the modified .tblk onto the Tunnelblick icon in the menu bar to install it.
Files Contained in a Tunnelblick VPN Configuration
The files that should be contained in a Tunnelblick VPN Configuration (the «files related to the connection» above) should all be «plain text» files:
- One or more OpenVPN configuration files (.ovpn or .conf files).
- Any certificate or key files for the configurations (.key, .crt, .pem, .cer, .der, .p12, .p7b, .p7c, and .pfx files); and
- Any script files for the configurations. Script files must must have a .sh extension so that Tunnelblick can secure them and use them properly.
The «Set Nameserver» Check Box and DNS & WINS Settings
If you are using DHCP, wish to use DNS and WINS servers at the far end of the tunnel when connected, and the VPN server you are connecting to «pushes» DNS and WINS settings to your client, select «Set nameserver». (This is the situation for most users.)
If you are using DHCP, wish to use your original DNS and WINS servers when connected, and the VPN server you are connecting to does not «push» DNS or WINS settings to your client, select «Do not set nameserver».
If you are using manual settings, different versions of macOS behave differently. This is due to a change in network behavior in Snow Leopard and is beyond the scope of this project to fix.
If you’re using Leopard (OS X 10.5) or Tiger (OS X 10.4), then it is possible to use the VPN-server-supplied DNS and WINS settings in addition to your manual settings by selecting «Set nameserver». However, your manual settings will always take precedence over any VPN server-supplied settings. If «Do not set nameserver» is selected, you will continue to use only your manually-configured settings and any VPN server-supplied settings will be ignored. «Take precedence» means that the manual DNS server will be used for all DNS queries unless it fails to answer, in which case the VPN server-supplied DNS server will be used.
If you are using Snow Leopard (OS X 10.6) or later, then your usual DNS and WINS settings will always be used, and no aggregation of configurations will be performed.
If you set your DNS servers manually, then regardless of the state of «Set nameserver», your manual DNS servers, Search Domains, and WINS servers will always be the only ones used unless you set the configuration to «Allow changes to manually-set network settings».
Each of these settings is independent of the others: if «Set nameserver» is selected, those settings not configured manually will be replaced by the settings obtained from the VPN server. If «Do not set nameserver» is selected, then as with Leopard/Tiger, no DNS/WINS settings will be applied unless you set the configuration to «Allow changes to manually-set network setttings».
If your situation is not described above (e.g., if you use manual DNS settings and wish to use DNS servers at the far end of a tunnel when connected, or you wish to use the macOS ability to use different nameservers for different domains), you must create your own up/down scripts and select «Set nameserver».
The OpenVPN —user and —group options and openvpn-down-root.so
When using «Set nameserver» or your own down script for OpenVPN, it is usually necessary to avoid using the OpenVPN «user» and «group» options in the configuration file. These options cause OpenVPN to drop root privileges and take the privileges of the specified user and group (usually, «nobody»). If this is done, then the down script that handles restarting connections when there is a transient problem fails, because it is run without root privileges. OpenVPN usually fails, too, if your configuration performs any routing (most configurations do).
However, Tunnelblick includes the «openvpn-down-root.so» plugin for OpenVPN. When this plugin is activated, OpenVPN still drops root privileges and runs as the specified user:group after a connection is made, but runs the down script run as root:wheel, so reconnecting after transient network problems can work if OpenVPN does not need to restore any routes.
When you connect with a configuration that includes the «user» and/or «group» options in the configuration file, Tunnelblick will ask if you wish to use the openvpn-down-root plugin. Answer «yes» and Tunnelblick will use the plugin each time it makes a connection. OpenVPN will still be unable to make route changes after the initial connection; they have to be made in the your own customized scripts.
Источник


