- How to enable or disable Wi-Fi and Ethernet network adapters on Windows 10
- How to enable or disable network adapters using Control Panel
- Disabling adapter
- Enabling adapter
- How to enable or disable network adapters using Device Manager
- Disabling adapter
- Enabling adapter
- How to enable or disable network adapters using Command Prompt
- Disabling adapter
- Enabling adapter
- How to enable or disable network adapters using PowerShell
- Disabling adapter
- Enabling adapter
- Wrapping things up
- More Windows 10 resources
- Halo: MCC’s live service elements make it better, not worse
- Microsoft’s Surface Duo is not ‘failing up’
- Here’s what you can do if Windows 10 update KB5001330 is causing issues
- These are the best PC sticks when you’re on the move
- Windows 10 network discovery not showing all computers [FIX]
- What can I do if Network discovery is turned off Windows 10:
- 1. Enable Network discovery
- 2. Activate dependency services
- 3. Configure Firewall Settings
- 4. Use Command Prompt to turn Network Discovery on
How to enable or disable Wi-Fi and Ethernet network adapters on Windows 10

Although a network adapter is an important part of your computer — it connects your PC to your local network, and thus the internet — sometimes you may need to disable it. Regardless of if you need to turn it off to just shut down things you’re not using, or to save battery life, or to keep your computer off a network, you have your reasons.
The only problem is that while you can use the Settings app on Windows 10 to manage network settings, Settings doesn’t include an option to enable or disable network adapters. Here’s how to do it.
In this Windows 10 guide, we’ll walk you through the steps to disable and enable a network adapter using GUI and command line tools.
How to enable or disable network adapters using Control Panel
On Windows 10, you can use Control Panel to quickly disable and then enable your network adapters as necessary.
Disabling adapter
To disable a network adapter using Control Panel, use these steps:
- Open Settings.
- Click on Network & Security.
Click on Status.
Quick Tip: You can also quickly access these settings by right-clicking the network icon in the taskbar and selecting the Network & Internet settings option.
Click on Change adapter options.

Right-click the network adapter, and select the Disable option.

Enabling adapter
To enable a network adapter using Control Panel, use these steps:
- Open Settings.
- Click on Network & Security.
- Click on Status.
- Click on Change adapter options.
Right-click the network adapter, and select the Enable option.
How to enable or disable network adapters using Device Manager
It’s also possible to use Device Manager to enable or disable network adapters that you don’t need.
Disabling adapter
To disable a network adapter using Device Manager, use these steps:
- Open Start.
- Search for Device Manager, and click the top result.
- Expand the Network adapters category.
Right-click the adapter you want, and select the Disable device option.
Enabling adapter
To enable a network adapter using Device Manager, use these steps:
- Open Start.
- Search for Device Manager, and click the top result.
- Expand the Network adapters category.
Right-click the adapter you want, and select the Enable device option.
How to enable or disable network adapters using Command Prompt
On Windows 10, you can use the netsh command tool to disable or re-enable network adapters on your device.
Disabling adapter
To disable a network adapter using netsh in Command Prompt, use these steps:
- Open Start.
- Search for Command Prompt, right-click the top result, and select Run as administrator.
Type the following command to identify the name of the adapter you want to disable and press Enter:
netsh interface show interface
Type the following command to disable the Wi-Fi or Ethernet adapter and press Enter:
netsh interface set interface «YOUR-ADAPTER-NAME» disable

In the command remember to specify the name of the adapter you want to disable. The quotation marks are only required if there are spaces within the name.
Enabling adapter
To enable a network adapter using netsh in Command Prompt, use these steps:
- Open Start.
- Search for Command Prompt, right-click the top result, and select Run as administrator.
Type the following command to identify the name of the adapter you want to enable and press Enter:
netsh interface show interface
Type the following command to disable the Wi-Fi or Ethernet adapter and press Enter:
netsh interface set interface «YOUR-ADAPTER-NAME» enable
In the command remember to specify the name of the adapter you want to enable. The quotation marks are only required if there are spaces within the name.
How to enable or disable network adapters using PowerShell
Alternatively, you can even use the PowerShell command line shell to disable or enable any network adapters that you don’t use on your PC.
Disabling adapter
To disable a Wi-Fi or Ethernet network adapter on Windows 10 using PowerShell, use these steps:
- Open Start.
- Search for Windows PowerShell, right-click the top result, and select Run as administrator.
Type the following command to identify the name of the adapter you want to disable and press Enter:
Type the following command to disable the Wi-Fi or Ethernet adapter and press Enter:
Disable-NetAdapter -Name «YOUR-ADAPTER-NAME» -Confirm:$false
In the command remember to specify the name of the adapter you want to disable. The quotation marks are only required if there are spaces within the name.
Enabling adapter
To enable a network adapter on Windows 10 using PowerShell, use these steps:
- Open Start.
- Search for Windows PowerShell, right-click the top result, and select Run as administrator.
Type the following command to identify the name of the adapter you want to enable and press Enter:
Type the following command to disable the Wi-Fi or Ethernet adapter and press Enter:
Enable-NetAdapter -Name «YOUR-ADAPTER-NAME» -Confirm:$false
In the command remember to specify the name of the adapter you want to enable. The quotation marks are only required if there are spaces within the name.
Wrapping things up
Even though the modern experience of Windows 10 doesn’t offer a complete set of network settings, there are still many ways to enable or disable network adapters when necessary.
Remember that using the network flyout to turn on or off wireless connections doesn’t disable your Wi-Fi adapter, it only disconnects the device from the network.
We’re focusing this guide on wireless and wired adapters, but remember that Bluetooth is also a networking device, as such you can use the same instructions to enable or disable the adapter.
What method do you prefer to manage network cards on Windows 10? Tell us in the comments.
More Windows 10 resources
For more helpful articles, coverage, and answers to common questions about Windows 10, visit the following resources:
![]()
Halo: MCC’s live service elements make it better, not worse
Halo: The Master Chief Collection is more popular than ever, but some fans don’t agree with the live service approach 343 Industries has taken with it. Here’s why those elements are, at the end of the day, great for the game and for Halo overall.
![]()
Microsoft’s Surface Duo is not ‘failing up’
Microsoft announced this week that it was expanding Surface Duo availability to nine new commercial markets. While Surface Duo is undoubtedly a work in progress, this is not a sign of a disaster. It’s also doesn’t mean that Surface Duo is selling a ton either. Instead, the reason for the expansion is a lot more straightforward.
![]()
Here’s what you can do if Windows 10 update KB5001330 is causing issues
In this guide, we’ll show you the steps to get rid of the update KB5001330 to fix profile, gaming, and BSoD problems with the Windows 10 October 2020 Update and May 2020 Update.
![]()
These are the best PC sticks when you’re on the move
Instant computer — just add a screen. That’s the general idea behind the ultra-portable PC, but it can be hard to know which one you want. Relax, we have you covered!
Windows 10 network discovery not showing all computers [FIX]

- Network Discovery is a network setting that lets you set the communication between connected devices and systems on your network – so you decide whether or not this is allowed.
- If a computer is not discoverable in a network, the first step is to enable network discovery. See how you can do that from our guide.
- Do you have any other network issues? Go ahead and visit our Network Troubleshooting section.
- If you have any problems with your Windows 10 OS, you can start by reading our Troubleshooting Windows 10 Hub.

In Windows operating system, Network Discovery is a network setting that lets you set the communication between connected devices and systems on your network – so you decide whether or not this is allowed.
When enabled, it becomes easier to share files and printers as well as connect through a private network. However, if your Windows 10 device or computer cannot view other devices on your network, it could be caused by either of two issues:
- Incorrect network profile
- Network discovery is turned off
To resolve the problem, try the solutions listed below.
What can I do if Network discovery is turned off Windows 10:
1. Enable Network discovery
- Click Start and select Settings
- Click Network and Internet
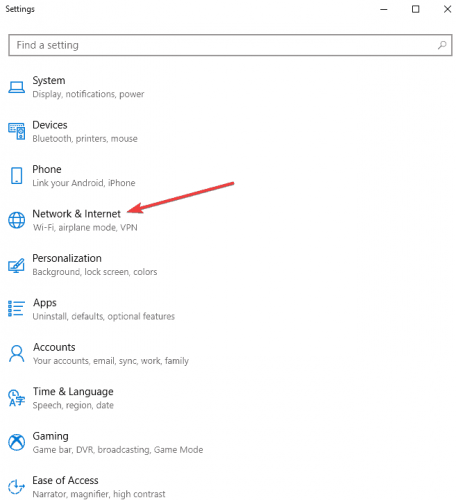
- Click WiFi or Ethernet from the left panel, depending on the connection you’re using
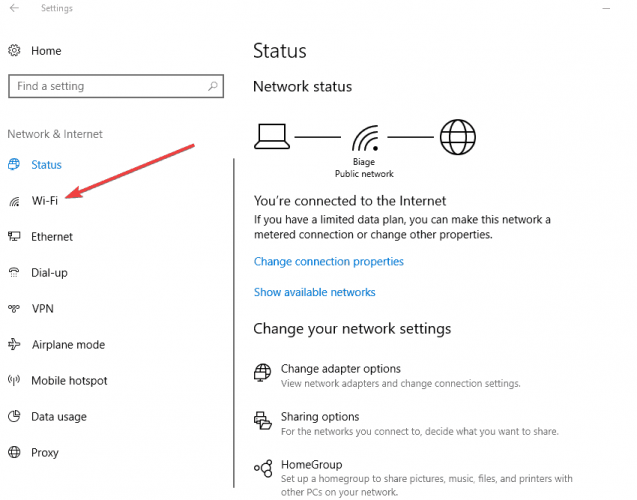
- Find the Change Advanced Sharing option
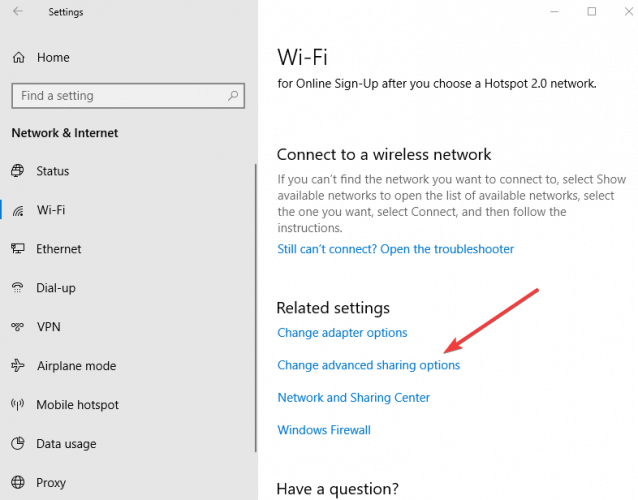
- Click to expand Private (Current Profile) network
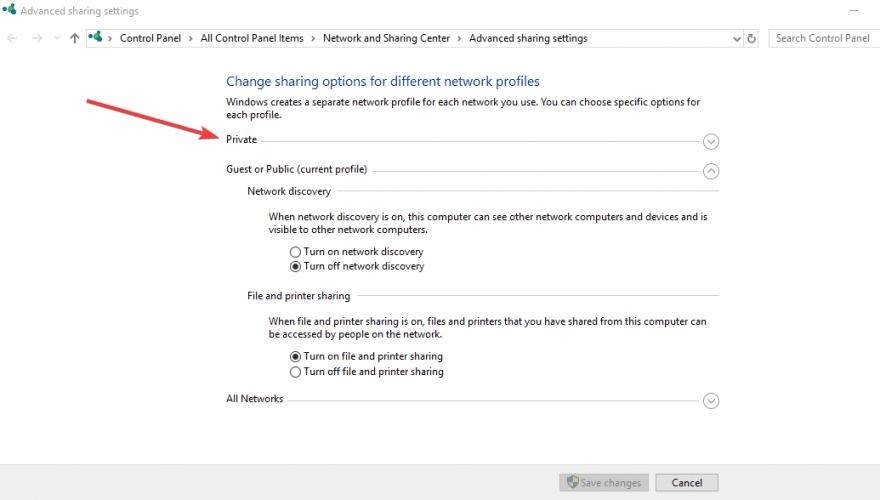
- Go to Network Discovery section and select Turn on network discovery
- Check the Turn on automatic setup of network connected devices box
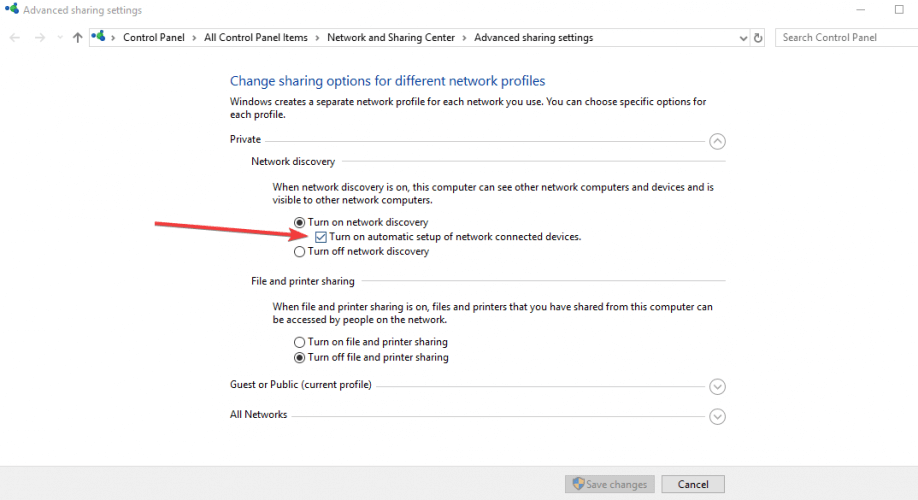
- Click Save changes and exit the window
2. Activate dependency services
Check that dependency services such as DNS Client, Function Discovery Resource Publication, SSDP Discovery, and UPnP Device Host are started.
To check if each of these is activated, do the following:
- Right-click Start and select Run
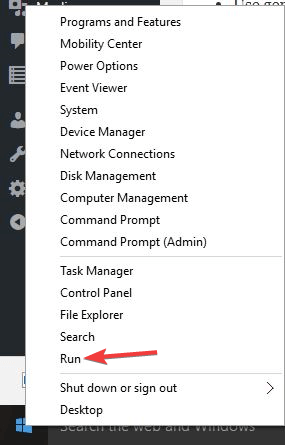
- Type services.msc to open Services Manager
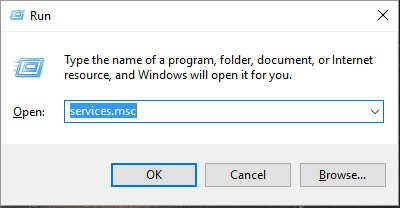
- Check if each of the four services is started, and set them to automatic
3. Configure Firewall Settings
- Do this to allow Network Discovery through the following steps:
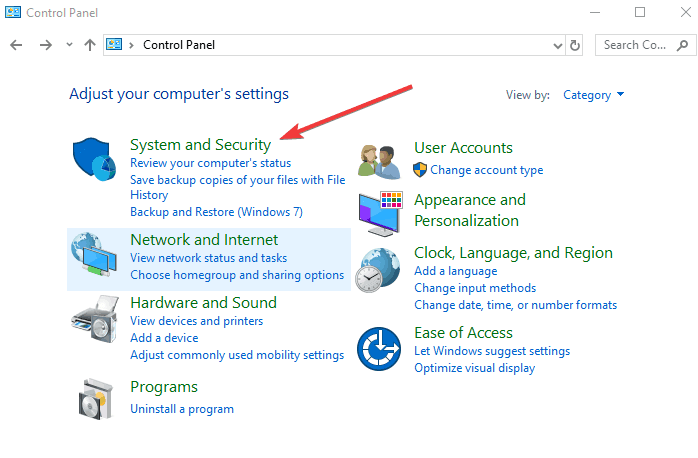
- Click Start and select Control Panel
- Select System and Security
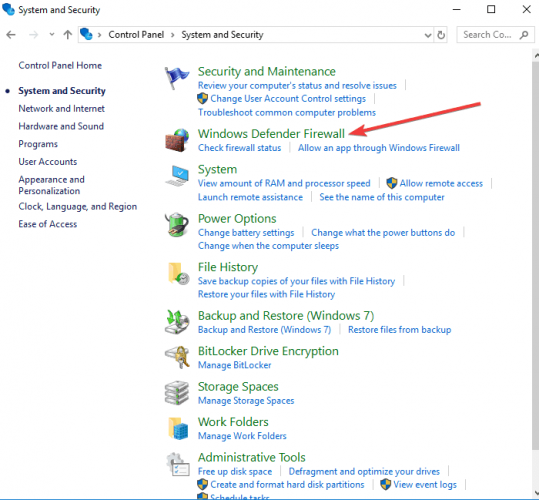
- Click Allow an app or feature through Windows Firewall on the left panel (or Allow a program or feature through Windows Firewall)
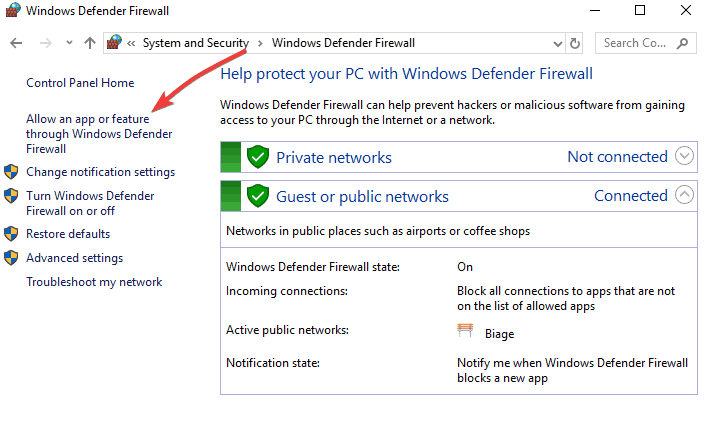
- Click Change settings and give required admin permissions if requested to
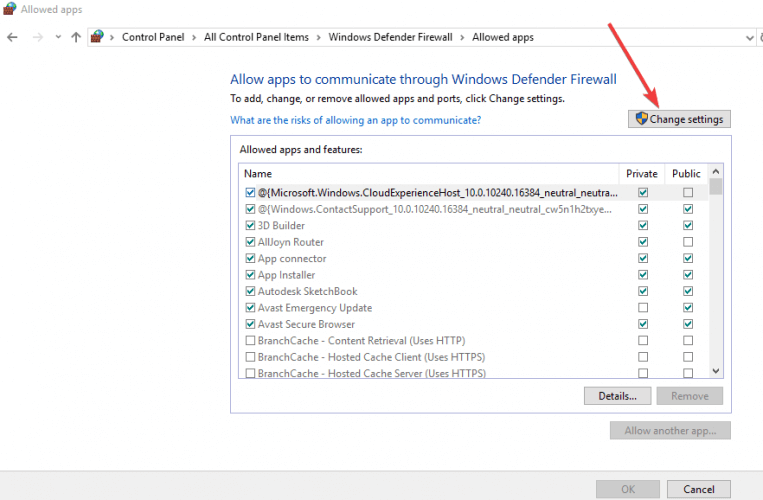
- Click Network Discovery then OK
- Configure any other firewalls on your Windows 10 computer to allow Network Discovery
- Turn on Network Discovery from the Network and Sharing Center
You can’t open Control Panel? Take a look at this step-by-step guide to find a solution.
4. Use Command Prompt to turn Network Discovery on
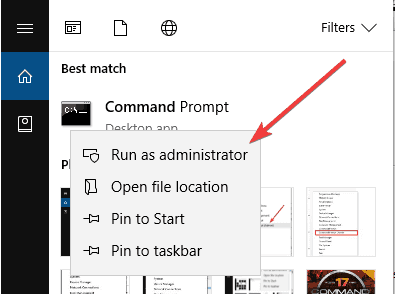
- Click Start and type CMD in the search bar
- From the search results, right-click Command Prompt
- Select Run as administrator
- In the elevated command prompt, type: netsh advfirewall firewall set rule group=”Network Discovery” new enable=Yes
- Press Enter. This will turn on Network Discovery.
- To turn off Network Discovery for all your network profiles, go back to the elevated command prompt, and type: netsh advfirewall firewall set rule group=”Network Discovery” new enable=No then press Enter and close the window.
Did any of these solutions help? Let us know in the comments section below.
Also, leave there any other questions or suggestions you may have and we will surely check them out.
Computer not showing up on network Windows 10


