- Как отключить пароль Windows 10 при входе
- How to Turn Off Password in Windows 10
- Part 1. How to Turn Off Password on Windows 10 with the Password?
- 1. Set Windows 10 to Automatically Sign in
- 2. Disable Lock Screen on Windows 10 via Local Group Policy Editor
- Part 2. How to Turn Off Password on Windows 10 without the Password?
- How to turn off the password feature on Windows 10 for quicker access to your computer
- Check out the products mentioned in this article:
- Windows 10 (From $139.99 at Best Buy)
- How to turn off the password feature on Windows 10
- How to Automatically Login to Windows 10 without a Password?
- How to Disable Windows 10 Login Password via the User Account Settings?
- Fix: Microsoft Removes User AutoLogin in Windows 10 20H1/20H2
- How to Turn On Automatic Logon in Windows via the Registry?
- Disable Password Prompt after Sleep/Hibernation in Windows 10
- Enable Secure Automatic Logon without a Password Using AutoLogon Tool
Как отключить пароль Windows 10 при входе
Операционная система Windows 10 сильно интегрирована с сетевыми службами, для которых нужна авторизация. Потому при каждом запуске система спрашивает вас пароль для входа, чтобы в том числе активировать сетевые службы (синхронизацию фотографий, документов, проверку почты и многое другое). Если вы работаете в офисе, то в принципе это не проблема, так как в офисном помещении много людей и вряд ли вы будете рады, если они начнут читать вашу почту и другую информацию. Но вот домашние пользователи находятся немного в другой ситуации. Зачастую кроме них за компьютером никто не сидит, потому каждый раз вводить пароль при включении весьма утомительно и по большому счету не нужно. Если вы как раз такой пользователь, то ниже вы узнаете, как отключить запросы пароля раз и навсегда.
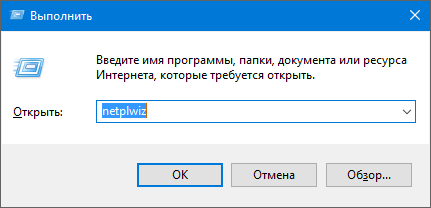
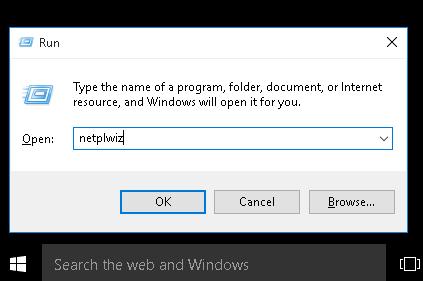
1. Вызываем окно «Выполнить» комбинацией Win + R
2. Вводим команду netplwiz и нажимаем Enter
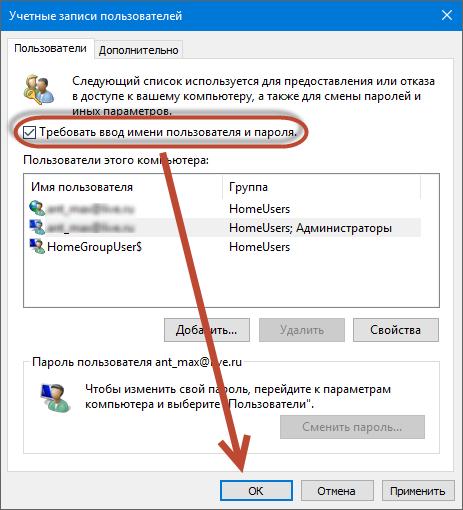
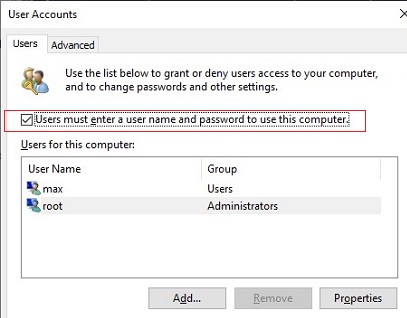
3. В появившемся окне снимаем галочку с опции «Требовать ввод имени пользователя и пароля» и нажимаем ОК
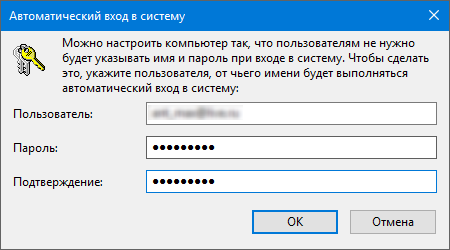
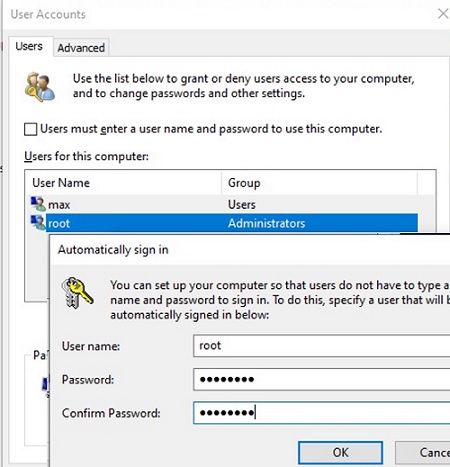
4. Вводим имя пользователя и два раза свой пароль от учетной записи. Нажимаем ОК
После этого Windows 10 больше не будет требовать ввести пароль.
При этом важно помнить, что в таком состоянии ваш компьютер остается незащищен и любой, кто ходит мимо, может получить доступ к вашим личным данным. Если вы этого не хотите, что лучше не отключать пароль. Если же вы дома, доверяете всем, то можно произвести отключение и наслаждаться работой в удобной операционной системе без лишних забот по вводу пароля.
How to Turn Off Password in Windows 10
«I can’t seem to figure out how to turn off the windows 10 password/pin upon startup of the computer.Ever since I upgraded from Windows 7 to windows 10, it now requires that I input my password/pin every time I turn on the computer»
If you have been using a Windows 7 system for some time, you would likely get annoyed by the Windows 10’s constant password prompts that appear on your log-in screen. Many of the users who have switched from Windows 7 to Windows 10 wish if they could somehow turn off password Windows 10.
Fortunately, it is indeed possible to turn off password on Windows 10 for your accounts. That way your computer will not ask you to input your password each time you want to log-in to your account. There are multiple methods that allow you to accomplish the task and the following guide has some of those methods for you.
Let’s check out how to turn off password on Windows 10:
Part 1. How to Turn Off Password on Windows 10 with the Password?
If you already know the password of your account which many of you do, you can log-in to your account and follow a few steps to turn off the password. There are actually two ways to do the task and both of those are shown below for you.
1. Set Windows 10 to Automatically Sign in
You can enable the auto sign-in feature on your Windows 10 system to automatically log-in to your account without entering a password each time you boot-up your computer. This is possible due to the Netplwiz utility on your computer.
The following is how you access the aforesaid utility to enable automatic sign-in for your Windows 10 computer:
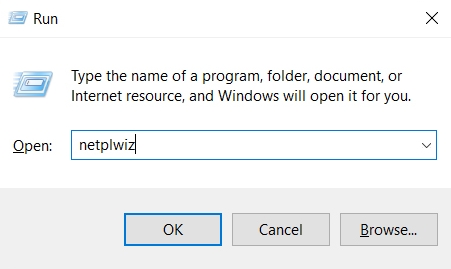
Step 1. Open the Run dialog box on your computer by pressing Windows + R keys together. When it opens, type in netplwiz and hit the Enter key on your keyboard to launch the utility.
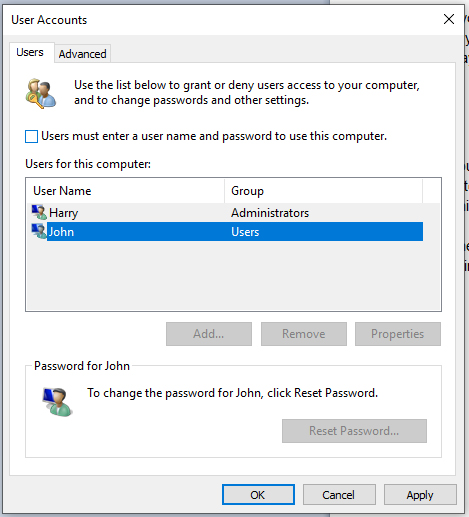
Step 2. When the Netplwiz utility opens, click on the Users tab if you are not already there. Then, click on your username and untick the box that says Users must enter a user name and password to use this computer. Click on OK.
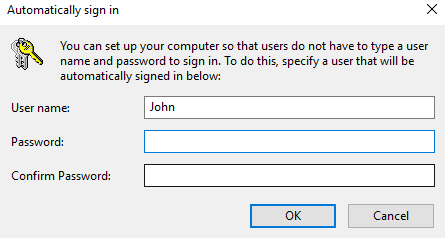
Step 3. You will be asked to enter your current username and password to authorize yourself. Enter your login details and click on the OK button.
You are all set. The automatic sign-in feature has been enabled and your Windows 10 based computer will no longer ask you to input your password the next time you want to access your account on the system.
That is how you turn off login Windows 10.
2. Disable Lock Screen on Windows 10 via Local Group Policy Editor
One of the ways to turn off the password on your Windows 10 computer is to disable the lock screen. Since lock screen is where you are asked to enter your password, disabling it will disable the password prompt as well. You will then no longer be asked to enter a password to access your account.
The lock screen of your system can be disabled using the Local Group Policy Editor. It is a built-in tool on your system and the following shows how you can use it to turn off lock screen Windows 10:
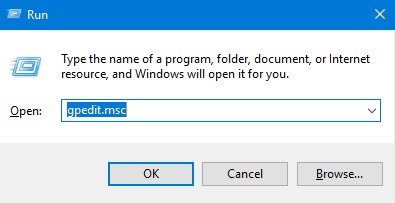
Step 1. Launch the Run dialog box by pressing Windows + R keys together. Then, type in gpedit.msc and hit the Enter key on your keyboard.
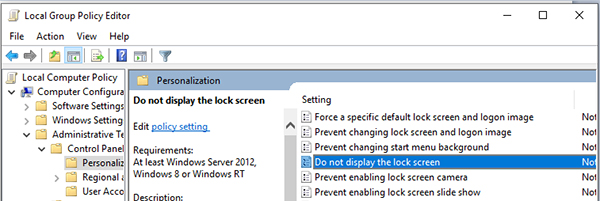
Step 2. When the utility opens, head to the following path by clicking on folder names in the left sidebar.
Administrative Templates/Control Panel/Personalization/
Step 3. Once you are there, find and double-click on the entry named Do not display the lock screen in the right panel.
Step 4. When the full entry opens on your screen, select the option that says Enabled at the top-left corner and then click on the Apply button followed by OK.
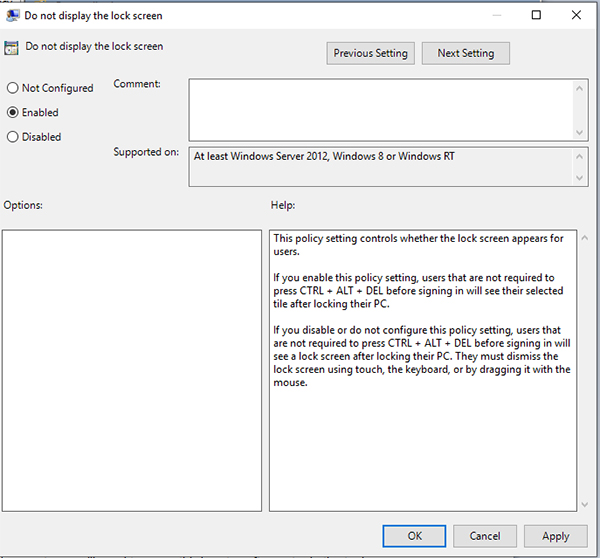
You are all done. The lock screen has been successfully disabled on your Windows 10 computer. You will not be asked to enter a password to access your account.
That is how you turn off screen lock using the policy editor.
Part 2. How to Turn Off Password on Windows 10 without the Password?
If you do not know the password of your admin account and you wish to turn off the login screen password prompt, you will need to use a third-party software to do the task.
There is a software called Windows Password Key that allows users to remove passwords of your user accounts on your system. Once a password is removed, the account can be accessed without inputting a password and this works exactly like turning off the password. Here’s how you do it on your computer:
Step 1. Download and launch the software on any computer you can access. Insert a blank CD/DVD/USB flash drive into your computer, select it in the software, and click on the Burn button.

Step 2. When the media drive is burned, reboot your system and boot it from this new media drive.
Step 3. The software will launch and you will be asked to choose your Windows installation. Do so andc hoose your user account, select Remove Windows Password, and click on Next to remove the password
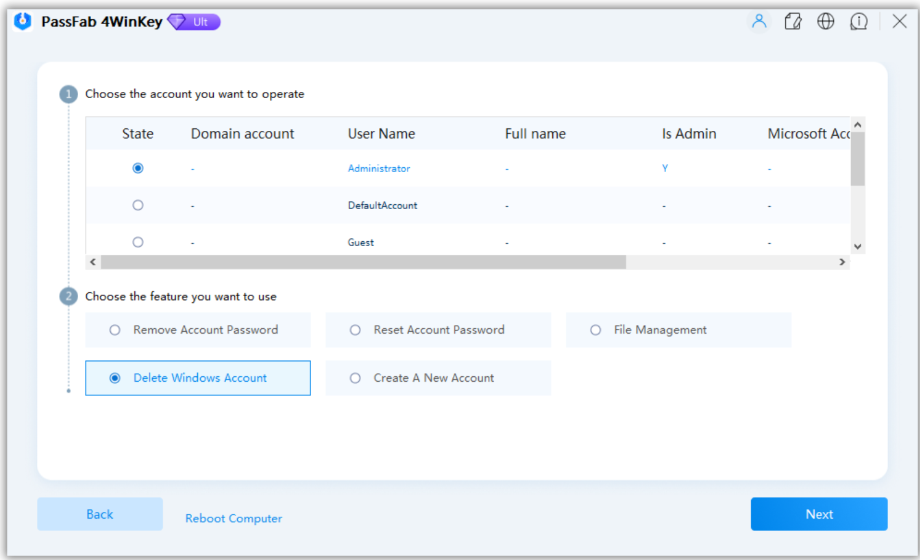
That’s all there is to it. The password for the chosen account will be removed from your system and you will be able to use the account without the need to enter a password.
We hope the above guide teaches you how to turn off password on Windows 10 so you do not get annoyed by the password prompts that appear on your screen. In case you want to remove a password for an account, you can do it using the Windows Password Key tool as shown above.
How to turn off the password feature on Windows 10 for quicker access to your computer

- You can turn off the password feature on Windows 10 if you want quicker and easier access to your computer — although it will be less secure.
- If you have important files and sensitive personal data on a Windows 10 system, or you use a shared computer, we don’t recommend that you turn off the password feature.
- It’s easy to turn the password feature back on at any time on Windows 10.
- Visit Business Insider’s homepage for more stories.
If you’re concerned about the security of your documents, photos, and other personal data, chances are you’ve taken advantage of the password feature on Windows 10, which allows you to lock your computer when you’re not using it so other people can’t access it.
It’s an important security measure which offers protection should your machine be stolen or fall into the wrong hands.
Admittedly, having to re-enter a password every time you turn on or wake your machine can be a minor annoyance, so there may come a time when you want to turn off the password on Windows 10.
Luckily, doing so is easy, and it’s just as simple to re-enable it if you change your mind down the line.
Here’s how to do it.
Check out the products mentioned in this article:
Windows 10 (From $139.99 at Best Buy)
How to turn off the password feature on Windows 10
1. Click the Start menu and type «netplwiz.» The top result should be a program of the same name — click it to open.
2. In the User Accounts screen that launches, untick the box that says «Users must enter a name and password to use this computer.»
3. Hit «Apply.»
4. When prompted, re-enter your password to confirm the changes.
5. Click «OK» once more. Your password will then be removed.
It should be noted that once your password is removed, anyone with access to your computer will be able to use your system to access your documents, photos, and other data, which could pose a security risk.
To re-enable your password in Windows 10 in future, re-run «netplwiz» and tick the password requirement box. Enter a password and save your changes as outlined above and your password will be saved by the system.
How to Automatically Login to Windows 10 without a Password?
In order to login to Windows 10, a user has to enter password for local or Microsoft (online) account each time. This provides a certain level of device protection against access by third parties, but it is inconvenient for home users as it increases the time to access the device’s desktop. In this guide we’ll look at how disable the password sign in on Windows 10 (Windows Server 2016/2012 R2) Login Screen and how to configure autologin under a specific account.
Most often, automatic login without a password is allowed for devices running in kiosk mode. At any reboot (for example, due to a power outage), Windows will automatically logon to the desktop and start the necessary programs via Autorun.
Disabling the password dialog on the Windows 10 Login Screen doesn’t mean that your account should have a blank password. You can configure Windows 10 to automatically use saved credentials to logon to your computer. In all other cases, for example, when accessing your computer via the network (SMB) or connecting to a remote desktop (RDP), you will be prompted for a password.
How to Disable Windows 10 Login Password via the User Account Settings?
The easiest way to disable password login on Windows 10 is to set the appropriate option in the User Account settings dialog box.
- Press Win+R;
- In the Run dialog box, enter netplwiz or control userpasswords2 command;

- In the next window with the list of local user accounts, uncheck the option “User must enter a username and password to use this computer” and save changes (OK);
- A window appears where you have to enter the user account and password (twice) that you need to use for automatic login and click “OK”;
- Restart your computer and make sure that the Windows boots directly to the desktop without entering a password.
Fix: Microsoft Removes User AutoLogin in Windows 10 20H1/20H2
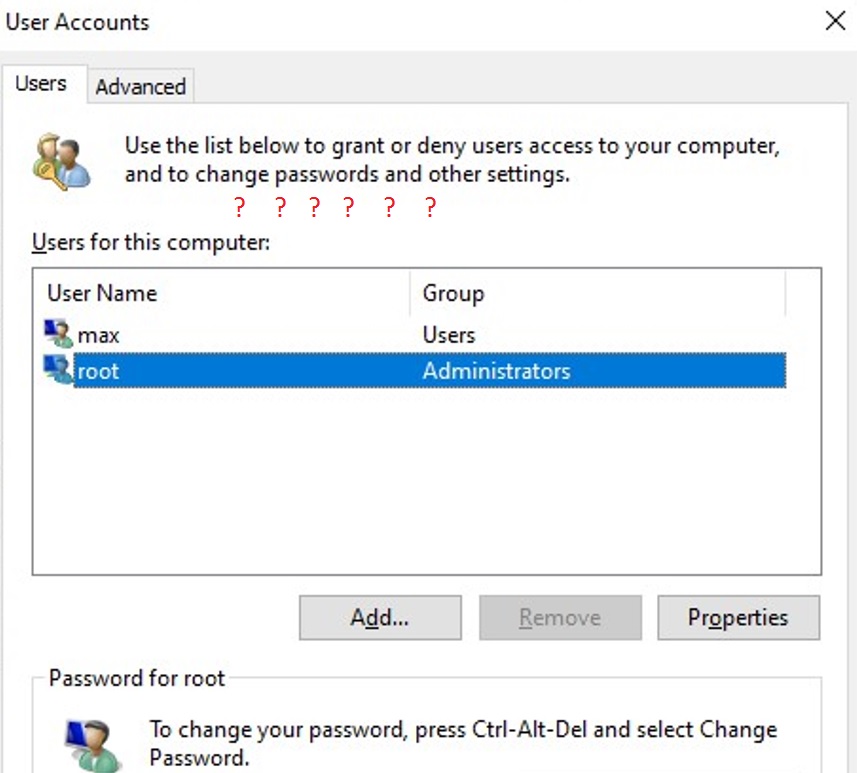
Starting with build Windows 10 2004 (20H1), Microsoft decided to remove the option to configure automatic login for local accounts in the User Control Panel (check the screen below). If you are using a local Windows logon account and not a Microsoft account (MSA), then the “User must enter a username and password to use this computer” option is not displayed.
To show the option used to disable password login on Windows 10 20H2, open the powershell.exe console and edit the registry:
New-ItemProperty -Path «HKLM:\SOFTWARE\Microsoft\Windows NT\CurrentVersion\PasswordLess\Device» -Name DevicePasswordLessBuildVersion -Value 0 -Type Dword –Force
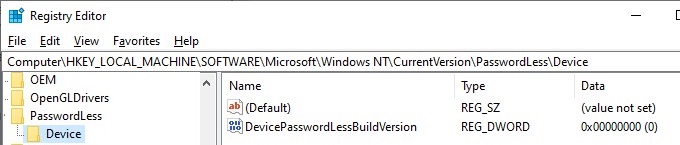
This registry key value disables the Windows 10 option “Require Windows Hello sign-in for Microsoft accounts” setting. Close and restart the netplwiz console and make sure the checkbox appears.
Thus, you can configure auto login without a password on the latest Windows 10 builds (20H2 and 20H2).
How to Turn On Automatic Logon in Windows via the Registry?
Let’s consider a more common way to automatically log into Windows 10 without prompting for a password and skipping the Login Screen. This method allows you to enable password-less sign-in for your Microsoft account, domain account, or Windows 10 local account via the Registry Editor.
- Press Win+R and type regedit ;
- Go to the registry key HKEY_LOCAL_MACHINE\Software\Microsoft\Windows NT\CurrentVersion\Winlogon;
- Change the value of the registry parameter AutoAdminLogon from 0 to 1;
- Create a new string parameter DefaultDomainName, specify the domain name or a local computer name as its value.
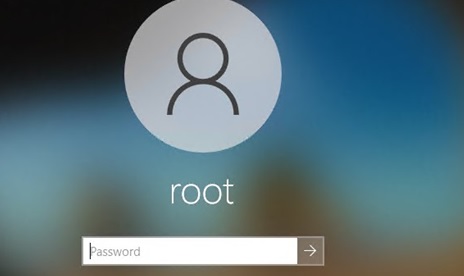
To enable autologon through the registry, you can use the following commands (replace root and P@ssword with your username and password, WORKGROUP should be replaced with the name of your AD domain if the domain account used):
reg add «HKLM\SOFTWARE\Microsoft\Windows NT\CurrentVersion\Winlogon» /v AutoAdminLogon /t REG_SZ /d 1 /f
reg add «HKLM\SOFTWARE\Microsoft\Windows NT\CurrentVersion\Winlogon» /v DefaultUserName /t REG_SZ /d root /f
reg add «HKLM\SOFTWARE\Microsoft\Windows NT\CurrentVersion\Winlogon» /v DefaultPassword /t REG_SZ /d P@ssword /f
reg add «HKLM\SOFTWARE\Microsoft\Windows NT\CurrentVersion\Winlogon» /v ForceAutoLogon /t REG_SZ /d 1 /f
reg add «HKLM\SOFTWARE\Microsoft\Windows NT\CurrentVersion\Winlogon» /v DefaultDomainName /t REG_SZ /d WORKGROUP /f
reg add «HKLM\SOFTWARE\Microsoft\Windows NT\CurrentVersion\Winlogon» /v IgnoreShiftOvveride /t REG_SZ /d 1 /f
reg add «HKLM\SOFTWARE\Microsoft\Windows NT\CurrentVersion\Winlogon» /v AutoLogonCount /t REG_DWORD /d 1 /f
Alternatively, you can use a PowerShell script to save the user’s login information to the registry:
$Username =’max’
$Pass = ‘Max$uperP@ss’
$RegistryPath = ‘HKLM:\SOFTWARE\Microsoft\Windows NT\CurrentVersion\Winlogon’
Set-ItemProperty $RegistryPath ‘AutoAdminLogon’ -Value «1» -Type String
Set-ItemProperty $RegistryPath ‘DefaultUsername’ -Value $Username -type String
Set-ItemProperty $RegistryPath ‘DefaultPassword’ -Value $Pass -type String
Restart-Computer
Disable Password Prompt after Sleep/Hibernation in Windows 10
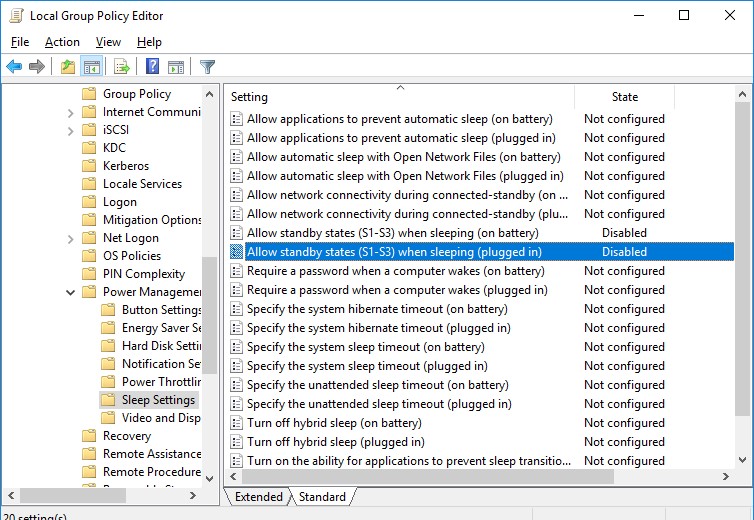
Using GPO, you can turn off the password request when the computer wakes up from sleep or hibernation.
- To do this, run the gpedit.msc console (in the home versions of Windows 10, you can run the local policy editor console like this);
- Go to the policy section Computer Configuration -> Administrative Templates -> System -> Power Management -> Sleep Settings;
- Disable the GPO parameters “Require a password when a computer wakes (on battery)” and “Require a password when a computer wakes on battery (plugged in)”;
- Now Windows won’t require a password after resuming from sleep or hibernation.
Enable Secure Automatic Logon without a Password Using AutoLogon Tool
For more secure automatic logon to Windows 10, you can use the free AutoLogon for Windows tool. The utility was part of the Sysinternals system utilities pack and is now available for download on the Microsoft website (https://docs.microsoft.com/en-us/sysinternals/downloads/autologon). The Autologon is also useful because the previous ways of enabling autologon in Windows 10 may not work on computers that are joined the Active Directory domain.
- Download and run Autologon.exe (or autologon64.exe ) as an administrator;
- Accept the terms of the license agreement;
- Specify the user account, domain and user password under which you want to perform autologin and press the Enable button:
- A window will appear in which it is indicated that the autologon is enabled. Encrypted password is stored in LSA format under the registry key HKLM\SECURITY\Policy\Secrets. In this case, the password is not stored in clear text, but the encryption algorithm is not strong and any local computer administrator (but not a user) can decrypt it.
You can set user credentials to automatically log on to Windows using the Autologon command line options. To configure Windows autologin for a user, you can use the following command:
autologon64.exe USER_NAME DOMAIN PASSWORD /accepteula
In this guide we looked at how to disable password login on Windows 10 and boot the computer directly to the user’s desktop. In order to temporarily disable automatic logon in Windows and manually specify the user credentials under which you need to sign in, you must hold down the Shift key while Windows is booting.


