- Information about power management setting on a network adapter
- Summary
- More information
- How to use Registry Editor to disable network adapter power management on a single computer
- Additional information
- Включение сетевого адаптера в Windows 7
- Способ 1: «Центр управления сетями и общим доступом»
- Способ 2: «Диспетчер устройств»
- Способ 3: Интерфейс ввода команд
- Top 13 Ways to Fix Windows 10 Network Adapter Missing Issue
- Mehvish
- 1. Restart Your PC
- 2. Put Laptop in Sleep Mode
- 3. Remove Power Cable
- 4. Remove Battery
- 5. Troubleshoot Network Issue
- 6. Update Network Drive
- 7. Uninstall or Rollback Adapter
- 8. Enable Driver
- 9. Install Driver
- 10. Show Hidden Drivers in Device Manager
- 11. Check Physical Network Buttons
- 12. Disable VPN and Antivirus
- 13. Reset Network Settings
- Is Your Windows Updated?
- Read Next
- 7 Ways to Reduce How Much Data Your Windows 10 PC Uses
- Top 5 Ways to Reinstall a Sound Driver in Windows 10
- 8 Best Ways to Fix Windows 10 Ethernet Keeps Disconnecting
- 8 Ways to Fix Wi-Fi Doesn’t Connect After Sleep in Windows 10
- How to Fix Windows 10 Won’t Detect Wi-Fi Network
- Where Are Bluetooth Settings in Windows 10 and How to Use Them
- How to Solve Hamachi Not Working in Windows 10
- 2 Ways to Reinstall and Update Realtek HD Audio Manager in Windows 10
Information about power management setting on a network adapter
This article provides a resolution to disable network adapter power management on a single computer.
Original product version: В Windows 7 Service Pack 1, Windows Server 2008 R2 Service Pack 1
Original KB number: В 2740020
Summary
The enhancements made to Windows 7 for managing power settings for network adapters greatly reduces the number of spurious wakes. It allows computers to sleep for longer periods of time when idle. Furthermore, you can configure the power management settings to meet the needs of your users through device properties, standard registry settings.
When deploying Windows 7 or Windows Server 2008 R2, you may want to disable the following network adapter power management setting on some computers:
Allow the computer to turn off this device to save power
More information
The Allow the computer to turn off this device to save power setting controls how the network card is handled when the computer enters sleep. This setting can be used if a driver misrepresents how it handles sleep states.
Windows never turns off the network card due to inactivity. When this setting is checked(enabled), Windows puts the network card to sleep and when it resumes it puts it back to D0. When this setting isn’t checked(disabled), Windows completely halts the device and on resume reinitializes it. This setting is useful if a network card driver says it supports going to different sleep states and back to D0 but it ultimately doesn’t support this functionality.
You can use Device Manager to change the power management settings for a network adapter. To disable this setting in Device Manager, expand Network Adapters, right-click the adapter, select Properties, select the Power Management tab, and then clear the Allow the computer to turn off this device to save power check box.
In Windows 7 or Windows Server 2008 R2, you have two additional check boxes on the Power Management tab for the Network Adapter that defines whether this device can wake the computer:
- Allow this device to wake the computer
- Only allow a magic packet to wake the computer
For above mentioned settings to work, you may also have to enable BIOS settings to enable WOL. The specific BIOS settings depend on the manufacturer of the computer.
However, with some Windows 7 or Windows Server 2008 R2 installations, you may want to use the registry to disable the Allow the computer to turn off this device to save power network adapter power management setting. Or you may want to use the registry to configure the wake options described above.
How to use Registry Editor to disable network adapter power management on a single computer
This section, method, or task contains steps that tell you how to modify the registry. However, serious problems might occur if you modify the registry incorrectly. Therefore, make sure that you follow these steps carefully. For added protection, back up the registry before you modify it. Then, you can restore the registry if a problem occurs. For more information about how to back up and restore the registry, see How to back up and restore the registry in Windows.
To disable the network adapter power management setting for a single computer, follow these steps:
Select Start, select Run, type regedit in the Open box, and then select OK.
Locate and then select the following registry subkey:
HKEY_LOCAL_MACHINE\SYSTEM\CurrentControlSet\Control\Class\<4d36e972-e325-11ce-bfc1-08002be10318>\DeviceNumber
DeviceNumber is the network adapter number. If a single network adapter is installed on the computer, the DeviceNumber is 0001.
Select PnPCapabilities.
On the Edit menu, select Modify.
In the Value data box, type 24, and then select OK.
By default, a value of 0 indicates that power management of the network adapter is enabled. A value of 24 will prevent Windows 7 from turning off the network adapter or let the network adapter wake the computer from standby.
On the File menu, select Exit.
Additional information
You have three options for the power management properties of the Network Card:
- Option 1: Allow the computer to turn off this device to save power
- Option 2: Allow this device to wake the computer
- Option 3: Only allow a magic packet to wake the computer
The different possible combinations that exist along with their DWORD values (in decimal and hex) are:
- Option 1 and option 2 are checked, Option 3 is unchecked: This combination is default and hence its value is 0.
- Option 1, option 2, and option 3 are all checked: The value becomes 0x100 (256).
- Only option 1 is checked: The value becomes 0x110 (272).
- Option 1 is unchecked (Note that option 2 and option 3 will be greyed out as a result): The value becomes 0x118 (280).
A conflict happens for the DWORD value for the last step where Option 1 is only checked, if the following steps are done exactly as mentioned below:
- If you check all the boxes, then the value is 256 (0x100).
- If you uncheck the box 1, the other two will be greyed out, and the value becomes 280 (0x118).
- If you check all the boxes except, the third one, PNPCapabilities value becomes 0.
- If step 2 is repeated, the value becomes 24 (0x18).
Now, the values are different for the same setting because the way it has been achieved.
For deployment purpose, to keep option 1 cleared, one needs to use the value 24 (0x18). By default, option 1 and 2 are checked. It’s the same as DWORD value 0 of this key, even though the key doesn’t exist in the registry by default. Hence, creating this key with a value 24 (0x18) in the deployment script/build process will inject this entry in the registry, which in turn should uncheck the first box during server startup.
In the same way, if you want to keep option 1 checked while option 2 and 3 cleared, the required value would be 10 (0x16).
Включение сетевого адаптера в Windows 7
Способ 1: «Центр управления сетями и общим доступом»
Самое простое решение нашей задачи заключается в задействовании оснастки «Центр управления сетями…».
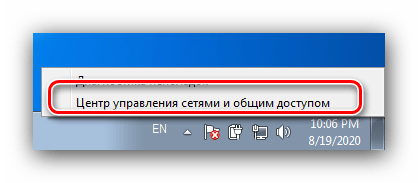
- Обратите внимание на системный трей в правом нижнем углу. Среди его значков должен находится элемент проводного соединения или Wi-Fi – кликните по нему правой кнопкой мыши и выберите вариант «Центр управления сетями…».
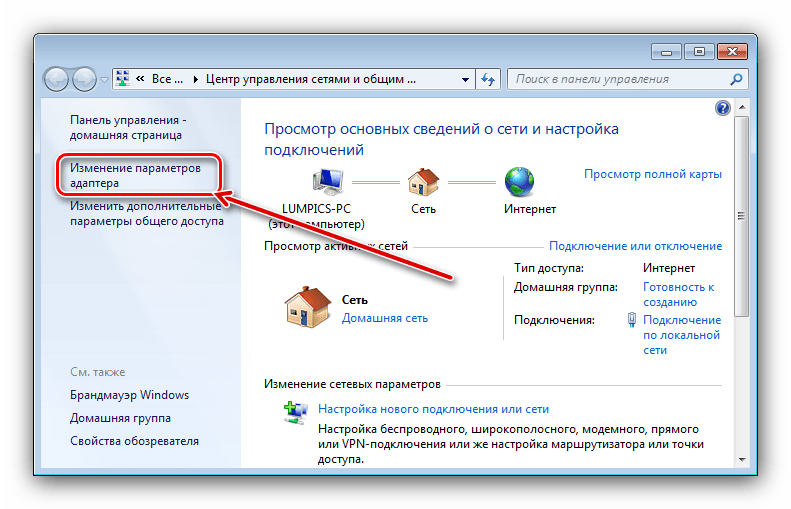
После запуска оснастки воспользуйтесь его меню, в котором выберите позицию «Изменение параметров адаптера».
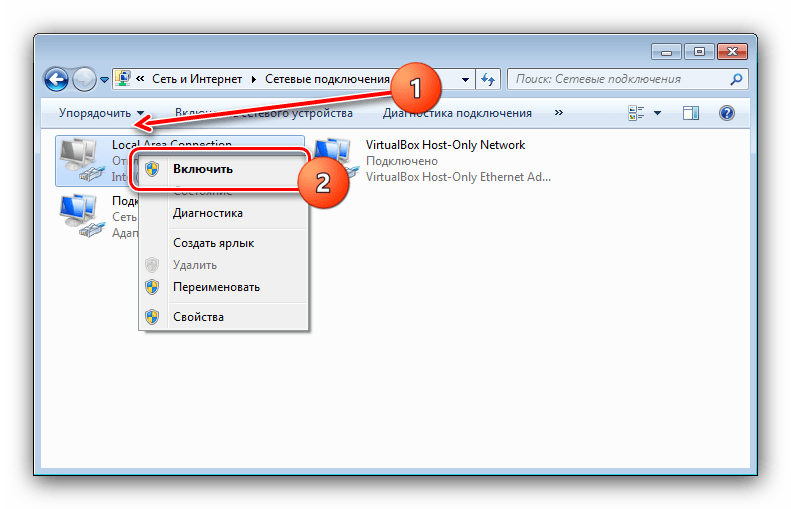
Готово – теперь сетевой адаптер будет активен и готов к работе.
Способ 2: «Диспетчер устройств»
В оснастке «Диспетчер устройств» можно программно включать и отключать большинство представленных в нём компонентов, в том числе и средства сетевых подключений.
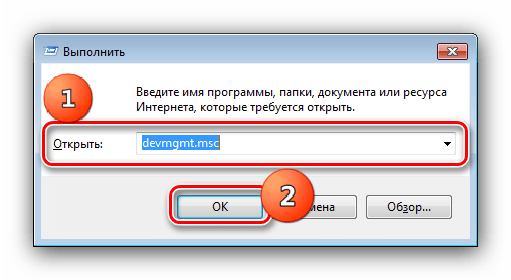
- Запустите требуемую оснастку – например, одновременно нажмите клавиши Win и R, в появившемся окне напечатайте запрос devmgmt.msc , затем нажмите Enter или «ОК».
Читайте также: Способы открытия «Диспетчера устройств» на Windows 7
Далее разверните ветку «Сетевые адаптеры» – выберите в перечне нужный, затем щёлкните по нему ПКМ, потом «Задействовать».
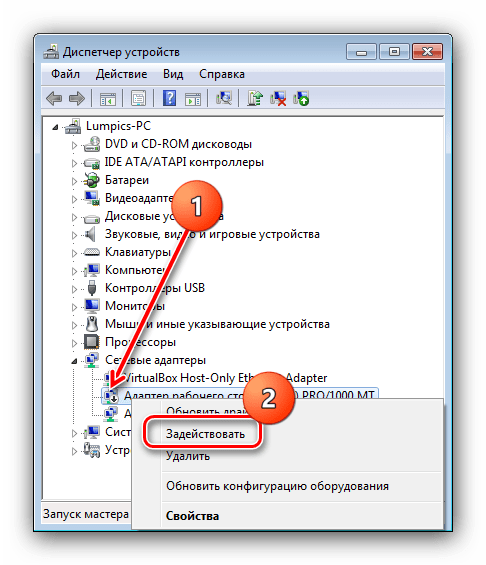
Теперь устройство перейдёт в активное состояние – стрелка на белом фоне возле иконки пропадёт.

Этот метод в большинстве случаев аналогичен предыдущему по эффективности.
Способ 3: Интерфейс ввода команд
Последний вариант отключения адаптера заключается в использовании «Командной строки».
- Для запуска инструмента воспользуемся поиском – откройте «Пуск», наберите в соответствующей строке запрос cmd , после щёлкните по результату ПКМ и выберите «Запуск от имени администратора».

wmic nic get name, index
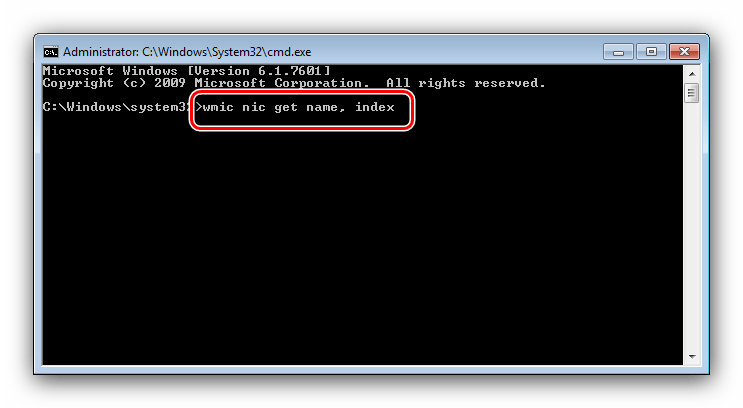
Внимательно ознакомьтесь со списком и запомните либо запишите номер, который находится в столбце «index» напротив целевого устройства.

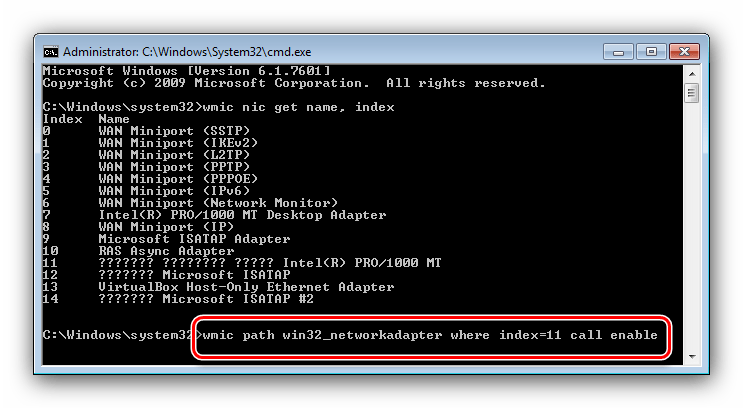
Далее напечатайте следующее:
wmic path win32_networkadapter where index=*номер* call enable
Вместо *номер* введите без звёздочек значение, полученное на предыдущем шаге.
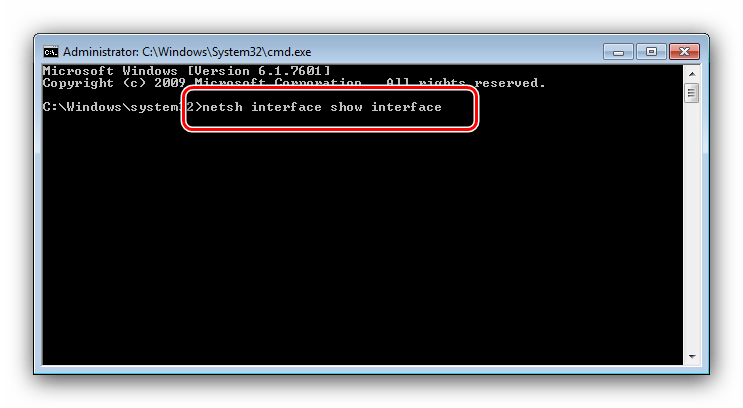
Кроме вышеупомянутых команд, активировать сетевые адаптеры можно с помощью утилиты netsh – введите в интерфейсе запрос:
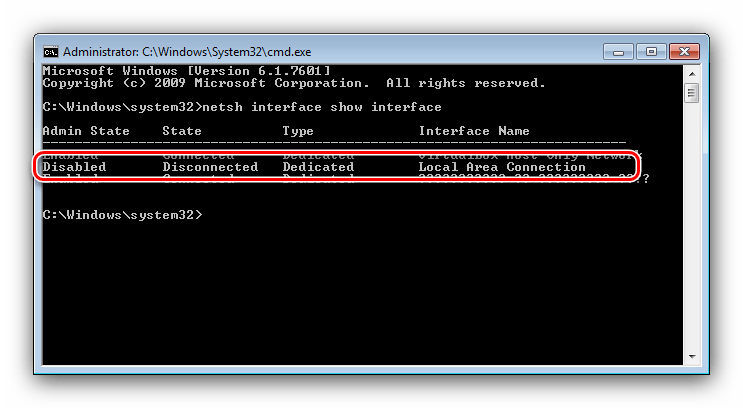
netsh interface show interface
Снова запомните данные, соответствующие сетевому устройству, на этот раз из графы «Interface Name» – нужный девайс можно легко определить по слову «Disabled» в столбце «Admin State».
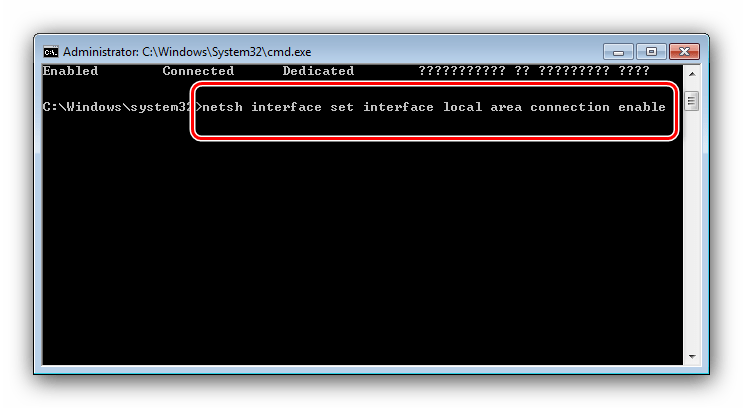
Потом пропишите следующие операторы:
netsh interface set interface *интерфейс* enable
Как и в случае с командой из шага 4, замените *интерфейс* данными из шага 5.
«Командная строка» пригодится юзерам, которые по тем или иным причинам не могут воспользоваться предыдущими методами.
Top 13 Ways to Fix Windows 10 Network Adapter Missing Issue
Mehvish
14 Sep 2019
Nobody appreciates it when the internet stops working out of the blue on their PC. Sadly, many of us have faced the issue due to the mischievous network adapter. The network adapter either disappears from the Device Manager or one gets a notification that network adapter is missing. Since the adapter is missing, one is unable to connect to the internet.

The reasons behind that could be many, but the most obvious one is any recent software fidgeting with it. It’s quite possible that a malware is disrupting your computer — that’s the worst-case scenario.
Don’t worry. Once the network adapter is back, you will be able to use the internet without any issue. But for that, you need to first solve the issue of network adapter.
That’s what we will help you with. In this post, you will find 13 ways to fix the network adapter driver missing issue on Windows 10.
Let’s check the solutions.
1. Restart Your PC
If there’s a magical cure in the world of technology, it is restarting the device. Reboot your Windows 10 device to check if the adapter is back in action.
2. Put Laptop in Sleep Mode
Some users have suggested that putting the laptop in the sleep mode by closing its lid for some time also solves the no network adapter issue.

3. Remove Power Cable
Another way to solve the issue is to go powerless for a while. That is turn off your PC and unplug the power cord from it. Wait for at least 10 seconds. Then re-plug the power cord and turn on the device.
4. Remove Battery
Removing the battery forces the motherboard of your laptop to soft reset its settings, thus solving any issues. If your laptop supports a removable battery, turn it off first. Then remove the battery cover and take the battery out for a few seconds. Insert it again and power on your laptop. Hopefully, the network adapter will be back.
5. Troubleshoot Network Issue
Windows 10 provides a competent troubleshooter that is known to fix various issues. Here we will take the help of the dedicated troubleshooter for network adapters.
Follow these steps to initiate the troubleshooting process:
Step 1: Open Settings from the Start Menu or press Windows key + I.

Step 2: Click on Update & Security.

Step 3: Select Troubleshoot from the left sidebar. Scroll down and click on Network Adapter followed by Run the troubleshooter. Follow the on-screen instructions to start the process.

Also on Guiding Tech

How to Prioritize Wi-Fi Networks on Your Android Phone
6. Update Network Drive
If the network adapter is visible in the Device Manager, you can also try updating it. Sometimes, the issue is due to a bug in the driver version installed on your system. So, updating it can fix the network adapter missing issue.
To fix it, follow these steps:
Step 1: Right-click on the Start Menu icon and select Device Manager from it. Alternatively, press Windows key + R. Type devmgmt.msc and hit enter.

Step 2: Click on the small down arrow present next to Network adapters. Right-click on your network adapter. It’s usually from Realtek/Broadcom or has wireless written next to it. Select Update driver. Complete the process and restart your computer.

7. Uninstall or Rollback Adapter
If updating the driver didn’t fix the issue, try rolling back to a previous version or uninstalling it. Start by rolling back. If you uninstall it, your system will install the driver automatically after a restart.
To uninstall, follow the steps mentioned in enabling the driver. However, after right-clicking on the driver, choose Uninstall device.

To roll back, click on Properties after right-clicking on the driver. Under Properties, go to the Driver tab and click on Roll Back Driver. Restart your system.

8. Enable Driver
Sometimes, the driver is disabled and that’s why you cannot connect to the internet. To fix it, you need to enable the driver.
For that, open Device Manager as shown above. Then right-click on your network driver under Network adapters and select Enable driver.
9. Install Driver
In case the driver isn’t visible under Network adapters, you will find it under Other devices or Unknown devices. It will have a yellow icon next to it. Right-click on the driver and select Update driver from the list. Restart your device.
Also on Guiding Tech
# internet
10. Show Hidden Drivers in Device Manager
If the network adapter doesn’t appear even after following the fixes mentioned above, it might be hidden.
To make it visible, follow these steps:
Step 1: Open Device Manager by right-clicking on the Start Menu icon.
Step 2: In the Device Manager, click on the View option in the toolbar at the top and select Show hidden devices.

Step 3: Click on the Action option and select Scan for hardware changes.

Step 4: If the adapter appears listed under Unknown devices, update it.
11. Check Physical Network Buttons
Make sure airplane mode is turned off on your system. Also, check for a physical button for Wi-Fi, use it to enable Wi-Fi.
12. Disable VPN and Antivirus
If you use VPN on your computer, try disabling or uninstalling it for a while. Then restart your PC.
Similarly, either disable the antivirus or check if an update is available. At times, even the antivirus requires a restart.
13. Reset Network Settings
Lastly, if nothing works, reset network settings. Doing that will revert all the network settings to their default values. Don’t worry, it will not hamper your data.
To reset network, follow these steps:
Step 1: Open Settings on your PC.
Step 2: Click on Network and Internet.

Step 3: Scroll down on the Status screen and click on Network reset.

Step 4: Confirm your decision by clicking on Reset now.

Also on Guiding Tech
2 Excellent Software to Monitor Your Internet Usage in Windows
Is Your Windows Updated?
We hope the above solutions would have brought back the network adapter on your PC. In case it persists, we would suggest you check Windows update service too. Sometimes, there is a mismatch between the network adapter and the current Windows version. Do look for an available update under Settings > Update and Security.
Next up: Once the internet connectivity is back, track its speed with a speed monitor tool in the taskbar. Learn how to use the tool by adding it to the status bar of Windows 10.
Last updated on 13 Sep, 2019
The above article may contain affiliate links which help support Guiding Tech. However, it does not affect our editorial integrity. The content remains unbiased and authentic.
Read Next

7 Ways to Reduce How Much Data Your Windows 10 PC Uses
Does your computer wastefully exhaust your limited internet plan? Learn how to reduce data usage on your # Windows 10 computer in this article.

Top 5 Ways to Reinstall a Sound Driver in Windows 10
A missing audio/ # sound driver on your # Windows PC could lead to several audio issues. Check out five different ways to reinstall your # Windows 10 PC # sound driver in this tutorial.

8 Best Ways to Fix Windows 10 Ethernet Keeps Disconnecting
Are you having difficulties using the internet because your # Windows 10 PC’s ethernet keeps disconnecting? Here are 8 possible solutions to the issue.

8 Ways to Fix Wi-Fi Doesn’t Connect After Sleep in Windows 10
Does your computer lose internet connection after waking up from sleep in # Windows 10? Know how to fix the problem of # Wi-Fi doesn’t connect after sleep or hibernate.

How to Fix Windows 10 Won’t Detect Wi-Fi Network
Is your # Windows 10 computer unable to detect the # Wi-Fi # network? Here is an exhaustive list of solutions to help you get back online ASAP.

Where Are Bluetooth Settings in Windows 10 and How to Use Them
Are you wondering how to use # Bluetooth on a # Windows 10 PC? Find out more about where is the # Bluetooth setting in # Windows 10 computer and how to use it.

How to Solve Hamachi Not Working in Windows 10
Having trouble setting up Hamachi on # Windows 10? Here are 10 useful ways to resolve the Hamachi not working or connecting error so you can go back to sharing.

2 Ways to Reinstall and Update Realtek HD Audio Manager in Windows 10
Can’t find the Realtek HD # Audio Manager on your # Windows PC? Or is it malfunctioning? Updating or reinstalling it could help. Check out 3 ways to get it done.


