- Устранение ошибки «Обнаружение интерактивных служб» в Windows 7
- Как убрать «Обнаружение интерактивных служб»
- Решение возможных проблем
- Заключение
- Включение и отключение компонентов Windows 10
- Работаем с Windows Features
- Управление Features on Demand (FOD)
- Установка и переустановка пакетов языков (Language Interface Packs, LIP)
- Turn Windows Features on or off: Here’s how to use it
- How do I turn on or off optional Windows features?
- Access this feature from Control Panel
- What features are available to be installed?
- Windows 10: How to Turn on or Turn off Location Services
- How to Turn Off Location Services for or Turn it On via Action Center
- Turn Off Location Services for the Device in Settings or Turn it On
- Turn Off or On Location Services for Apps and Accounts in Settings
- How to Permanently Turn off Windows 10 Location Services for Accounts and Apps via Regedit
- Turn Off Location Services for the Device via Regedit
- How to Turn On or Off Location Services During Windows 10 Setup
Устранение ошибки «Обнаружение интерактивных служб» в Windows 7

Как убрать «Обнаружение интерактивных служб»
Начнём с причин появления сбоя. Дело в том, что в старых версиях Виндовс (до XP включительно) в системе присутствовали компоненты под названием «Интерактивные службы», которые позволяли той или иной программе создавать дополнительные сообщения. В Windows Vista и новее они отсутствуют, но присутствует служба-заменитель для обратной совместимости. Однако порой она только мешает, поскольку программа может запускаться и без интерактивных служб, так что этот элемент можно отключить для решения проблемы.
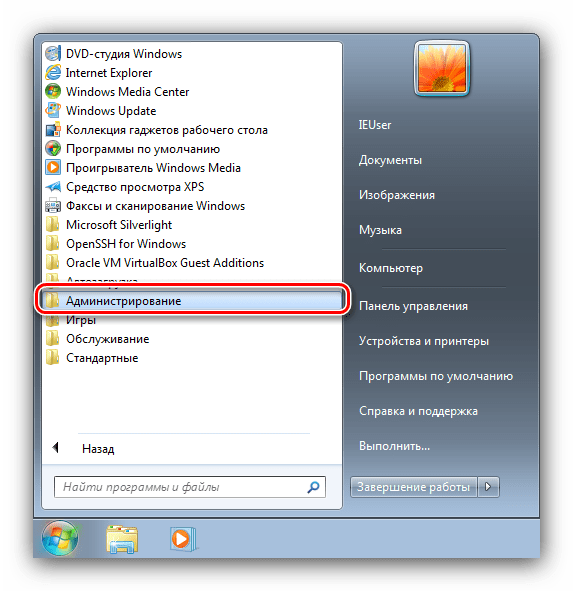
- Откройте «Пуск» и перейдите по пути «Все программы» – «Служебные» – «Администрирование».
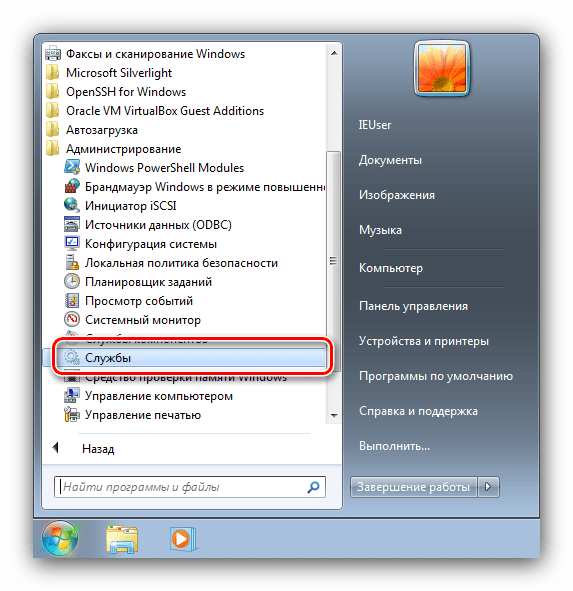
Откроется каталог с ярлыками средств администрирования – найдите пункт «Службы» и запустите его двойным кликом левой кнопкой мыши.
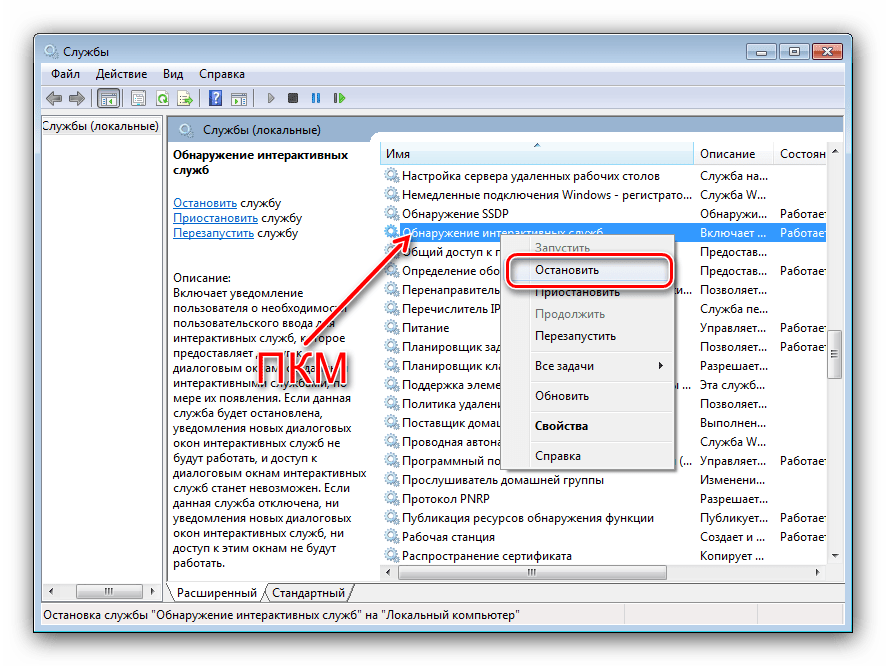
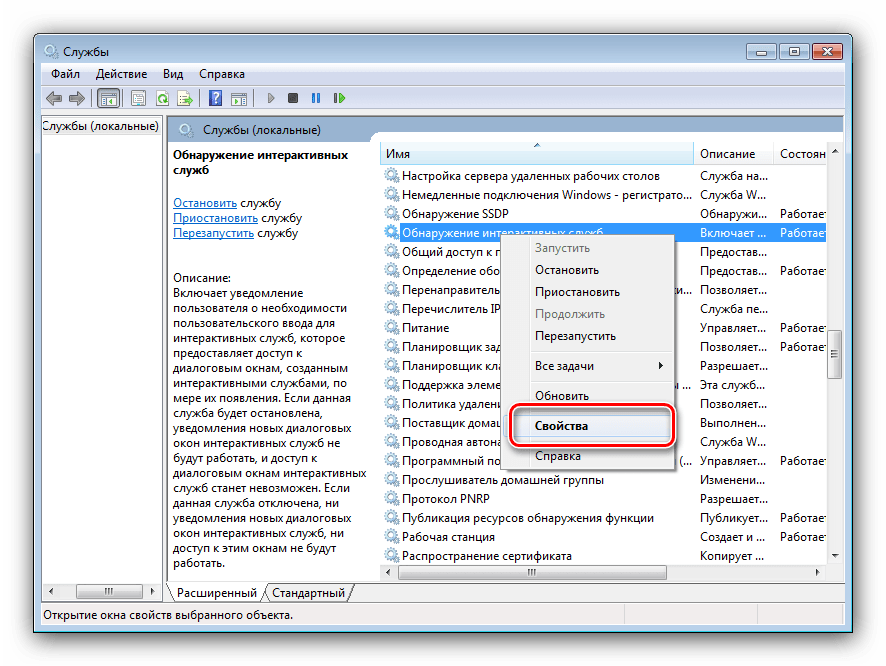
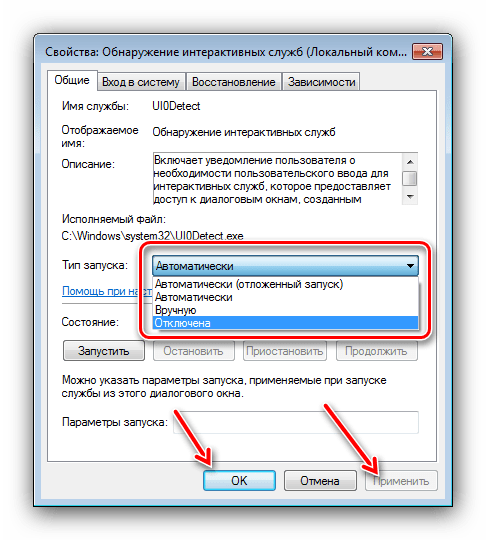
Снова вызовите контекстное меню службы, но на этот раз выберите пункт «Свойства».
Обратитесь к выпадающему списку «Тип запуска» – в нём следует выбрать вариант «Остановлена». Далее нажмите кнопки «Применить» и «ОК».
Перезагрузите компьютер, после чего проблема должна быть устранена.
Решение возможных проблем
Нередко попытка устранить рассматриваемую неполадку приводит к проявлению дополнительных сбоев. Рассмотрим самые частые и предложим способы их устранения.
Не открываются «Службы»
Самой частой дополнительной ошибкой является невозможность открыть оснастку «Службы». В большинстве случаев это означает повреждение системных файлов (что, кстати, может быть и причиной основной неполадки, которую мы рассматриваем в настоящей статье). Само собой, методом устранения проблемы будет восстановление повреждённых компонентов, однако перед этим стоит проверить систему на вирусы – не исключено, что именно их активность и нарушила целостность данных.
После этого можно переходить к восстановлению.

После устранения проблемы перестали запускаться другие программы
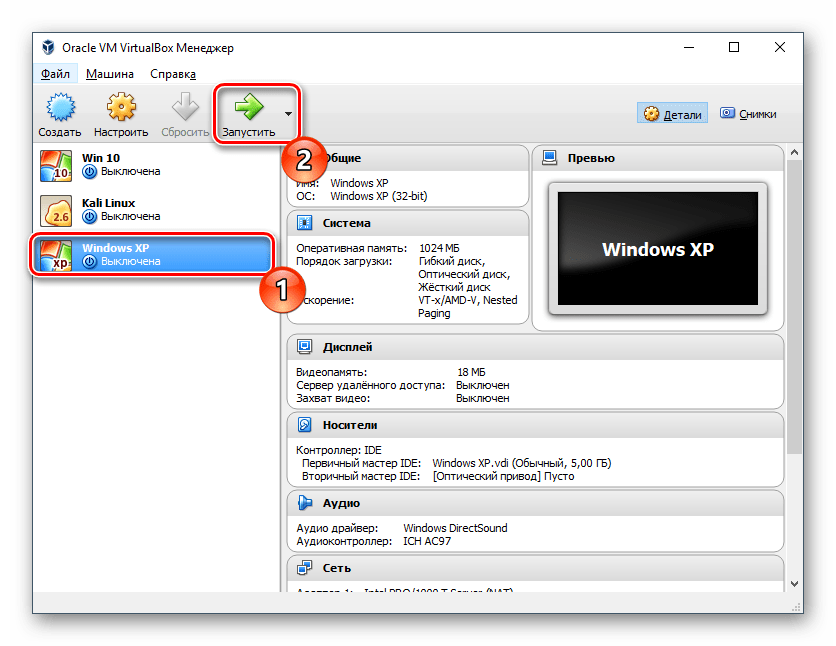
Отключение элемента «Обнаружение интерактивных служб» иногда приводит к тому, что другие программы, преимущественно также старые, начинают либо не запускаться вовсе, либо работать с ошибками. Единственным методом устранения этого сбоя будет включение «Обнаружения интерактивных служб» – выполняйте инструкцию выше, только на шаге 4 выберите вариант «Автоматически». В дальнейшем, во избежание подобных неполадок, рекомендуем установить Windows XP на виртуальную машину, и из-под неё работать с проблемным софтом.
Заключение
Мы рассмотрели способ устранения проблемы с ошибкой «Обнаружение интерактивных служб» на Виндовс 7. Подводя итоги, отметим, что у многих старых программ существуют более современные аналоги, в которых нередко сохраняется обратная совместимость с рабочими форматами старых, поэтому использовать такой софт будет компромиссным решением.
Включение и отключение компонентов Windows 10
Как известно, Windows 10 отличается набором компонентов от предыдущих версий операционных систем Windows. Зачастую требуется их включить или выключить, чтобы они не потребляли системные ресурсы, да и просто не мешали. В этой статье мы рассмотрим как это сделать быстрее и эффективнее.
Начнем с того, что существует два основных способа работы с компонентами (они еще называются features) — утилита DISM и командлеты Powershell. И то и другое встроено в Windows 10, в отличие от Windows 7, где dism можно было добавить или установив пакет Windows ADK, или руками скопировав dism.exe с другого компьютера.
Сразу отмечу, что утилиту dism и среду powershell для работы с системой необходимо запускать от имени администратора, даже если ваш аккаунт уже находится в группе локальных админов. Итак, вы или находите cmd или windows powershell в меню и, кликнув правой кнопкой мышки, выбираете «Запуск от имени администратора».
В Windows 10 есть понятие Features и Capabilities. Первое — это привычные нам компоненты, которые можно найти в Панели управления -> Программы и компоненты -> Включение и отключение компонентов Windows. То есть это встраиваемые модули, которые выполняют определенный сервисный функционал.
Capabilities — это дополнительные возможности, которые расширяют возможности интерфейса и увеличивают удобство пользователя. Среди них — Language packs, наборы шрифтов. Да, Microsoft удалил часть нестандартных шрифтов, которые теперь вынесены в опциональные компоненты. Скачать эти компоненты можно в виде ISO файла с сайта Volume Licensing Service Center или напрямую через Internet и графический интерфейс Windows. Такую концепцию Microsoft назвала Features on Demand (FOD). Их в более ранних версия Windows не было.
Работаем с Windows Features
Итак, список установленных компонентов можно посмотреть командой
Dism /online /Get-Features
Вот как в Powershell можно получить список всех компонентов командлетами Get-WindowsFeature (для Windows Server) или Get-WindowsOptionalFeature (Windows 10):
Чтобы получить список отключенных компонентов, введите:
Get-WindowsOptionalFeature -Online | ? state -eq ‘disabled’ | select featurename
Этот список также можно вывести в файл (для windows Server):
Get-WindowsFeature | Where-Object <$_.Installed -match “True”>| Select-Object -Property Name | Out-File C:\Temp\WindowsFeatures.txt
Посмотрев список названий и их состояние, можно использовать эти названия для того, чтобы компоненты включить или выключить:
Dism /online /Enable-Feature /FeatureName:TFTP /All
ключ /All позволяет включить также все дочерние компоненты;
Установка компонентов через Powershell выполняется командой Enable-WindowsOptionalFeature.
Enable-WindowsOptionalFeature -Online -FeatureName RSATClient-Roles-AD-Powershell
Параметр -All включает все дочерние компоненты.
Dism /online /Disable-Feature /FeatureName:TFTP
Аналогично, через Powershell это можно сделать командой Disable-Windowsoptionalfeature -online -featureName [feature name].
Обратите внимание, некоторые фичи имеют разные названия в Windows 7 и Windows 10. Например, RSAT в Windows 7 — это RemoteServerAdministrationTools, а в Windows 10 — RSATclient.
Управление Features on Demand (FOD)
Если вы устанавливаете их через графический интерфейс, то вам необходимо пройти “System –> App & features –> Manage optional features” и нажать знак + напротив необходимых компонентов.
Чтобы сделать это автоматизированно через командную строку, наберите чтобы получить список доступных компонентов:
DISM.EXE /Online /Get-Capabilities
или на Powershell:
Как и прежде, запомните название необходимых вам компонентов, чтобы включить их командой (на примере .Net Framework 3):
DISM.EXE /Online /Add-Capability /CapabilityName:NetFx3
или на Powershell:
Add-WindowsCapability –Online -Name NetFx3
Если же у вас нет доступа в Интернет, то есть выход. Итак, вы скачиваете ISO образ диска с FOD компонентами с сайта Volume Licensing Service Center. Файлы будут разные для разных релизов Windows 10 — 1511, 1607, 1703, 1709. Важно помнить, что компоненты одного релиза не подходят к другому. Если вы сделаете in-place upgrade (установка одного релиза поверх другого через обновление), то несовместимые установленные компоненты будут удалены без вашего желания! Да, Microsoft удаляет то, что считает несовместимым при обновлении.
Так вот, ISO файл содержит набор неизвестных и сложных для понимания файлов с расширением cab. Вот чудесный файлик на сайта Microsoft, который обясняет назначение каждого файла. Итак, существуют следующие типы FOD:
- Microsoft-Windows-LanguageFeatures-Basic — проверка правописания для различных языков и раскладок клавиатуры;
- Microsoft-Windows-LanguageFeatures-Fonts — национальные шрифты, например, азиатские
- Microsoft-Windows-LanguageFeatures-OCR — средства для распознавания шрифтов
- Microsoft-Windows-LanguageFeatures-Handwriting — средства для распознавания рукописного ввода
- Microsoft-Windows-LanguageFeatures-TextToSpeech — средства преобразования текста в голос, используемые подсказчиком Cortana
- Microsoft-Windows-LanguageFeatures-Speech — распознавание голоса
- Microsoft-Windows-InternationalFeatures — пакеты национальных настроек, например, для Тайваня
Итак, для добавления таких FOD компонентов, используйте команды вида (замените имя компонента):
Dism /Online /Add-Capability /CapabilityName:Language.Basic
Для удаления FOD:
Dism /Online /Remove-Capability /CapabilityName:Language.Basic
Установка и переустановка пакетов языков (Language Interface Packs, LIP)
Язык интерфейса Windows можно поменять, установив так называемые LIP. ранее они назывались MUI (Multi user interface). Файлы LIP выглядят так: Microsoft-Windows-Client-Language-Pack_x64_es-es.cab для испанского языка. Выглядеть установка будет примерно так:
Dism /Add-Package /online /PackagePath:»C:\Languages\Microsoft-Windows-Client-Language-Pack_x64_fr-fr.cab»
Dism /Remove-Package /online /PackageName:Microsoft-Windows-Client-LanguagePack-Package
В следующей статье мы поговорим как с помощью DISM и Powershell управлять так называемыми Modern-приложениями AppX.
Turn Windows Features on or off: Here’s how to use it


Windows 10 is a great operating system, but it also comes with several hidden features that you might not know about. All these features are listed in the Turn Windows features on or off section, and in today’s article, we’ll show you how you can enable or disable them.
How do I turn on or off optional Windows features?
Access this feature from Control Panel
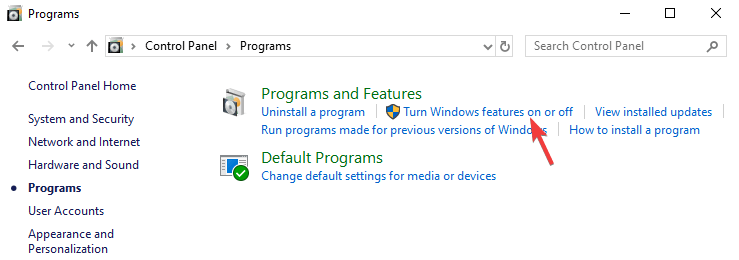
- Open Control Panel and go to Programs.
- Now select Turn Windows features on or off.

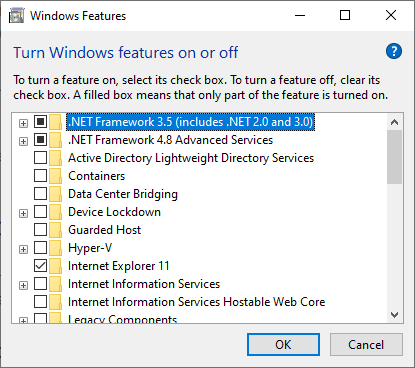
- List of features will now appear. Just check the feature you want to install or uncheck the one you want to remove and click OK.
- You’ll be asked to restart your PC in order to apply the changes.
If you want to access this feature quickly, you can use the following method:
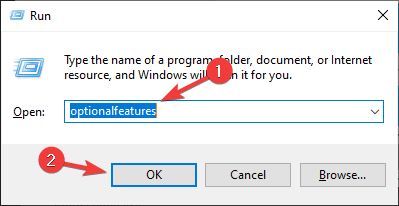
- Press Windows Key + R to open the Run window.
- Now enter optionalfeatures and press Enter or click OK.
What features are available to be installed?

There are about 30+ optional features available to be installed, but we’re going to focus on several most important ones.
- .NET Framework 3.5 (includes .NET 2.0 and 3.0)and.NET Framework 4.6 Advanced Services– These two features are required in order to run applications created using the .NET Framework 3.5 or 4.6.
- Hyper-V– Microsoft’s virtualization technology that lets you run virtual machines on your PC without third-party software.
- Internet Explorer 11– If you still need to use Internet Explorer on your PC, you should know it’s still available on Windows 10.
- Media Features – This includes Windows Media Player and other multimedia components.
- Microsoft Print to PDF – A feature that lets you “print” your documents straight to PDF files instead of an actual printer.
- Windows PowerShell 2.0 – Command Line interface similar to the Command Prompt, but more advanced.
- Windows Subsystem for Linux (Beta)– This feature gives you the access to the Ubuntu command line and it allows you to use the same commands you’d use on a Linux system.
These are some of the most notable features that you can enable/disable, but there are a lot more available.
There you go, a quick and easy guide on how to use Turn Windows Features on or off on your PC.
As you can see, most of the features available here are made for advanced users, and you most likely won’t have to enable or disable them on your own anytime soon.
We hope you found this article informative and that you now have a better understanding of optional Windows Features.
Windows 10: How to Turn on or Turn off Location Services
Privacy conscious? We show you how to turn off location services in Windows 10 or turn them on again to suit your preferences.
Windows 10’s location services are a somewhat controversial feature. On the one hand, some apps require them to provide useful functionality, but on the other, some see it as an invasion of privacy. This is only compounded by seemingly random messages that “Your location is currently in use” or “Your location has recently been accessed”. We’re going to show you how to turn off location services if you wish, but also talk through adjusting location settings to be on, but more conservative.
Should location services be on or off?
Though some fear that Windows 10 will be checking their location constantly, if they enable the geolocation service, that isn’t the case. For the most part, the OS confirms exactly to the settings you provide, it’s just that many don’t know how to configure location services or have forgotten to do so for a certain app.
Ultimately, only you can decide whether location services should be on or off, but knowledge of how it works and what it provides can help a decision. When the device location setting is enabled in Windows 10, it makes features such as auto time zones, find my device, and live mapping locations possible. To gain its data, the OS doesn’t just use GPS – it may also scan for data like nearby Wi-Fi networks, your IP address, and nearby cell towers if you have a SIM card.
Though some of this data is sent to Microsoft for diagnostic and improvement purposes, it’s transmitted after personally identifiable information is removed by the OS. Theoretically, this should make it very difficult for the company to tie it to any specific person. However, previous studies of anonymized data from other providers have hinted that it can be combined with other analytics to figure out somebody’s identity.
Giving an app access to your location and location history means it can determine your location more precisely, though it can still give a rough estimate without it. Windows location settings can only be changed for apps in the store, not desktop apps, but all of them must comply with your local legislation surrounding consent, especially if you fall under GDPR. The only exception to this is if you make an emergency call, in which case Windows will attempt to find your precise location regardless of settings to help emergency services.
Ultimately, turning off location services could mean you’re unable to find your laptop it’s lost or stolen. On a desktop PC, you aren’t missing out on anything major and it largely comes down to preference. Let’s jump into how to turn off location service or turn them on again to suit your decision:
How to Turn Off Location Services for or Turn it On via Action Center
The simplest way to turn off or on location services is through Windows 10’s Action Center, the one-stop-shop for all the frequently accessed toggles.
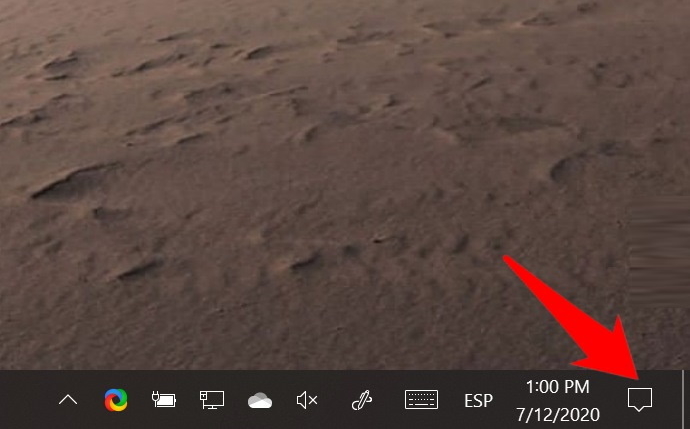
- Open the Action Center
This can be achieved by pressing the message bubble in the bottom-left corner of your screen.
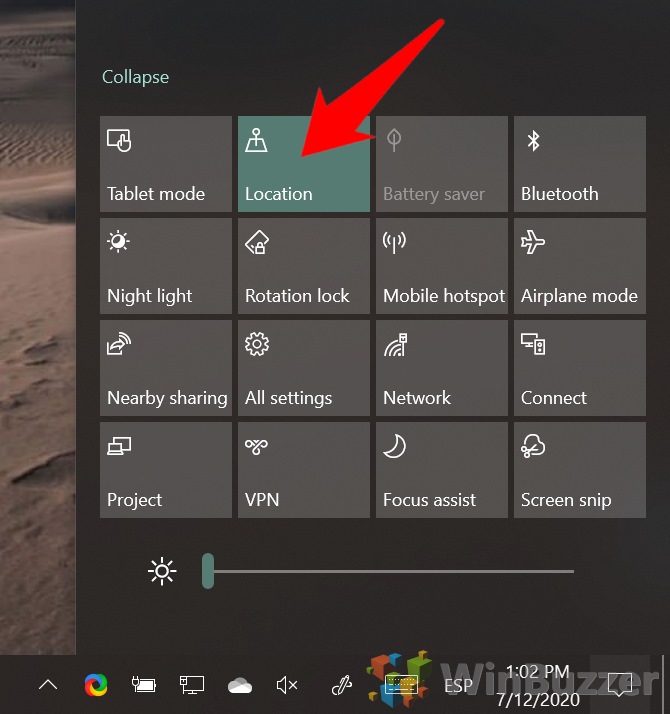
Click the location services toggle
When the location tile is lit with your accent color, location services are turned on for your account and apps. When it’s grey, it’s turned off.
Turn Off Location Services for the Device in Settings or Turn it On
When trying to turn on location services in Windows 10, some may notice a greyed out icon and will be unable to toggle it. This because the location settings in the OS were denied during setup. You can rectify this through the location settings.
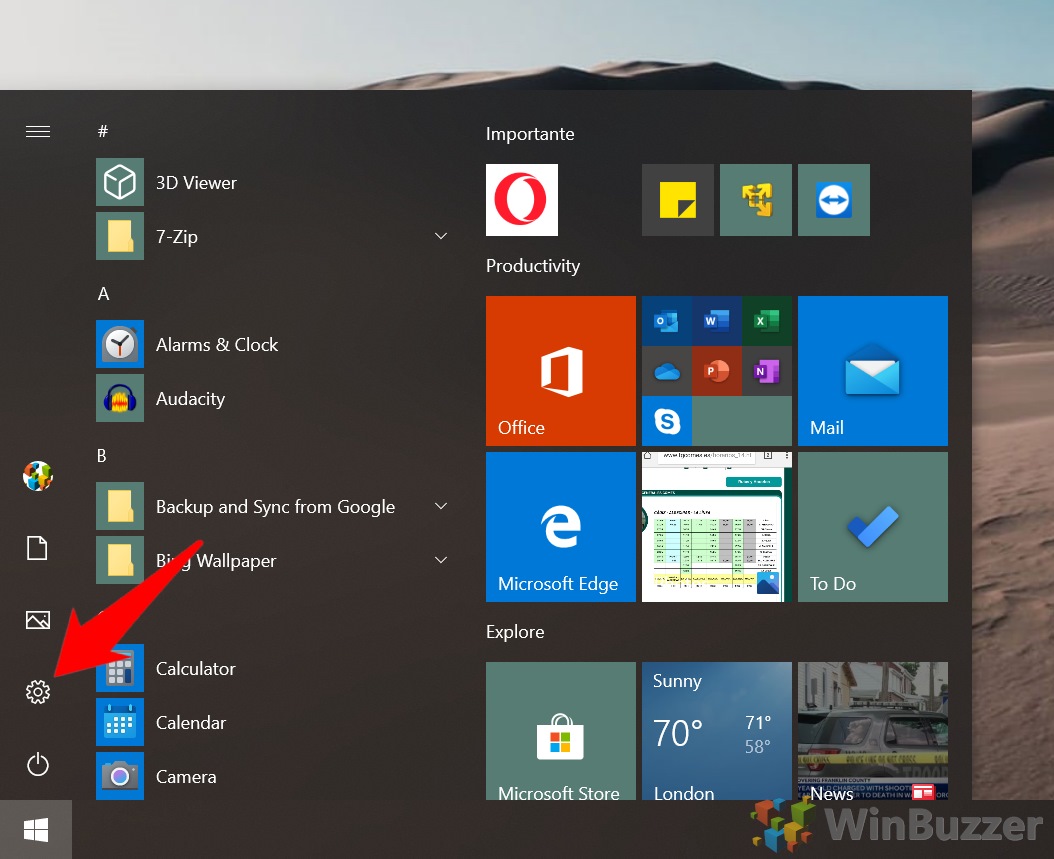
Press “Start” and click the settings cog in the bottom-left corner, above the power button.

Choose location settings in the sidebar and click “Change”
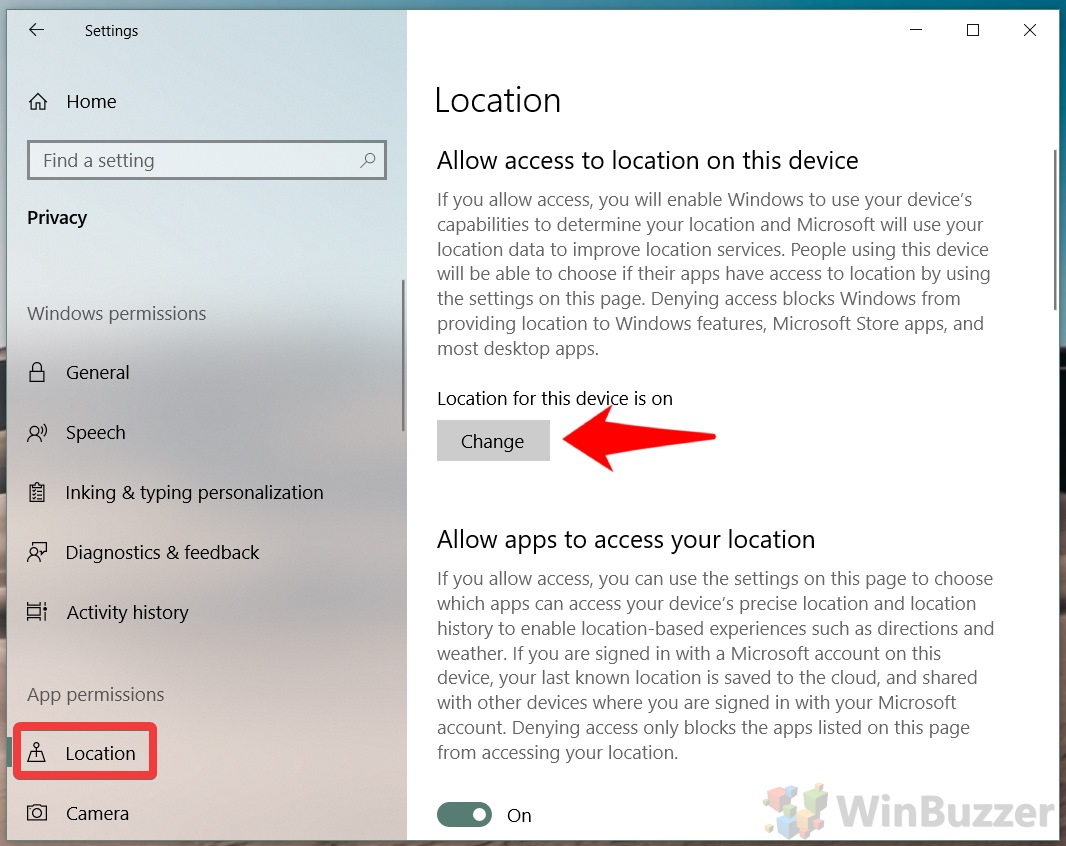
Turn location services off or on
You’ll now be able to edit the location services toggle, which you can use to turn them on or off.

Turn Off or On Location Services for Apps and Accounts in Settings
As well as the global location setting, you can define access to the Windows 10 geolocation service on a per-app basis
Press “Start”, then the settings cog above the power button.
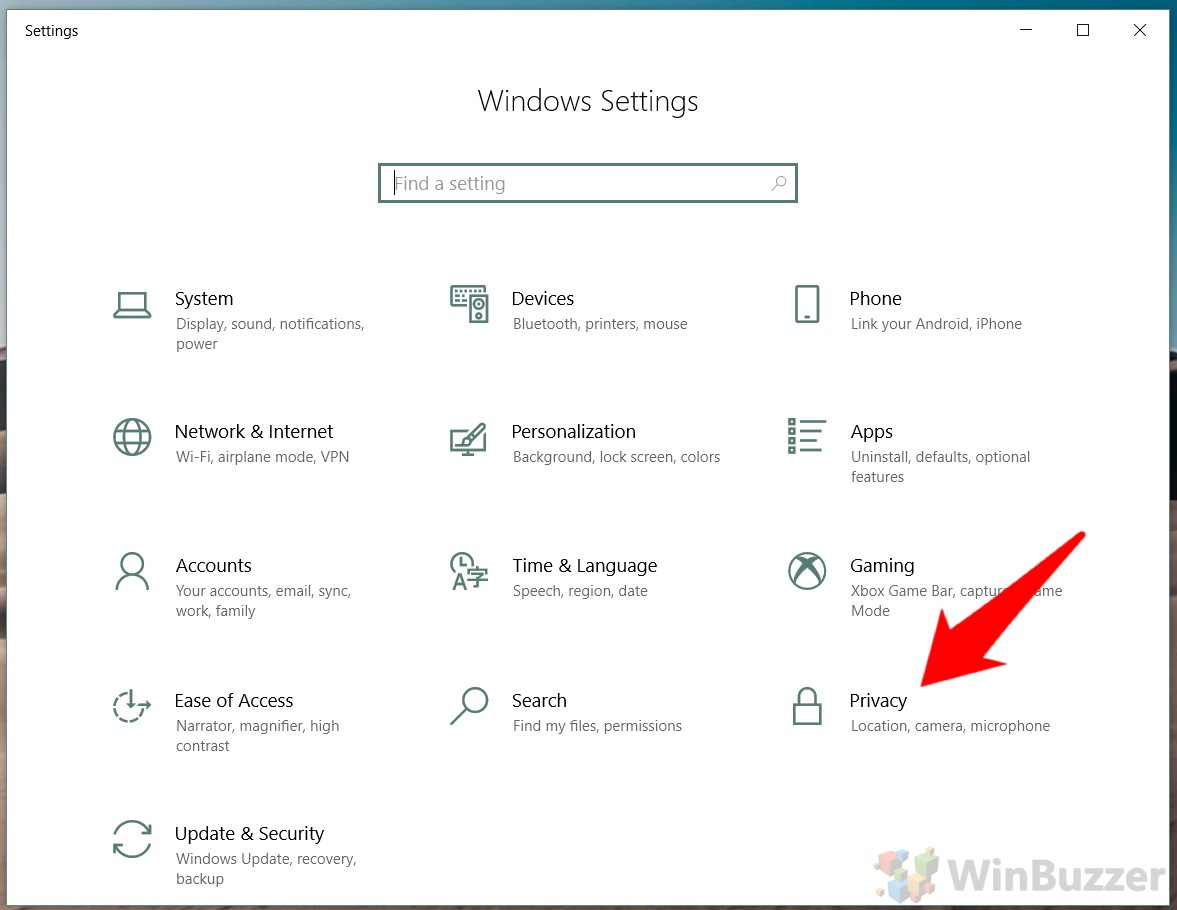
Open Windows 10 privacy settings

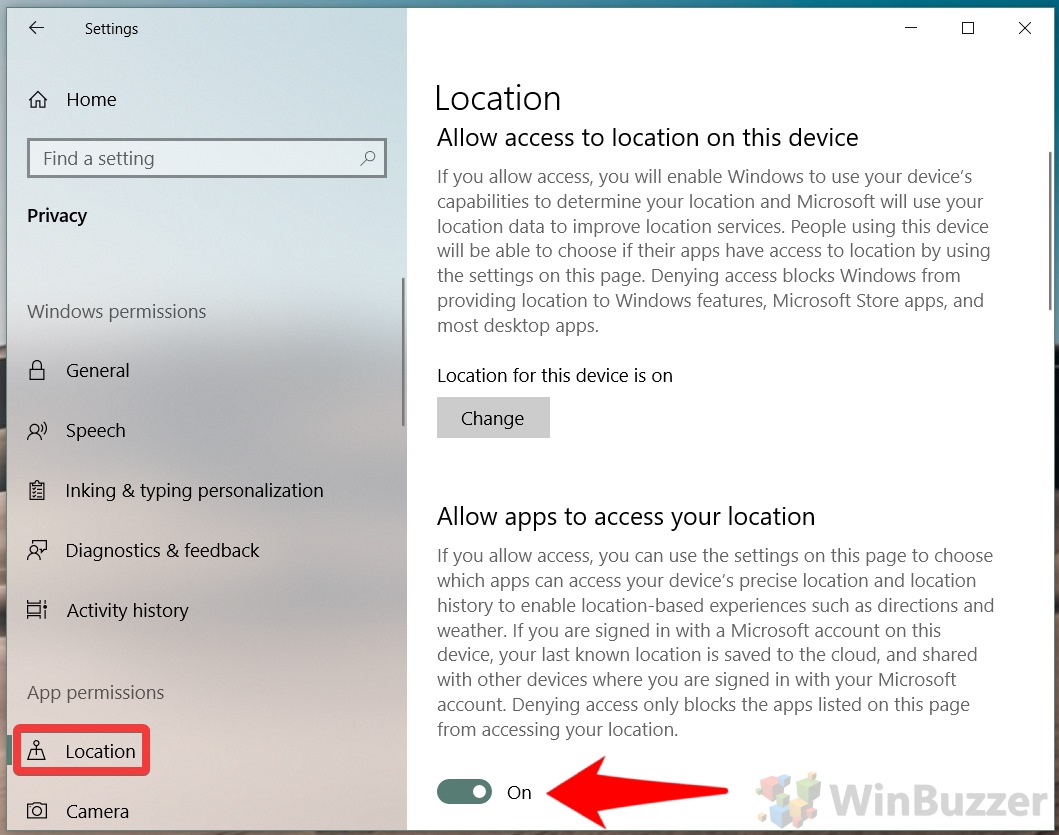
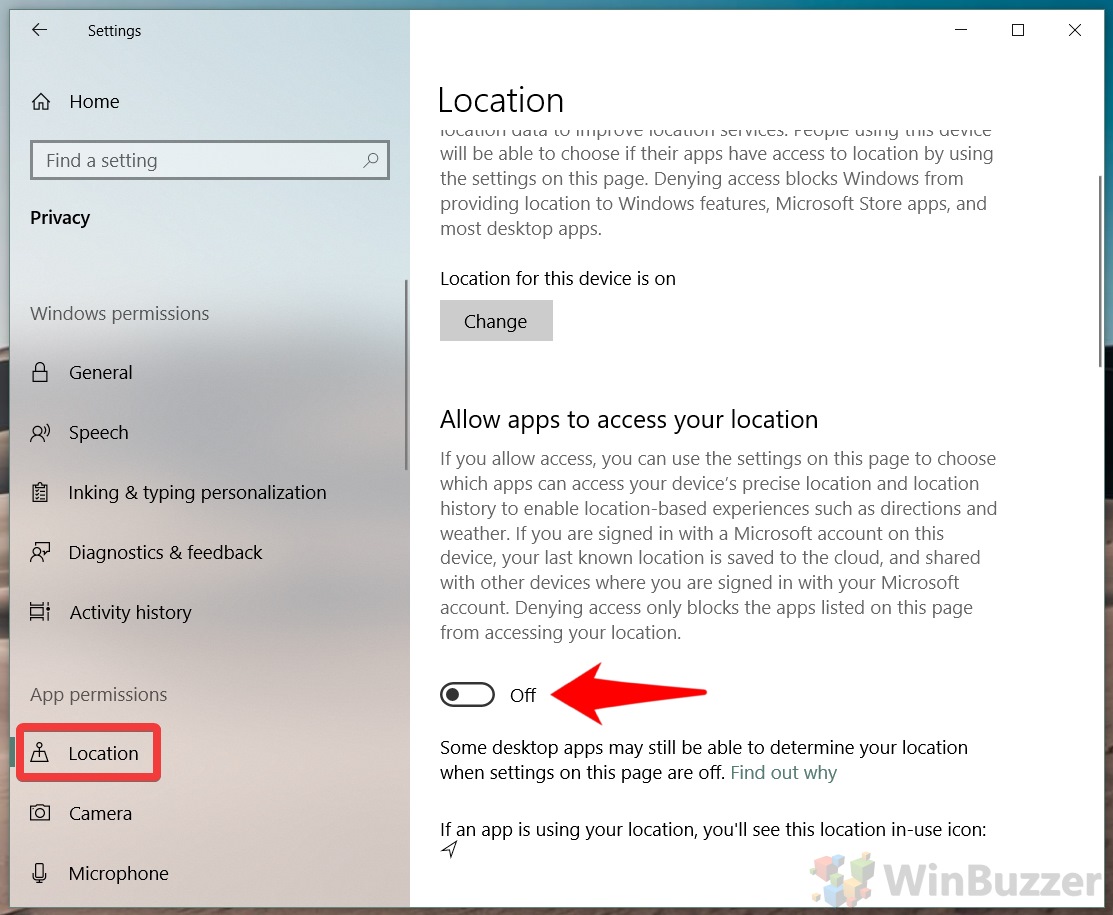
Navigate to location settings and turn location on
Toggle the “Allow apps to access your location” setting on.
Turn location services on or off for individual apps
Scroll down to your apps list and turn the Windows apps you’d like to use your location on. For some, such as Maps, this might make sense, but it’s doubtful 3D viewer really needs your location, for example.
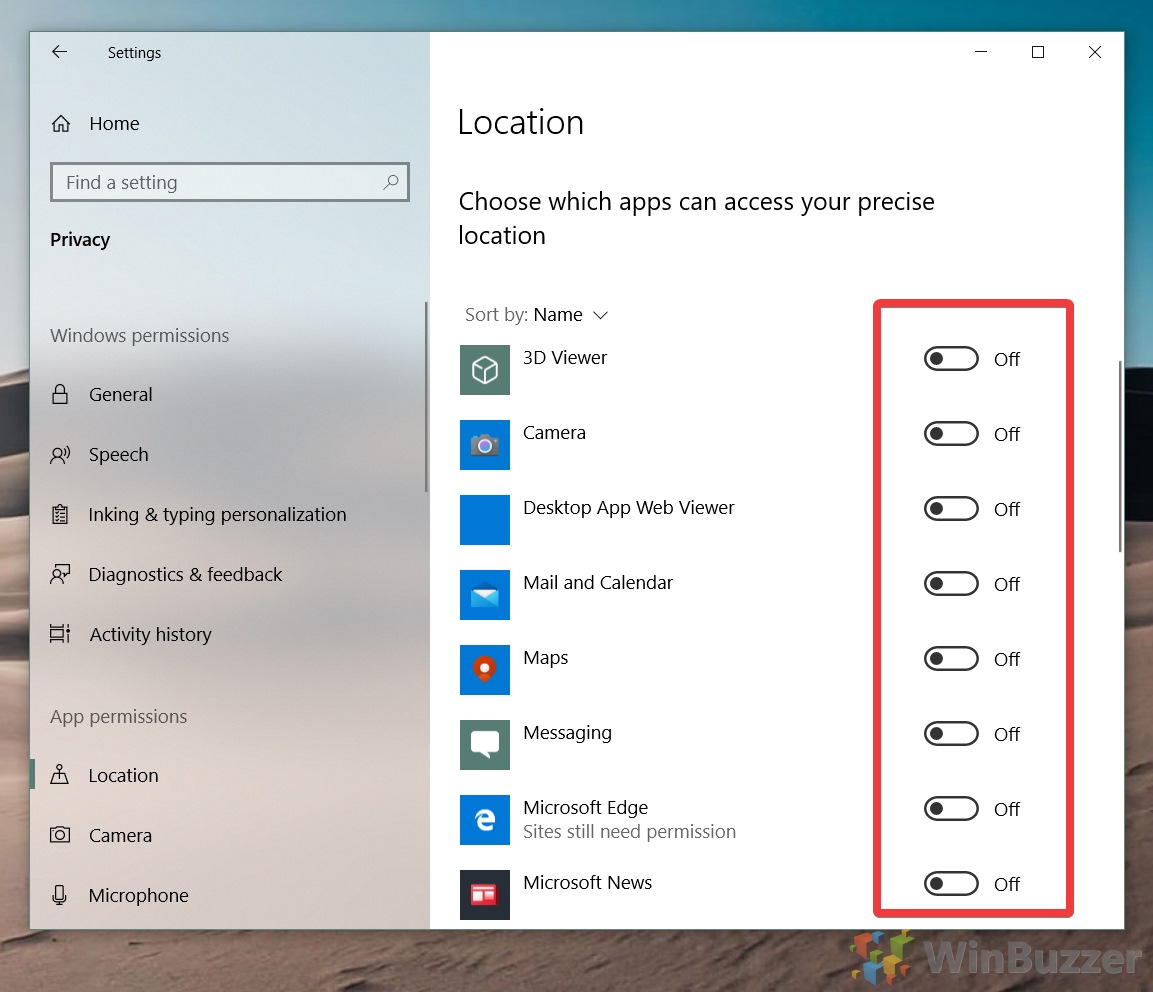
Turn off all apps’ location access
Alternatively, you can turn off location access for apps by toggling “Allow apps to access your location” off. This will only apply to Microsoft store/included apps.
How to Permanently Turn off Windows 10 Location Services for Accounts and Apps via Regedit
Modifying settings via the in-built UI is much more user-friendly, but some find that they switch back again after an update. To avoid this, you can make the changes in the registry instead. You’ll need to make sure location is first turned on via Settings for this to work.
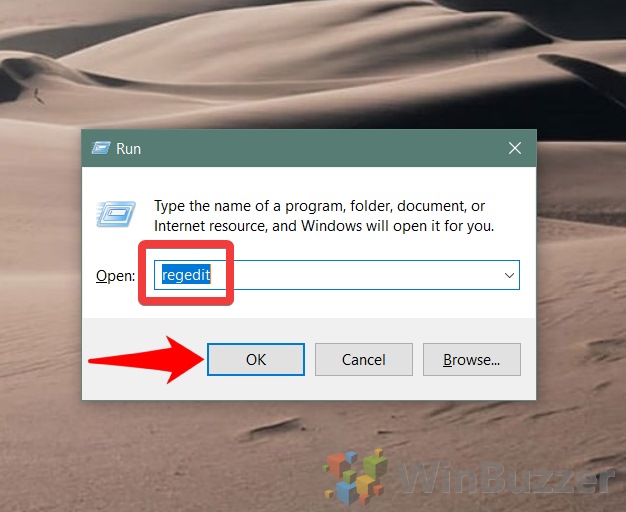
Press “Windows + R” to open the Run dialog, type “regedit”, and click “OK”.
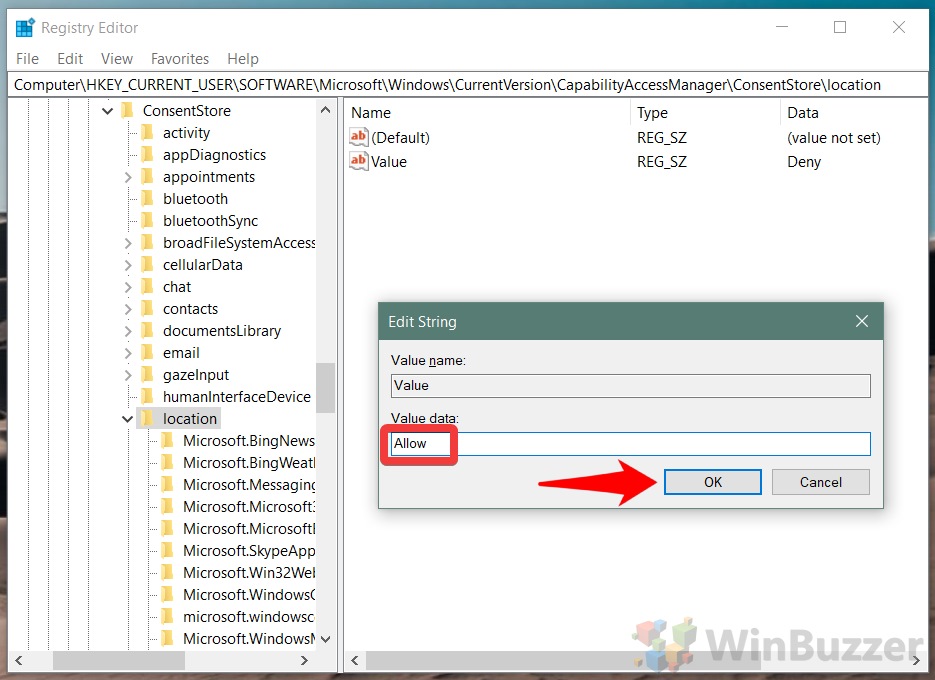
Navigate to the Windows 10 location setting registry key and modify “Value”
You can find the “Value” REG_SZ at Computer\HKEY_CURRENT-USER\SOFTWARE\Microsoft\Windows\CurrentVersion\CapabilityAccessManager\ConsentStore\location . You can navigate here by pasting this into the address bar or by using the side menu. Once there, double-click “Value” in the main pane.
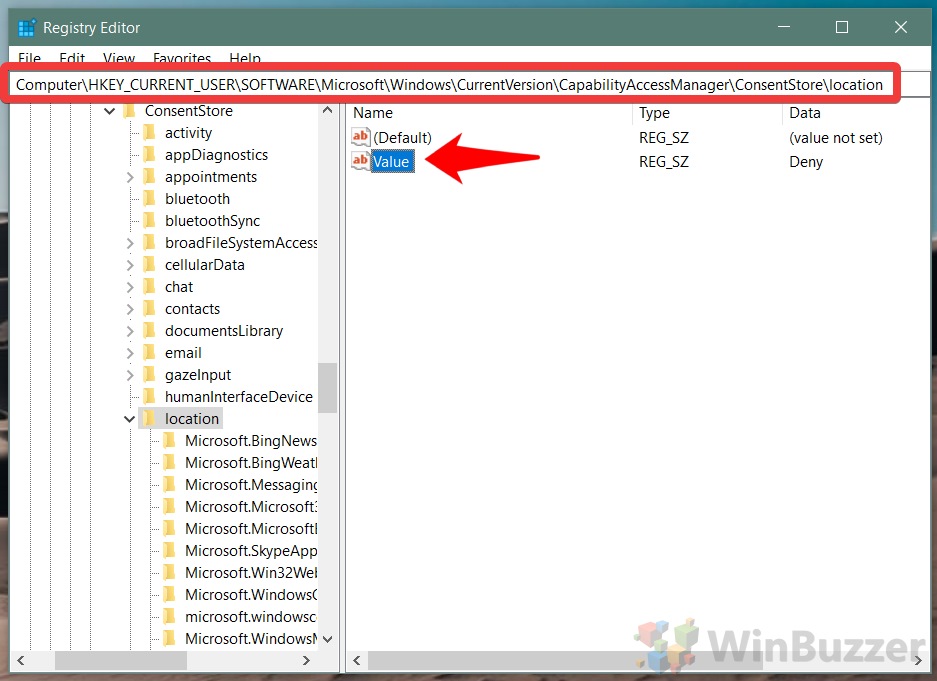
Edit the Value data to turn Windows location services off or on
Changing the string to “Allow” will turn location services on, while “Deny” will turn it off. Choose your Windows 10 location settings and click “OK”.
Turn Off Location Services for the Device via Regedit
It’s also possible to turn location settings on or off for the device as a whole via the registry. This location setting should be more permanent that the ones done through Microsoft’s settings interface.
Press “Windows + R” and type “regedit”, then click “OK”.

Navigate to the location settings key and modify “Value”
This time, navigate to Computer\HKEY_LOCAL_MACHINE\SOFTWARE\Microsoft\Windows\CurrentVersion\CapabilityAccessManager\ConsentStore\location note that you’ll want to go to the consent store location in LOCAL_MACHINE this time, not CURRENT_USER as was used for apps and accounts above. Once there, double-click on “Value” to edit it.
Set the “Value data” to “Allow” to enable location services for the device, or “Deny” to turn it off. Then click “OK”.

Change the “Value data” to “Allow” or “Deny”
Press “Windows + R” and type “regedit”, then click “OK”. Changing the string to “Allow” will turn location services on, while “Deny” will turn it off. Choose your Windows 10 location settings and click “OK”.

How to Turn On or Off Location Services During Windows 10 Setup
As mentioned earlier, you can also change Windows 10 location settings when you first set up the OS. This geolocation service setting is often missed by users.
- Turn location services on during setup
When Windows 10 prompts you to “Choose privacy settings for your device”, find the “Location” subheading, toggle it to “Yes”, and click “Accept”.
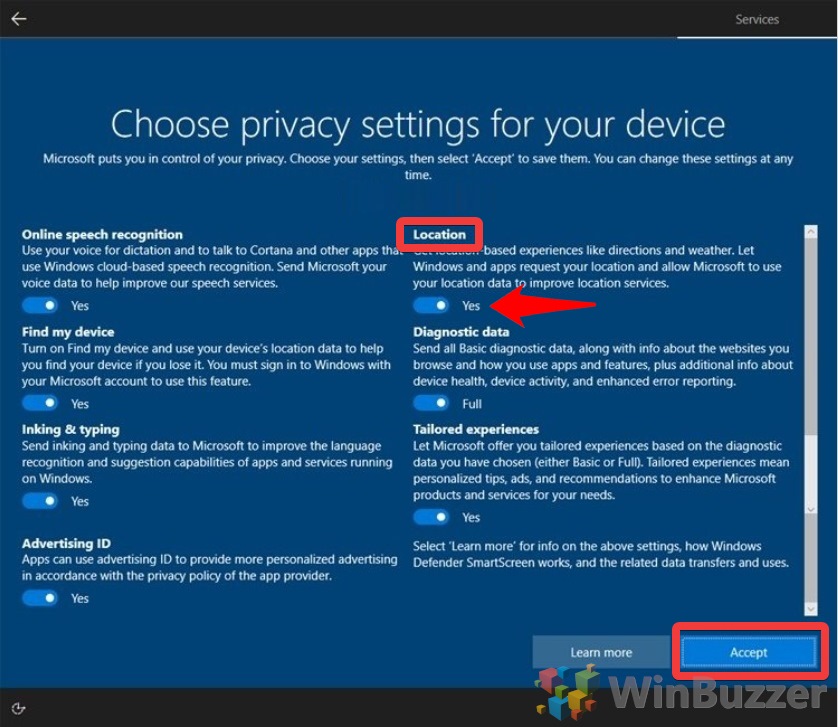
Turn off location services during setup
When Windows 10 prompts you to “Choose privacy settings for your device”, find the “Location” subheading, toggle it to “No”, and click “Accept”.


