- Turn On Windows Security Centre Service Message
- Replies (6)
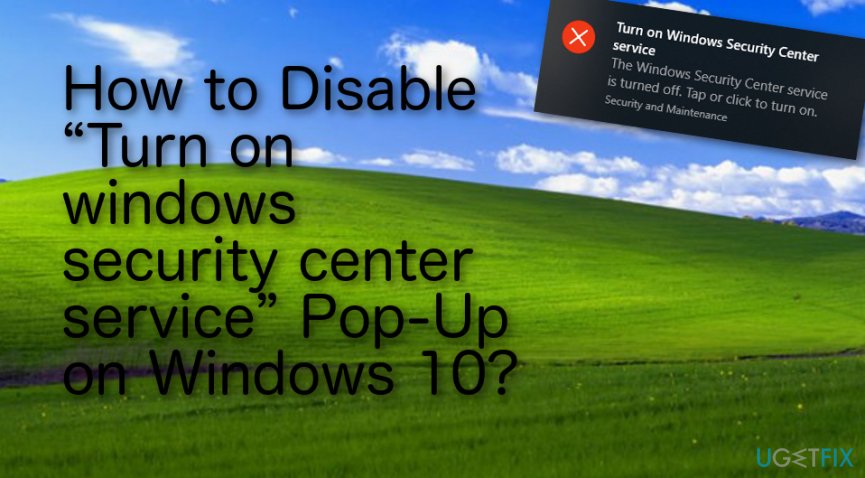
- How to Disable “Turn on windows security center service” Pop-Up on Windows 10?
- How to Disable “Turn on windows security center service” Pop-Up on Windows 10?
- Method 1. Turn off Security and Maintenance Notifications
- Method 2. Turn Off All Notifications from Apps and Senders
- Method 3. Disable Action Center and Notifications
- How to change your Automatic Updates settings by using Windows Security Center
- INTRODUCTION
- More Information
- Fix it for me
- Let me fix it myself
- Stay protected with Windows Security
- Important security info
- Understand and customize Windows Security features
- Status icons indicate your level of safety:
- Run a malware scan manually
- Run a quick scan in Windows Security
- Run an advanced scan in Windows Security
- Schedule your own scan
- Schedule a scan
- Turn Microsoft Defender Antivirus real-time protection on or off
- Turn real-time protection off temporarily
Turn On Windows Security Centre Service Message
I am using a clean install version of Windows 10.
On booting to the desktop I see ‘Turn On Windows Security Centre Service’ message in the Action Centre then it disappears by itself after a few seconds. I am not using any third party security software.
On checking the Security and Maintenance window I do not see anything that has been switched off. The only thing I have not enabled is Windows SmartScreen.
I have no idea what is causing this behaviour or if it is a bug.
Replies (6)
![]()
2 people found this reply helpful
Was this reply helpful?
Sorry this didn’t help.
Great! Thanks for your feedback.
How satisfied are you with this reply?
Thanks for your feedback, it helps us improve the site.
How satisfied are you with this reply?
Thanks for your feedback.
![]()
Was this reply helpful?
Sorry this didn’t help.
Great! Thanks for your feedback.
How satisfied are you with this reply?
Thanks for your feedback, it helps us improve the site.
How satisfied are you with this reply?
Thanks for your feedback.
![]()
Does anything happen if you right click the x in the red disc or any other part of the pop up? Also open Settings>System>Notifications and Actions, under the heading Get Notification from these senders, go to Security and Maintenance and make sure it is turned on, then click into it, this will open to a page where you can set security notifications. You may have disabled something like auto updates or turned the firewall off which is why you are getting the warning notifications, hopefully you can turn off the notification. I believe that the notification settings are similar to the security centre in earlier versions of windows.
Was this reply helpful?
Sorry this didn’t help.
Great! Thanks for your feedback.
How satisfied are you with this reply?
Thanks for your feedback, it helps us improve the site.
How satisfied are you with this reply?
Thanks for your feedback.
![]()
Just to clarify Windows Security Centre Service does start by itself but there is a delay in it starting after the computer is booted up, this can vary from a few seconds to a few minutes. The red x notification then disappears by itself.
I checked Settings>System>Notifications and Actions>Get Notification from these senders>> Security and Maintenance. This is set to on.
Firewall and updates are on.
I am also experiencing the desktop icons refreshing on each boot up, this happens after about 3 or 4 minutes — I am not sure if the two issues are related.
Was this reply helpful?
Sorry this didn’t help.
Great! Thanks for your feedback.
How satisfied are you with this reply?
Thanks for your feedback, it helps us improve the site.
How satisfied are you with this reply?
Thanks for your feedback.
![]()
We suggest that you perform these steps and see if it helps:
Step 1: Turn off your Windows Security Centre Service Message.
Step 2: Perform System File Checker (SFC) scan.
System File Checker is a utility in Windows that allows users to scan for corruptions in Windows system files and restore corrupted files. To perform the SFC Scan, you may refer to this link.
Step 3: Clean boot.
A clean boot is performed to start Windows by using a minimal set of drivers and startup programs. This will help to eliminate software conflicts that occur when you install a program. Please see this link for the steps.
Step 4: Turn on you Windows Security Centre Service Message
How to Disable “Turn on windows security center service” Pop-Up on Windows 10?
Issue: How to Disable “Turn on windows security center service” Pop-Up on Windows 10?
Hi guys! Is it possible to disable “Turn on windows security center service” warning?
“Security Center” feature comes by default in all Windows OS versions. It plays a crucial role in the system’s maintenance because it informs a PC owner about pending updates, missing software, security breaches, registry errors, [1] and similar problems. All “Security Center” notifications are displayed at the bottom-right corner of the screen in a form of a pop-up box.
Unfortunately, but most Windows [2] users find these pop-ups annoying and opt for disabling them. While in older Windows versions this feature could be disabled without problems, Windows 10 has an additional “Notification Center” feature, which starts throwing “Turn on windows security center service” pop-up once the “Security Center” notifications are disabled. This message shows up every time when the system is rebooted and, if it’s not rebooted for a long time, ay start showing on a particular schedule.
Turn on Windows Security Center service
The Windows Security Center service is turned off. Tap or click to turn it on.

No need to say that “Turn on windows security center service” pop-ups are more than annoying having in mind that people turn off “Security Center” alerts purposely. Luckily, “Notification Center” warnings urging people to turn off security center service can be disabled as well, so in this short post, we are going to explain that.
How to Disable “Turn on windows security center service” Pop-Up on Windows 10?
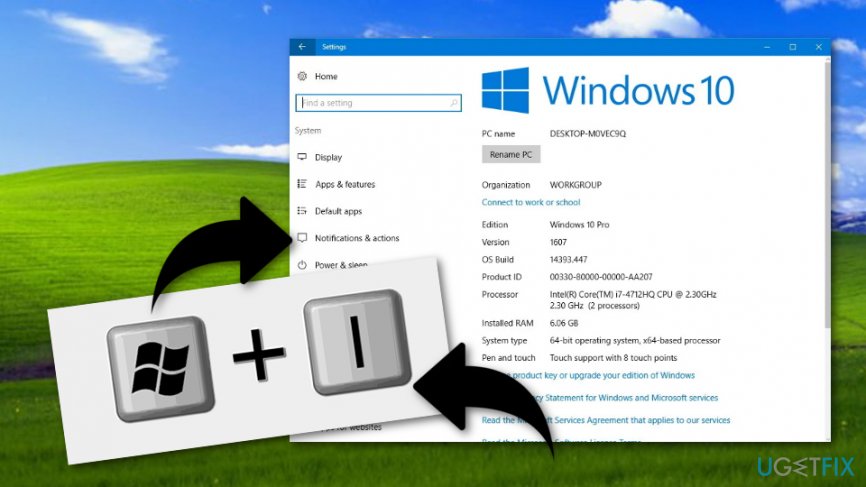
Method 1. Turn off Security and Maintenance Notifications
- Click Win key + I and navigate to System ->Notifications & actions.

- Scroll down to find Get notifications from these senders option.
- Slide a toggle from On to Off.
Method 2. Turn Off All Notifications from Apps and Senders
Those who are using the latest Anniversary Update may not be allowed to turn off security and maintenance notifications via Settings. In this case, you should disable All Notifications from Apps and Senders, what can be done by performing the following steps:
- Click Win key + I and navigate to System ->Notifications & actions.
- Scroll down to find Show app notifications option.
- Slide a toggle from On to Off.
Method 3. Disable Action Center and Notifications
- Click Win key + R, type gpedit.msc, and press Enter to open Group Policy Editor.
- After that, navigate to User Configuration ->Administrative Templates ->Start Menu and Taskbar.
- Double-click on the Remove Notifications and Action Center option on the right pane and click Enabled.
- Apply the changes and reboot the system.
- After that, click Ctrl + Alt + Delete and select Task Manager.
- Click More Details and open Processes.
- Find Windows Explorer, click on it, and select Restart (at the bottom-right corner).

That’s it! You should have disabled “Turn on windows security center service” notifications successfully. In order to ensure a proper system’s maintenance, we would highly recommend installing Reimage Mac Washing Machine X9 anti-malware. [3] It will scan the system for errors, pending updates, inappropriate software, and similar issues that may be negatively influencing your PC’s performance.
How to change your Automatic Updates settings by using Windows Security Center
INTRODUCTION
Windows Security Center is the centralized location in Windows XP Service Pack 2 where users can learn about security and can perform security-related tasks. Security Center monitors the status of three major security functions: the firewall, Automatic Updates, and virus detection. If Security Center detects a problem with any one of these, it displays an icon and balloon message in the notification area.
By default, Windows checks to make sure that Automatic Updates is set to download and install security and other important updates to your computer automatically. If Automatic Updates is turned off, or if Automatic Updates is not set to the highest setting, Security Center provides recommendations to turn on or to adjust Automatic Updates.
More Information
To have us turn on Automatic Updates for you, go to the «Fix it for me» section. If you would rather turn on Automatic Updates yourself, go to the «Let me fix it myself» section.
Fix it for me
To fix this problem automatically, click the Fix this problem link. Then click Run in the File Download dialog box, and follow the steps in this wizard.
Turn Automatic Updates on
Turn Automatic Updates off
Note This wizard may be in English only; however, the automatic fix also works for other language versions of Windows.
Note If you are not on the computer that has the problem, you can save the automatic fix to a flash drive or to a CD, and then you can run it on the computer that has the problem.
Let me fix it myself
To turn on Automatic Updates yourself, follow these steps:
Click Start, click Run, type wscui.cpl, and then click OK.
Click Automatic Updates.
The following options are available:
Automatic (recommended)
This option lets you select the day and the time that updates are automatically downloaded and installed. This can be every day, or it can be on a specific day and time.
Download updates for me, but let me choose when to install them
This option automatically downloads updates, but requires user interaction to install them.
Notify me but don’t automatically download or install them
This option notifies you that there are updates available. It requires user interaction to download them and install them.
Turn off Automatic Updates
This option disables Automatic Updates. It provides a link to the Windows Update Web site where you can manually select, download, and install updates.
Stay protected with Windows Security
Windows 10 includes Windows Security, which provides the latest antivirus protection. Your device will be actively protected from the moment you start Windows 10. Windows Security continually scans for malware (malicious software), viruses, and security threats. In addition to this real-time protection, updates are downloaded automatically to help keep your device safe and protect it from threats.
Windows 10 in S mode
Some features will be a little different if you’re running Windows 10 in S mode. Because this mode is streamlined for tighter security, the Virus & threat protection area has fewer options. But don’t worry—the built-in security of this mode automatically prevents viruses and other threats from running on your device, and you’ll receive security updates automatically. For more info, see Windows 10 in S mode FAQ.
Important security info
Windows Security is built-in to Windows 10 and includes an antirvirus program called Microsoft Defender Antivirus. (In previous versions of Windows 10, Windows Security is called Windows Defender Security Center).
If you have another antivirus app installed and turned on, Microsoft Defender Antivirus will turn off automatically. If you uninstall the other app, Microsoft Defender Antivirus will turn back on automatically.
If you’re having problems receiving Windows Security updates, see Fix Windows Update errors and the Windows Update FAQ.
For info on how to uninstall an app, see Repair or remove an app in Windows 10.
To change your user account to an admin account, see Create a local user or administrator account in Windows 10.
Understand and customize Windows Security features
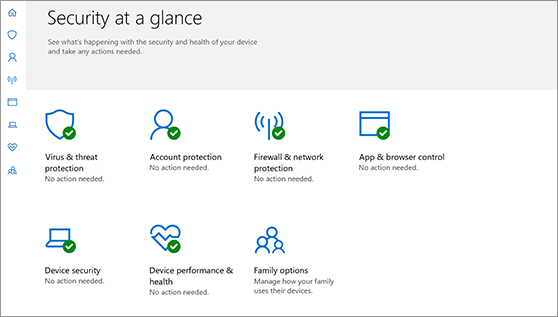
Windows Security is your home to manage the tools that protect your device and your data:
Virus & threat protection. Monitor threats to your device, run scans, and get updates to help detect the latest threats. (Some of these options are unavailable if you’re running Windows 10 in S mode.)
Account protection. Access sign-in options and account settings, including Windows Hello and dynamic lock.
Firewall & network protection. Manage firewall settings and monitor what’s happening with your networks and internet connections.
App & browser control. Update settings for Microsoft Defender SmartScreen to help protect your device against potentially dangerous apps, files, sites, and downloads. You’ll have exploit protection and you can customize protection settings for your devices.
Device security. Review built-in security options to help protect your device from attacks by malicious software.
Device performance & health. View status info about your device’s performance health, and keep your device clean and up to date with the latest version of Windows 10.
Family options. Keep track of your kids’ online activity and the devices in your household.
You can customize how your device is protected with these Windows Security features. To access them, select Start > Settings > Update & Security > Windows Security . Then select the feature you want to explore.
Open Windows Security settings
Status icons indicate your level of safety:
Green means your device is sufficiently protected and there aren’t any recommended actions.
Yellow means there is a safety recommendation for you.
Red is a warning that something needs your immediate attention.
Run a malware scan manually
When you’re concerned about risks to a specific file or folder, you can right-click the file or folder in File Explorer, then select Scan with Microsoft Defender.
If you suspect there’s malware or a virus on your device, you should immediately run a quick scan. This is much faster than running a full scan on all your files and folders.
Run a quick scan in Windows Security
Select Start > Settings > Update & Security > Windows Security and then Virus & threat protection.
Open Windows Security settings
Under Current threats, select Quick scan (or in previous versions of Windows 10, under Threat history, select Scan now).
If the scan doesn’t find any issues, but you’re still concerned, you may want to check your device more thoroughly.
Run an advanced scan in Windows Security
Select Start > Settings > Update & Security > Windows Security and then Virus & threat protection.
Under Current threats, select Scan options (or in previous versions of Windows 10, under Threat history, select Run a new advanced scan).
Select one of the scan options:
Full scan (check files and programs currently running on your device)
Custom scan (scan specific files or folders)
Microsoft Defender Offline scan (run this scan if your device has been, or could potentially be, infected by a virus or malware). Learn more about Microsoft Defender Offline
Select Scan now.
Note: Because of streamlined security, this process isn’t available if you’re running Windows 10 in S mode.
Schedule your own scan
Even though Windows Security is regularly scanning your device to keep it safe, you can also set when and how often the scans occur.
Schedule a scan
Select the Start button, type schedule tasks in the Search box, and in the list of results, select Task Scheduler.
In the left pane, select the arrow (>) next to Task Scheduler Library to expand it, do the same with Microsoft > Windows, and then scroll down and select the Windows Defender folder.
In the top-center pane, select Windows Defender Scheduled Scan. (Point to the choices to see the full names.)
In the Actions pane on the right, scroll down and then select Properties.
In the window that opens, select the Triggers tab, and then select New.
Set your preferred time and frequency, and then select OK.
Review the schedule and select OK.
Note: Because of streamlined security, this process isn’t available if you’re running Windows 10 in S mode.
Turn Microsoft Defender Antivirus real-time protection on or off
Sometimes you may need to briefly stop running real-time protection. While real-time protection is off, files you open or download won’t be scanned for threats. However, real-time protection will soon turn on automatically again to protect your device.
Turn real-time protection off temporarily
Select Start > Settings > Update & Security > Windows Security and then Virus & threat protection > Manage settings. (In previous versions of Windows 10, select Virus & threat protection > Virus & threat protection settings.)
Open Windows Security settings
Switch the Real-time protection setting to Off and choose Yes to verify.
Note: Because of streamlined security, this process isn’t available if you’re running Windows 10 in S mode.


