- Windows store apps not updating and saying that » Turn on windows update» while the update is already turned on
- Replies (1)
- How to stop automatic updates in Windows 10
- Replies (11)
- How to Fix Update and Store Error 0x80240438 on Windows 10
- Ways to Fix Windows Update and Store Error 0x80240438
- 1. Remove Third-party Antivirus Program
- 2. Disable Windows Firewall/ Windows Security
- 3. Manually install the Standalone Package
- Get the name of recent CU
- Download the Standalone Package
- 4. Run Windows Update Troubleshooter
- 5. Disable IPV6
- 6. Disable Proxy
- 7. Modify Windows Update features Group Policy
- 8. Reset Windows Update Folders
- 9. Clear Microsoft Store Cache
- 10. Tweak Registry Editor
Windows store apps not updating and saying that » Turn on windows update» while the update is already turned on
Replies (1)
Start by running the Windows Store Apps troubleshooter.
Open Start > Settings > Update & security > Troubleshoot
Scroll down to the bottom
Click Windows Store Apps
Click Run the troubleshooter
When complete try opening the Store again.
Also check if the Store works in another user account.
Press Windows key + R
Type: wsreset.exe
Hit Enter
Do this a couple times then try launching the Store again.
Your Antivirus might be interfering with the Store, try disabling it ‘temporarily’ to see if it launches.
Check Windows Update and install the latest updates. Sometimes Microsoft releases infrastructure fixes for the Store through Windows Update.
You can also try resetting the store app using the following instructions:
Reinstall the Store:
Press Windows key + X
Click Windows PowerShell (Admin)
At the command prompt, type the following then hit Enter:
Get-AppXPackage *WindowsStore* -AllUsers | Foreach
If that does not work, try resetting the software distribution folder:
Before carrying out this procedure, disconnect from the Internet. That means turning off Wi-Fi and disconnecting from a wired connection. If you don’t, Windows 10 will indicate some files are in use and cannot be modified or the command will be non-responsive. Also, you should restart your computer after disconnecting from the Internet. The easiest way to do it is to enable Airplane mode from the Action Center — Windows key + A.
1. Open Start, type: CMD
Right click CMD
Click Run as administrator
Type each of the following then hit Enter
taskkill /F /FI «SERVICES eq wuauserv» (do this multiple times)
net stop cryptSvc
net stop bits
net stop msiserver
ren C:\Windows\SoftwareDistribution SoftwareDistribution.old
rmdir C:\Windows\SoftwareDistribution\DataStore
rmdir C:\Windows\SoftwareDistribution\Download
If that does not work.
1. Open Start, type: CMD
Right click CMD
Click Run as administrator
Type each of the following then hit Enter
Run these codes:
Net Stop bits
Net Stop wuauserv
Net Stop appidsvc
Net Stop cryptsvc
Ren %systemroot%\SoftwareDistribution SoftwareDistribution.bak
Ren %systemroot%\system32\catroot2 catroot2.bak
Net Start bits
Net Start wuauserv
Net Start appidsvc
Net Start cryptsvc
After running these commands, check if your issue is fixed.
When complete, hit Enter, then restart, then try updating again.
How to stop automatic updates in Windows 10
How do I stop Windows 10 updating automatically. Basically, I don’t want to update my OS. Windows update is very annoying and it breaks the system sometimes. In windows 10 I don’t find any option to turn off automatic update.
***Post moved by the moderator to the appropriate forum category.***
Replies (11)
* Please try a lower page number.
* Please enter only numbers.
* Please try a lower page number.
* Please enter only numbers.
Basically, at the moment there is little you can do to stop W10 updating itself for most W10 versions. This is unlikely to change by much as far as I can tell from the info around on the www.
Apart from the Enterprise version (I believe), you cannot pick and choose updates for most versions of W10 (Home etc), Its all automatic. Unlike with older versions of Windows which allowed you to set Windows Update in a number of different ways.
There are a few minor tweaks you can do, like:
But basically, you have to accept the update(s) as they are offered.
32 people found this reply helpful
Was this reply helpful?
Sorry this didn’t help.
Great! Thanks for your feedback.
How satisfied are you with this reply?
Thanks for your feedback, it helps us improve the site.
How satisfied are you with this reply?
Thanks for your feedback.
To disable Windows 10 Automatic Updates:
- Go to Control Panel — Administrative Tools — Services
- Scroll down to Windows Update in the resulting list
- Double click the Windows Update Entry
- In the resulting dialog, if the service is started, click ‘Stop’
- Set Startup Type to Disabled
Please Note: if you disable Windows 10 Updates, your system will be at risk from attack
- Windows Defender will not be updated
- Operating System patches will not be applied
- You will not be able to use the Windows Store
- Windows Apps will not update and possibly fail
On the plus side your hardware will continue to work!
If you do decide to turn off Automatic Updates, you should download them from the Microsoft Catalog Page and install them manually at a convenient time. Just enter Windows 10 + your current build number into the search box (1607, 1511 . . .etc.) to get the appropriate updates — for example: Windows 10 1607
Power to the Developer!
MSI GV72 — 17.3″, i7-8750H (Hex Core), 32GB DDR4, 4GB GeForce GTX 1050 Ti, 256GB NVMe M2, 2TB HDD
202 people found this reply helpful
Was this reply helpful?
Sorry this didn’t help.
Great! Thanks for your feedback.
How satisfied are you with this reply?
Thanks for your feedback, it helps us improve the site.
How satisfied are you with this reply?
Thanks for your feedback.
This no longer works, Windows is enabling that service on it’s own now. I’m attempting to disable via gpedit.msc, but the service disable I’ve been using for a while doesn’t stay disabled anymore.
45 people found this reply helpful
Was this reply helpful?
Sorry this didn’t help.
Great! Thanks for your feedback.
How satisfied are you with this reply?
Thanks for your feedback, it helps us improve the site.
How satisfied are you with this reply?
Thanks for your feedback.
Every time an update tries to occur it destroys my entire network internet connection and all the users start screaming. That’s why it should be made easy and sticky to only notify of updates but not download or do them until the users gives consent. This is an issue for all types of users, dumb or sophisticated. MS just makes it ridiculously hard to take control of updates, and particularly hard in W10 Home.
Once you think you have it stopped then when you do allow an update they turn it all on again for you.
Now they’ve removed the registry value you can tweak to accomplish this in Home version, and you are forced to collect a bunch of missing features and get them installed in your OS again. If you do get it working it will probably all just disappear again next time you do an update.
Yet another reason why users hate Microsoft.
116 people found this reply helpful
Was this reply helpful?
Sorry this didn’t help.
Great! Thanks for your feedback.
How satisfied are you with this reply?
Thanks for your feedback, it helps us improve the site.
How satisfied are you with this reply?
Thanks for your feedback.
Honestly a bad situation.
I have no problem if Windows notifies me and I can apply updates when I have time to fix everything the update breaks.
But unilaterally applying an update that can eff up my system without allowing me to accept or delay that update is not good. I’ve had updates bomb out my system the evening before a critical presentation and, oh-well, you’re out of luck. Enjoy your brick in front of a customer.
80 people found this reply helpful
Was this reply helpful?
Sorry this didn’t help.
Great! Thanks for your feedback.
How satisfied are you with this reply?
Thanks for your feedback, it helps us improve the site.
How satisfied are you with this reply?
Thanks for your feedback.
44 people found this reply helpful
Was this reply helpful?
Sorry this didn’t help.
Great! Thanks for your feedback.
How satisfied are you with this reply?
Thanks for your feedback, it helps us improve the site.
How satisfied are you with this reply?
Thanks for your feedback.
In this method, we are going to use the Local Group Policy Editor. Since Group Policy Editor is not present in Windows 10 Home edition , this method is not applicable to Windows 10 Home.
Step 1: Open Local Group Policy Editor. To do so, type Edit Group Policy in Start or taskbar search box and then press Enter key. Alternatively, open Run command box, type Gpedit.msc, and then press Enter key to open the same.
Step 2: Navigate to the following policy:
Computer Configuration > Administrative Templates > Windows Components > Windows Update.
Step 3: On the right-side, double-click on the policy labelled Configure Automatic Updates to open its properties.
Step 4: Select Enabled option. Under Configure automatic updating, select second option labelled Notify for download and notify for install. Don’t touch rest of the settings.
Click Apply button. As mentioned before, this method will not turn off Windows Update but you will be notified when updates are available to download. You can simply ignore the alert to avoid downloading and installing updates.
When this policy is enabled, you’ll see Some settings are managed by your organization message under Advanced options of Windows Update
21 people found this reply helpful
Was this reply helpful?
Sorry this didn’t help.
Great! Thanks for your feedback.
How satisfied are you with this reply?
Thanks for your feedback, it helps us improve the site.
How satisfied are you with this reply?
Thanks for your feedback.
In this method, we are going to use the Local Group Policy Editor. Since Group Policy Editor is not present in Windows 10 Home edition , this method is not applicable to Windows 10 Home.
Step 1: Open Local Group Policy Editor. To do so, type Edit Group Policy in Start or taskbar search box and then press Enter key. Alternatively, open Run command box, type Gpedit.msc, and then press Enter key to open the same.
Step 2: Navigate to the following policy:
Computer Configuration > Administrative Templates > Windows Components > Windows Update.
Step 3: On the right-side, double-click on the policy labelled Configure Automatic Updates to open its properties.
Step 4: Select Enabled option. Under Configure automatic updating, select second option labelled Notify for download and notify for install. Don’t touch rest of the settings.
Click Apply button. As mentioned before, this method will not turn off Windows Update but you will be notified when updates are available to download. You can simply ignore the alert to avoid downloading and installing updates.
When this policy is enabled, you’ll see Some settings are managed by your organization message under Advanced options of Windows Update
Thanks for the information. However, I have windows 10 home edition.
How to Fix Update and Store Error 0x80240438 on Windows 10
The Error 0x80240438 is a recently occurring bug that appears when users try to update their Windows 10 OS or install apps via Microsoft Store. As there is an interlinkage between the store app and the update section, the error remains the same for both. There are primarily three different reasons that lead to this error on Windows 10. They are – Enabled Firewall, Use of IPV6 for the net connectivity, and manually connecting to a Proxy.
Temporarily turning off the Firewall, disable IPV6, and the use of a manual proxy should resolve the error code 0x80240438. If not, run the update troubleshooter, modify windows update group policy, or tweak the registry DOWRD key. In this post, we discuss 10 different approaches to correct this issue and are applicable to all Windows 10 Build versions. Let’s explore the solutions in detail –
Ways to Fix Windows Update and Store Error 0x80240438
To solve the Error code 0x80240438 in Windows 10, try the following suggestions –
1. Remove Third-party Antivirus Program
Using a third-party anti-malware program may cause the update or Store error 0x80240438 on Windows 10 PC. This is because there exist two different applications that perform similar tasks i.e. Windows Security. Since you can’t remove the later one as being the in-built app, you should uninstall the 3rd party antivirus program. Anyways, Windows Defender works quite effectively, unlike its predecessors.
- Hit the Win icon and scroll down to locate the antivirus in the Apps list.
- Make a right-click on the matching result and hit the Uninstall button.
- If the UAC window prompts, tap Yes to confirm this uninstallation.
Note: If you don’t want to uninstall the software, disable it visiting its Settings page.
- Make sure to reboot your PC as there are leftover files that don’t delete even after the program deletion.
2. Disable Windows Firewall/ Windows Security
Windows Firewall aims to provide maximum security by blocking any files that it finds suspicious. This is very helpful in keeping malicious invaders away. However, this may sometimes block the monthly patch resulting in an error message like 0x80240438. You must check whether this indeed is the case before applying any other fixes. To do so, temporarily disable Windows Firewall using the below steps –
- Press Win + S to start the Search bar, type Windows Firewall, and click the top result.
- On the next user interface, click “Turn Windows Defender Firewall on or off“.
- Choose to “Turn off Windows Firewall (not recommended)” under both networks i.e. Private and Public.

- Hit OK to confirm this action. Now, check if the error 0x80240438 resolves or not while opening the Store app/updating Windows 10 OS.
3. Manually install the Standalone Package
Microsoft releases security as well as non-security cumulative updates very often on the patch Tuesday. Since you are already encountering an update error, you may download and install the standalone package that comes with each CU. Here’s how to proceed –
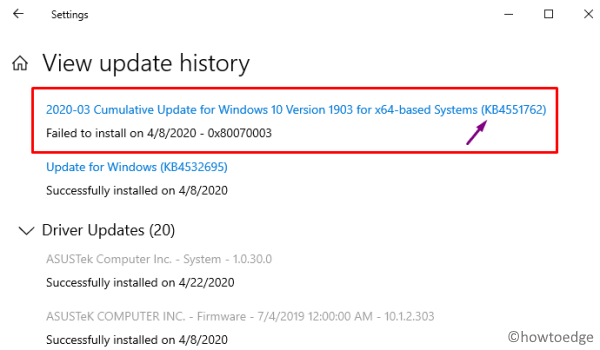
Get the name of recent CU
- Jointly Press Win+I to launch the Settings app.
- Select Update & Security thereafter Windows Update on the succeeding screen.
- On the right pane, scroll down and click View Update History.
- Here, you can get a list of all cumulative updates – successful or fail ones.
- Note the failed patch number and move to the next section.
Download the Standalone Package
- Open any of your web browsers and visit Microsoft Update Catalog.
- At the search bar, paste the failed knowledge base number (noted down above) and press Enter.
- A list containing all the matching CUs will appear afterward.
- Click the Download button next to the most suited and latest update as per your system architecture.
- When a new window appears, click the first link to download the .msu file. Wait for a while as this is a relatively big file.
- Once over, go to the Download folder and double-click the set-up file to start installing the standalone package.
4. Run Windows Update Troubleshooter
Windows 10 includes an in-built utility that can troubleshoot any update-related issues. If the error 0x80240438 is still appearing, run the troubleshooter to find and repair the underlying cause. Here are the essential steps to work upon –
- Jointly press WinKey + I to start the Settings app.
- Select Update & Security thereafter Troubleshoot on the succeeding window.
- Jump to the right side and click to expand the Windows Update section.
- Hit Run the troubleshooter to start looking for any update errors.

- Follow the instructions as they appear in the remaining process.
Once over, Restart the PC so that changes performed may become effective.
5. Disable IPV6
Several users have confirmed that disabling IPV6 under the Network settings resolves error 0x80240438 on their PCs. That’s why we have included this in the list of solutions and the procedure is as follows –
- Launch the control panel and reach out to the following location –
Control Panel\Network and Internet\Network Connections
- Make a click on the internet connection (currently in use to access net connectivity) and hit Properties.

- Next, uncheck the box left to “Internet Protocol Version 6 (TPC/IPV6)” and tap OK.

- Make sure to Reboot your PC so as to apply the recent changes.
From the next login, you must be able to update Windows 10 OS or launch Microsoft Store.
6. Disable Proxy
Connecting the PC to a proxy often causes bugs and issues. So, if you are still experiencing the error 0x80240438 while opening the Store app, try once to disable the Proxy. Here are the steps to work upon –
- Press Win+Q hotkey altogether to start the Search box and type “Proxy”.
- Click the top result to launch the Proxy Settings window.
- Move to the right panel and scroll down to “Manual Proxy Setup“.
- Turn off the toggle switch next to “Use a Proxy server” and click the Save button.

Note: If you use a script address, make sure to disable this as well.
- Restart your PC and check whether this error resolves after the next login or not.
7. Modify Windows Update features Group Policy
If the error 0x80240438 still persists, you should modify the Windows Update features group policy. On different Windows 10 forums, this solution is widely accepted. That’s why we are including this method as well –
- Right-click on the Win icon and select Run.
- Type gpedit.msc at the empty text box and press Enter.
- When the Group Policy window comes into view, browse to the below address –
User Configuration > Administrative Templates > Windows Components > Windows Update
- Move to the adjacent right side and scroll down to locate “Remove Access To Use All Windows Update Features“.
- Once found, double-click on it to open its respective window. Mark the checkbox next to “Not configured” and hit OK.
- Restart your computer so as to implement the changes from the next login.
8. Reset Windows Update Folders
The existing contents inside the SoftwareDistribution and Catroot2 folders may cause the error 0x80240438 on Windows 10 PC. To get rid of this nagging issue, you must clean these two update folders accomplishing the below steps –
- Press Win & R to invoke the Run dialog.
- Type cmd at the void, hold Ctrl+Shift and press Enter to launch the Command Prompt as Admin.
- When the UAC window prompts, tap Yes to authorize the access.
- Now, execute the following codes one after another. Make sure to press the Enter key after each command.
- The above codes will stop the essential update services, now run the below codes to rename certain services –
- Subsequently, configure your network connectivity using the following commands –
- After successfully executing the above codes, restart the services that you have previously stopped.
- Finally, Restart your system and check whether the update error code 0x80240438 gets solved or not.
9. Clear Microsoft Store Cache
Note: This workaround is primarily for Microsoft Store related error 0x80240438. If you are receiving the error message while performing Windows 10 update, you may skip this solution.
As time passes by, a huge amount of cache piles up at Windows Store. If you don’t clear these unnecessary data, you may end up receiving the error 0x80240438. So, go through the below steps to clear the Store cache –
- Launch the Run dialog, type wsreset at the void, and press the Enter key.
- The Windows console appears immediately afterward clearing off the stored cache.
- When the command prompt finishes the task, Microsoft Store will start without any error code.

10. Tweak Registry Editor
If you are still getting the error 0x80240438 on your computer, modifying the “DisableWindowsUpdateAccess” entry inside Registry may resolve this bug. Here’s how to perform this task –
- Press Winkey + R altogether to start Run dialog. Type regedit at the void and press Enter to invoke the Registry Editor.
- Using the key-ladder on the left pane, reach out to the below path –
- Head over to the right side and locate “DisableWindowsUpdateAccess“.
- Click on this DWORD entry twice and put “0” at its value data.

- Click OK and Restart Windows 10 to implement the above changes.
That’s it, I hope the above fixes do help to resolve the Update and Store Error 0x80240438 on your Windows 10 device. If you have any queries or suggestions related to this article, do tell us in the comment section.


