- Как включить или отключить Hyper-V в Windows 10
- Как включить и отключить через Windows PowerShell
- Управление Hyper-V с помощью DISM
- Активация в окне «Компоненты Windows»
- Install Hyper-V on Windows 10
- Check Requirements
- Enable Hyper-V using PowerShell
- Enable Hyper-V with CMD and DISM
- Enable the Hyper-V role through Settings
- Virtualization applications don’t work together with Hyper-V, Device Guard, and Credential Guard
- Determine whether the Hyper-V hypervisor is running
- Cause
- How to disable Hyper-V
- Disable Hyper-V in Control Panel
- Disable Hyper-V in PowerShell
- Disable Device Guard and Credential Guard
- More information
- Установка Hyper-V в Windows 10 Install Hyper-V on Windows 10
- Проверьте следующие требования Check Requirements
- Включение Hyper-V с помощью PowerShell Enable Hyper-V using PowerShell
- Включение Hyper-V с помощью CMD и DISM Enable Hyper-V with CMD and DISM
- Включение роли Hyper-V с помощью раздела «Параметры» Enable the Hyper-V role through Settings
Как включить или отключить Hyper-V в Windows 10

В данной статье показаны действия, с помощью которых можно включить или отключить виртуализацию (компонент) Hyper-V в операционной системе Windows 10.
Hyper-V позволяет запускать несколько операционных систем в виде виртуальных машин в Windows. Компонент Hyper-V можно включить или отключить несколькими способами, в их числе консоль Windows PowerShell, утилита командной строки DISM (средство обслуживания образов развертывания и управления ими), а также используя графический интерфейс панели управления.
Прежде чем включить компонент Hyper-V, необходимо проверить следующие требования:
- Windows 10 Корпоративная, Профессиональная или для образовательных учреждений
- 64-разрядный процессор с поддержкой преобразования адресов второго уровня (SLAT)
- Процессор должен поддерживать технологии виртуализации (Intel VT-x или AMD-V)
- На компьютере должно быть установлено не менее 4ГБ оперативной памяти
Также необходимо проверить, включены ли технологии виртуализации в BIOS/UEFI.
Как включить и отключить через Windows PowerShell
Компонент Hyper-V можно включить используя консоль Windows PowerShell.
Чтобы включить компонент Hyper-V, откройте консоль Windows PowerShell от имени администратора и выполните следующую команду:
Enable-WindowsOptionalFeature -Online -FeatureName Microsoft-Hyper-V -All

Для завершения установки выполните перезагрузку компьютера.
Для того чтобы отключить компонент Hyper-V, откройте консоль Windows PowerShell от имени администратора и выполните следующую команду:
Disable-WindowsOptionalFeature -Online -FeatureName Microsoft-Hyper-V-All

Для завершения операции отключения компонента Hyper-V, необходимо перезагрузить компьютер.
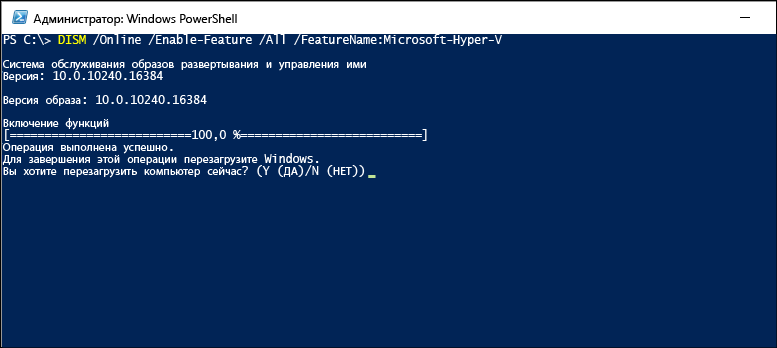
Управление Hyper-V с помощью DISM
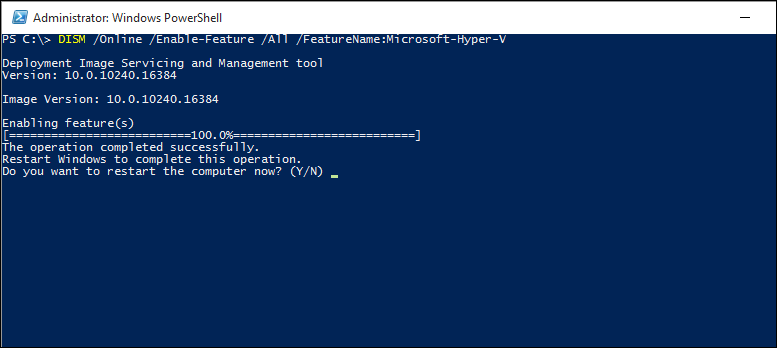
Чтобы включить компонент Hyper-V используя DISM, запустите командную строку от имени администратора и выполните следующую команду:
dism.exe /Online /Enable-Feature:Microsoft-Hyper-V-All

Для завершения операции перезагрузите Windows
Чтобы отключить компонент Hyper-V используя DISM, запустите командную строку от имени администратора и выполните следующую команду:
dism.exe /Online /Disable-Feature:Microsoft-Hyper-V-All

Для завершения операции перезагрузите Windows.
Активация в окне «Компоненты Windows»
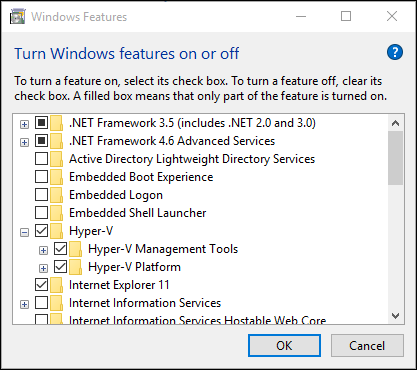
Чтобы включить компонент Hyper-V в окне «Компоненты Windows», нажмите сочетание клавиш  + R и в открывшемся окне Выполнить введите (скопируйте и вставьте) OptionalFeatures и нажмите клавишу Enter ↵.

В открывшемся окне «Компоненты Windows» выберите Hyper-V и нажмите кнопку OK.

После завершения установки вам будет предложено перезапустить компьютер.

Чтобы отключить компонент Hyper-V, окне «Компоненты Windows» отключите Hyper-V и нажмите кнопку OK.

После завершения установки вам будет предложено перезапустить компьютер.

Используя рассмотренные выше действия можно включить или отключить компонент Hyper-V.
Install Hyper-V on Windows 10
Enable Hyper-V to create virtual machines on Windows 10.
Hyper-V can be enabled in many ways including using the Windows 10 control panel, PowerShell or using the Deployment Imaging Servicing and Management tool (DISM). This documents walks through each option.
Note: Hyper-V is built into Windows as an optional feature — there is no Hyper-V download.
Check Requirements
- Windows 10 Enterprise, Pro, or Education
- 64-bit Processor with Second Level Address Translation (SLAT).
- CPU support for VM Monitor Mode Extension (VT-c on Intel CPUs).
- Minimum of 4 GB memory.
The Hyper-V role cannot be installed on Windows 10 Home.
Upgrade from Windows 10 Home edition to Windows 10 Pro by opening up Settings > Update and Security > Activation.
For more information and troubleshooting, see Windows 10 Hyper-V System Requirements.
Enable Hyper-V using PowerShell
Open a PowerShell console as Administrator.
Run the following command:
If the command couldn’t be found, make sure you’re running PowerShell as Administrator.
When the installation has completed, reboot.
Enable Hyper-V with CMD and DISM
The Deployment Image Servicing and Management tool (DISM) helps configure Windows and Windows images. Among its many applications, DISM can enable Windows features while the operating system is running.
To enable the Hyper-V role using DISM:
Open up a PowerShell or CMD session as Administrator.
Type the following command:
For more information about DISM, see the DISM Technical Reference.
Enable the Hyper-V role through Settings
Right click on the Windows button and select вЂApps and Features’.
Select Programs and Features on the right under related settings.
Select Turn Windows Features on or off.
Select Hyper-V and click OK.
When the installation has completed you are prompted to restart your computer.
Virtualization applications don’t work together with Hyper-V, Device Guard, and Credential Guard
Many third-party virtualization applications don’t work together with Hyper-V. Affected applications include VMware Workstation and VirtualBox. These applications might not start virtual machines, or they may fall back to a slower, emulated mode.
These symptoms are introduced when the Hyper-V Hypervisor is running. Some security solutions are also dependent on the hypervisor, such as:
- Device Guard
- Credential Guard
Original product version: В Windows 10 — all editions
Original KB number: В 3204980
Determine whether the Hyper-V hypervisor is running
To determine whether the Hyper-V hypervisor is running, follow these steps:
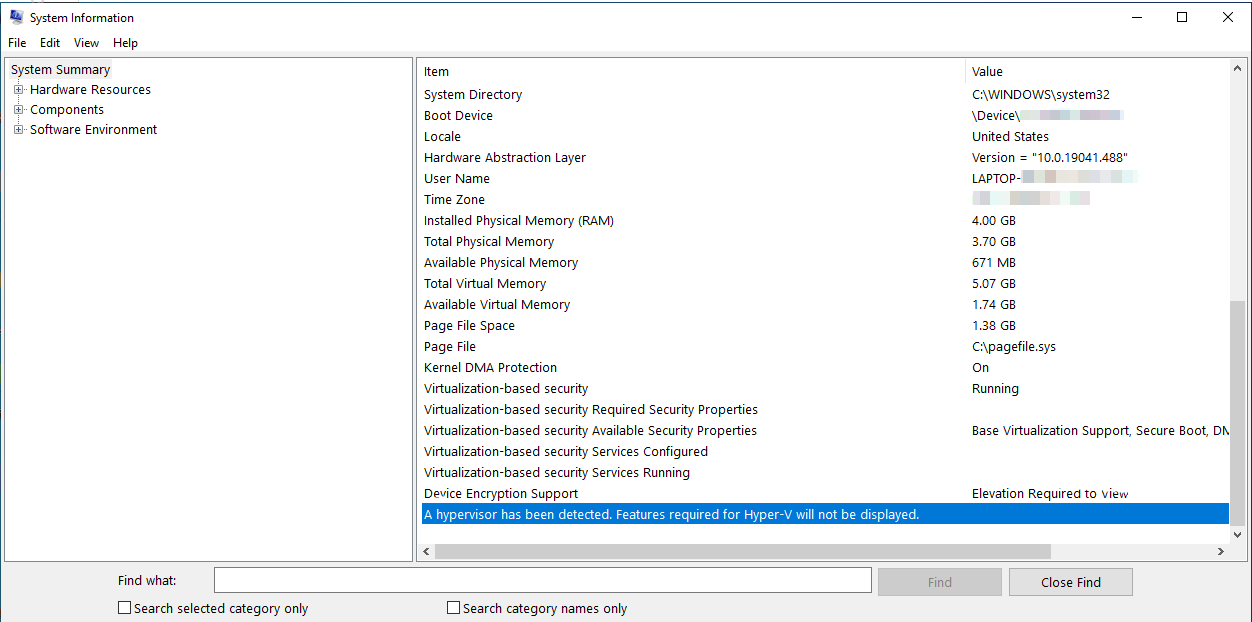
In the search box, type msinfo32.exe.
Select System Information.
In the detail window, locate the following entry:
A hypervisor has been detected. Features required for Hyper-V will not be displayed.
Cause
This behavior occurs by design.
Many virtualization applications depend on hardware virtualization extensions that are available on most modern processors. It includes Intel VT-x and AMD-V. Only one software component can use this hardware at a time. The hardware cannot be shared between virtualization applications.
To use other virtualization software, you must disable Hyper-V Hypervisor, Device Guard, and Credential Guard. If you want to disable Hyper-V Hypervisor, follow the steps in next two sections.
How to disable Hyper-V
You can disable Hyper-V Hypervisor either in Control Panel or by using Windows PowerShell.
Disable Hyper-V in Control Panel
To disable Hyper-V in Control Panel, follow these steps:
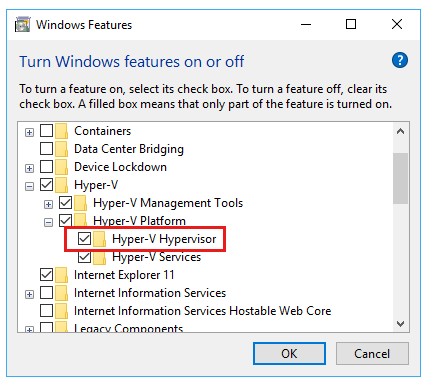
In Control Panel, select Programs and Features.
Select Turn Windows features on or off.
Expand Hyper-V, expand Hyper-V Platform, and then clear the Hyper-V Hypervisor check box.
Disable Hyper-V in PowerShell
To disable Hyper-V by using Windows PowerShell, follow these steps:
Open an elevated PowerShell window.
Run the following command:
Disable Device Guard and Credential Guard
You can disable Device Guard and Credential Guard by using registry keys or group policy. To do it, see Manage Windows Defender Credential Guard.
More information
Third-party information disclaimer
The third-party products that this article discusses are manufactured by companies that are independent of Microsoft. Microsoft makes no warranty, implied or otherwise, about the performance or reliability of these products.
Установка Hyper-V в Windows 10 Install Hyper-V on Windows 10
Включение Hyper-V для создания виртуальных машин в Windows 10. Enable Hyper-V to create virtual machines on Windows 10.
Hyper-V можно включить разными способами, в том числе используя панель управления Windows 10, PowerShell или с помощью средства обслуживания образов развертывания и управления ими (DISM). Hyper-V can be enabled in many ways including using the Windows 10 control panel, PowerShell or using the Deployment Imaging Servicing and Management tool (DISM). В этом документе последовательно описан каждый из указанных способов. This documents walks through each option.
Примечание. Механизм Hyper-V встроен в Windows в качестве дополнительной функции. Скачать Hyper-V нельзя. Note: Hyper-V is built into Windows as an optional feature — there is no Hyper-V download.
Проверьте следующие требования Check Requirements
- Windows 10 Корпоративная, Pro или для образовательных учреждений Windows 10 Enterprise, Pro, or Education
- 64-разрядный процессор с поддержкой преобразования адресов второго уровня (SLAT). 64-bit Processor with Second Level Address Translation (SLAT).
- Поддержка расширения режима мониторинга виртуальной машины (технология VT-c на компьютерах с процессорами Intel). CPU support for VM Monitor Mode Extension (VT-c on Intel CPUs).
- Не менее 4 ГБ оперативной памяти. Minimum of 4 GB memory.
Роль Hyper-V невозможно установить в Windows 10 Домашняя. The Hyper-V role cannot be installed on Windows 10 Home.
Выполните обновление с выпуска Windows 10 Домашняя до выпуска Windows 10 Pro, открыв раздел Параметры > Обновление и безопасность > Активация. Upgrade from Windows 10 Home edition to Windows 10 Pro by opening up Settings > Update and Security > Activation.
Дополнительные сведения и советы по устранению неполадок см. в статье Требования к системе для Hyper-V в Windows 10. For more information and troubleshooting, see Windows 10 Hyper-V System Requirements.
Включение Hyper-V с помощью PowerShell Enable Hyper-V using PowerShell
Откройте консоль PowerShell от имени администратора. Open a PowerShell console as Administrator.
Выполните следующую команду. Run the following command:
Если не удается найти команду, убедитесь, что вы используете PowerShell от имени администратора. If the command couldn’t be found, make sure you’re running PowerShell as Administrator.
По завершения установки выполните перезагрузку. When the installation has completed, reboot.
Включение Hyper-V с помощью CMD и DISM Enable Hyper-V with CMD and DISM
Система обслуживания образов развертывания и управления ими (DISM) позволяет настраивать ОС Windows и образы Windows. The Deployment Image Servicing and Management tool (DISM) helps configure Windows and Windows images. Помимо всего прочего? средство DISM может включать функции Windows во время выполнения операционной системы. Among its many applications, DISM can enable Windows features while the operating system is running.
Чтобы включить роль Hyper-V с помощью DISM, выполните указанные ниже действия. To enable the Hyper-V role using DISM:
Запустите PowerShell или сеанс CMD от имени администратора. Open up a PowerShell or CMD session as Administrator.
Введите следующую команду: Type the following command:
Дополнительные сведения о DISM см. в разделе Техническое руководство по DISM. For more information about DISM, see the DISM Technical Reference.
Включение роли Hyper-V с помощью раздела «Параметры» Enable the Hyper-V role through Settings
Щелкните правой кнопкой мыши кнопку Windows и выберите пункт «Приложения и компоненты». Right click on the Windows button and select ‘Apps and Features’.
Выберите Программы и компоненты справа в разделе связанные параметры. Select Programs and Features on the right under related settings.
Выберите пункт Включение или отключение компонентов Windows. Select Turn Windows Features on or off.
Выберите Hyper-V и нажмите кнопку ОК. Select Hyper-V and click OK.

После завершения установки вам будет предложено перезапустить компьютер. When the installation has completed you are prompted to restart your computer.


