- How to prevent Windows 10 screen display from turning off
- Prevent Windows 10 screen display from turning off
- 1] Through the Settings app
- 2] By using Command Prompt
- 3] Through the Control Panel
- How to schedule Automatic Shutdown in Windows 10 [EASY GUIDE]
- How to schedule shutdown in Windows 10?
- 1. Use Run dialog, Command Prompt or PowerShell
- 2. Use Task Scheduler
- 3. Use a dedicated software to help with shutdown
- Computer randomly shuts down in Windows 10 [FIXED]
- How can I fix computer random shutdowns in Windows 10?
- 1. Update your drivers
- DriverFix
- 2. Turn off the Sleep mode
- 3. Turn off Fast Startup
- 4. Tweak the advanced power settings
- 5. Use this dedicated tool we recommend
- 6. Check the CPU temperature
- 7. Update BIOS
- 8. Check HDD state
- 9. Perform a clean reinstall
How to prevent Windows 10 screen display from turning off
You might have seen that the screen display turns off automatically when you leave your PC idle for a certain period of time. This function is very helpful to increase the device’s battery life and to some extent, it even prolongs the screen life. However not every person likes this feature. Many people prefer to keep the screen from turning off regardless of whether they actively use their computer or not. On Windows 10, there are multiple ways using which you can prevent your screen display from turning off.
Prevent Windows 10 screen display from turning off
To keep your screen from turning off on a Windows 10 computer, you may use one of these options:
- Through Settings app
- By using Command Prompt
- Through the Control Panel
Let’s see all these methods in details:
1] Through the Settings app
If you want to prevent the screen display from turning off, you need to perform some changes in the Settings app:
- Open the Windows Settings using Win+I keyboard shortcut and then head to the System > Power & sleep.
- Move to the right pane and locate the Screen section. Then click on the drop-down menu and set “On battery power, turn off after” as Never.
- Similarly, click on the drop-down menu and set “When plugged in, turn off after” as Never.
- After following the above steps, your computer screen display will not turn off automatically.
2] By using Command Prompt
You can also keep your screen from turning off by running a simple command in Command Prompt. To do so, open the Run dialog box using the Win+R keyboard shortcut.
In the text field, type Ctrl+Shift+Enter keys to open Command Prompt with admin privileges. Click on the Yes button if UAC popup on your computer screen.
In the Command Prompt window, type the following command:
Press the Enter key to set timeout setting to never
Furthermore, you can also set your screen timeout settings to never when your PC is running on battery. To do this, type the following command and hit enter to run it:
After running the above commands, it will set your screen timeout setting to never turn off.
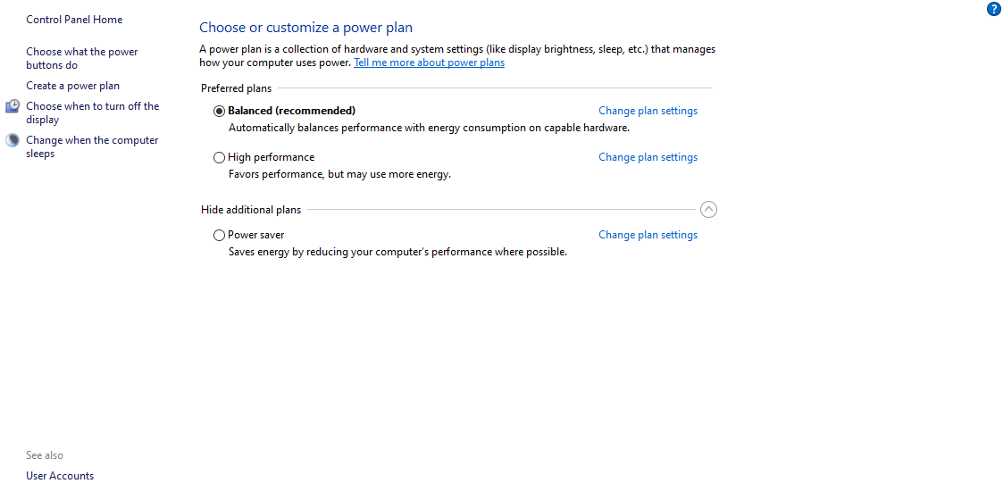
3] Through the Control Panel
The next option is the control panel using which you can prevent your Windows 10 screen display from turning off. So let’s see how to do this:
Go to the upper right corner of the screen and make sure the View by option is set to Category.
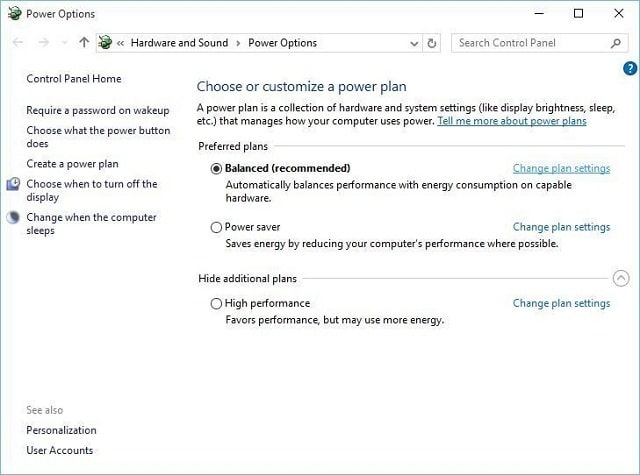
Now go to Hardware and Sound > Power Options.
From the left pane, click the link named Choose when to turn off the display.
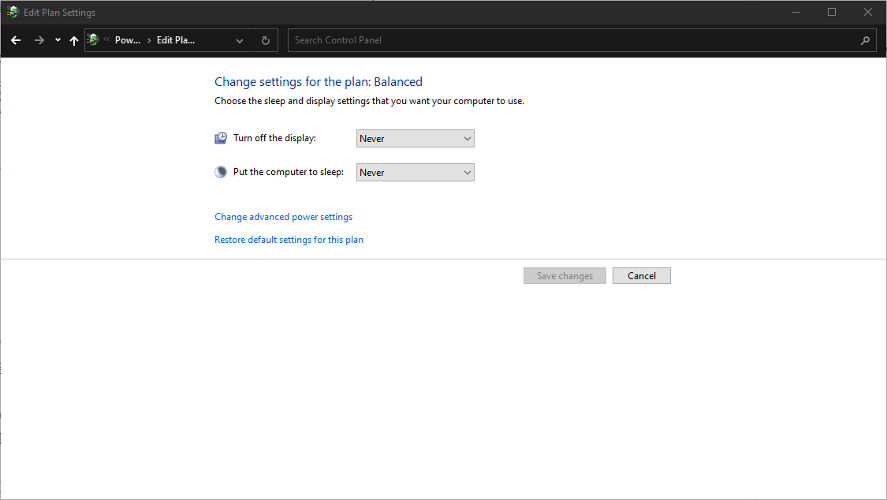
In the Edit Plan Settings window, set the “Turn off the display” option to Never using the drop-down menu for both On battery and Plugged in.
Here please note that the “On Battery” option is only available for the laptop computer.
How to schedule Automatic Shutdown in Windows 10 [EASY GUIDE]

- Programming your device to shut down automatically can be done in a couple of steps.
- In this article, we’re showing you how to do this, using certain commands or apps.
- Curious to learn more tips&tricks about Windows 10? Go to our Windows 10 Guides Hub for some interesting articles.
- Don’t leave without checking out the How-To area, for useful tutorials about everything concerning your electronic devices.

- Download Restoro PC Repair Tool that comes with Patented Technologies (patent available here).
- Click Start Scan to find Windows issues that could be causing PC problems.
- Click Repair All to fix issues affecting your computer’s security and performance
- Restoro has been downloaded by 0 readers this month.
Sometimes you might want to schedule certain tasks, especially if you don’t have enough time to do them manually.
If you want to learn more about scheduling on Windows 10, today we’re going to show you how to schedule shutdown on Windows 10.
If you can’t shut down your computer manually for some reason, you might want to schedule a shutdown. This is extremely useful if you leave your computer to do something during the night, or if you have to leave your computer for a few hours while you do some errands.
So, let’s see how to schedule a shutdown in Windows 10.
How to schedule shutdown in Windows 10?
1. Use Run dialog, Command Prompt or PowerShell
To start the Run dialog just press Windows key + R. If you want to run Command Prompt or PowerShell you can search it in the search bar.
Now, all that you have to do is type the following command into Run dialog, Command Prompt or PowerShell and press Enter:
shutdown –s –t 600 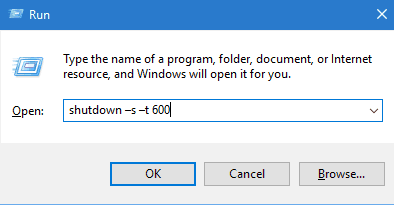
We have to mention that 600 represents the number of seconds, so in this example, your computer will turn off automatically after 10 minutes. You can experiment with different values and set the one you want.
If you’re having trouble accessing Command Prompt as an admin, then you better take a closer look at this guide. There’s a similar article about Powershell problems and how to fix them.
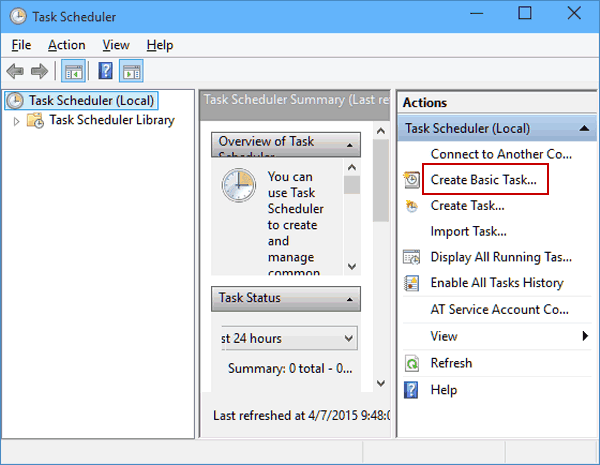
2. Use Task Scheduler
- Start Task Scheduler by going to the Start Menu, typing schedule in the Search bar, and choosing Schedule tasks.
- When Task Scheduler opens, click the Create Basic Task.

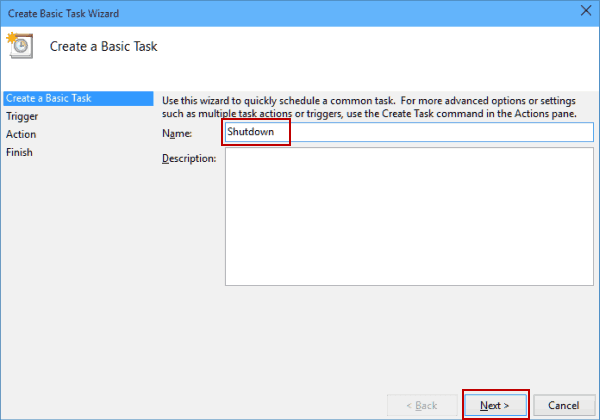
- Enter the name for your task, for example, Shutdown.
- Now choose When do you want the task to start. In our case, we’ll choose One time.
- Now enter the time and date when the task will be executed.
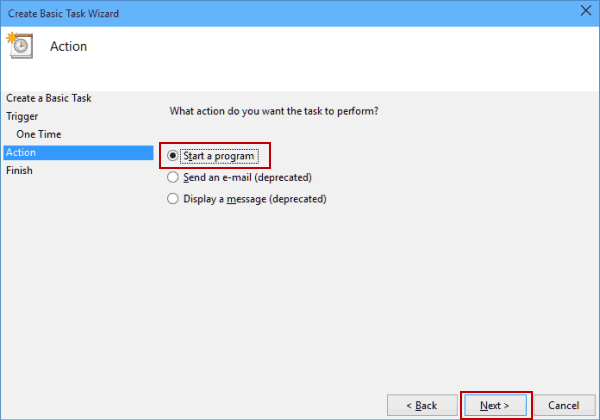
- Next, choose Start a program.
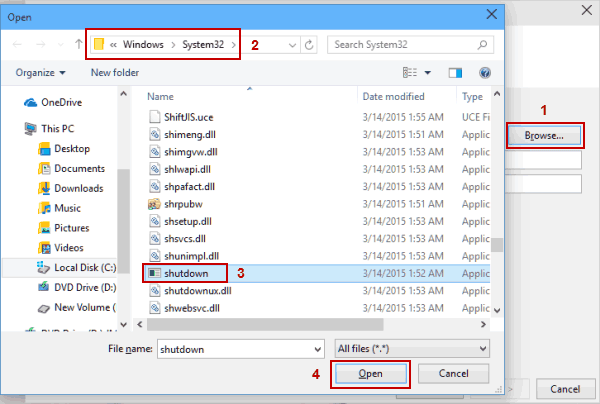
- Click the Browse button and go to C:WindowsSystem32 and select a file called shutdown. Then click Open.
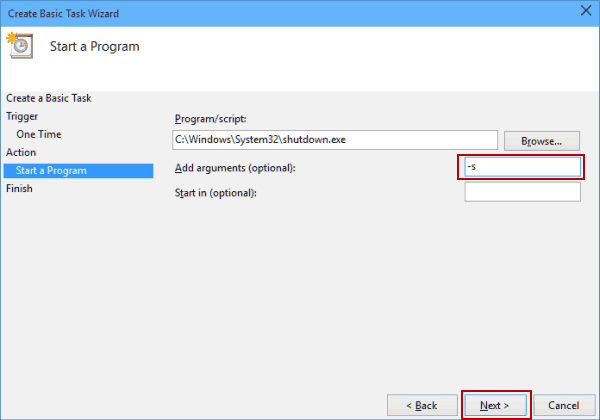
- Now just in the Add arguments field add -s, and then click Next.
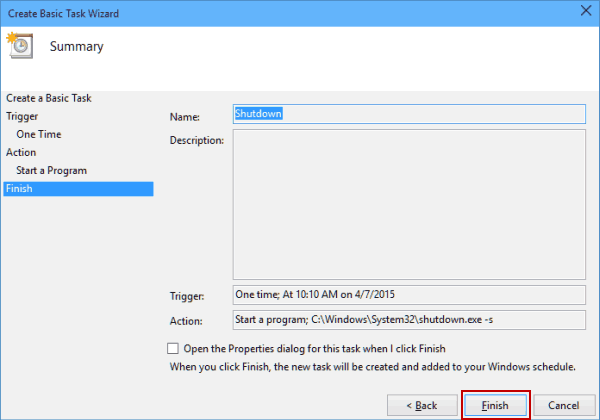
- Now you should see the task information. You can check it one last time, and if you’re pleased with your settings click Finish to schedule a shutdown.

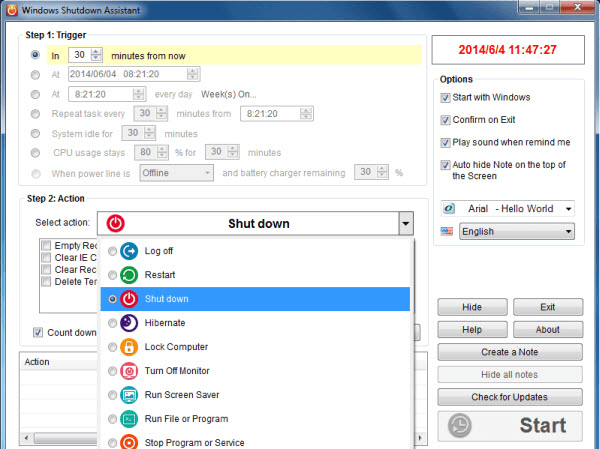
3. Use a dedicated software to help with shutdown
Windows Shutdown Assistant is a software that allows you to shut down your PC at the set time automatically. You can also set it to shut down in other situations such as system idle, excessive CPU usage, or low battery.
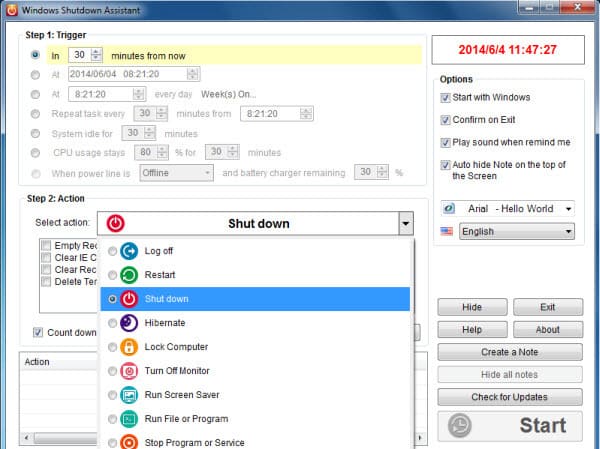
It can also support computer log off, restart, and lock up, all automatically. Thus, we recommend you download the free version of the program before deciding whether it’s worth your money or not.
That’s it, you now know how to schedule a shutdown in Windows 10. If you have any questions, just reach for the comments below.
Computer randomly shuts down in Windows 10 [FIXED]
- If your computer randomly turns off, there is surely a problem with your Windows.
- Updating your drivers manually or using a third-party program seems to fix this issue.
- Sleep mode might also cause your c omputer to randomly shuts down on Windows 10.
- Tweaking your advanced power settings should also get rid of the issue quickly.
- Download Restoro PC Repair Tool that comes with Patented Technologies (patent available here).
- Click Start Scan to find Windows issues that could be causing PC problems.
- Click Repair All to fix issues affecting your computer’s security and performance
- Restoro has been downloaded by 0 readers this month.
All of us have experienced one or two spontaneous shutdowns or restarts from time to time. Sometimes the culprit is hardware, sometimes software.
Either way, it’s an isolated event. However, what happens your computer keeps shutting down? On a daily or even hourly basis?
That is just the case with the problem we are addressing today. Namely, the IT forums are full of people asking for the solution.
You’ll hear a lot of generic solutions from Windows 10 technicians, but that is, with all due respect, a lot of apologetic nonsense.
So we prepared our list of workarounds for both tower and laptop computers.
We won’t tell you this troubleshoots will repair your computer definitely, but it may help you eliminate usual suspects.
Additionally, you’ll learn a thing or two about standard steps you should take in similar situations.
How can I fix computer random shutdowns in Windows 10?
1. Update your drivers
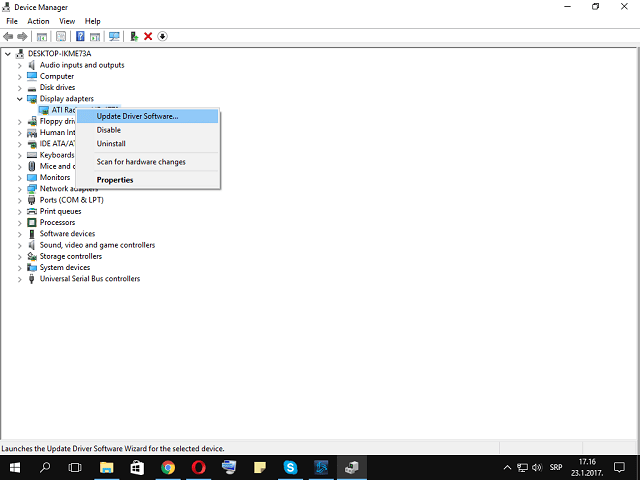
- Right-click Start and run Device Manager.
- Find Display adapters.
- Right-click on your GPU and open Properties.
- In the Details tab, open HardwareId and copy the first line to your clipboard.
- Now, move on to Drivers tab and Uninstall driver.
- Paste the first line and search.
- You should see the exact name and details about the GPU you’re using.
- Navigate to an official drivers provider site and download proper, latest drivers.
- Install drivers and restart PC.
Note: If you are using dual-GPU with Intel (integrated) and AMD/nVidia (dedicated) graphic cards, make sure to update drivers for both.
The majority of generic drivers that you received through the Windows Update can be used, but that’s not the case with GPU drivers. You’ll need the latest drivers provided by the official manufacturer.
Update your drivers automatically
If you’re tired of manually searching up drivers for all of your components, you’ll be happy to know that there is a third-party app that can do that for you.
This awesome software will not only scan your computer for compatible drivers, but it will also automatically install them for you as well, saving you a lot of time and effort.
DriverFix
2. Turn off the Sleep mode
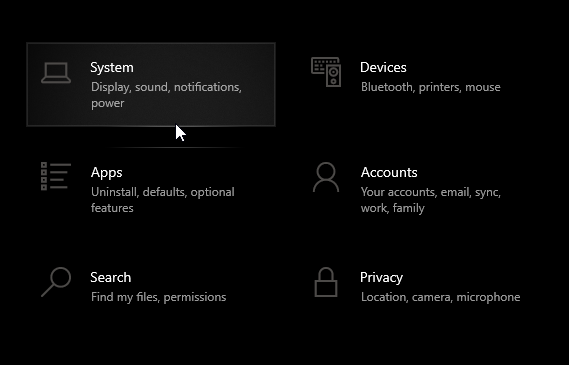
- Open Start.
- Click on Settings.
- Open System.
- Go to Power & sleep.
- Set both Screen and Sleep to Never.

Sleep mode is great in scenarios when your PC/Laptop is idle for a long period of time.
It preserves energy while enabling you to continue with the use in a few seconds. Until it became a problem in Windows 10. Namely, some users, instead of standard sleep, experienced complete shutdowns.
To be precise, it seems that Safe Mode equals Hibernation in some cases. Because of that, your next step would be to disable sleep mode. We’ll continue from there.
You can also try and set it on 5 hours timeout. That way some other possible interference should be prevented. If the shutdowns repeat, move on to the next steps.
3. Turn off Fast Startup
- Right-click Start and run Power Options.
- In Power Options click Choose what the power buttons do.
- Click Change settings that are currently unavailable.
- Uncheck the Turn on fast startup (recommended) within the Shutdown settings.
- Click OK to confirm and you are done.
With the newly added Fast Startup, Microsoft tried to speed things up while maintaining stability. But, since it affects the way your PC is shutting down, it may summon a lot of errors.
Luckily, you can disable it, check the PC behavior, and move on to the next steps if the workaround failed.
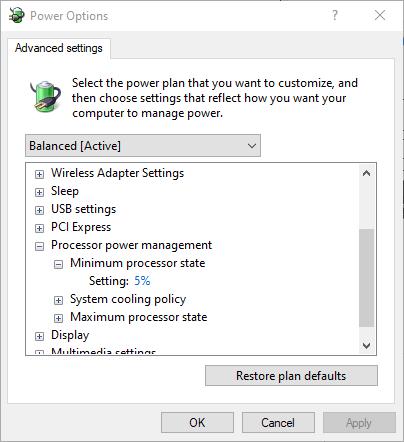
4. Tweak the advanced power settings
- Right-click on Start and open Power Settings.
- Choose your default power plan and click on Change plan settings.
- Click on Change advanced power settings.
- Navigate to Processor power management.
- Change the value from 100 to 0 in the Minimum processor state.
- Now, navigate to Hard Disk, then Turn off hard disk after and reduce the value until it shows Never.
- It goes both for plugged in and on battery for laptops.
- Save changes and exit.
It seems that a lot of issues are related to power settings in Windows 10. Random shutdowns may be on the list. We have a few tweaks for advanced power settings that are worth trying.
Have in mind that you’ll need the administrative permissions in order to perform them.
5. Use this dedicated tool we recommend
The Windows Shutdown Assistant is a dedicated tool that will stop your computer from randomly shutting down. With an easy-to-use interface and automated tasks.
It enables you to shut down the computer at a desired set time automatically.
Additionally, you can set it to shut down the computer in other situations such as system idle, excessive CPU usage, or low battery. The software also allows you to log off, restart, and lock the computer automatically.
This tool supports all Windows Operating Systems and comes with the following features:
- Turn off the computer automatically in various situations
- Schedule to Run a Program or Open a File
- Multiple Functions to Manage Windows Tasks
- Secure Computer Files and Data
- A Visual Break Reminder
- Create a reminder and set it to auto-display on the desktop at a set time.
Feel free to download the trial version now and give it a shot. Besides fixing the random shutdowns, it’s also a great tool to organize your tasks effortlessly.
6. Check the CPU temperature

In some cases, your CPU or GPU may overheat and that will lead to shutdowns. Namely, your motherboard is programmed to shut down everything in order to prevent serious damage to your CPU.
This especially goes for laptops that are most of the time lacking an adequate cooling system for intensive gaming.
You can check system temperatures with 3rd-party tools or just casually touch the backside of the laptop.
If the temperatures are alarmingly high, you’ll need to take some action.
- Clean fan bay on laptops or CPU cooler on a desktop.
- Change the thermal paste.
- Use the cooling pad of some kind to reduce heating.
- Change overclock settings to default.
In case your notebook/PC is in warranty, we advise you to take it to your supplier and let the professionals do the cleanup.
7. Update BIOS

Even though BIOS updating is not advisable, especially for beginners, sometimes it’s required. If misused, Bios update can cause a lot of problems and most of them are fatal to your PC.
Some motherboards offer special update tool featured in BIOS settings. If you have a new motherboard, you’ll have an easy time updating.
However, those of you with the older configurations have a much harder task.
Make sure you gather all the information before performing the process. Moreover, if your motherboard is up to date, don’t upgrade it.
8. Check HDD state
- Right-click on Start and run Command Prompt (Admin).
- In the command line type, the following command and press Enter to confirm: wmic diskdrive get status
- You’ll know your hard disk is healthy when prompted with OK for every partition.
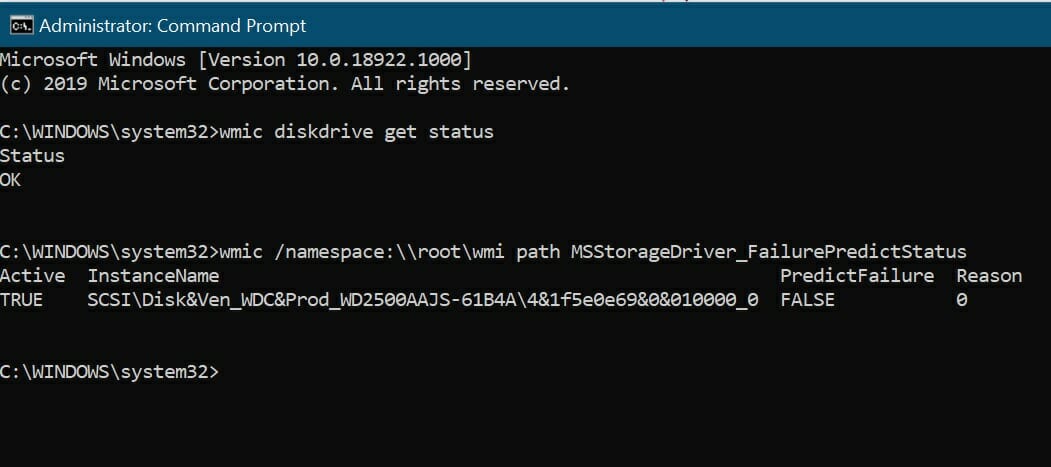
Another thing worth checking is your HDD. If your HDD is corrupted or it has damaged sectors, you’ll probably encounter a large variety of problems.
Most of the time the system won’t boot, but it may as well be related to sudden shutdowns. For that purpose, you can use 3rd-party tools and scan the disk (like HDDScan), or use the built-in tool and do it internally.
For starters, the built-in tool will serve you right and here is how to use it. On the other hand, if you are seeing Unknown, Caution, or Bad, your hard disk has some issues.
Of course, you can always scan your HDD with one of the best tools from this great list!
9. Perform a clean reinstall
At the end of the day, the clean reinstallation of Windows is the most viable solution. Of course, if the hardware isn’t the instigator of the uncalled shutdowns.
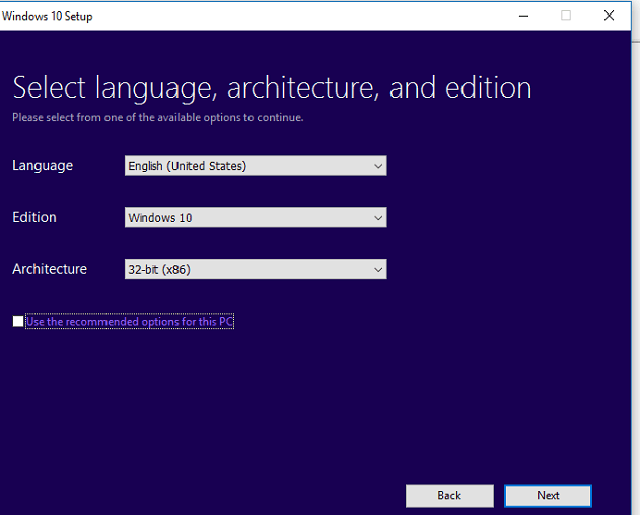
You can use Media Creation Tool to easily obtain installation setup for either ISO DVD or bootable USB.
Have in mind to back up your data from the system partition before the process commences. Moreover, take good care of your license key.
The process is not as hard as it was on some of the previous systems so you’ll be able to finish in two hours.
That should wrap it up. We hope you’ll find these workarounds appropriate for the issue.
Finally, all you can do is try since Microsoft is the one that should address this issue with more enthusiasm. In case you have any suggestions, alternative solutions, or questions, don’t forget to tell us in the comments.


