- Turn on Windows Defender to access company resources
- Turn on Windows Defender
- Turn on real-time and cloud-delivered protection
- Update your antivirus definitions
- Next steps
- How to Turn Off Windows Defender in Windows 10
- Stay protected with Windows Security
- Important security info
- Understand and customize Windows Security features
- Status icons indicate your level of safety:
- Run a malware scan manually
- Run a quick scan in Windows Security
- Run an advanced scan in Windows Security
- Schedule your own scan
- Schedule a scan
- Turn Microsoft Defender Antivirus real-time protection on or off
- Turn real-time protection off temporarily
- How to Turn Off Windows Defender in Windows 10
Turn on Windows Defender to access company resources
Organizations want to ensure that devices accessing their resources are secured so they may require you to use Windows Defender. Windows Defender is an antivirus software that’s included in Windows and can help protect your device from viruses and other malware and threats.
This article describe how to update your device settings to meet your organization’s antivirus requirements and resolve access problems.
Turn on Windows Defender
Complete the following steps to turn on Windows Defender on your device.
- Select the Start menu.
- In the search bar, type group policy. Then select Edit group policy from the listed results. The Local Group Policy Editor will open.
- Select Computer Configuration >Administrative Templates >Windows Components >Windows Defender Antivirus.
- Scroll to the bottom of the list and select Turn off Windows Defender Antivirus.
- Select Disabled or Not configured. It might feel counter-intuitive to select these options because the names suggest that you’re turning Windows Defender off. Don’t worry, these options actually ensure that it’s turned on.
- Select Apply >OK.
Turn on real-time and cloud-delivered protection
Complete the following steps to turn on real-time and cloud-delivered protection. Together, these antivirus features protect you against spyware and can deliver fixes for malware issues via the cloud.
- Select the Start menu.
- In the search bar, type Windows Security. Select the matching result.
- Select Virus & threat protection.
- Under Virus & threat protection settings, select Manage settings.
- Flip each switch under Real-time protection and Cloud-delivered protection to turn them on.
If you don’t see these options on your screen, they may be hidden. Complete the following steps to make them visible.
- Select the Start menu.
- In the search bar, type group policy. Then select Edit group policy from the listed results. The Local Group Policy Editor will open.
- Select Computer Configuration >Administrative Templates >Windows Components >Windows Security >Virus and threat protection.
- Select Hide the Virus and threat protection area.
- Select Disabled >Apply >OK.
Update your antivirus definitions
Complete the following steps to update your antivirus definitions.
- Select the Start menu.
- In the search bar, type Windows Security. Select the matching result.
- Select Virus & threat protection.
- Under Virus & threat protection updates, select Check for updates. If you don’t see this option on your screen, complete the first set of steps in Turn on Real-time Protection. Then try checking for updates again.
Next steps
Still need help? Contact your company support. For their contact information, check the Company Portal website.
How to Turn Off Windows Defender in Windows 10

Thursday, June 28, 2018


Windows Defender is the security application that Microsoft puts in every version of Windows. Sometimes, you may want to turn it off to perform certain tasks that Windows Defender may interfere with, or you plan to install other anti-virus applications. In this article, I will show you how to turn off Windows Defender in Windows 10.
Method 1: Turn off windows defender temporarily
Step 1: Click “Settings” in the “Start Menu”. And then choose “Update & Security”.

Step 2: Select “Windows Security” from the left pane and choose “Open Windows Defender Security Center”.

Step 3: Open Windows Defender’s settings, and then click on the «Virus & Threat Protection settings» link.

Step 4: Click the Real-Time Protection, Cloud-Delivered Protection and Automatic Sample Submission switches to turn Windows Defender off.

Method 2: Using Group Policy to disable Windows Defender
Step 1: Press “Win + R” and Type “gpedit.msc”, then hit Enter or OK.

Step 2: Click on Computer Configuration and Administrative Templates.

Step 3: Click on “Windows Components” and double click “Windows Defender Antivirus”.

Step 4: Double click “Turn off Windows Defender Antivirus”.

At last, select the Enable button on the left edge and click OK.
But without the protection of Windows Defender, your computer may be in some threats, so you need to install some powerful third-party program instead. Wise Anti Malware not only fully protects your computer from malware, but also does a better job of cleaning and optimizing. Have a try!
Stay protected with Windows Security
Windows 10 includes Windows Security, which provides the latest antivirus protection. Your device will be actively protected from the moment you start Windows 10. Windows Security continually scans for malware (malicious software), viruses, and security threats. In addition to this real-time protection, updates are downloaded automatically to help keep your device safe and protect it from threats.
Windows 10 in S mode
Some features will be a little different if you’re running Windows 10 in S mode. Because this mode is streamlined for tighter security, the Virus & threat protection area has fewer options. But don’t worry—the built-in security of this mode automatically prevents viruses and other threats from running on your device, and you’ll receive security updates automatically. For more info, see Windows 10 in S mode FAQ.
Important security info
Windows Security is built-in to Windows 10 and includes an antirvirus program called Microsoft Defender Antivirus. (In previous versions of Windows 10, Windows Security is called Windows Defender Security Center).
If you have another antivirus app installed and turned on, Microsoft Defender Antivirus will turn off automatically. If you uninstall the other app, Microsoft Defender Antivirus will turn back on automatically.
If you’re having problems receiving Windows Security updates, see Fix Windows Update errors and the Windows Update FAQ.
For info on how to uninstall an app, see Repair or remove an app in Windows 10.
To change your user account to an admin account, see Create a local user or administrator account in Windows 10.
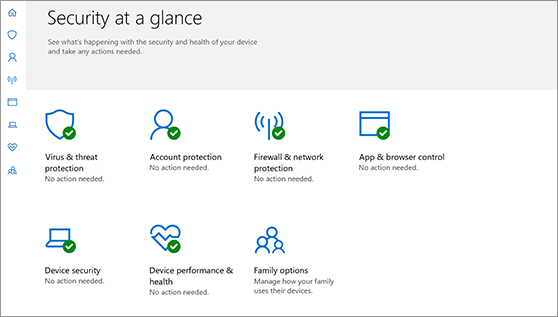
Understand and customize Windows Security features
Windows Security is your home to manage the tools that protect your device and your data:
Virus & threat protection. Monitor threats to your device, run scans, and get updates to help detect the latest threats. (Some of these options are unavailable if you’re running Windows 10 in S mode.)
Account protection. Access sign-in options and account settings, including Windows Hello and dynamic lock.
Firewall & network protection. Manage firewall settings and monitor what’s happening with your networks and internet connections.
App & browser control. Update settings for Microsoft Defender SmartScreen to help protect your device against potentially dangerous apps, files, sites, and downloads. You’ll have exploit protection and you can customize protection settings for your devices.
Device security. Review built-in security options to help protect your device from attacks by malicious software.
Device performance & health. View status info about your device’s performance health, and keep your device clean and up to date with the latest version of Windows 10.
Family options. Keep track of your kids’ online activity and the devices in your household.
You can customize how your device is protected with these Windows Security features. To access them, select Start > Settings > Update & Security > Windows Security . Then select the feature you want to explore.
Open Windows Security settings
Status icons indicate your level of safety:
Green means your device is sufficiently protected and there aren’t any recommended actions.
Yellow means there is a safety recommendation for you.
Red is a warning that something needs your immediate attention.
Run a malware scan manually
When you’re concerned about risks to a specific file or folder, you can right-click the file or folder in File Explorer, then select Scan with Microsoft Defender.
If you suspect there’s malware or a virus on your device, you should immediately run a quick scan. This is much faster than running a full scan on all your files and folders.
Run a quick scan in Windows Security
Select Start > Settings > Update & Security > Windows Security and then Virus & threat protection.
Open Windows Security settings
Under Current threats, select Quick scan (or in previous versions of Windows 10, under Threat history, select Scan now).
If the scan doesn’t find any issues, but you’re still concerned, you may want to check your device more thoroughly.
Run an advanced scan in Windows Security
Select Start > Settings > Update & Security > Windows Security and then Virus & threat protection.
Under Current threats, select Scan options (or in previous versions of Windows 10, under Threat history, select Run a new advanced scan).
Select one of the scan options:
Full scan (check files and programs currently running on your device)
Custom scan (scan specific files or folders)
Microsoft Defender Offline scan (run this scan if your device has been, or could potentially be, infected by a virus or malware). Learn more about Microsoft Defender Offline
Select Scan now.
Note: Because of streamlined security, this process isn’t available if you’re running Windows 10 in S mode.
Schedule your own scan
Even though Windows Security is regularly scanning your device to keep it safe, you can also set when and how often the scans occur.
Schedule a scan
Select the Start button, type schedule tasks in the Search box, and in the list of results, select Task Scheduler.
In the left pane, select the arrow (>) next to Task Scheduler Library to expand it, do the same with Microsoft > Windows, and then scroll down and select the Windows Defender folder.
In the top-center pane, select Windows Defender Scheduled Scan. (Point to the choices to see the full names.)
In the Actions pane on the right, scroll down and then select Properties.
In the window that opens, select the Triggers tab, and then select New.
Set your preferred time and frequency, and then select OK.
Review the schedule and select OK.
Note: Because of streamlined security, this process isn’t available if you’re running Windows 10 in S mode.
Turn Microsoft Defender Antivirus real-time protection on or off
Sometimes you may need to briefly stop running real-time protection. While real-time protection is off, files you open or download won’t be scanned for threats. However, real-time protection will soon turn on automatically again to protect your device.
Turn real-time protection off temporarily
Select Start > Settings > Update & Security > Windows Security and then Virus & threat protection > Manage settings. (In previous versions of Windows 10, select Virus & threat protection > Virus & threat protection settings.)
Open Windows Security settings
Switch the Real-time protection setting to Off and choose Yes to verify.
Note: Because of streamlined security, this process isn’t available if you’re running Windows 10 in S mode.
How to Turn Off Windows Defender in Windows 10
Thursday, June 28, 2018
Windows Defender is the security application that Microsoft puts in every version of Windows. Sometimes, you may want to turn it off to perform certain tasks that Windows Defender may interfere with, or you plan to install other anti-virus applications. In this article, I will show you how to turn off Windows Defender in Windows 10.
Method 1: Turn off windows defender temporarily
Step 1: Click “Settings” in the “Start Menu”. And then choose “Update & Security”.
Step 2: Select “Windows Security” from the left pane and choose “Open Windows Defender Security Center”.
Step 3: Open Windows Defender’s settings, and then click on the «Virus & Threat Protection settings» link.
Step 4: Click the Real-Time Protection, Cloud-Delivered Protection and Automatic Sample Submission switches to turn Windows Defender off.
Method 2: Using Group Policy to disable Windows Defender
Step 1: Press “Win + R” and Type “gpedit.msc”, then hit Enter or OK.
Step 2: Click on Computer Configuration and Administrative Templates.
Step 3: Click on “Windows Components” and double click “Windows Defender Antivirus”.
Step 4: Double click “Turn off Windows Defender Antivirus”.
At last, select the Enable button on the left edge and click OK.
But without the protection of Windows Defender, your computer may be in some threats, so you need to install some powerful third-party program instead. Wise Anti Malware not only fully protects your computer from malware, but also does a better job of cleaning and optimizing. Have a try!


