- How to fix Windows 10 WiFi won’t turn on
- Try these methods
- Method 1: If you’re using a laptop, verify the WiFi switch is toggled on
- Method 2: Change the property of your wireless network adapter
- Method 3: Update your network adapter driver
- Method 4: Uninstall and reinstall your network adapter driver
- Method 5: Run network adapter troubleshooter
- Method 6: Perform a system restore
- How to turn on Wi-Fi on your Windows 10 computer in 3 ways
- Check out the products mentioned in this article:
- Windows 10 (From $139.99 at Best Buy)
- Lenovo IdeaPad 130 (From $299.99 at Best Buy)
- How to turn on Wi-Fi on Windows 10
- Turning on Wi-Fi via the Wi-Fi icon
- Turning on Wi-Fi via the Start menu
- FIX: WiFi won’t Turn On, Wireless Networks Not Available (Windows 10, 8)
- How to fix the «No Wi-Fi Networks» issue on Windows 10, 8.1 & 8.
How to fix Windows 10 WiFi won’t turn on
Last Updated: 5 months ago
When you try to turn on WiFi on Windows 10, the wireless network somehow won’t turn on. And you have to use the wired network to try troubleshooting this “Windows 10 WiFi won’t turn on” problem. Don’t worry, this article gives you 6 effective methods to solve the problem, quickly and easily.
Try these methods
You don’t have to try them all; just work your way down the list until you find the one that works for you.
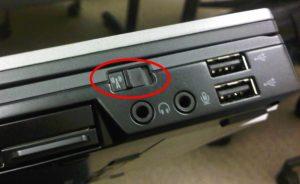
Method 1: If you’re using a laptop, verify the WiFi switch is toggled on
On laptop, there’s usually a switch or button for WiFi connection. If you’ve been unable to use WiFi on your laptop, you should try toggling the WiFi switch on your laptop multiple times to check.
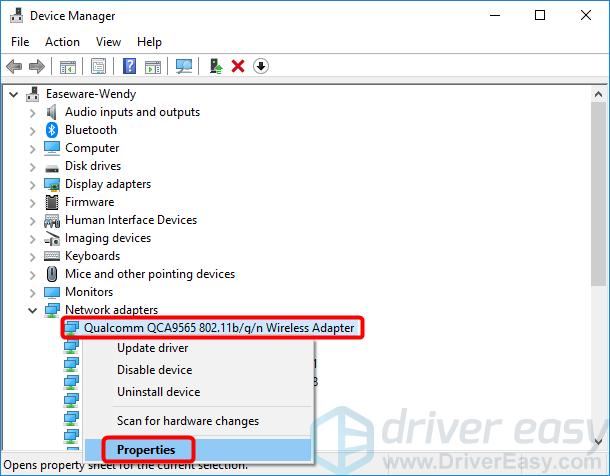
Method 2: Change the property of your wireless network adapter
The “Windows 10 WiFi won’t turn on” issue may occur due to corrupt network settings. And some users fixed their “WiFi won’t turn on” problem by changing the property of their WiFi network adapter. You can follow these steps:
- On your keyboard, press the Windows logo key and R at the same time to open the Run box.
- Type devmgmt.msc and press Enter to access Device Manager.


Method 3: Update your network adapter driver
A corrupted or outdated network adapter driver may also stop WiFi from turning on. You can update your network adapter driver to better troubleshoot your “Windows 10 WiFi won’t turn on” problem.
There are two ways to update your network adapter driver: manually and automatically.
Update your network adapter driver manually — You can update your driver manually by going to the hardware manufacturer’s website, and searching for the latest driver for your network adapter. But if you take this approach, be sure to choose the driver that’s compatible with the exact model number of your hardware, and your version of Windows.
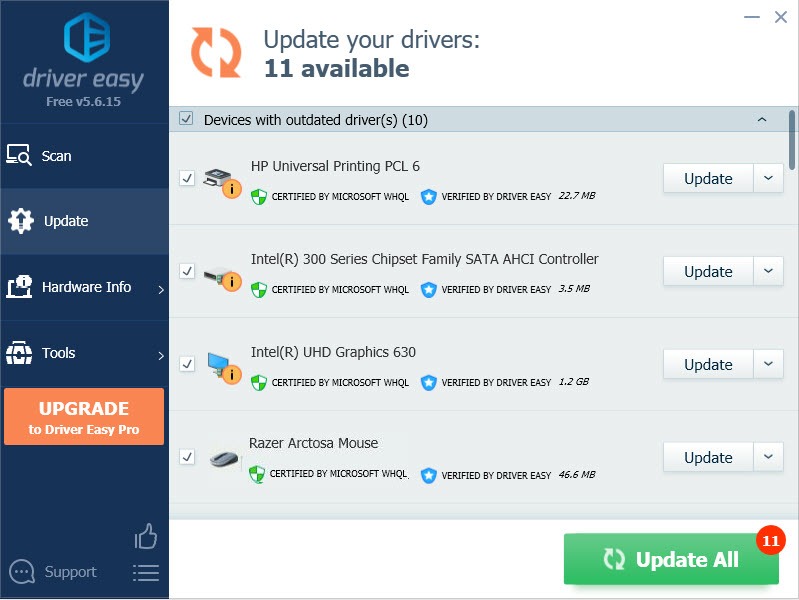
Update your network adapter driver automatically — If you don’t have the time, patience or computer skills to update your network adapter driver manually, you can do it automatically with Driver Easy. You don’t need to know exactly what system your computer is running, you don’t need to risk downloading and installing the wrong driver, and you don’t need to worry about making a mistake when installing. Driver Easy handles it all.
- Download and install Driver Easy.
- Run Driver Easy and click Scan Now. Driver Easy will then scan your computer and detect any problem drivers.
- Click Update next to any flagged devices to automatically download the correct version of their drivers, then you can install them manually. Or click Update All to automatically download and install them all automatically. (This requires the Pro version – you’ll be prompted to upgrade when you click Update All. You get full support and a 30-day money back guarantee.)
- Once you’ve updated your network adapter driver, check if you can turn on WiFi. If not, you can contact Driver Easy’s support team at support@drivereasy.com for further assistance. They’d be happy to help you. Or you can try Method 4, below.

Method 4: Uninstall and reinstall your network adapter driver
You can also try uninstalling your network adapter driver and see if this helps solve your WiFi problem.
- Go to Device Manager.
- Expand the Network adapters entry, right-click on your WiFi network adapter, and select Unisntall device.
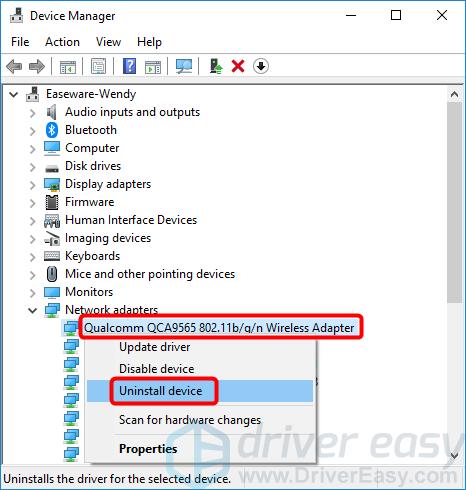
Click Uninstall. 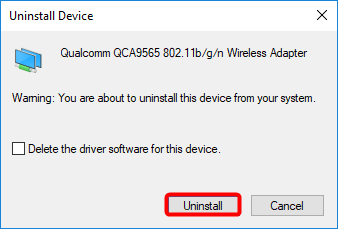
Method 5: Run network adapter troubleshooter
You can also use the handy tool — network adapter troubleshooter — to try fixing your “Windows 10 WiFi won’t turn on” problem. You can run the network adapter troubleshooter by following these steps:
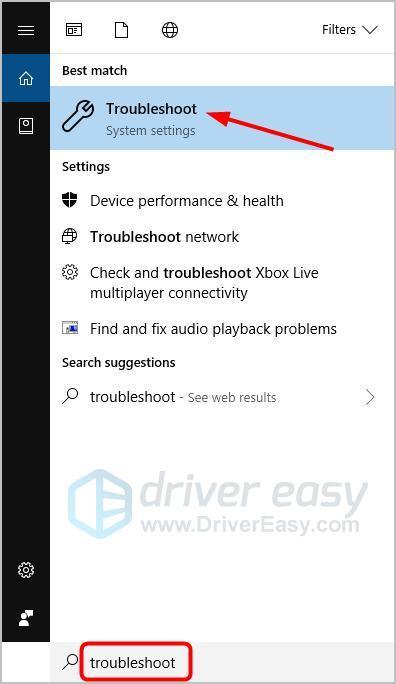
- Type troubleshoot in the search box and press Enter.
Click Internet Connections, then click Run the troubleshooter. 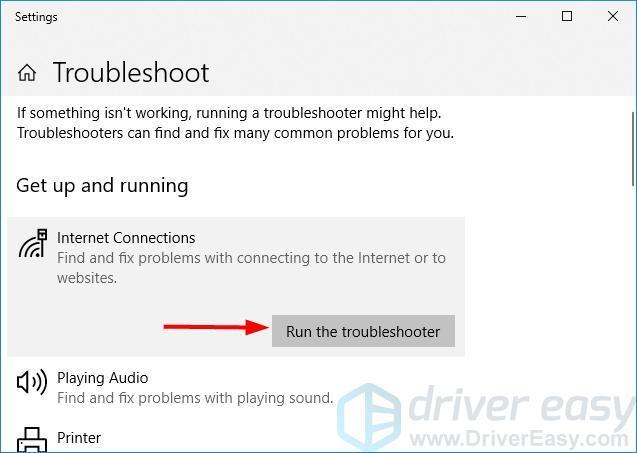
Click Network Adapter, then click Run the troubleshooter. 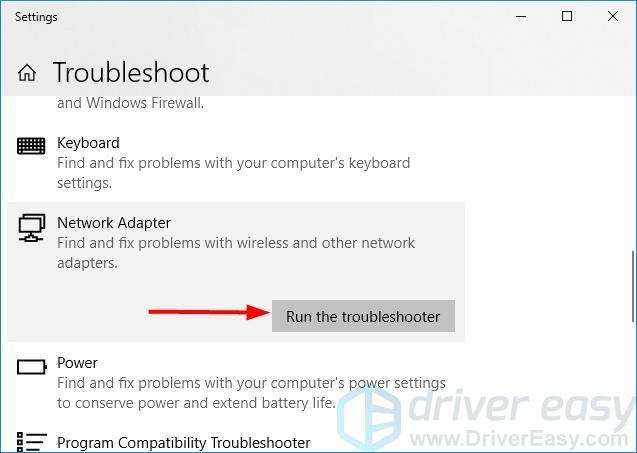
Method 6: Perform a system restore
If the steps above didn’t work for you and your ” Windows 10 WiFi won’t turn on” issue only occurs recently, we recommend performing a system restore on your computer. It’ll return your system files and settings to an earlier point in time when WiFi works properly on your computer, without affecting your personal files.
Here’s how to perform a system restore:
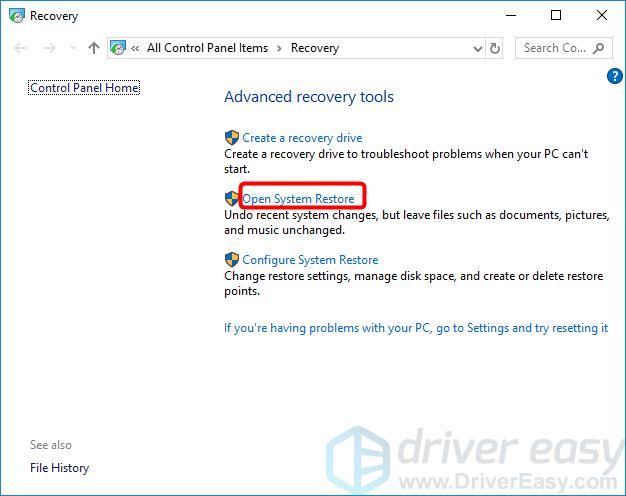
- Type recovery in the Windows search box, then press Enter.
- At Recovery, click Open System Restore.
Select Choose a different restore point, and click Next. 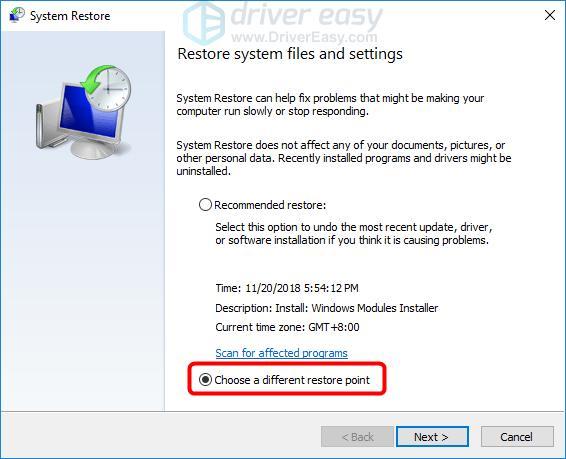
Check the box beside Show more restore points. You should see a list of ‘restore points’. These are like backups of your computer, as it was at that particular date and time. Think back to a date when you were able to connect to WiFi, and select a restore point from that date or slightly earlier (but no later). 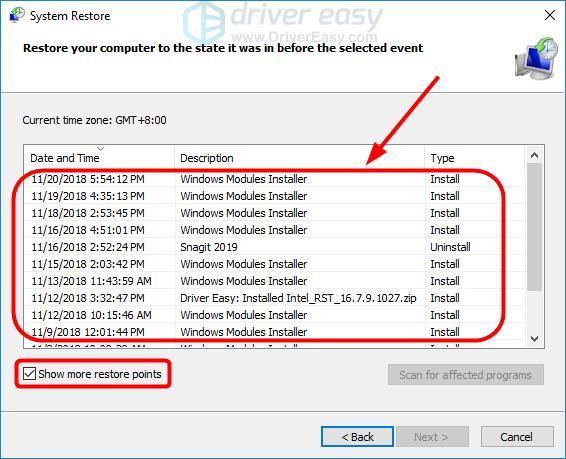
If you have any question or suggestion, please feel free to leave a comment below.
How to turn on Wi-Fi on your Windows 10 computer in 3 ways
Gone are the days of having to hook up a cord to your computer and telephone line, only to browse the internet at a snail’s pace.
These days, not only is it possible to go browse the web at super fast speeds without any wires, it’s actually the most popular way to get online.
Wi-Fi capabilities are a feature on pretty much every computer on the market these days, and turning Wi-Fi on is the quickest and easiest way to get online on your Windows computer.
If you’re running Windows 10, your Wi-Fi adapter is likely already enabled.
If it’s not, or if you’ve accidentally disabled it in the past, and can’t figure out how to get it back, don’t worry. Here’s how to get up and running on WiFi in no time.
Check out the products mentioned in this article:
Windows 10 (From $139.99 at Best Buy)
Lenovo IdeaPad 130 (From $299.99 at Best Buy)
How to turn on Wi-Fi on Windows 10
First of all, see if there’s a Wi-Fi button on your keyboard — it’ll have a picture of waves coming off of a circle or line. This is common on laptops, and will likely require you to press the Fn key and one of the numbered F keys at the top of the keyboard.
Turning on Wi-Fi via the Wi-Fi icon
1. Look to the lower-left corner of your computer screen. On the toolbar, there may be a Wi-Fi icon, which resembles a radio signal transmitting upwards. If it isn’t there, click the upwards facing arrow to see if it’s grouped with the other icons not on your toolbar.
2. Click on the Wi-Fi icon on your toolbar, then click again on the larger Wi-Fi box that appears in the pop-up menu to turn Wi-Fi on.
3. Once turned on, connect to any Wi-Fi network you prefer, so long as you have the password.
Turning on Wi-Fi via the Start menu
1. Click the Windows button and type «Settings,» clicking on the app when it appears in the search results.
2. Click on «Network & Internet.»
3. Click on the Wi-Fi option in the menu bar on the left side of the Settings screen.
4. Toggle the Wi-Fi option to «On» to enable your Wi-Fi adapter.
5. Connect to any WiFi network you prefer, granted you know the network password.
FIX: WiFi won’t Turn On, Wireless Networks Not Available (Windows 10, 8)
Last updated on August 20th, 2017
The «No Wireless Networks Connections are available» problem can occur on Windows 10 after installing a new Windows 10 update through Automatic Updates or after you have upgraded Windows 7, 8 or Windows 8.1 to Windows 10. Despite of the Wi-Fi connectivity issue, the built-in Ethernet adapter may work properly and without any problems.

In the case that you face problems with the Wireless connection (WiFi does not work, No WiFi connections) on Windows 10, then this tutorial will show you some methods to fix the problem.
The methods and solutions below apply to the following issues:
- No WiFi connections on Windows 10 or Windows 8, 8.1
- No Wi-Fi is available after Windows 10 update or upgrade.
- Wireless Connections Unavailable on Windows 8, 8.1 or 10.
- Wi-Fi not working on Windows 10 or Windows 8, 8.1.
- WiFi won’t turn on in Windows 10
- Wi-Fi stopped working after Windows 10 upgrade or update.
- No Wireless connections on Windows 10 or Windows 8, 8.1.
- Wireless Networks Not Available on Windows 10, 8.
How to fix the «No Wi-Fi Networks» issue on Windows 10, 8.1 & 8.
Method 1. Ensure that Wireless Adapter is Enabled
Method 2. Make sure that WiFi is ON and Airplane Mode is OFF.
Method 3. Perform a Full Shutdown.
Method 4. Modify Wi-Fi Adapter’s Power Management Settings.
Method 5. Update WiFi Adapter’s driver.
Method 6. Uninstall and Reinstall the WiFi adapter.
Other Methods to fix Wireless Connectivity Issues.
Method 1. Ensure that Wireless Adapter is Enabled.
First of all make sure that the Wireless adapter is not disabled. To do that:
1. Press “Windows”  + “R” keys to load the Run dialog box.
2 Type ncpa.cpl and press Enter.

3. Right click on the Wireless network (Wi-Fi) connection and select Enable. *
* Note: If you see the Disable option available, then your card is already enabled, but you can give a try to Disable and re-Enable it.

Method 2. Make sure that Wi-Fi is ON and Airplane Mode is OFF.
1. Click the Start menu  and click Settings
  .
.
2. Open Network and Internet.
3. Select the Airplane Mode on the left and ensure that:
1. Airplane Mode is OFF.
2. Wi-Fi is On.

Method 3. Perform A Full Shutdown.
Windows 10 and Windows 8 use a new technology that is called Fast Startup in order to start Windows quickly. By using the Fast Startup feature, Windows don’t need to reinitialize all drivers and system files upon starting up, so the operating system is loaded faster.
To perform a full shutdown in order to reinitialize WiFi adapter:
1. Click the Start  menu and then click the Power
  button.
2. Now press and HOLD DOWN the SHIFT key (on your keyboard) and then click Shutdown.

3. Wait until all indicator lights turn Off and then Power On your computer again.
Method 4. Modify Wireless Adapter’s Power Management settings.
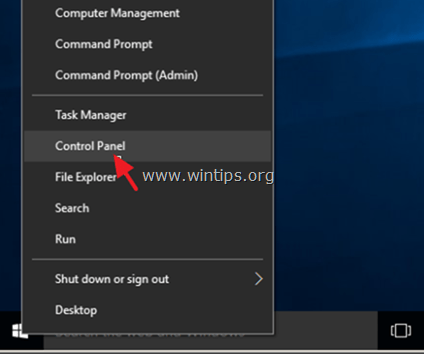
1. Right-click on the Start menu  and choose Control Panel.
2. Change the View By (at the up right) to Small icons and then open Power Options.

3. Click Change plan settings (next to «Balanced») and then select Change advanced power settings.
4. Scroll down to find and expand the Wireless Adapter Settings.
5. Now set the On Battery and Plugged in Setting to Maximum Performance.

Method 5. Update WiFi Adapter’s driver.
Important: Before proceeding, connect your computer to the Internet by using an Ethernet cable.
1. Right click on the Start menu and select Device Manager.

2. Click to expand Network Adapters.
3. Right click at the problematic Wireless Adapter and select Update Driver Software.

4. A the next screen choose «Search automatically for updated driver software«.

5. Let Windows find and install the latest driver for your Wi-Fi adapter.
6. Restart your computer.
Method 6. Uninstall and Reinstall the WiFi adapter.
Important: Before proceeding, connect your computer to the Internet by using an Ethernet cable.
1. Open Device Manager.
2. Click to expand Network Adapters.
3. Right click at the problematic Wireless Adapter and select Uninstall.
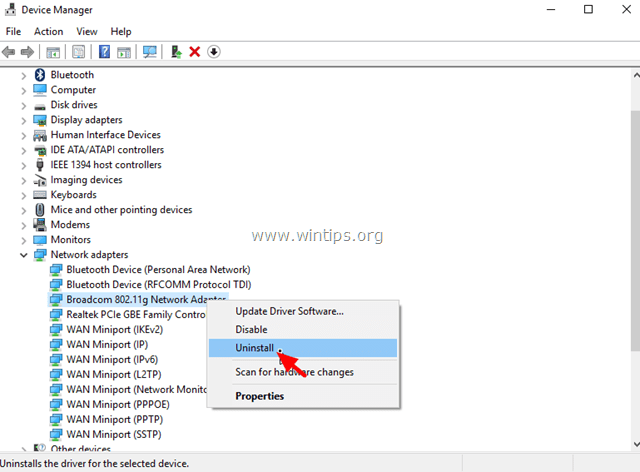
4. Press OK at the warning message to remove the installed Wi-Fi adapter.
5. When the driver uninstall is completed, right click at the computer name on the top (or at the Action menu on the top) and select Scan for hardware changes.
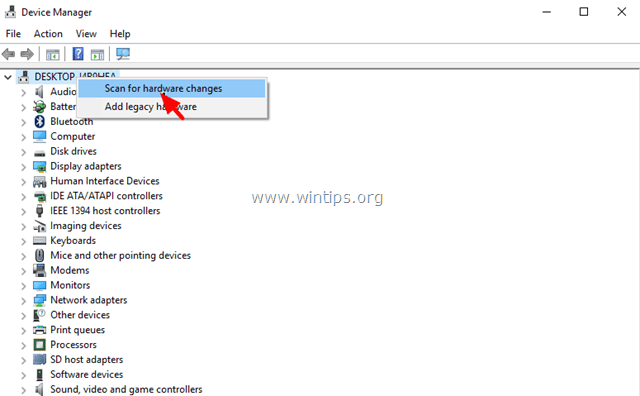
6. Wait until Windows installs the Wireless driver.
7. Restart your computer.
Other Methods to fix Wireless Connectivity Problems.
1. Uninstall VPN Software.
– If you have upgraded to Windows 10 from a previous version (Windows 8.1, 8 or 7) and you have a VPN software previously installed, then proceed and uninstall it. After the uninstall, restart your computer and see if the «No Wi-Fi connectivity» problem is resolved. If not, then proceed and run the troubleshooter on this link:
Other Methods to fix Wireless Connectivity Issues.
1. Uninstall VPN Software.
— If you have upgraded to Windows 10 from a previous Windows version (7, 8 or 8.1) and you have installed a VPN software, then uninstall it and restart your computer. If the problem persists then run the troubleshooter from this link: https://support.microsoft.com/en-us/kb/3084164.
2. Uninstall any third party Security Program (Antivirus/Firewall).
– Sometimes the installed security program may block Network connections, especially after updating Windows. In this case, it is better to uninstall the old version of your security program and install the latest version.
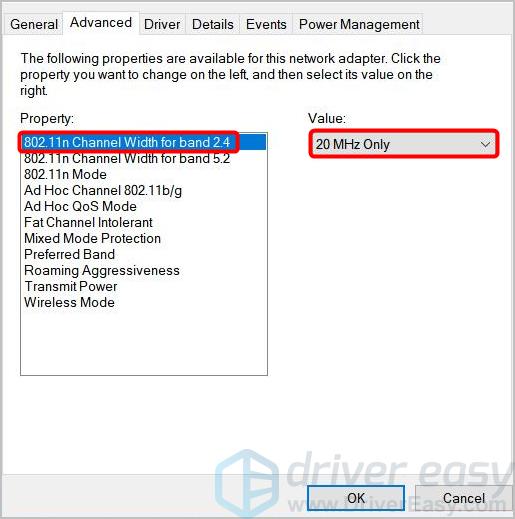
3. Change the «802.11n Bandwidth» setting.
– If your Wireless adapter supports the 802.11n Networking Standard, then try to set the «802.11n Bandwidth» setting to «20MHz/40MHz Auto». To do that:
1. Navigate to Device Manager.
2. Right click on the Wireless Adapter and select Properties.
3. In Advanced tab, find and set the «802.11n Bandwidth» (channel width) to «20 MHz only» or to «20MHz/40MHz Auto«.
That’s it! Let me know if this guide has helped you by leaving your comment about your experience. Please like and share this guide to help others.


