Настройка сканирования KYOCERA через TWAIN драйвер
Как настроить сканирование на МФУ KYOCERA через TWAIN драйвер.
1. Сначала нужно скачать сам драйвер сканера. Это можно сдалать на официальном сайте KYOCERA в Центре поддержки по этой ссылке. На странице поддержки необходимо выбрать из списка Вашу модель МФУ и ниже найти ссылку TWAIN scanner driver для вашей операционной системы.
2. Распакуйте скачанный архив и запустите файл setup.exe.
3. После установки запустите программу Kyocera TWAIN Driver.
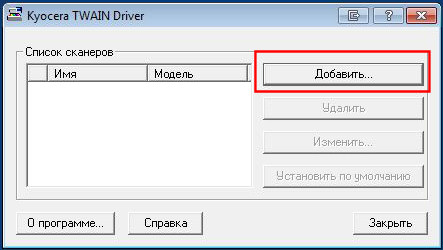
4. В открывшемся окне нажмите кнопку Добавить. как показанно на картинке 1.
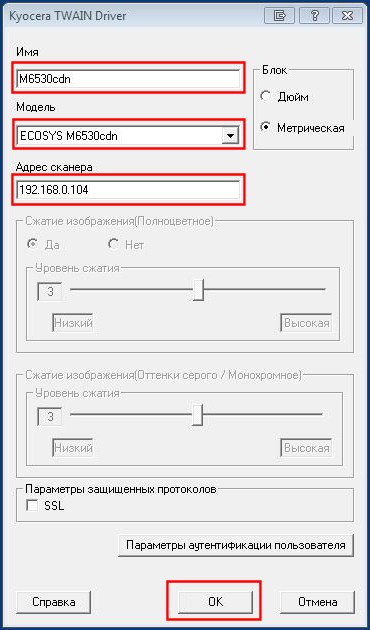
5. В следующем окне заполните поля (картинка 2):
Имя — произвольное название, например, модель вашего аппарата
Модель — необходимо выбрать из выпадающего списка вашу модель Kyocera. При этом, если Вы используете USB подключение, необходимо выбирать модель именно с USB в названии
Адрес сканера — пропишите IP-адрес Вашего МФУ. Если используется USB подключение, то поле остаётся пустым (или неактивным)
По завершении нажмите кнопку OK внизу окна.
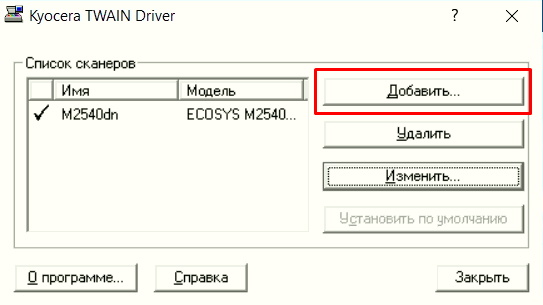
6. Ваш аппарат должен появиться в списке установленных сканеров (картинка 3). После этого нажмине кнопку Закрыть.
Для сканирования Ваших документов используйте приложения поддерживающие функцию сканирования через TWAIN, например: Adobe Photoshop, Corel Paint Shop Pro и т.п. или же можно воспользоваться бесплатной программой Paperscanfree.
Приятного сканирования!
!! Если Вам необходимо настроить сетевое сканирование в общую папку, на почту или на FTP сервер, подробную инструкцию можно прочитать по этой ссылке.
WIA / TWAIN драйвер для сканера — где скачать?
Модель драйверов WIA, или Windows Imaging Architecture, была разработана Майкрософт для ОС Windows. С помощью драйверов этого типа графические программы (Photoshop и другие) могут взаимодействовать со сканерами, видеокамерами и фотоаппаратами. А в 1992 году появилась технология TWAIN с целью дальнейшего развития стандартов взаимодействия между такими приложениями и устройствами.
Для любого устройства нужно скачивать свой оригинальный WIA или TWAIN драйвер, который разрабатывается производителем и позволяет операционной системе использовать все возможности техники. Однако благодаря тому, что стандарт открытый, в некоторых случаях сканеры, вебкамеры или другое оборудование для захвата изображения может работать и с программным обеспечением сторонних разработчиков.
Найдите в сопроводительных документах или на корпусе модель вашего устройства (сканера или МФУ) . В видео ролике после статьи подробный рассказ на английском языке (с субтитрами на русском) где смотреть название продукта HP, его модель, номер серии, и даже серийный номер, хотя для того, чтобы найти и скачать Wia или TWAIN драйверы для сканера он вряд ли будет нужен. Аналогичным образом поищите модель МФУ или сканера Canon, Sumsung, Brother или любого другого производителя.
Чтобы найти Wia или TWAIN драйвер на нашем сайте кликните по надписи Выберите рубрику в колонке справа и в выпадающем меню кликните производителя или серию вашего устройства. Например, у вас Canon, но не МФУ, а сканер серии CanoScan. Нажмите на соответствующую строку и откройте список, а затем и статью для вашей модели устройства. Выберите и скачайте драйвер с учетом версии и разрядности ОС Windows.
Для продукции Epson у нас есть отдельные статьи, где собраны все устройства этого производителя, для которых разработана утилита Epson Scan, в обязательном порядке включающая в себя также и драйвер для сканирования:
Если не находите на сайте статьи для вашей модели сканера или МФУ, сообщите об этом в комментарии к любому из материалов и мы постараемся разместить недостающую информацию в ближайшие дни. Если же у вас нет времени на ожидание, ищите устройство на сайте производителя. Наберите в поисковике, например, WIA драйвер для Xerox WorkCentre 5222 и выбирайте ссылку ведущую на официальный сайт. На странице продукта найдите нужную ОС с учетом разрядности, язык интерфейса, и скачайте предложенный драйвер.
Install and use a scanner in Windows 10
When you connect a scanner to your device or add a new scanner to your home network, you can usually start scanning pictures and documents right away. If your scanner doesn’t automatically install, here’s some help to get things working.
Select one of the following sections, or select Show all. Any section you choose will open to show you more info on using your scanner.
In most cases, all you have to do to set up a scanner is to connect it to your device. Plug the USB cable from your scanner into an available USB port on your device, and turn the scanner on. If that doesn’t work, here’s a way to do it manually.
Select Start > Settings > Devices > Printers & scanners or use the following button. Open the Printers & scanners settings
Select Add a printer or scanner. Wait for it to find nearby scanners, then choose the one you want to use and select Add device.
Note: If your scanner is included in a multifunction or All-In-One printer, you may only see the name of your printer. To see your scanner, under Printers & scanners, select your installed printer, select Manage, and then choose your scanner.
If your scanner is turned on and connected to the network, Windows should find it automatically. Available scanners can include all scanners on a network, such as Bluetooth and wireless scanners or scanners that are plugged into another device and shared on the network. Here’s a way to do it manually.
Select Start > Settings > Devices > Printers & scanners or use the following button. Open the Printers & scanners settings
Select Add a printer or scanner. Wait for it to find nearby scanners, then choose the one you want to use, and select Add device.
If your scanner isn’t in the list, select The printer that I want isn’t listed, and then follow the instructions to add it manually.
If you use wireless access points, extenders or multiple wireless routers with separate SSIDs, you’ll need to ensure that you’re connected to the same network as the scanner for your PC to find and install it.
If you have a new wireless scanner that hasn’t been added to your home network, read the instructions that came with the scanner and check the scanner manufacturer’s website to learn more and to get up-to-date software for your scanner.
If your scanner is included in a multifunction or All-In-One printer, you may only see the name of your printer. To see your scanner, under Printers & scanners, select your installed printer, select Manage, and then choose your scanner.
You might need administrator permission to install some scanners.
If you want to see if your scanner is installed, make sure that your scanner is turned on and use the Open the Printers & scanners settings button, or follow these steps:
Under Printers & devices, look for your scanner.
Note: If your scanner is included in a multifunction or All-In-One printer, you may only see the name of your printer. To see your scanner, under Printers & scanners, select your installed printer, select Manage, and then choose your scanner.
Once your scanner is installed, use the Windows Scan app to scan a picture or document. Here’s how:
Note: Need to install the Windows Scan app? You can get the app at Microsoft Store.
Make sure your scanner is turned on.
In the search box on the taskbar, type Windows Scan, and then select Scan from the results.
Do one of the following:
Place the item you want to scan face down on the scanner’s flatbed and close the cover.
Place the item you want to scan in the scanner’s document feeder.
On the Scan page, do the following:
Under Scanner, select the scanner you want to use.
Under Source, select the location you prefer to scan from.
Under File type, select the type of file you want the scan to be saved as. For example, you can save the file in different file formats—such as JPEG, Bitmap, and PNG.
Select Show more to show the Save file to options.
Under Save file to, browse to the location where you want to save the scan.
Select Scan at the bottom of the screen to scan your document or picture.
After your scan is finished, select View to see the scanned file before you save it, or select Close to save it. You can edit the scanned document or picture in the preview that appears when you select View.
To locate a previously saved scan file, select File Explorer from the taskbar, and then select the location that you chose to save your scanned files.
If none of these instructions solved your scanner problem, there could be an issue with the scanner itself. Go to the scanner manufacturer’s website for specific troubleshooting info.
Настройка сканирования Kyocera через TWAIN-драйвер
У многих возникает вопрос: как настроить сканирование на МФУ Kyocera с помощью TWAIN-драйвера. Давайте разберём этот вопрос 🙂
Первым делом необходимо скачать сам драйвер сканера. Это можно сделать в разделе «Центр поддержки» на официальном сайте Kyocera:
Перейдите по ссылке выше, найдите Ваше МФУ с помощью поля поиска, после чего перейдите на страницу устройства, в раздел «Драйверы»
Найдите в списке драйверов «TWAIN scanner driver» (может называться иначе, однако везде будет слово «TWAIN»), скачайте его и установите
После установки драйвера, запустите утилиту «Kyocera TWAIN Driver», которая устанавливается вместе с драйверами, и нажмите кнопку «Добавить. »:
В окне добавления устройства:
В поле «Имя» введите произвольное имя, которое будет отображаться в списке устройств. Во избежание путаницы, рекомендуем вводить в это поле модель вашего МФУ
В выпадающем списке «Модель» выберите модель Вашего устройства, чтобы утилита правильно подобрала параметры работы со сканнером
Если используете подключение через локальную сеть — в поле «Адрес сканера» укажите IP-адрес МФУ Kyocera. При подключении через интерфейс USB — указывать IP-адрес не нужно
После завершения настройки драйвера сканера, нажмите кнопку «ОК».
На этом настройка сканера Kyocera завершена. Для сканирования Вы можете использовать любую программу для сканирования с поддержкой TWAIN, например:
NAPS2
PaperScan
HippoScan
ScanLite
EasyScan
WinScan2PDF
TWAIN Drivers
TWAIN drivers are files and programs that are designed for the very specific purpose of regulating communication between scanners, digital cameras, and other imaging devices and software applications that use them. TWAIN drivers are often referred to as Application Program Interfaces or APIs.
TWAIN drivers were created to ensure compatibility between imaging software and imaging hardware. Before the creation of TWAIN Drivers in 1992, users were required to first acquire the image using a scanner or digital camera for example, then save the image as a file. Next, in order to work with the acquired image using the imaging software (such as software that can edit or alter images), the user would have to run the imaging software program and open the saved image file from that program.
Initially, detailed image editing required lots of memory and storage space and with the limited computer resources in the early 1990 this process was far more tedious than it sounds. Now, using TWAIN drivers, a user can open the imaging software program and acquire the image directly through the program using the hardware device, without the need for saving the file first.
The TWAIN Working Group is a non-profit imaging industry organization. According to the TWAIN Working Group, it does not furnish any scanners or drivers. They develop the specifications that help the imaging device developers create a TWAIN compatible driver.
Therefore, TWAIN drivers are normally provided by manufacturers of the imaging devices (scanners and digital cameras). Incidentally, TWAIN is not an acronym. It is short for “never the twain shall meet” in reference to the difficulty in connecting computers and scanners in the time period around 1990.
Generally, when accessing a TWAIN device using the TWAIN driver through an image editing program, the imaging device’s control program appears in another window to allow control over the image acquisition.
This allows for settings to be changed as needed for acquiring the image, such as color, resolution, and size. After the imaged is acquired, the device control program automatically closes and the image is automatically placed in the image editing program.
Common Problems with TWAIN Drivers
1) Failure to acquire the image through the user software program
2) Incorrect, corrupt, or missing TWAIN drivers
3) Incompatibility with the imaging device or the operating system
Troubleshooting TWAIN Driver Problems
If an imaging device is installed without a TWAIN driver, typically, the device will continue to work individually, but will not work from within a TWAIN compliant software program. Occasionally the device will not work all together, or the operating system may freeze or crash.
Regardless of the TWAIN related problem, the best remedy is to ensure the latest TWAIN driver is installed for the device.
Quick Fix:Click “Download” to scan and identify out-of-date drivers using Driver Whiz. A one-click download & update Windows driver updater.