- How to Network Two Windows 10 Computers
- How To Network Two Computers in Windows 10
- Sharing Files Using File Explorer
- Sharing Files with OneDrive
- 15 thoughts on “How To Network Two Computers in Windows 10”
- Leave a Reply Cancel reply
- Two users one computer windows
- Sharing Internet In Windows Operating Systems
- Share files from Windows to Windows
- Sharing Internet From Mac
- Sharing Files From One MAC system to Another MAC System
- Sharing Files From Mac to Windows
How to Network Two Windows 10 Computers
Posted on February 5, 2020 by Mel Hawthorne 13 Comments
Connecting two Windows 10 computers together in an ad hoc local network can be useful, it can allow you to share files or game together when you can’t trust, or don’t have a wireless network. To do so, the first step is to plug a Crossover Ethernet Cable from one device into the other. Alternatively, this can also be done with the use of a hub or router – the steps will be the same. Make sure both computers are connected to the same one, and keep in mind that the connection type will be different depending on which type of connection you are using.
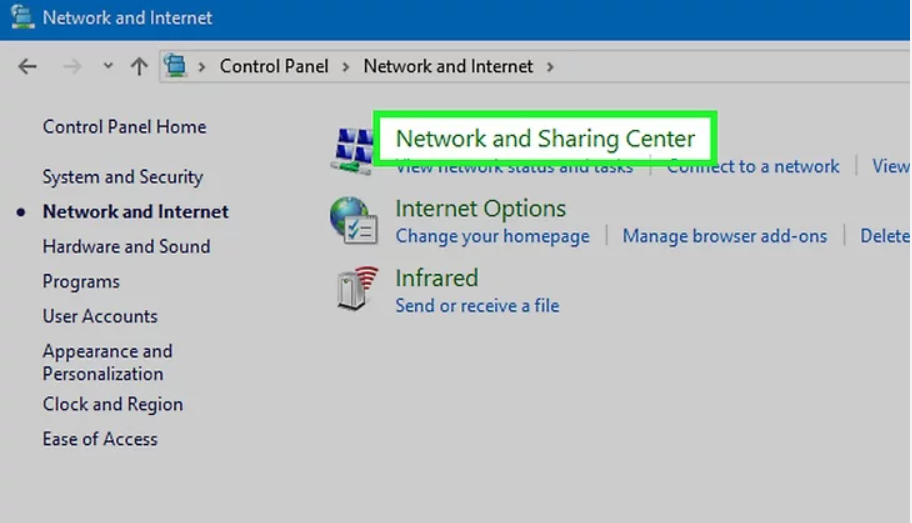
Once connected you need to configure the two Ethernet adapters to be able to communicate. Open Control panel and browse to Control Panel > Network and Internet > Network and Sharing Center and then click “Change adapter settings” on the left-hand side.
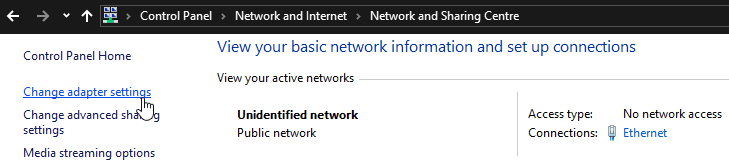 Change adapter settings.
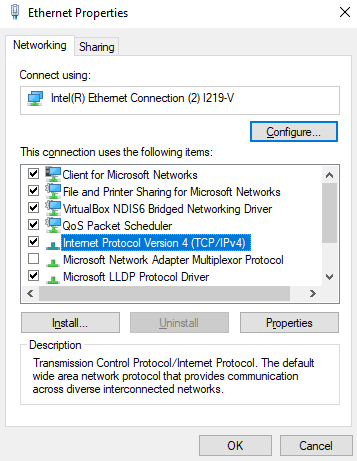
Right-click on your Ethernet device and select properties. In the adapter properties, double click on “Internet Protocol Version 4 (TCP/IPv4)”.
 Configure IPv4 settings.
Set the IP address to be 192.168.0.1 and the subnet mask to be 255.255.255.0 on the first device. On the second device, the IP address should be 192.168.0.2 and the subnet mask should be the same as the first host. Apply the changes by clicking ok until you’re back to the list of network adaptors.
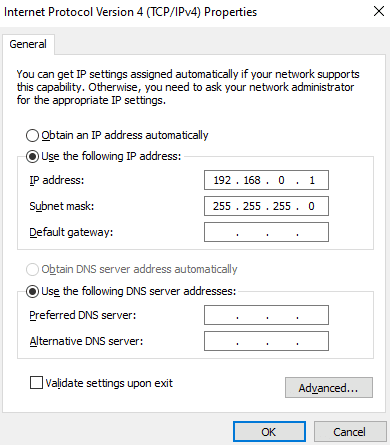 Configure and IP address and subnet mask.
Once both computers are connected and have IP addresses assigned. Go back to Network and Sharing Center and click on “Change advanced sharing settings” on the left-hand side. In the advanced sharing settings menu, ensure “Turn on network discovery” and “Turn on automatic setup of network-connected devices” are both enabled.
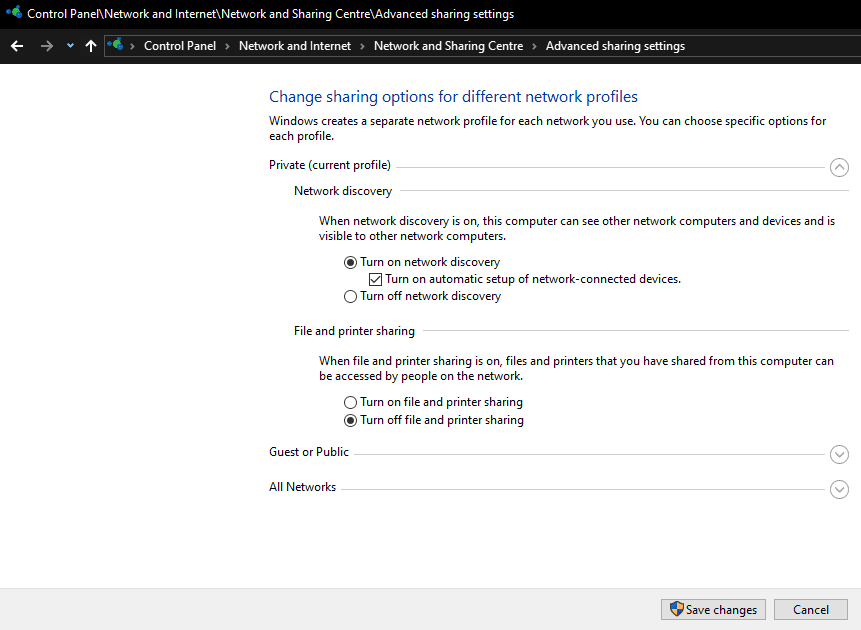 Ensure network discovery is enabled.
Enabling network discovery will allow the Windows 10 devices to identify each other and communicate via network protocols. If you want to connect to a game, web or FTP server this should now work.
Should you want to share files through Windows’ file-sharing features, you will need to enable “File and printer sharing” from the same menu that you enabled network discovery. You will also need to configure the files and folders to be shared.
How To Network Two Computers in Windows 10
Matthew Matthew is a freelancer who has produced a variety of software articles for sites such as Bright Hub. He has an A — Level in ICT, at grade C, and is proficient with a number of software packages. Check out his book at http://battlesofthepacificwar.blogspot.co.uk/. Battles of the Pacific War 1941 -1945 recalls where, when and how the Pacific War was won and lost within the battlefields of the Pacific. Read more November 27, 2018
Windows 10 users wanting to share files with other members of their household, or coworkers in a small office, often relied on HomeGroup, a technology that allowed you to share resources on a small local network. But the Windows 10 April 2018 update (version 1803) discontinued this service. You can still accomplish the same tasks, but as a replacement, you need to use the Windows 10 built-in sharing tools like OneDrive, Share, and Nearby Sharing. In this article, we’ll walk you through getting connected.

Sharing Files Using File Explorer
Sharing a file to someone in your house–or across the globe–is easy. Just open File Explorer (Windows key + E), and find the file you’d like to share. You can select multiple files if you wish. Then, click the Share tab, and you’ll see the Share button in the upper left corner of the window.

When you click this button, a dialog box will open, asking you to select the sharing method, which includes Email, Nearby sharing, or a Microsoft Store app.
Clicking on “Tap to turn on nearby sharing” will allow you to share with any nearby computer running the Windows 10 April 2018 update or later with compatible Bluetooth adapters.
Sharing Files with OneDrive
To share files stored with OneDrive, open the the File Explorer, navigate to your OneDrive folder, and right-click on the file you want to share. Then select Share a OneDrive link.

This will create a unique link to the file location in OneDrive which will be copied to your clipboard. You can then paste that link into an email message, or share it however you like. Only people with that link will have access to the file.
Below the Share a OneDrive link contextual menu item, you’ll find a choice for More OneDrive sharing options. This will allow you to set permissions for the shared file, including the ability to edit, setting an expiration date, setting a password, and sharing via social media.
For most people, these methods will be all you need to get those documents into other people’s hands.
15 thoughts on “How To Network Two Computers in Windows 10”
I will revert to Windows 8.1 (still supported and still functions quite well with a classic menu app), and see who sees what. Maybe the fix for the version 2004 upgrade will solve all the problems. Too bad there isn’t alternative networking software available for home use.
Sharing didn’t work. Setting access via the Credential Manager didn’t work I tried many posted solutions but they didn’t work (ever notice how many posted solutions don’t work because Microsoft keep moving/hiding operational functions. They are usually there somewhere, the trick is to find them).
Finally, I came up with this method. It requires taking away ALL local security, but it was the only way I could get it to work. Well done Microsoft … every time you release a new Win 10 version you break something (or deliberately block it) .
Follows these steps …
1. Make sure your network has Network Discovery and File and Printer Sharing turned on.
2. Make sure the drive(s) you want to access on the networked computer is “Shared”.
3. Select each drive (right click) and open “Properties”.
4. Go to the “Security” tab and click the “Edit” button.
5. Click the “Add…” button and add a new group “Everyone” (you have to type it).
6. Give “Everyone” Full Control and “Apply” (it will run through the files and may take a while).
7. Repeat the above for all drives you want to access (if you have partitions).
It’s crap that you have to take away ALL security to get access to a networked computer.
8. On each computer the Credential Manager will ask for the Username and Password of the networked computer you want to access.
9. Enter these and check the Remember box (it won’t ask again if you enter them correctly).
10. You should now have access to the networked computer and all shared drives and files.
Final Comment: I always though that how I configure, run and secure my computer was up to me. But, with each new version of Windows Microsoft seem hell bent on taking away more and more control (notice how they now hide the Control Panel). Based on past experience the cynical side of me thinks that if Microsoft see this post they will likely change security permissions to block you doing the above. I hope I’m wrong!
My wife’s computer is running Windows 10 while I still use Windows 7 on my computer. The ease with which I do things like networking in Windows 7 makes Windows 10 look like a sick pile of dog****
BTW, for those of you who are now saying “Oh noooo, Windows 7 – you’re unsafe!”, I say, “Try these new-fangled things called antivirus/antiransom software, and hardware firewalls.”
Leave a Reply Cancel reply
Disclaimer: Some pages on this site may include an affiliate link. This does not effect our editorial in any way.
Two users one computer windows
Two computers can be easily connected to share the files between them or to share the internet, printer between them. The process is usually simple and can be done with a few hardware devices and a bit of software knowledge. This article will tell you about various ways to connect two computers.
Sharing Internet In Windows Operating Systems
Follow these steps to connect two computers having a Windows Operating system to share the internet:
Step 1: Connect two Computers using an ethernet cable.
Step 2: Click on Start->Control Panel->Network and Internet->Network and Sharing Center.
Step 3: Click on option Change Adapter Setting in the upper-left side of the window.
Step 4: Select both the Wi-Fi connection and the Ethernet connection and Right-click the Wi-Fi connections.

Step 5: Click on Bridge Connections. After some time your computer’s Wi-Fi will be shared with the other computer.

Share files from Windows to Windows
Follow these steps to connect two computers having a Windows Operating system to share the files between them:
Step 1: Connect two Computers using an ethernet cable.
Step 2: Click on Start->Control Panel->Network and Internet->Network and Sharing Center.
Step 3: Click on option Change Advanced Sharing Settings in the upper-left side of the window.

Step 4: Turn on file sharing. Check the Turn on file and printer sharing.

Step 5: To Share a folder follow these steps-
- Go to the folder’s location.
- Select the folder you want to share.
- Click on the Share tab and then on specific people
- Select Everyone from the drop-down menu.
- Click Share
- Click Done

Step 6: Open the File Explorer on another computer.
Step 7: On the left side below the Network heading you will find your first computer name. Click on the name.

Step 8: Copy the shared folder onto your second computer.
Sharing Internet From Mac
Following steps to connect two MAC to share the internet.
Step 1: Connect two Computers using an ethernet cable.
Step 2: Click on Apple Menu->System Prefrences->Sharing->Internet Sharing box.

Step 3: Click the Share your connection from the drop-down box. It’s in the middle of the window. A drop-down menu will appear.

Step 4: Select the Wi-Fi option from the drop-down menu.
Step 5: Select the Ethernet box. Doing so shares your MAC’s Internet connection with the computer to which it is currently connected.

Sharing Files From One MAC system to Another MAC System
Follow these steps to connect two MAC to share files.
Step 1: Connect two Computers using an ethernet cable.
Step 2: Click on Go->Connect to Server->Browse.
Step 3: Double Click on the Second MAC’s name.
Step 4: A dialogue box will appear. Enter the second computer’s password to connect to the second computer.
Step 5: Click Connect. It’s in the lower-right side of the pop-up window.

Step 6: Open Finder.

Step 7: Move files onto the other MAC. Find a file that you want to move onto the second MAC, copy it by clicking it and pressing Command+C, click the other MAC’s name in the lower-left side of the Finder window, open your preferred folder, and press Command+V.
Sharing Files From Mac to Windows
Follow these steps to connect MAC to Windows to share files.
Step 1: Connect two Computers using an ethernet cable.
Step 2: Enable file sharing on windows computer. Click on Start->Control Panel->Network and Internet->Network and Sharing Center. Click Advanced Share Settings and Check the Turn on file and printer sharing box.
Step 3: Share a folder. Click on Start-> Select the folder to share->Click on Share tab->Click Specific people->Select Everyone->Click Share and then Done.

Step 4: Enable file sharing on the MAC computer. Click on Apple Menu->System Prefrences->Sharing->File Sharing box->Change the Everyone permissions from Read Only to Read and Write.

Step 5: Share a folder from your MAC. Click the icon below the list of shared folders, then double-click the folder that you want to share.
Step 6: Access MAC’s files from the Windows computer.Click on Start->File Explorer->MAC name on left below Network. Open shared folder->Select files->Press Ctrl+C->Go to the folder on your computer then press Ctrl+V.
Step 7: Access the Windows computer’s files from the MAC. Open Finder->Click your Windows computer’s name in the lower-left side of the window. Open shared folder->Select files then press Command+C->Go to the folder on your MAC then press Command+V.


