- How to Type Japanese
- Step 2 : How to Start Typing Japanese Mode
- How to Type Japanese
- Installing IME and Typing Japanese on Windows
- Setting up Japanese on Windows 8
- Reading Japanese on Windows
- Websites
- Excel
- Software
- Typing Japanese on Windows
- Alternative Japanese IMEs
- Using Windows in Japanese
- The Dummies Guide to Typing Japanese Letters on Your Windows 7 or 8 PC
- Kana Input Mode
- Romaji Input Mode
- Romaji-Kana Correspondence Chart
- How to Type in Japanese with the Microsoft IME on Windows
- Installing the Japanese Microsoft IME on Windows 7
- Typing in Japanese
- Did you get all that?
How to Type Japanese
Step 2 : How to Start Typing Japanese Mode
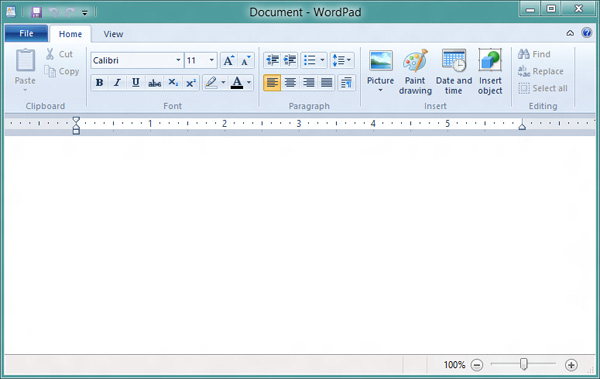
| 1. | Start your word processing software or Email software. |
| Here will take WordPad as an example. WordPad is available as a standard application in the «Windows accessories» | |
 |
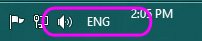
| 2. | Click «ENG» of the Language Bar Select «Japanese Microsoft IME». |
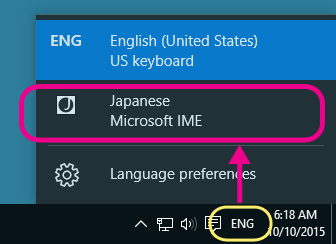 |
| 3. | Language mode «ENG» will be on Japanese mode [A]. |
 |
This mode is to type English alphabet under the Japanese typing mode.
| 4. | Click [A] |
| The mode will be on Japanese mode [гЃ‚] . | |
| This is Hiragana in put mode by using Romaji typing mothod. | |
 | |
| This is a standard input mode of Japanese language. You can, of course, type not only Hiragana , but also Katakana and Kanji . |
| You can switch between English mode and Japanese mode from the «ENG» or «J icon». |
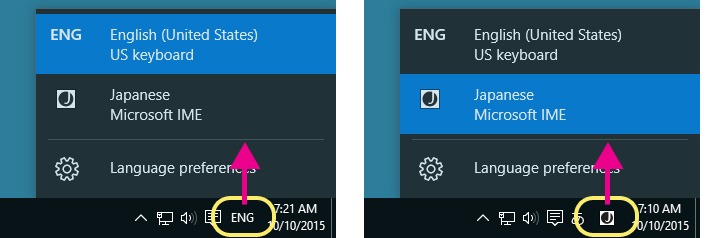 |
| You can also switch the mode by a shortcut, «ALT» + «SHIFT». | ||
 |  |  |
Now, you are ready to type in Japanese.
Let try to type a Japanese word, » Hajimemashite «.
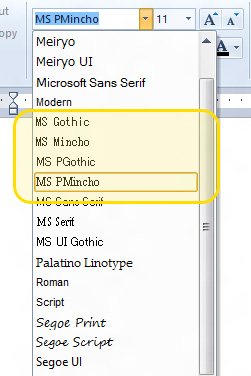
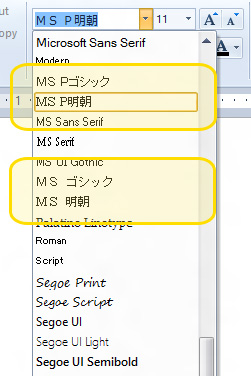
| 5. | Activate WordPad. Select Japanese font. | ||
| Two font faces (4 fonts) are provided as as standard fonts of Windows. Gothic is a Sans-serif font like Arial in English font. Mincho is a Serif font like Time New Roman. P in MS PMincho / MS PGothic means «Proportional font». | |||
| Here will take MS PMincho . | |||
 |  |  | |
If you have installed Microsoft Office 2007 (or later), the font names are in Japanese.
Or, if you set «Japanese» at «Language for non-Unicode Programs» of «Region» from the Control panel, the font names are also in Japanese.
| 6. | Type «hajimemashite (ha_ji_me_ma_shi_te)». |
 will appear on the screen in Hiragana . will appear on the screen in Hiragana . | |
| At this point it is underlined. | |
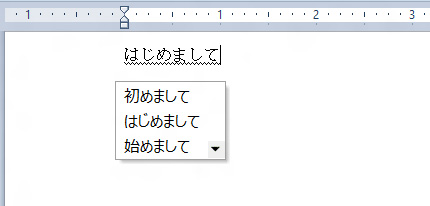 |
You can convert Romaji into Kana or Kanji by «Space» bar.
It is the convert key while the word typed is underlined.
MS-IME on Windows 10 provides «Auto-Conversion» and shows some options automatically.
If the word (phrase) you want to type is in the option, select it by «Up/Down» key.
Or, you can use «Space» bar to go down.
If MS-IME doesn’t give any option automatically, please press the «Space» bar.
You can convert Romaji into Kana or Kanji manually.
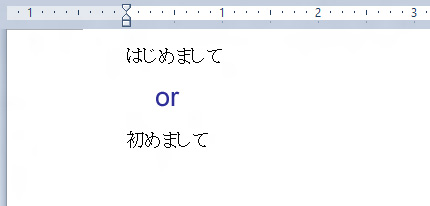
| 7. | Press Enter key |
| The underline disappears and Japanese characters are typed in the document. | |
 |
We provided some Lessons to practice typing Japanese in this section.
Please try it.
Go to the next step, How to Finish Japanese mode or Remove MS-IME .
How to Type Japanese
Installing IME and Typing Japanese on Windows
You need to install MS-IME to input Japanese characters on Windows.
MS-IME is a typing Japanese software provided by Microsoft.
It is already on your system as a standard accessory.
Japanese keyboard is NOT necessary.
You can type Japanese words in Hiragana, Katakana and Kanji using a keyboard of English or other languages.
If your keyboard has the English alphabet letters on the key top, you can type like Japanese people do.
Installing and Setting
First, please check if the IME is already installed on your Windows.
If you see «EN» (in case of Windows English version) on the taskbar
like on the right, It is the Language Bar. MS-IME is already installed.
You do not need to go through Step 1.
Step 1 — Installing MS-IME
Step 2 — How to Start Typing Japanese Mode
How do Japanese people type Japanese?
What is IME ?, What does IME do?

(Japanese keyboard is not necessary)
There are two typing methods, Romaji typing and Kana typing.
Currently, Romaji typing is more common than Kana typing among Japanese people.
Because . 
 |
| Windows 10 |
 |
| Windows 8 |
 |
| Windows 7 |
 |
| Windows VISTA |
 |
| Windows XP |
Step 3 — How to Finish Typing Japanese Mode or Remove MS-IME
Option — Setting «non-Unicode Programs»
If you cannot view Japanese characters properly
even after installing Japanese fonts, please try this option.

Go to the «Lesson 1» to practice typing Japanese
Setting up Japanese on Windows 8
Setting up Japanese on a Windows PC is easy as pie if you follow the simple steps below.
Android, Linux or Mac OS X user? Check out our full Japanese reading & typing guide
Reading Japanese on Windows
If you have Windows Vista, 7 or 8, your computer is pre-bundled with Japanese fonts and everything necessary to start reading Japanese websites and documents with no additional setup.
If you nevertheless come across content which does not display correctly, try following the tips below:
Websites
Most modern websites use the UTF-8 Unicode encoding, and the encoding of older sites should usually be guessed automatically by your browser.
If you still see squares, question marks or random character on the page, try changing the browser encoding to Shift_JIS, EUC-JP or ISO-2022-JP. One of these will usually solve the problem.
Google Chrome: Menu button > Tools > Encoding
IE: Right click page > Encoding > More
Excel
The encoding of some CSVs containing Japanese characters might be misrecognized by Excel. To fix the problem, go to the Data tab, click From Text under Get External Data, choose your file, and a window will appear which will allow you to choose an appropriate encoding (most of the time it will be automatically pre-selected so you’ll only have to click Next a couple of times).
Software
All newer Japanese software should work fine on Windows with no setup necessary, but older applications (think pre-2000) might not display correctly on non-Japanese Windows. One possible solution is to:
- Press the Win key
- Type ‘region’
- Select Region under Settings
- Open the Administrative tab
- Click Change system locale…
- Choose Japanese (Japan)
Note that you must have administrative rights to change this setting, and you can only have one locale selected at a time so older applications in other foreign languages might stop working properly.
Typing Japanese on Windows
To add a Japanese IME (Input Method) which will allow you to type in hiragana, katakana and kanji, simply follow the steps below.
- Press the Win key
- Type ‘input methods’
- Click Change input methods
- Click Add a language
- Choose Japanese
You can now safely remove the English language setting. The Japanese input mode already allows you to type in English (Direct Input mode) so having a separate input method is redundant.
To quickly switch between the two modes, press Alt +
(the tilde key left of the ‘1’ key). If you have a Japanese computer, use the 半角/全角 key instead.
Alternative Japanese IMEs
There are also several alternative Japanese IMEs available:
Google IME is simple to install and use, but does not offer any benefits over the default MS IME. The main difference is that kanji autocomplete options tend to be slightly more colloquial, as the suggestions are pulled from language used online instead of a pre-built dictionary. The effect is hardly noticeable however.
The input method used by most Japanese companies and preinstalled on many computers in Japan is ATOK IME. It is one of the most advanced IMEs on the market, with many useful features for professionals working with Japanese on a daily basis, though they come at a steep price of almost $100.
Using Windows in Japanese
A good way to practice Japanese is to use in Japanese, websites and software that you know well enough to navigate without reading every label. Facebook is a good place to start as you can use browser extensions such as rikaikun to quickly look up kanji on buttons when necessary, but as you get more proficient, you might want to switch the entire Windows interface as well.
- Press the Win key
- Type ‘language’
- Select Language under Settings
- Choose 日本語 and click Options
- Click Download and install language pack
- Return to the Language screen
- Click Advanced settings
- Choose Japanese under Override for Windows display language
- Restart Windows
Note that you must have administrative rights to change this setting.
The Dummies Guide to Typing Japanese Letters on Your Windows 7 or 8 PC
Learn how to type Japanese letters on your Windows PC without a Japanese keyboard!
Now that you have Japanese input installed on your PC (if not, please go back to the previous tutorial), let’s take a look at how to type Japanese letters.
There are two ways for you to type Japanese letters:
- Romaji input mode, and
- Kana input mode
Kana Input Mode
Kana input is immensely useful for those who have Japanese keyboards. These keyboards have both hiragana and Roman letters indicated.
You can input Japanese using the kana characters shown on the keyboard. As the keys range from the あ key to the ん key, the number of keys used for input is greater than for romaji input.
However, as “か” for example can be input by one press of the か key, the number of keystrokes needed is less than for romaji input.
Obviously, for this input mode to work, you’d have to memorize the new keyboard layout and learn to type using it.
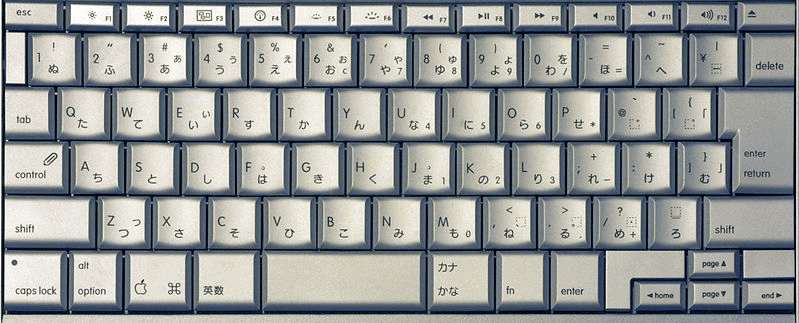
An Apple MacBook Pro Japanese Keyboard ( Source )
Romaji Input Mode
As an alternative to direct input of kana, some Japanese input method editors allow Japanese text to be entered using the romaji reading, which can then be converted to kana or kanji.
This method does not require the use of a Japanese keyboard with kana markings. So this is proably the most convenient way for people with Western keyboards to type Japanese letters.
We will focus on the Romaji input mode in this post. As romaji input uses the 26 keys A to Z , the number of keys needed is fewer than for kana input.
However, the number of keystrokes per character is greater for romaji input as inputting “か”, for example, requires you to press both the K key and A key.
Romaji-Kana Correspondence Chart
In order to input and edit Japanese letters using the romaji input mode, you will need to master the Microsoft IME Romaji-Kana correspondence chart below. Does it look scary and overwhelming?
Don’t worry! Based on the 80-20 Pareto principle, you only need to memorize the most commonly-used Japanese letters to get by. You can see them circled in pink below.
You can bookmark this page and look up the less commonly-used Japanese letters when needed.
You will observe that some Japanese letters have multiple spellings. All of them work, just pick the spelling that works best for you.
How to Type in Japanese with the Microsoft IME on Windows
 Typing has become such a critical part of our lives. Can you even imagine how much typing you do on a daily basis? Between Facebook, Twitter and email, your little fingers are probably quite busy typing away on the average day.
So it only makes sense that if you are practicing a language, you should be able to type in that language as well, right? These days you have it pretty easy. Before the dawn of Windows, people who wanted to type in Japanese had to type with a kana keyboard. As a matter of fact Japanese keyboards still have kana printed on them, but only older people use them anymore.
Nowadays, you have this handy thing called the IME that does some crazy voodoo magic to allow you to type pretty easily in Japanese. This is actually a little freebie that has been thrown into Windows. It is quite simple to set up and use actually.
Installing the Japanese Microsoft IME on Windows 7
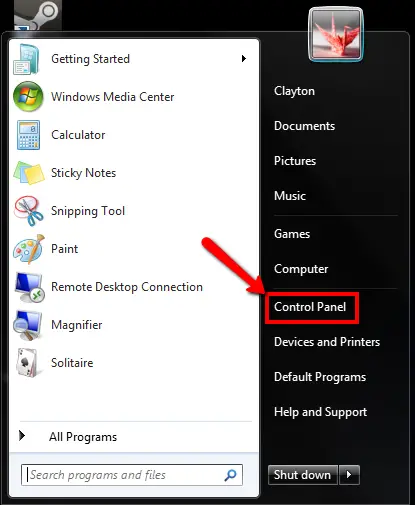
Click on the start button (that glossy windows thing in the lower left corner of your screen) and open up the control panel.
Under Clock, Language, and Region, click on Change keyboards or other input methods
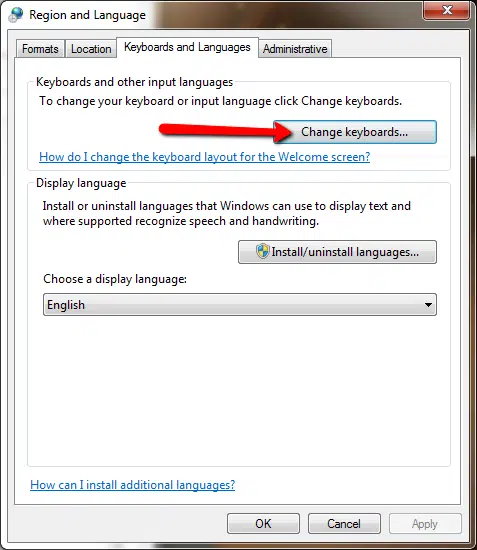
 You should then see something like the Region and Language menu below. Click on Change keyboards…
Then, you should see something like the following Text Services and Input Languages menu. The big difference will be that yours will probably not have the Japanese keyboard already installed. My PC has it installed already because I have a physical Japanese keyboard (that actually has built in shortcut keys for the Microsoft IME) and so when I installed Windows on this machine it just automatically installed the Japanese keyboard along with the Microsoft IME as the default keyboard. Yes, even if you have a physical Japanese keyboard you will still want to setup the Microsoft IME. In case you were wondering it is a Microsoft Natural Ergonomic Keyboard 4000, and I highly recommend it if you are going to be doing a lot of typing.


I personally use all of these on a daily basis and highly recommend them.
Anyway, for this menu click the Add… button.
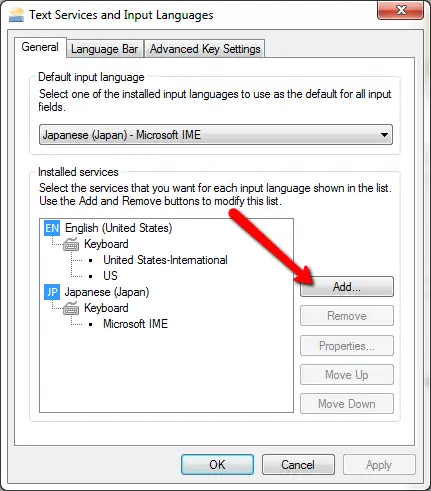
By the way, this is also where you can set the default input language. If you become really comfortable using the Japanese Microsoft IME keyboard, you can set it here as your default so that you don’t have to keep switching to it after you boot up your PC. You can use the IME to type in both Japanese or English as we will see in a bit, so this is a good option to remember.
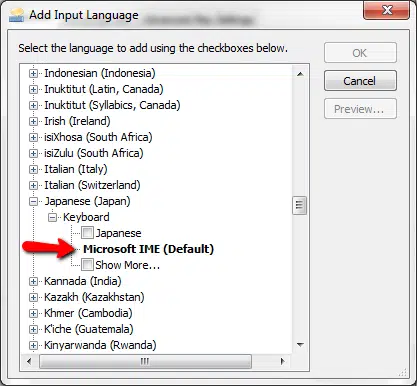
After you press the Add… button, you should see this Add Input Language menu. Scroll down and find the Japanese (Japan) options, open it up by clicking the + sign and select Microsoft IME. The Japanese keyboard only allows you to type in a kana, which as I said before is what older people in Japan use. So, to avoid confusion, don’t install it. It’ll just clutter up your language bar.
After you’ve done that click OK. This will take you back to the Text Services and Input Languages menu, where you can confirm that you’ve installed the Japanese (Japan) – Microsoft IME keyboard. After doing that, go ahead and click the OK button. Then click the OK button on the Region and Language menu. And Windows might prompt you for your installation disc, or simply just ask you to log out and back in again depending on your setup.
And then, finally, after all that mambo jumbo, you should have a shiny new language bar:
 You should see this down in the lower right of your screen hanging out with all your tray icons.
You can also un-dock it as well by right-clicking the JP or EN icon and selecting Restore the Language bar.
 Then you’ll have this lovely toolbar to play around with:
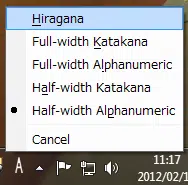
 The main advantage of this is that you can switch conversion modes (you can set the IME to bias for names or speech) easily or use the IME Pad (to draw kanji that you don’t know the pronunciation of) Clicking the kana button will enable you to use those awesome kana keys.
Now, let’s have a little fun typing in Japanese
Typing in Japanese
Basically, there are 3 systems of romanization for Japanese: nihon-shiki, kunrei-shiki, and the hepburn system.
In brief, nihon-shiki is a direct transliteration of the Japanese writing system, it converts ち for example into ti because it comes from the t- line of kana – た ta, て te, ち ti, と to, つ tu (actually pronounced tsu as in tsunami). However, we don’t pronounce ち as the English ti, we pronounce it chi, so that is why the kunrei-shiki system was developed. However, the hepburn system is more widely used for official things. This is generalizing a bit, but the big difference between hepburn and kunrei is that it uses more punctuation to indicate stops, long vowels and such. It is a little trickier to type in so I would recommend sticking with kunrei. Although, you can use the nihon-shiki system to type with the IME if that is what you are comfortable with.
 So, let’s give it a try. You can open up Wordpad (or your favorite word processing app and give it a try). To access Wordpad, you can simply type Wordpad in the search window of the start menu. Now, when your IME switched to Half-width alphanumeric, which it is by default, it’ll look like this:
When it is in this mode, you can type in English like a regular keyboard. Some of the punctuation buttons will be in different places. Most noticeably the single quote -> ‘, will be above the 7 key and not off to the right like it is on the English keyboard.
If you switch to hiragana mode, by clicking on the ‘A’ and selecting hiragana, you can type in Japanese.
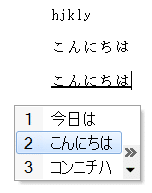
 You’ll see romaji on the screen until you make a kana. For example, if you type hjkly, it’ll show up as romaji. You must type a valid kana and then it will automatically switch to the kana. So if you type the letters konnichiha, you’ll get こんにちは. Now if you hit enter, it will simply leave the kana as is. If you want to use the kanji, you have to hit the space bar. This will give you the IME’s best guess as to what kanji you want to use. If you hit the space bar again, you will see a pop up menu where you can select the kanji that you want to use.
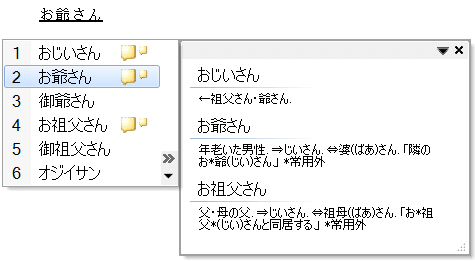
Note, this is also the way you can get katakana without having to select it in the IME. Some kana have several kanji available for them. If the kanji or often confused (they have similar meanings, same pronunciation, but different kanji) then there are notes available to help you differentiate. Unfortunately these notes are in Japanese:
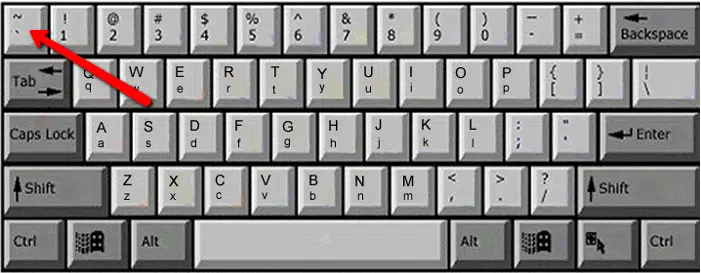
Two shortcuts that will definitely come in handy are the keyboard to switch between languages (SHIFT+ALT) and the shortcut to switch between alphanumeric and hiragana (ALT+`). The ` key is the one usually under the tilde
not the single quote. It should be here on your keyboard:
 These shortcuts allow you to rapidly switch between typing in English and in Japanese, which is handy if you are say practicing vocabulary on memrise or filling out a form for a Japanese website.
I should also note that the Microsoft IME will remember what you are using in what window. So, for example, if you are typing in Japanese in Wordpad, you should be able to switch to Firefox and type in English without changing it in the IME.
If you are more of a visual person, you can check out the full video walk through on YouTube:
Did you get all that?
Did I miss something? Did you have problems setting up the IME? Let me know in the comments below and I’ll try to clarify.


