- Как установить последние версии ядра Linux в Ubuntu и Linux Mint
- Предупреждение перед обновлением ядра
- mainline — репозиторий ядер Ubuntu
- mainline (продолжение бесплатной версии ukuu) — программа с графическим и консольным интерфейсом для обновления ядра
- Утилита ubuntu-mainline-kernel.sh
- Как восстановить Linux после установки ядра
- Ubuntu kernels from Canonical
- Identifying a kernel
- Kernel and OS releases
- Kernel security
- General Availability (GA) and variant Ubuntu kernels
- Custom kernels
- How to Install the Latest Mainline Linux Kernel Version in Ubuntu [GUI and Terminal Methods]
- Using the latest Linux kernel version in Ubuntu: Things you should know
- Why install a new Linux kernel version manually?
- HWE kernel option is also available
- Older kernels remain available
- Two ways of installing new kernel in Ubuntu: Command line and GUI
- Method 1: Manually install new Linux kernel in Ubuntu using command line
- Step 1: Check current installed version
- Step 2: Download the mainline Linux kernel of your choice
- Step 4: Install the downloaded kernel
- Step 5: Reboot Ubuntu and enjoy the new Linux kernel.
- Rollback the changes and downgrade Linux kernel
- Method 2: Upgrade Linux Kernel in Ubuntu Ukuu GUI tool
- Step 1: Install Ukuu in Ubuntu
- Step 2: Install kernel with Ukuu
- Rollback the changes/Downgrade Linux Kernel with Ukuu
Как установить последние версии ядра Linux в Ubuntu и Linux Mint
Последние версии ядра Linux имеют драйверы для новых устройств и другие нововведения. К сожалению, многие популярные дистрибутивы Linux не спешат обновить ядро. Данная инструкция покажет, как легко, без компиляции, установить любую версию ядра Linux в Ubuntu и Linux Mint. Вы можете выбрать для установки как более новое ядро, так и более старое, чем предлагает репозиторий вашего дистрибутива.
При желании, вы без проблем можете удалить установленные ядра Linux и вернуться к ядру из репозитория.
Поскольку Linux Mint основана на Ubuntu, то данная инструкция в полной мере применима и к дистрибутивам Linux Mint, кроме LMDE. Для LMDE (Linux Mint Debian Edition) смотрите статью «Как установить последние версии ядра Linux в Debian и основанные на Debian дистрибутивы».
Предупреждение перед обновлением ядра
Необходимо помнить, что из-за несовместимости ядра с программами (в первую очередь, с проприетарными видео драйверами), вы можете столкнуться с проблемами, в том числе с чёрным экраном во время загрузки.
В большинстве случаев, возникшие проблемы можно решить без переустановки дистрибутива. Начните с того, что в меню загрузки перейдите в дополнительные параметры и загрузитесь с предыдущей версией ядра. Выполнив загрузку, удалите проблемное ядро.
Проблемы могут вызвать проприетарные драйверы для видеокарт, поскольку старые версии могут быть не совместимы с последними версиями ядра без патча. Если у вас установлены проприетарные видео драйверы, то серьёзной подумайте, прежде чем следовать инструкциям ниже. Также подготовьтесь, поищите инструкции, как решить проблему при загрузки дистрибутива в чёрный экран.
Следует быть особенно осторожным владельцам старых дистрибутивов — настоятельно рекомендуется обновлять ядро только на последних версиях ОС.
Ещё одна вполне вероятная проблема, с которой вы можете столкнуться если установите ядро самой последней версии — проблема с неразрешёнными зависимостями и как следствие невозможность использования менеджера пакетов apt для обновления и установки программ. Если вы столкнулись с ситуацией, когда после успешной установки нового ядра не получается обновить пакеты с помощью apt, то попробуйте устанавливать более ранние версии ядра, которые вам подходят, а версии, вызывающие проблемы с зависимостями, удаляйте. Помните, что невозможно удалить ядро с которым вы загрузились — перед удалением загрузите компьютер с любой другой версией ядра.
mainline — репозиторий ядер Ubuntu
Для Ubuntu имеется репозиторий скомпилированных ядер mainline всех версий, в том числе самых последних, поэтому установка не вызывает особых сложностей — компилировать ядро Linux не нужно. Более того, имеются инструменты, в том числе с графическим интерфейсом для установки любых ядер.
На самом деле, если ядра уже скомпилированы, то достаточно скачать из одной папки с сервера файлы следующего вида:
- linux-headers-*-generic_*_amd64.deb
- linux-headers-*_all.deb
- linux-image-unsigned-*-generic_*_amd64.deb
- linux-modules-*-generic_*_amd64.deb
И установить их командой:
Но процесс можно упростить ещё больше, используя утилиты для работы с ядрами.
mainline (продолжение бесплатной версии ukuu) — программа с графическим и консольным интерфейсом для обновления ядра
Если вы предпочитаете графический интерфейс, то используйте Mainline.
Чтобы установить программу выполните следующие команды:
Для запуска графического интерфейса выполните:
Для запуска консольной версии выполните:
Использование графической версии не должно вызвать затруднений. При запуске будет получена информация о доступных ядрах, вы можете выбрать любое ядро и установить его, просто нажав на кнопку «Установка». Дополнительно доступны такие действия как удаление ядер и просмотр списков изменений для каждой версии ядра.

Использование консольной версии следующее:
Справка по опциям и командам:
(1) Строка версии должна браться из вывода —list
(2) Одна или более строк версий (разделённые запятыми) берутся из вывода —list
Перезагрузите компьютер, чтобы использовать новое ядро.
По умолчанию ваша система будет загружена с последним ядром, если вы хотите это изменить, то перейдите в дополнительные параметры загрузки
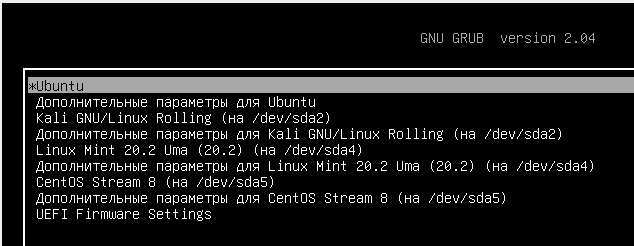
и выберите желаемую версию из установленных ядер.

Утилита ubuntu-mainline-kernel.sh
Последнюю версию ядра на Ubuntu и Linux Mint также можно установить с помощью утилиты командной строки ubuntu-mainline-kernel.sh.
Загружаем и устанавливаем скрипт ubuntu-mainline-kernel.sh:
Справка по ubuntu-mainline-kernel.sh
Пример установки последней версии ядра
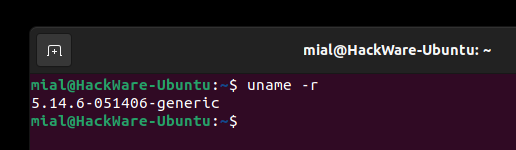
Проверяем текущую версию ядра:

Ядро имеет версию 5.11.
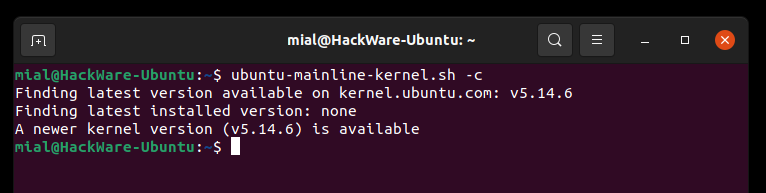
Проверяем, какая версия ядра является последней:
Чтобы вывести список доступных для установки версий ядер выполните команду:
Например, мы хотим установить ядро версии v5.12.11, тогда команда следующая (префикс «v» указывать не надо):
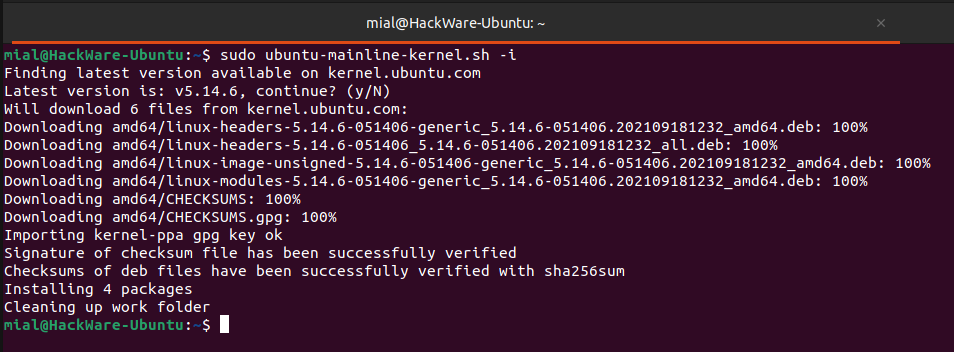
Если вы хотите установить последнюю на данный момент версию, то запустите следующую команду:

Вам будет задан вопрос, хотите ли вы продолжить, введите «y»:
Программа завершила работу — чтобы изменения вступили в силу, требуется перезагрузка.
Опять проверяем версию ядра:
Как восстановить Linux после установки ядра
Если ваш компьютер загружается с чёрным экраном, зависает или что-то не работает после обновления ядра, перезагрузитесь и выберите Дополнительные параметры для вашего дистрибутива в меню GRUB:
Затем выберите предыдущую версию ядра и нажмите Enter:
Независимо от причины, вам необходимо загрузиться с предыдущей версией ядра, если вы хотите удалить последнее ядро. Это потому, что вы не можете удалить ядро, которое в настоящее время используется.
Если вы не видите меню GRUB2, нажмите и удерживайте клавишу Shift или несколько раз нажмите клавишу Esc (это может варьироваться в зависимости от загрузки BIOS или UEFI и от используемой вами версии Ubuntu/Linux Mint) при загрузке GRUB. Должно появиться меню Grub, позволяющее выбрать предыдущую версию ядра.
После загрузки предыдущего ядра вы можете удалить неисправное ядро. ubuntu-mainline-kernel.sh позволяет удалять ядра, установленные из PPA ядра Ubuntu.
С помощью ubuntu-mainline-kernel.sh вы можете удалить версию ядра, запустив:
Где ВЕРСИЯ — это версия ядра, например 5.14. Вы также можете эту утилиту с -u без указания версии, и в этом случае инструмент выведет список до 10 версий ядра и спросит вас, какую из них вы хотите удалить. Стоит отметить, что ubuntu-mainline-kernel.sh не будет показывать в этом списке официальные ядра Ubuntu.
Обновите настроки GRUB если это не было сделано автоматически:
Источник
Ubuntu kernels from Canonical
At the core of the Ubuntu operating system is the Linux kernel, which manages and controls the hardware resources like I/O (networking, storage, graphics and various user interface devices, etc.), memory and CPU for your device or computer. It is one of the first software programs a booting device loads and runs on the central processing unit (CPU). The Linux kernel manages the system’s hardware environment so other programs like the operating system’s user space programs and application software programs can run well without modification on a variety of different platforms and without needing to know very much about that underlying system.

Identifying a kernel
The easiest way to determine the kernel you’re running is to type cat /proc/version_signature on the terminal. For example:
Ubuntu 5.4.0-12.15-generic 5.4.8
This output provides important information about the kernel:
- Canonical adds » Ubuntu «
- Ubuntu kernel-release = 5.4.0-12.15-generic
- kernel version is 5.4 , which is identical to upstream stable kernel version
- .0 is an obsolete parameter left over from older upstream kernel version naming practices
- -12 application binary interface (ABI) bump for this kernel
- .15 upload number for this kernel
- -generic is kernel flavour parameter, where -generic is the default Ubuntu kernel flavour
- Mainline kernel-version = 5.4.8
Kernel and OS releases
Canonical provides long-term support (LTS) kernels for Ubuntu LTS releases. Canonical also provides interim operating system releases with updated kernels every 6 months.
For customers and business partners that don’t have specialised bleeding-edge workloads or latest hardware needs, the latest LTS release «-generic» kernel is the best option for them such as the 4.15 default kernel in Ubuntu 18.04 LTS. Customers who need the latest hardware support capability can install the latest HWE kernel such as the ones contained in interim releases, keeping in mind the shorter support lifespan associated with these kernels (9 months). HWE kernel customers are recommended to upgrade to a newer LTS release that supports their hardware and/or software needs as soon as it is available. Another option for customers is to use point releases. For example, there is an 18.04.4 point release as of February 2020, which includes an updated 5.3.x kernel but is also considered LTS, exactly like the original GA 4.15 kernel in 18.04.
Kernel security
The Canonical Kernel Team’s primary focus is the careful maintenance of kernels and their variants for regular delivery via the Ubuntu SRU process and the Canonical livepatch service. This includes rigorous management of all Linux kernel Common Vulnerabilities and Exposures (CVE) lists (with a focus on patching all high and critical CVEs) review and application of all relevant patches for all critical and serious kernel defects in the mailing lists and then rigorously testing newly updated kernels end-to-end each SRU cycle.
General Availability (GA) and variant Ubuntu kernels
The complete functionality of any given kernel is determined by the included modules and the kernel configuration for both hardware and the expected workloads that are run on it.
Kernel modules are binary programs that extend a kernel’s ability to control the computing system’s hardware or add additional system capabilities like high-performance networking or non-standard graphics, etc. The GA kernel that is shipped by default, with the Canonical Ubuntu Long Term Support (LTS) and Hardware Enablement (HWE) releases, are tuned for stable, reliable, secure, high-performance operation over a wide variety of hardware platforms and workloads.
A kernel variant is a kernel that deviates from the generic GA kernel by changes to its configuration, and/or by having modules added and/or removed.
Custom kernels
Canonical advocates for customers to use the GA kernel shipped with Ubuntu as the best and most cost-effective option in their business environment. We also offer the option for customers to customize their own Ubuntu kernels. Several of our enterprise, Telco and cloud provider customers have systems and workload needs, which justify both the time investment to optimise their kernels and the pay to develop and maintain those custom kernels over time.
© 2021 Canonical Ltd. Ubuntu and Canonical are registered trademarks of Canonical Ltd.
Источник
How to Install the Latest Mainline Linux Kernel Version in Ubuntu [GUI and Terminal Methods]
Last updated October 29, 2020 By Abhishek Prakash 54 Comments
This article shows you how to upgrade to the latest Linux kernel in Ubuntu. There are two methods discussed. One is manually installing new kernel and the other uses a GUI tool providing even easier way.
I am assuming that you already know what is Linux kernel. This is the core software that drives any Linux distribution. This is what Linus Torvalds created around 30 years ago and this is what he still works on.
A newer version of Linux kernel is released every few months with new features (such as support for more hardware), bug fixes etc.
But most Linux distribution does not provide the latest Linux kernel unless you are using an Arch-based distribution or some other rolling release distribution.
Linux distributions are responsible for your system’s stability and this is why they don’t release a newer version of Linux Kernel to its users unless they test it for regression on their end. They often use a specific kernel release as base and provide you updates on this base kernel, instead of giving you the latest mainline kernel.
This does not mean that you cannot use the latest Linux kernel in Ubuntu or other distribution you are using.
In this tutorial, I’ll discuss various ways to get a new Linux kernel on Ubuntu.
Using the latest Linux kernel version in Ubuntu: Things you should know
In my opinion, there is no ‘real’ need of upgrading to a newer Linux kernel unless it provides you a good enough reason.
Why install a new Linux kernel version manually?
What could be such a reason? Well, suppose the new Linux kernel introduces support for your sound card or Wi-Fi card or some other hardware component. You read some official forum that the problem you are having with the hardware component could be fixed with a newer Linux kernel version.
HWE kernel option is also available
You should also keep in mind that Ubuntu has this hardware stack enablement (HWE) feature that lets you use somewhat newer Linux kernel on an Ubuntu LTS release.
Older kernels remain available
Another thing to note here is that installing a new kernel doesn’t mean that the older kernel has been removed from the system. It remains at your disposal. By default, Ubuntu boots into the newest Linux Kernel installed on the system.
Two ways of installing new kernel in Ubuntu: Command line and GUI
There are two ways to install newer Linux kernel:
The GUI tool Ukuu is not open source anymore and it locks a few feature which I have discussed in its section.
Let’s see the methods.
Method 1: Manually install new Linux kernel in Ubuntu using command line
The latest Linux kernel is called mainline Linux kernel. You’ll see this term used often.
I must warn you that you should be aware of the risk. If something goes wrong, you may revert to a previous Kernel version but you must not panic. Make a backup of Ubuntu system to be sure. If you are easily baffled with troubleshooting, avoid playing with manual upgrades and stick to your distribution’s system updates.
Step 1: Check current installed version
You may want to first check current installed version of kernel. You can do this by using the uname command in the terminal:
As you can see in output below, I have kernel version 5.4 installed.
Step 2: Download the mainline Linux kernel of your choice
Now you have to download the desired kernel build provided Ubuntu from here.
You can see kernel list like this. I am going to download kernel 5.7. You also should keep in mind to install the stable kernel instead of rc (release candidate).
Now download appropriate kernel files for your architecture. For 64 bit architecture, you should download these kind of files
- linux-headers-VERSION-NUMBER_all.deb
- linux-headers-VERSION-NUMBER_amd64.deb
- linux-image-VERSION-NUMBER_amd64.deb
- linux-modules-VERSION-NUMBER_amd64.deb
Hence I will download these files:
Step 4: Install the downloaded kernel
Now it’s time to install downloaded kernel. First do into the directory where you’ve downloaded kernel and enter following command. Make sure there isn’t any other “.deb” file in that directory other than downloaded kernel files.
sudo dpkg -i *.deb
It will take some time. After installation finished, you will see screen like this.
Step 5: Reboot Ubuntu and enjoy the new Linux kernel.
Now you’ve installed new kernel in Ubuntu successfully, it’s time to reboot the machine. Ubuntu by default boots into the newer kernel version.
After rebooting, check kernel version with same uname -sr command you used earlier. As you can see, it’s updated to 5.7.0.
Rollback the changes and downgrade Linux kernel
If you didn’t like new Linux Kernel or if you discovered issues with it. You can easily downgrade the Kernel. You just have to:
- Boot into an older kernel
- Remove the newer Linux kernel you don’t want
Let’s see how to do that.
When you are booting into your system, on the grub menu, select the Advanced options for Ubuntu.
If you do not see the grub menu, try holding the shift key or use Esc key to bring the grub menu.

In here, you’ll see all the Linux kernels installed on your system. Select an older one. Don’t choose the recovery mode, just go with the normal ones.
Now that you have booted into your good old kernel, we have to remove new kernel.
You can use the apt or dpkg command to remove the installed kernel version. Do you remember the version of new kernel you installed manually? For me it was kernel 5.7. So here’s what I use to delete it.
Change the commands with the version you want to install:
You can see, I have two packages associating with kernel 5.7.0. If I remove the first package it will automatically remove all it’s related dependencies.
Install New Linux Kernel 10
Method 2: Upgrade Linux Kernel in Ubuntu Ukuu GUI tool
You can upgrade Linux kernel on your own in Linux command line. But the kernel upgrade procedure is much easier and more convenient with a GUI tool called Ukuu (Ubuntu Kernel Update Utility).
This GUI tool is developed by Tony George who has provided us with several other useful tools for Ubuntu such as battery monitor for Ubuntu, app backup tool Aptik etc.
You should know that Ukuu of version above 18.9 is now paid and closed source. Version 18.9 is still free and open source.
Paid version contains additional features like:
- Downloading and installing newer kernel versions automatically
- Deleting downloaded packages after install
- Option to stay on same series of a kernel release
- Automatically removing older kernels.
- UI improvements.
If you want the additional features, you can purchase it from developer’s official website. Ukuu free version can still be used for installing and removing kernels, though.
Step 1: Install Ukuu in Ubuntu
You can download the deb files for the old Ukuu version 18.9 which is free to use but not updated lately.
Step 2: Install kernel with Ukuu
Once you have installed Ukuu, start it. It will refresh the list of available Linux kernels available for Ubuntu.
By default, it will show you all the available kernels, including the unstable release kernel (tagged with RC and with red Tux icon).
Kernel versions from the distributions are labeled with the logo and the other versions have just the good old Tux logo.
As you can see I have kernel 5.7.0 installed already, now I will install kernel 5.7.1 using Ukuu.
Again, you should avoid the release candidates. Select the desired Kernel version and click on install to install the newer Linux kernel version.
Of course, it will require admin password for this action. Once you have entered your password, you can see the installation progress in the application itself. Focus on the end result to know if it new Linux kernel was installed successfully or not.
Note: If the installation fails, no need to panic. Nothing will be wrong the system. Just try a different Kernel version and it might work.
You should see something like this when installation finished successfully.
Once installation finishes, you’ll see a very helpful screen that tells you if anything goes wrong with the new Linux kernel, you can always choose to boot into the older kernel from the grub menu.
When you boot into the system next, you’ll be running the Linux kernel you had just installed.
Rollback the changes/Downgrade Linux Kernel with Ukuu
Rollbacking done in two steps:
- Boot into an older kernel
- Remove the newer Linux kernel you don’t want
Let’s see how to do that.
When you are booting into your system, on the grub menu, select the Advanced options for Ubuntu.
Select your old kernel to boot into it.
Once you boot into the system with the older Linux kernel, start Ukuu again. Make sure that you are not deleting the kernel that you are running at present.
Select the newer kernel version which you don’t want anymore and click on Remove.
That’s all you need to do here to downgrade the Linux kernel in Ubuntu.
While we are discussing it, I would like to point out a few more features of Ukuu. Ukuu has settings option that allows you to not display release candidates of kernels in the list. You can also hide Linux kernel versions older than version 4.0.
You can also choose the option to display desktop notifications in case new Linux Kernel are available.
You can also remove Ukuu using apt remove ukuu command.
How do you upgrade Linux kernel?
I hope this tutorial was helpful to show you how to install mainline Linux kernel in Ubuntu.
So, do you often upgrade Linux kernel on your own or do you wait for your distribution to provide the upgrade? How do you do it?
Like what you read? Please share it with others.
Источник


