- How to install Microsoft TrueType Fonts on Ubuntu-based Distributions
- Why Microsoft fonts are not installed by default in Linux?
- Installing Microsoft fonts on Ubuntu-based Linux distributions
- Dimitrios Savvopoulos
- Использование шрифтов Windows в Ubuntu
- Содержание
- Установка шрифтов
- Копирование шрифтов
- Установка из репозитория
- Настройка шрифтов
- Ссылки
- Установка шрифтов Microsoft Windows в Ubuntu 18.04 LTS
- Установить MS Fonts в Ubuntu 18.04 LTS desktop
- Установите MS Fonts в режиме двойной загрузки Linux и Windows
- Протестировать шрифт Windows
- Install Microsoft Windows Fonts In Ubuntu 18.04 LTS
- Install MS Fonts in Ubuntu 18.04 LTS desktop
- Install MS Fonts in Dual boot with Linux and Windows
- Test Windows font
- Ставим шрифты Windows в Linux
- С помощью менеджера пакетов
- TrueType
- ClearType
- Установка Windows шрифтов в Fedora и другие дистрибутивы на RPM
How to install Microsoft TrueType Fonts on Ubuntu-based Distributions
Last updated October 29, 2020 By Community 39 Comments
If you open some Microsoft documents in LibreOffice on Linux, you’ll notice that the fonts look a bit different. You’ll also notice that you cannot find common fonts like Times New Roman, Arial etc.
Don’t worry. I’ll show you how to install these fonts in Ubuntu and other Ubuntu-based Linux distributions. But before that, let me tell you why these fonts are not available by default.
Why Microsoft fonts are not installed by default in Linux?

Times New Roman, Arial and other such fonts are owned by Microsoft and they are not open source. Many Linux distributions don’t provide proprietary software by default to avoid licensing issue.
This is why Ubuntu and other Linux distributions use an open source fonts “Liberation fonts” to substitute Microsoft fonts by default. The Liberation Fonts were created by Red Hat to substitute Arial, Arial Narrow, Times New Roman and Courier New as their width is the same. When you open a document written in Times New Roman, the equivalent Liberation Font will be used to keep the document uninterrupted.
However Liberation fonts are not identical to Microsoft’s fonts and in some cases you may need to use Arial or Times New Roman. A very common scenario is that Microsoft’s fonts are the only option is in schools, universities and other public and private organizations. They require you to submit the documents in one of those fonts.
Good thing is that you can install the Microsoft fonts on Ubuntu and other distributions easily. This way, you will be able to increase compatibility of LibreOffice and have the freedom to choose an open source office software.
Installing Microsoft fonts on Ubuntu-based Linux distributions
You can install new fonts in Ubuntu by downloading them on your own. But since Microsoft fonts are very popular (and is provided free of cost), Ubuntu provides an easy way of installing it.
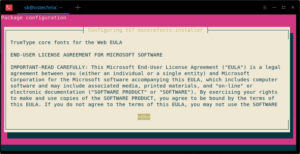
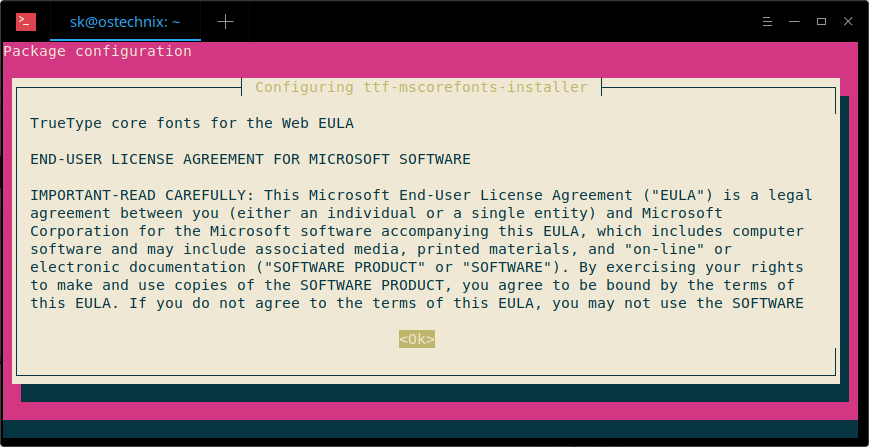
Be aware that despite Microsoft has released its core fonts for free of charge, the usage of the fonts is restricted in other operating systems. You’ll have to read and accept EULA (End User License Agreement) before installing Microsoft fonts in Ubuntu.
After that, you can update your Ubuntu repository cache and install the Microsoft fonts like this:
Press tab to select OK and the press enter when the Microsoft’s End user agreement appears.
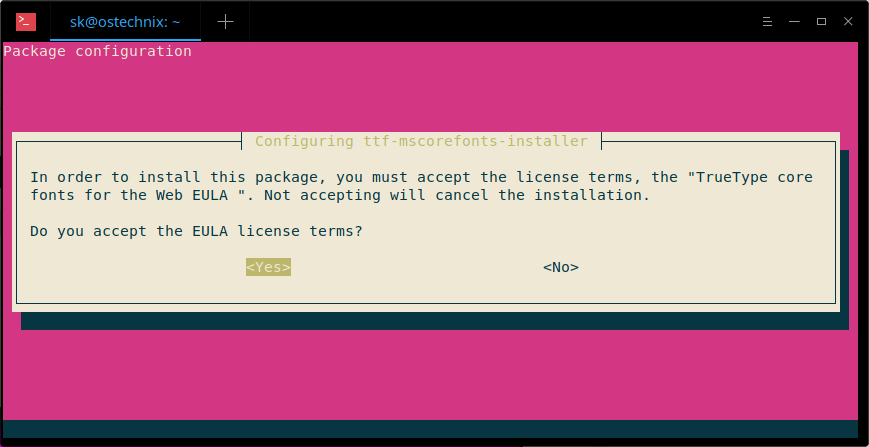
Click Yes to accept the Microsoft’s agreement:
When the installation is done, you should update the font cache using the command below:

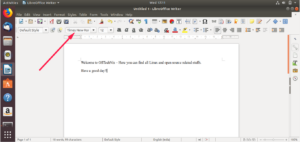
If you open the LibreOffice now, you’ll see the Microsoft TrueType fonts.

In case that you accidentally reject the license agreement, you can reinstall the installer with this command:
Microsoft TrueType fonts are also available via the Ubuntu Restricted Extras package that contains other proprietary media codecs to play files like MP3 etc.
Don’t underestimate proprietary fonts
You may think what’s the big deal with fonts? After all, it’s just a font, not a crucial piece of software, right?
But did you know that for years, Netflix paid millions of dollars for the proprietary font it used? At the end, they created their own custom fonts and that saved them a considerable amount of money.
I hope you find this quick tutorial useful. More productivity tutorials are down the line, leave your comments below and subscribe to our social media for more!

Dimitrios Savvopoulos
Dimitrios is an MSc Mechanical Engineer but a Linux enthusiast in heart. He is well settled in Solus OS but curiosity drives him to constantly test other distros. Challenge is part of his personality and his hobby is to compete from 5k to the marathon distance.
Like what you read? Please share it with others.
Использование шрифтов Windows в Ubuntu
Содержание
Многие пользователи Windows при переходе на Ubuntu сразу же замечают разницу в шрифте и хотят установить те, к которым они привыкли.
Это легко и просто делается. Для начала нужно установить сами шрифты.
Установка шрифтов
Копирование шрифтов
Если у Вас имеется параллельно установленная операционная система Windows, Вы можете скопировать используемые в ней шрифты.
Смысл операции заключается в том, чтоб скопировать шрифты в соответствующие каталоги, есть 2 варианта:
Все шрифты операционной системы Windows хранятся в папке: C:\WINDOWS\Fonts, что бы скопировать шрифты можно воспользоваться терминалом и следующими командами:
Здесь подразумевается, что локальный диск с операционный системой Windows примонтирован в папку /media/disk-1
Так же скопировать шрифты можно вручную, используя Файловый менеджер nautilus.
Установка из репозитория
Если установленной операционной системы Windows у Вас нет, то можно просто установить набор стандартных шрифтов Microsoft из репозитория командой:
На этом инсталляция шрифтов завершена.
Настройка шрифтов
Шрифты настраиваются там же, где и темы gnome. Заходим в меню Система→Параметры→Внешний вид, затем закладка «Шрифты». В списке должны были появиться шрифты из операционной системы Windows.
Устанавливаем все шрифты (кроме моноширинного) — tahoma 8, отрисовка — монохромная. Нажимаем кнопку «Подробнее» и устанавливаем следующие параметры:
На этом настройка шрифтов в системе закончена. При необходимости Вы можете настроить шрифты для отдельных приложений.
Ссылки
Форум — тема, посвященная установке и настройке шрифтов
Шрифты Windows — Убунтология
Установка шрифтов Microsoft Windows в Ubuntu 18.04 LTS

Большинство учебных заведений по-прежнему используют Microsoft Fonts.
Я не уверен в других странах.
Но в России шрифты Times New Roman и Arial в основном используются почти всеми видами документации, проектами и заданиями в колледжах и школах.
Шрифты MS Windows по-прежнему используются не только в учебных заведениях, небольших организациях, офисах и магазинах.
На всякий случай, если вы находитесь в ситуации, когда вам нужно использовать шрифты Microsoft на рабочем столе Ubuntu Linux, вот как это сделать.
Отказ от ответственности: Microsoft выпустила свои основные шрифты бесплатно. Однако имейте в виду, что использование шрифтов Microsoft запрещено в других операционных системах. Внимательно прочитайте EULA перед установкой MS Fonts в любой операционной системе Linux. Мы (itisgood.ru) не несем ответственности за какие-либо действия связанные с пиратством.
Установить MS Fonts в Ubuntu 18.04 LTS desktop
Установите шрифты MS TrueType, как показано ниже:
Появится мастер соглашения с конечным пользователем Microsoft.
Нажмите «ОК», чтобы продолжить.
Нажмите «yes», чтобы принять соглашение Microsoft:

После установки шрифтов нам нужно обновить кеш шрифтов с помощью команды:
Установите MS Fonts в режиме двойной загрузки Linux и Windows
Если у вас есть система двойной загрузки с операционной системой Linux и Windows, вы можете легко установить шрифты MS с диска Windows C.
Все, что вам нужно сделать, это смонтировать раздел Windows (C: / Windows).
Я предполагаю, что вы установили раздел C: \ Windows в каталог / Windowsdrive в linux.
Теперь свяжите расположение шрифтов с папкой шрифтов вашей системы Linux, как показано ниже.
После связывания папки шрифтов восстановите кеш шрифта с помощью команды:
Кроме того, скопируйте все шрифты Windows в каталог /usr/share/fonts и установите шрифты, используя следующие команды:
Наконец, восстановите кеш шрифта с помощью команды:
Протестировать шрифт Windows
Откройте LibreOffice или GIMP после установки MS Fonts.
Теперь вы увидите шрифты Microsoft coretype.
Опять же, я предупреждаю, что использование шрифтов MS в другой операционной системе запрещено.
Перед установкой шрифтов MS ознакомьтесь с лицензионным соглашением Microsoft.
Install Microsoft Windows Fonts In Ubuntu 18.04 LTS
Most of the educational institutions are still using Microsoft Fonts. I am not sure about other countries. But in Tamilnadu (India), Times New Roman and Arial fonts are still being mostly used by almost all sorts of documentation works, projects, and assignments in colleges and schools. Not only the educational institutions, most government and private offices, small organizations, and shops are still using MS Windows Fonts. Just in case, if you are in a situation where you need to use Microsoft fonts in your Ubuntu Linux desktop, here is how to do it.
Disclaimer: Microsoft has released its core fonts for free. However, Please be aware that usage of Microsoft fonts is prohibited in other operating systems. Read the EULA carefully before installing MS Fonts in any Linux operating system. We (OSTechNix) are not responsible for any kind of piracy act.
Install MS Fonts in Ubuntu 18.04 LTS desktop
Install MS TrueType Fonts as shown below:
Microsoft’s End user agreement wizard will appear. Click OK to continue.
Click Yes to accept the Microsoft agreement:
After installing the fonts, we need to update the font cache using command:
Sample output:
Install MS Fonts in Dual boot with Linux and Windows
If you have dual boot system with Linux and Windows operating system, you can easily install the MS fonts from Windows C drive. All you have to do is mount the Windows partition (C:/Windows).
I assume you have mounted the C:\Windows partition at /Windowsdrive directory in linux.
Now, link the fonts location to your Linux system’s fonts folder as shown below.
After linking the fonts folder, regenerate the fontconfig cache using command:
Alternatively, copy all Windows fonts to /usr/share/fonts directory and install the fonts using the following commands:
Finally, regenerate the fontconfig cache using command:
Test Windows font
Open LibreOffice or GIMP after installing MS Fonts. Now, you will see there the Microsoft coretype fonts.

That’s it. Hope this guide useful.
Update 1:
Mscorefonts comes preinstalled in Ubuntu 18.04.2 LTS desktop. So, I guess the latest Ubuntu 18.04 LTS desktop users need not to install it.
Update 2:
If you accidentally rejected license agreement during upgrade from Ubuntu 16.04 LTS to 18.04.3 LTS, you can reinstall the installer to get the license agreement by running the following command:
Ставим шрифты Windows в Linux
Чего не хватает обычному юзеру, который решил попробовать работать в Линукс? Такого привычного и даже на первый взгляд незаметного?
Это шрифты, да, самые обычные и привычные, такие как Ариал, Таймс Нью Роман, Колибри и тд.
А в системе какие то другие шрифты, не привычные, и документы в ворде этими же шрифтами.
Linux хранит шрифты в следующих местах: /usr/share/fonts это глобальные шрифты системы и /home/юзер/.fonts, которые доступны только этому пользователю.
Можете посмотреть что там у вас.
Так как же добавить шрифты Windows в Linux? В общем то так же примерно, как и в Виндовс, просто скопировать нужные шрифты в нужные папки.
Вот например у меня шрифты привычные виндусевые
А после добавления нужно обновить кеш командой fc-cache –f –v
Но, в этом есть неудобство, нужно искать шрифты, качать, особенно если на соседнем диске не живет виндоувс.
Если у вас виндоувс есть, то идем в его диск в папочку со шрифтами:
Находим нужный шрифт и кликаем по нему 2 раза, и нажимаем в окне установить.
С помощью менеджера пакетов
Способ удобен тем, что не надо обновлять кэш шрифтов, но сам шрифт надо искать да в консоле. Ну например:
sudo apt search название_шрифта
Если такой есть, то ставим:
sudo apt install название_шрифта
Ну, честно сказать, так себе метод.
TrueType
Еще в далеком 96 году майкорософт разрешила ставить эти шрифты всем желающим, ну точнее выложила пакет шрифтов в составе Andale Mono, Arial, Arial Black, Comic Sans MS, Courier New, Georgia, Impact, Times New Roman, Trebuchet, Verdana, и Webdings.
sudo apt install ttf-mscorefonts-installer
Принимаем лицензию, для этого кликаем по tab и потом курсором ok.
ClearType
Тут у нас следующие шрифты: Constantia, Corbel, Calibri, Cambria, Candara, Consolas.
Тут шрифты встанут не глобально, а только для конкретного пользователя, увы, но только так.
sudo apt install cabextract
/.fonts это если у вас нет такой директории
wget -qO- http://plasmasturm.org/code/vistafonts-installer/vistafonts-installer | bash
Это все справедливо для всех дистрибутивов на базе Ubuntu
Установка Windows шрифтов в Fedora и другие дистрибутивы на RPM
Ручное добавление шрифтов аналогично, тому что я писал выше.
Копируем под администратором сюда: /usr/share/fonts/ttf
Так как мы делали под root, меняем владельца и прописываем права:
chown root.root *.ttf
Теперь переходим в каталог /usr/share/fonts/ttf и запускаем там консоль, дабы создать индекс шрифтов.
Теперь находим файл /usr/share/fonts/truetype/fonts.cache-1 и редактируем его:
Да, способ так себе, скажу я вам. Но так как я давно не использую дистрибутивы на основе RPM, может там что то поменялось и для начала просто попробуйте скопировать шрифты в папку локального пользователя.
Интернет мне подсказывает, что есть пакетный способ установить, сам не проверял:


