- Ubuntu downloads
- Ubuntu Desktop ›
- Ubuntu Server ›
- Ubuntu Cloud ›
- Ubuntu flavours ›
- Ubuntu for IoT ›
- Professional support for Ubuntu
- Ubuntu linux server edition
- 2. Requirements
- 3. Boot from install media
- 4. Choose your language
- 5. Choose the correct keyboard layout
- 6. Choose your install
- 7. Networking
- 8. Configure storage
- 9. Select a device
- 10. Confirm partitions
- 11. Confirm changes
- 12. Set up a Profile
- 13. Install software
- 14. Installation complete
- 15. What next?
- Finding help
- Ubuntu Server Guide
- Support
- Improving the Documentation
- PDFs and Previous Releases
- Get Ubuntu Server
- Option 2: Manual server installation
- Alternative releases
- Ubuntu Server 21.04
- Alternative downloads
- BitTorrents
- Ubuntu Server 18.04 LTS
- Other versions
- Alternative architectures
- Ubuntu Server for ARM
- Ubuntu for POWER
- Ubuntu for IBM Z
- Installation guides
- Ubuntu Server guide
Ubuntu downloads
Ubuntu Desktop ›
Download Ubuntu desktop and replace your current operating system whether it’s Windows or macOS or run Ubuntu alongside it.
Do you want to upgrade? Follow our simple guide


Ubuntu Server ›
Whether you want to configure a simple file server or build a fifty thousand-node cloud, you can rely on Ubuntu Server and its five years of guaranteed free upgrades.
Ubuntu Cloud ›
Ubuntu is the reference OS for OpenStack. Try Canonical OpenStack on a single machine or start building a production cloud on a cluster — just add servers.
Ubuntu flavours ›
Ubuntu flavours offer a unique way to experience Ubuntu with different choices of default applications and settings, backed by the full Ubuntu archive for packages and updates.
Ubuntu for IoT ›
Are you a developer who wants to try snappy Ubuntu Core? The new, transactionally updated Ubuntu for clouds and devices.
Professional support for Ubuntu
Get professional support for Ubuntu from Canonical. We help organisations around the world to manage their Ubuntu cloud, server and desktop deployments.
Источник
Ubuntu linux server edition
Ubuntu Server is a variant of the standard Ubuntu you already know, tailored for networks and services. It’s just as capable of running a simple file server as it is operating within a 50,000 node cloud.
Unlike the installation of Ubuntu Desktop, Ubuntu Server does not include a graphical installation program. Instead, it uses a text menu-based process. If you’d rather install the desktop version, take a look at our Install Ubuntu desktop tutorial.
This guide will provide an overview of the installation from either a DVD or a USB flash drive.
For a more detailed guide on Ubuntu Server’s capabilities and its configuration, take a look at our the Community Ubuntu Server documentation.
2. Requirements
You’ll need to consider the following before starting the installation:
- Ensure you have at least 2GB of free storage space.
- Have access to either a DVD or a USB flash drive containing the version of Ubuntu Server you want to install.
- If you’re going to install Ubuntu Server alongside data you wish to keep, ensure you have a recent backup.
See the server guide pages for more specific details on hardware requirements. We also have several tutorials that explain how to create an Ubuntu DVD or USB flash drive.
3. Boot from install media
To trigger the installation process, perform the following:
- Put the Ubuntu DVD into your DVD drive (or insert the USB stick or other install media).
- Restart your computer.
After a few moments, you should see messages like those shown below on the screen…

Most computers will automatically boot from USB or DVD, though in some cases this is disabled to improve boot times. If you don’t see the boot message and the “Welcome” screen which should appear after it, you will need to set your computer to boot from the install media.
There should be an on-screen message when the computer starts telling you what key to press for settings or a boot menu. Depending on the manufacturer, this could be Escape , F2 , F10 or F12 . Simply restart your computer and hold down this key until the boot menu appears, then select the drive with the Ubuntu install media.
4. Choose your language
After the boot messages appear, a ‘Language’ menu will be displayed.

As the message suggests, use the Up , Down and Enter keys to navigate through the menu and select the language you wish to use.
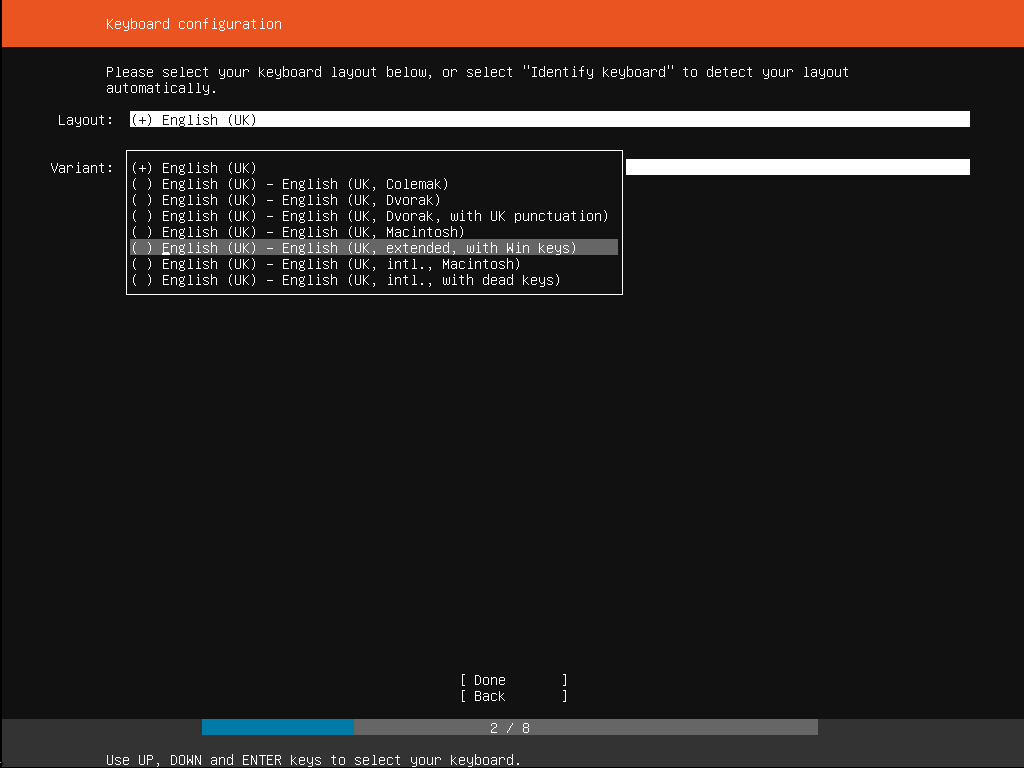
5. Choose the correct keyboard layout
Before you need to type anything in, the installer will next display a menu asking you to select your keyboard layout and, if applicable, the variant.

If you don’t know which particular variant you want, just go with the default — when Ubuntu Server has been installed you can test and change your preferences more easily if necessary.
6. Choose your install
Now we are ready to select what you want to install. There are three options in the menu:
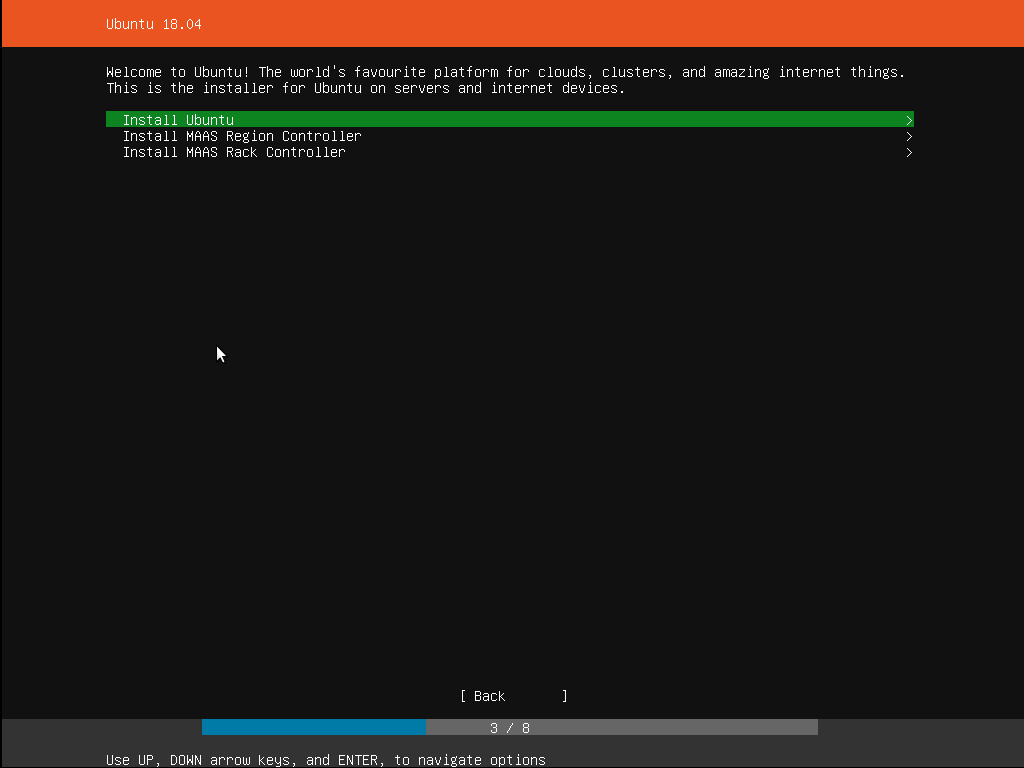
The bottom two options are used for installing specific components of a Metal As A Service (MAAS) install. If you are installing MAAS, you should check out the MAAS documentation for more information on this! The rest of this tutorial assumes you select the first option, Install Ubuntu .
7. Networking
The installer will automatically detect and try to configure any network connections via DHCP.

This is usually automatic and you will not have to enter anything on this screen, it is for information only.
If no network is found, the installer can continue anyway, it just won’t be able to check for updates. You can always configure networking after installation.
8. Configure storage
The next step is to configure storage. The recommended install is to have an entire disk or partition set aside for running Ubuntu.

If you need to set up a more complicated system, the manual option will allow you to select and reorganise partitions on any connected drives.
Note that Ubuntu no longer requires a separate partition for swap space, nor will the automated install create one.
9. Select a device
This menu will allow you to select a disk from the ones detected on the system.

To help identification, the drives will be listed using their system ID. Use the arrow keys and enter to select the disk you wish to use.
10. Confirm partitions
With the target drive selected, the installer will calculate what partitions to create and present this information…
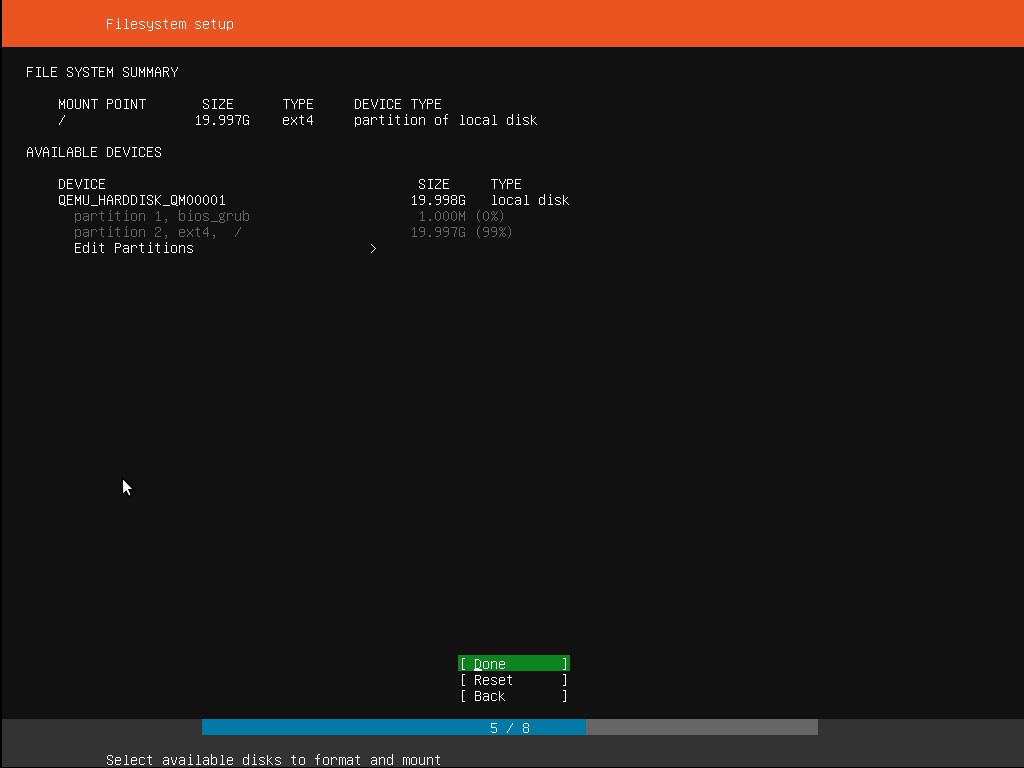
If this isn’t what you expected to see (e.g., you have selected the wrong drive), you should use the arrow keys and enter to select Back from the options at the bottom of the screen. This will take you back to the previous menu where you can select a different drive.
It is also possible to manually change the partitions here, by selecting Edit Partitions . Obviously you should only select this if you are familiar with how partitions work.
When you are happy with the disk layout displayed, select Done to continue.
11. Confirm changes
Before the installer makes any destructive changes, it will show this final confirmation step. Double check that everything looks good here and you aren’t about to reformat the wrong device!

There is no “Undo” for this step, once you confirm the changes, the indicated devices will be overwritten and any contents may be lost
12. Set up a Profile
The software is now being installed on the disk, but there is some more information the installer needs. Ubuntu Server needs to have at least one known user for the system, and a hostname. The user also needs a password.

There is also a field for importing SSH keys, either from Launchpad, Ubuntu One or Github. You simply need to enter the username and the installer will fetch the relevant keys and install them on the system ready for use (e.g. secure SSH login to the server).
13. Install software
Once you have finished entering the required information, the screen will now show the progress of the installer. Ubuntu Server now installs a concise set of useful software required for servers. This cuts down on the install and setup time dramatically. Of course, after the install is finished, you can install any additional software you may need.

14. Installation complete
When the install is complete, you will see a message like this on the screen.

Remember to remove the install media, and then press enter to reboot and start the server. Welcome to Ubuntu!
15. What next?
With Ubuntu Server installed, you can now carry on and build that file-server or multi-node cluster we mentioned!
If you are new to Ubuntu Server, we’d recommend reading the Server Guide.
You can also check out the latest on Ubuntu Server, and what others are using it for on the Ubuntu Server pages.
Finding help
The Ubuntu community, for both desktop and server, is one of the friendliest and most well populated you can find. That means if you get stuck, someone has probably already seen and solved the same problem.
Try asking for help in one of the following places:
Alternatively, if you need commercial support for your server deployments, take a look at Ubuntu Advantage.
Источник
Ubuntu Server Guide
Welcome to the Ubuntu Server Guide! This site includes information on using Ubuntu Server for the latest LTS release, Ubuntu 20.04 LTS (Focal Fossa). For an offline version as well as versions for previous releases see below.
Getting Started:
| Basic Install | Install Server Edition using the installer |
| Automated Install | Automate installation using autoinstall |
| Cloud Images | Run Ubuntu Server Edition on a public cloud provider |
| Docker Images | Run Ubuntu Server software in LTS Docker OCI containers |
Refining Your Infrastructure:
| Networking | Register network devices |
| Networked Storage | Configure multiple I/O paths for storage |
| Security | Protect your server and network |
| Virtualization | Separate your services into virtualized environments |
| High Availability | Cluster systems redundantly to minimize down-time |
| Monitoring | Ensure infrastructure availability |
Configuring Your Services:
| Databases | Install database servers |
| Backups | Establish your backup plans |
| Mail Servers | Set up e-mail services |
| Web Servers | Set up web services |
Support
There are a couple of different ways that the Ubuntu Server edition is supported: commercial support and community support. The main commercial support (and development funding) is available from Canonical, Ltd. They supply reasonably- priced support contracts on a per desktop or per-server basis. For more information see the Ubuntu Advantage page.
Community support is also provided by dedicated individuals and companies that wish to make Ubuntu the best distribution possible. Support is provided through multiple mailing lists, IRC channels, forums, blogs, wikis, etc. The large amount of information available can be overwhelming, but a good search engine query can usually provide an answer to your questions. See the Ubuntu Support page for more information.
Improving the Documentation
If you find any errors or have suggestions for improvements to pages, please use the link at the bottom of each topic titled: “Help improve this document in the forum.” This link will take you to the Server Discourse forum for the specific page you are viewing. There you can share your comments or let us know about bugs with any page.
PDFs and Previous Releases
Below are links to the previous Ubuntu Server release server guides as well as an offline copy of the current version of this site:
Ubuntu 20.04 LTS (Focal Fossa): PDF
Ubuntu 18.04 LTS (Bionic Beaver): Web and PDF
Ubuntu 16.04 LTS (Xenial Xerus): Web and PDF
Источник
Get Ubuntu Server
Option 2: Manual server installation
USB or DVD image based physical install
- OS security guaranteed until April 2025
- Extended security maintenance until April 2030
- Commercial support for enterprise customers
Alternative releases
Ubuntu Server 21.04
The latest version of Ubuntu Server, including nine months of security and maintenance updates, until January 2022.
Alternative downloads
BitTorrents
BitTorrent sometimes enables higher download speeds and more reliable downloads of large files.
Ubuntu Server 18.04 LTS
The previous long-term support version of Ubuntu Server, including support guaranteed until April 2023.
Other versions
Other versions of Ubuntu Server including torrents, the network installer, a list of local mirrors and past releases.
Alternative architectures
Ubuntu Server for ARM
Optimised for hyperscale deployments and certified on ARM chipsets — Ubuntu Server for ARM includes the 64-bit ARMv7 and ARMv8 platforms.
Ubuntu for POWER
Ubuntu is available on the IBM POWER platform, bringing the entire Ubuntu ecosystem to IBM POWER.
Ubuntu for IBM Z
IBM Z and LinuxONE leverage open technology solutions to meet the demands of the new application economy. Ubuntu is now available on those platforms with Multipass, MicroK8s and more.
Installation guides
If you need some help installing Ubuntu, please check out our step-by-step guides.
Ubuntu Server guide
Read the official Ubuntu Server 20.04 LTS documentation.
Источник


