- Raspberry Pi
- Features
- Hardware Recommendations
- Additional features
- USB Booting
- Compute Module 4
- Enable USB boot for Raspberry Pi 4
- Enable USB boot for Raspberry Pi 2, 3 and 3+
- Firmware
- Redirecting audio output
- For HDMI
- For 3.5mm audio jack
- Feedback and Improvements
- Install Ubuntu on a Raspberry Pi
- Download Ubuntu Server
- Ubuntu Server 20.04.3 LTS
- Ubuntu Server 21.04
- Works on:
- Download Ubuntu Desktop
- Ubuntu Desktop 21.04
- Works on:
- Which image should I pick?
- Desktop vs Server
- 32 bit vs 64 bit
- Make something great today
- Ubuntu for Raspberry Pi
- Full Desktop experience
- Mission-critical platform for industrial-grade Pi
- All of open source
- Your ARM exploration starts here
- Ubuntu linux x64 raspberry
- What you’ll learn
- What you’ll need
- 2. Prepare the SD Card
- 3. Wi-Fi or Ethernet
- Getting setup with Wi-Fi
- Set a static IP
- 4. Boot Ubuntu Server
- Connect remotely to your Raspberry Pi
- Determining the Pi’s IP address
- Using an SSH client
- Changing the password
- Still not connected to the internet?
- 5. Install a desktop
- 6. That’s all, folks!
Raspberry Pi
Ubuntu MATE 20.04 is available for Raspberry Pi with separate images for armhf (ARMv7 32-bit) and arm64 (ARMv8 64-bit). We have done what we can to optimise the builds for the Raspberry Pi without sacrificing the full desktop environment Ubuntu MATE provides on PC.
Ubuntu MATE for the Raspberry Pi provides a complete, familiar, desktop environment that can be used for basic desktop computing. It is also of interest to makers and device hackers who want to target Ubuntu for their projects. You can prototype homebrew ARMv7 or ARMv8 based IoT devices in a comfortable desktop environment, including building and testing your apps as snaps. The full Ubuntu archive is available to you.
For hobbyist projects, you can stick with Ubuntu MATE for “deployment”. But, if you have something more professional in mind then the applications and snaps you’ve prototyped with Ubuntu MATE can be used with Ubuntu Server or Ubuntu Core. You might want to check out the Ubuntu Appliance Portfolio too.
 Ubuntu MATE running on the Raspberry Pi 4
Features
High-level features of these images are:
- Ubuntu kernel.
- Performance optimised by the Ubuntu Kernel team.
- Regularly security patches by the Ubuntu Security team.
- VC4/V3D (fkms) driver is enabled by default.
- fbturbo driver is available if you want it, but limited to 2D accelerated window moving/scrolling on Raspberry Pi (using the BCM2835 DMA Controller).
- Automatic online filesystem expansion.
- Ethernet & WiFi (where available)
- Bluetooth (where available)
- Audio out via 3.5mm analog audio jack or HDMI
- Video out via Composite or HDMI
- GPIO access via GPIO Zero and WiringPi.
- Support for USB Booting is available for Ubuntu MATE 20.10 or newer.
- Automatic first-boot file system resizing.
- First-boot setup wizard guides you through creating a user account and configuring WiFi.
Hardware Recommendations
| Raspberry Pi 4 8GB RAM | Argon One Case | SanDisk Extreme 128 GB microSDXC |
| Raspberry Pi 4 4GB RAM | Argon NEO Case | Kingston 64 GB microSDXC Canvas Go Plus |
| Raspberry Pi 4 2GB RAM | Flirc Case | Samsung EVO Plus 32 GB microSDHC UHS-I U1 |
 |
Additional features
USB Booting
Ubuntu MATE 20.10 and newer support USB booting, but Ubuntu MATE 20.04 does not.
Compute Module 4
If you have a Compute Module 4 you can enable the USB2 outputs on the Compute Module 4 IO Board, assuming your Compute Module is plugged into such a board, by un-commenting the following line in /boot/firmware/config.txt .
Enable USB boot for Raspberry Pi 4
To enable USB mass storage boot on a Raspberry Pi 4 follow these steps:
Enable USB boot for Raspberry Pi 2, 3 and 3+
The Raspberry Pi 3, 3+ and Pi 2 v1.2 with the same BCM2837 SoC as the Pi 3, are capable of booting from a USB drive. For the Pi 2 and 3 you’ll first need to program USB boot mode, this is unnecessary on the Pi 3+ as USB booting is enabled by default.
Firmware
The GPU firmware partition is mounted at /boot/firmware . The files /boot/firmware/config.txt and /boot/firmware/cmdline.txt contain the system configuration and kernel command line options respectively.
The OpenSSH server is not installed by default. Simply install it to to enable SSH.
If you install SSH then you might also want to install sshguard which is highly optimised and well suited for use on the Raspberry Pi to protect from brute force attacks against SSH.
Redirecting audio output
If you have issues with audio, you may try un-commenting the following line in /boot/firmware/config.txt :
This forces the HDMI output into HDMI mode instead of DVI; which doesn’t support audio output. You can also configure the system to output to a particular audio device.
For HDMI
For 3.5mm audio jack
Feedback and Improvements
These images are not official Ubuntu products and are community supported by the Ubuntu MATE team. Please post feedback and issues on the dedicated community forum.
© 2014-2021 Ubuntu MATE Team
An official flavour of the Ubuntu family. Ubuntu is a trademark of Canonical Ltd.
Источник
Install Ubuntu
on a Raspberry Pi
Running Ubuntu on your Raspberry Pi is easy. Just pick the OS image you want, flash it onto a microSD card, load it onto your Pi and away you go.
First time installing Ubuntu on Raspberry Pi?
Follow our desktop or server tutorials.

Download Ubuntu Server
Ubuntu Server 20.04.3 LTS
The version of Ubuntu with five years of long term support, until April 2025.
Ubuntu Server 21.04
The latest development release of Ubuntu with nine months of support, until January 2022.
- Raspberry Pi 2 — 32-bit only
- Raspberry Pi 3
- Raspberry Pi 4
- Raspberry Pi 400
- Raspberry Pi CM4
Works on:

* 32-bit only


Raspberry Pi 400
Raspberry Pi CM4
Download Ubuntu Desktop
Ubuntu Desktop 21.04
The latest development release of Ubuntu with nine months of support, until January 2022.
- Raspberry Pi 4
- Raspberry Pi 400
- Raspberry Pi CM4
Works on:
* At least 4 GB RAM required
Raspberry Pi 400
Raspberry Pi CM4
* At least 4 GB RAM required
Which image should I pick?
If you are wondering which download to pick, here are a few pointers on the options.
Desktop vs Server
The full Ubuntu Desktop image is large but it contains everything you need to turn a Raspberry Pi into your main PC. Surf the web, watch videos, write some documents, do some shopping — whatever you like. However, because of its size it only works on the Raspberry Pi 4 models with 4GB or 8GB of RAM. The Ubuntu Server image is much smaller, you can install flavours of the Ubuntu Desktop on top of it, it gives you access to the Ubuntu CLI and by extension, all of the latest open source. Ubuntu Server works on the Raspberry Pi 2, 3 and 4.
32 bit vs 64 bit
The Raspberry Pi 2 only supports 32 bits, so that’s an easy choice. However the Raspberry Pi 3 and 4 are 64 bit boards. According to the Raspberry Pi foundation, there are limited benefits to using the 64 bit version for the Pi 3 due to the fact that it only supports 1GB of memory; however, with the Pi 4, the 64 bit version should be faster.
Make something great today
Create an Ubuntu Appliance with a Raspberry Pi
Источник
Ubuntu for Raspberry Pi
Your gateway to open source invention
A tiny machine with a giant impact. The Ubuntu community and Canonical are proud to enable desktop, server and production internet of things on the Raspberry Pi. In support of inventors, educators, entrepreneurs and eccentrics everywhere, we join the Raspberry Pi Foundation in striving to deliver the most open platform at the lowest price, powered by our communities.

Full Desktop experience
Work, web and software development, done
Raspberry Pi 4 brings the graphics, RAM and connectivity needed for a Linux workstation.
Mission-critical platform for industrial-grade Pi
The RPi Compute Module is built for production
When your invention turns into a product, the Raspberry Pi compute module is a hardened, industrial grade system-on-module that provides the brain for a range of hardware from robots to racks.
Take the Pi to production with Ubuntu Server LTS and Ubuntu Core with a decade of security updates.


All of open source
Every aspect of modern compute at your fingertips
Open source is the new normal for software innovation — from cloud to edge, containers to IoT, from AI/ML to robotics, from self-driving cars to nanosats, the biggest companies in the world are building on open source and making it better too.
Your ARM exploration starts here
Same OS, whole new world
The Raspberry Pi is an ARM instruction set computer, just like your Android or iOS phone, and the next generation Mac. This feels just like Ubuntu on a PC, but under the hood you have a whole new approach to architecture and devices.
© 2021 Canonical Ltd. Ubuntu and Canonical are registered trademarks of Canonical Ltd.
Источник
Ubuntu linux x64 raspberry
In this tutorial, we walk you through the process of installing Ubuntu Server on a Raspberry Pi, connecting it to the internet and using it remotely. There are two setup methods in this tutorial: with an extra HDMI screen and USB keyboard for your Pi, or headless. Let’s start!

What you’ll learn
- How to create a bootable Ubuntu Server microSD card
- How to setup internet connectivity on the Raspberry Pi
- How to access your Raspberry Pi remotely
What you’ll need
- A microSD card (4GB minimum, 8GB recommended)
- A computer with a microSD card drive
- A Raspberry Pi 2, 3 or 4
- A micro-USB power cable (USB-C for the Pi 4)
- A Wi-Fi network or an ethernet cable with an internet connection
- A monitor with an HDMI interface
- An HDMI cable for the Pi 2 & 3 and a micro HDMI cable for the Pi 4
- A USB keyboard
2. Prepare the SD Card
Warning
Following these steps will erase all existing content on the microSD card.
First, insert the microSD card into your computer.
Now you need to install the right Raspberry Pi Imager for your operating system. You can do this with the following links:
Or, if you are on Ubuntu, you can run:
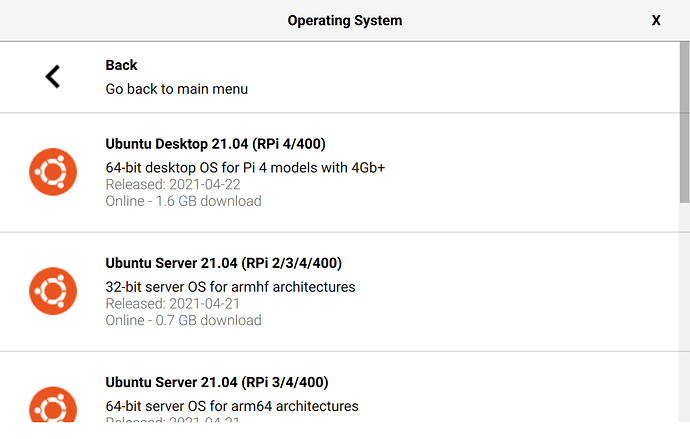
Once this is done, start the Imager and open the “CHOOSE OS” menu.
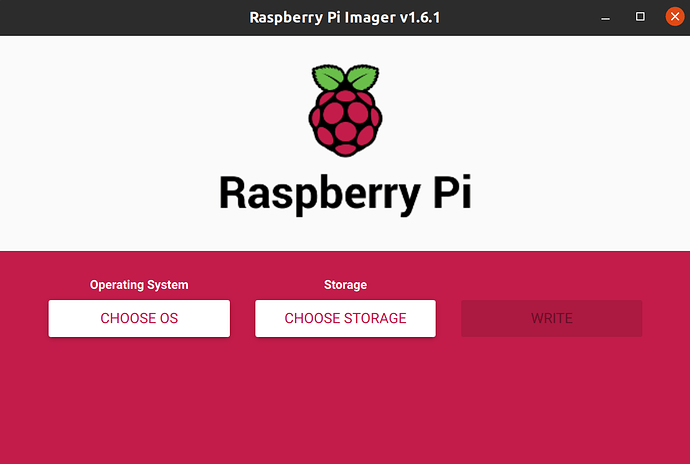
Scroll down the menu click “Other general-purpose OS”.

Here you you can select Ubuntu and see a list of download options. For this tutorial we recommend you select the Ubuntu 20.04 download. As indicated in the imager this will work for the Raspberry Pi 2,3, 3+ and any of the 4’s.
Select the image and open the “SD Card” menu. Select the microSD card you have inserted.
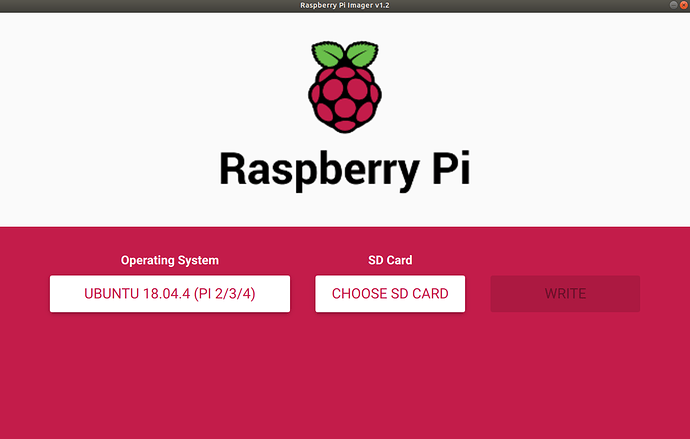
Finally, click “WRITE” and wait for the magic to happen… (This magic might take a few minutes)
3. Wi-Fi or Ethernet
If you want to use your local lan’s DHCP server to get an IP address for your pi then there are two ways to get your Pi connected to the internet:
The first is to connect your Pi to your router with an ethernet cable. In this case, you can skip this step and go to the next one in the tutorial.
The second requires a local Wi-Fi network that both your computer and Pi can be connected to. We are going to edit files you just downloaded on your SD card to ensure your Pi can connect to the Wi-Fi network at boot.
If you want to have the Pi boot to a known IP address then see the section “Set a Static IP”.
Getting setup with Wi-Fi
With the SD card still inserted in your laptop, open a file manager and locate the “system-boot” partition on the card. It contains initial configuration files that load during the first boot process.
Note: your system might look different from the screenshots here because this tutorial was written using Ubuntu 18.04 LTS. The steps are still the same even if things look a little different.

Note: Screenshots have been made on an Ubuntu desktop but it can be done on Windows and MacOS too
Edit the network-config file to add your Wi-Fi credentials. An example is already included in the file, you can simply adapt it.
To do so, uncomment (remove the “#” at the beginning) and edit the following lines:
Note: network name must be enclosed in quotation marks.
Save the file and extract the card from your laptop.
Note ⓘ: During the first boot, your Raspberry Pi will try to connect to this network. It will fail the first time around. Simply reboot sudo reboot and it will work.
Set a static IP
To set a static IP you need to replace the
line in the network-config file with lines that specify the intended IP address as well as its default gateway and DNS server. You can do this for either the eth0 or wlan0 interface (or both). It is important that you get the indenting right for this work correctly
For example, if you were planning to give the pi the address 192.168.1.23 in the 192.168.1.0/24 subnet with a default gateway of 192.168.1.1 and a DNS server of 192.168.1.53 then the following text would work. The same structure works for both the eth0 or wlan0 sections in the file:
4. Boot Ubuntu Server
If you are using an HDMI screen and a USB keyboard, ensure they are plugged in before powering the Pi. You will be able to see the boot process on the screen.
Warning
During your first boot a tool called cloud-init is doing configuration. WAIT for it to finish before trying to log in. It typically takes less than 2 minutes but there is a break between the log-in prompt and cloud-init completing. If you interrupt the process you have to start again. You’ll know it’s done when it outputs some more lines after the log-in prompt has appeared.
Once cloud-init finishes log in using “ubuntu” as both the password and login ID. After a minute or so, Ubuntu on your Raspberry Pi will have fully booted and connected to the network.
If you are using an ethernet cable and are not connected to the network at this point you may need to run:
sudo dhclient eth0
Connect remotely to your Raspberry Pi
To connect to your Raspberry Pi remotely, you need two things (we’ll help you find them):
- Its IP address on the local network
- An SSH client (SSH is a communication protocol between machines)
You have to do this if you are running your device headless, but you might also want to do this if you are not so you can access your Pi from anywhere.
Determining the Pi’s IP address
To determine the IP address of your board, open a terminal and run the arp command:
On Ubuntu and Mac OS:
If this doesn’t work and you are using the latest Raspberry Pi 4, instead run:
Information
Depending on your version of Ubuntu, you may need to install the net-tools package. Install it with sudo apt install net-tools and try the arp command again.
If this doesn’t work and you are using the latest Raspberry Pi 4, instead run:
This will return an output similar to:
Where the x’s are the IP address of any Raspberry Pi connected to the local network. Note it down.
If the command doesn’t return an IP address, you may need to wait a little longer for your Pi to join the network. If you still can’t see it after a few tries, which can happen with some home or office network configurations, we recommend you use a USB keyboard and HDMI screen to interact with your device.
Using an SSH client
On Ubuntu and Mac OS, an SSH client is already installed. Some versions of Windows 10 also include an SSH client too, but if yours does not or you’re unsure, follow these steps to install one.
Open a terminal and run the following command:
You will be asked to confirm the connection:
Type “yes” to confirm.
Changing the password
When prompted, use “ubuntu” for the password. (The cursor won’t move when you type the password.) The first thing Ubuntu will do is to ask you to change it to a secure password. Once done, you can reconnect again with the SSH command and the new password.
Success! You are now connected to Ubuntu Server running on your Raspberry Pi.
Still not connected to the internet?
Sometimes the structure of the network-config file that you modified before boot gets messed up when you book. This would cause your Pi not to be able to connect to your wifi.
To fix this you need to go into the correct file and correct the issue. Run:
sudo nano /etc/netplan/50-cloud-init.yaml
so you can edit the file. Edit it so it looks like this again, the indentation needs to be correct for the .yaml to work:
Save and exit the file with Ctrl + S and Ctrl + X .
Run sudo netplan apply and sudo reboot and when you log back in, you will be connected to your wifi.
5. Install a desktop
Optional step
Depending on what you are going to use your Pi for, you may want a desktop environment to run graphical applications. Nevertheless, this step is completely optional.
First you need to ensure your packages are updated to the latest version, run:
Then, you can use the apt install command to install a desktop environment.
Here are some popular and lightweight options:
sudo apt install xubuntu-desktop
sudo apt install lubuntu-desktop
If you run into issues with either of these check out this blog. We’re working on fixing this imminently.
Once the install finishes, reboot your pi with:
And your new desktop will come up automatically
Alternatively, if you now decide you want an Ubuntu Desktop proper, a full-fat version, you can head over to our other tutorial to re-flash your Raspberry Pi with the Ubuntu Desktop.
6. That’s all, folks!
You are done! Up and running on Ubuntu Server.
For more details about Raspberry Pi specific packages included with this image and further customisations, such as accelerated video drivers and optional package repositories, you can refer to the RaspberryPi wiki.
Источник


