- Ubuntu live usb from linux
- 2. Requirements
- 3. USB selection
- 4. Boot selection and Partition scheme
- 5. Select the Ubuntu ISO file
- 6. Write the ISO
- 7. Additional downloads
- 8. Write warnings
- 9. Writing the ISO
- 10. Installation complete
- Ubuntu Documentation
- Introduction
- Reasons for Using a LiveCD Session
- Other Ways to Try Ubuntu
- How-To LiveCD Ubuntu
- Preparing your LiveCD
- To create a LiveCd
- To create a LiveUsb
- To buy an Ubuntu Cd
- Using your LiveCD
- Installing Programs or Other Packages
- Making a Customised LiveCD
- Troubles with a LiveCD
- Logging in
- Security and Updating
- Setting a Password
- Text-Mode Installation
Ubuntu live usb from linux
With a bootable Ubuntu USB stick, you can:
- Install or upgrade Ubuntu
- Test out the Ubuntu desktop experience without touching your PC configuration
- Boot into Ubuntu on a borrowed machine or from an internet cafe
- Use tools installed by default on the USB stick to repair or fix a broken configuration
Creating a bootable Ubuntu USB stick from Microsoft Windows is very simple and we’re going to cover the process in the next few steps.
Alternatively, we also have tutorials to help you create a bootable USB stick from both Ubuntu and Apple macOS.

2. Requirements
- A 4GB or larger USB stick/flash drive
- Microsoft Windows XP or later
- Rufus, a free and open source USB stick writing tool
- An Ubuntu ISO file. See Get Ubuntu for download links

Take note of where your browser saves downloads: this is normally a directory called ‘Downloads’ on your Windows PC. Don’t download the ISO image directly to the USB stick! If using Windows XP or Vista, download version 2.18 of Rufus.
3. USB selection
Perform the following to configure your USB device in Rufus:
- Launch Rufus
- Insert your USB stick
- Rufus will update to set the device within the Device field
- If the Device selected is incorrect (perhaps you have multiple USB storage devices), select the correct one from the device field’s drop-down menu

You can avoid the hassle of selecting from a list of USB devices by ensuring no other devices are connected.
4. Boot selection and Partition scheme
Now choose the Boot selection. Choices will be Non bootable and FreeDOS. Since you are creating a bootable Ubuntu device select FreeDOS.
The default selections for Partition scheme (MBR) and Target system (BIOS (or UEFI-CSM)) are appropriate (and are the only options available).

5. Select the Ubuntu ISO file
To select the Ubuntu ISO file you downloaded previously, click the SELECT to the right of “Boot selection”. If this is the only ISO file present in the Downloads folder you will only see one file listed.
Select the appropriate ISO file and click on Open.

6. Write the ISO
The Volume label will be updated to reflect the ISO selected.
Leave all other parameters with their default values and click START to initiate the write process.

7. Additional downloads
You may be alerted that Rufus requires additional files to complete writing the ISO. If this dialog box appears, select Yes to continue.

8. Write warnings
You will then be alerted that Rufus has detected that the Ubuntu ISO is an ISOHybrid image. This means the same image file can be used as the source for both a DVD and a USB stick without requiring conversion.
Keep Write in ISO Image mode selected and click on OK to continue.

Rufus will also warn you that all data on your selected USB device is about to be destroyed. This is a good moment to double check you’ve selected the correct device before clicking OK when you’re confident you have.

If your USB stick contains multiple partitions Rufus will warn you in a separate pane that these will also be destroyed.
9. Writing the ISO
The ISO will now be written to your USB stick, and the progress bar in Rufus will give you some indication of where you are in the process. With a reasonably modern machine, this should take around 10 minutes. Total elapsed time is shown in the lower right corner of the Rufus window.

10. Installation complete
When Rufus has finished writing the USB device, the Status bar will be green filled and the word READY will appear in the center. Select CLOSE to complete the write process.

Congratulations! You now have Ubuntu on a USB stick, bootable and ready to go.
If you want to install Ubuntu, take a look at our install Ubuntu desktop tutorial.
Источник
Ubuntu Documentation

Needs Expansion
This article is incomplete, and needs to be expanded. More info.
Introduction
A live CD can be used for a quick demo or test of Ubuntu. Try Ubuntu without any changes to your machine! Windows or whatever you use normally is unaffected after trying this and then rebooting.
The standard Ubuntu Cd can be used as a LiveCd as well as an installer. Live mode is the default option when booting from CD. Only some of the non-standard downloads (such as the «Alternate Cd») lack this functionality. Windows users might be familiar with the term ‘boot CD’ or ‘bootable CD’ or ‘Recovery/Restore Media’. A «LiveCD» is more than that because it gives the option of running a normal desktop environment with all the normal programs and some extras. A LiveCD usually finds your wired internet connection and Firefox should be able to surf the internet into here.
This guide has screen-shots of the 8.04 and 10.04 Desktop Edition of Ubuntu. However, Lubuntu, Xubuntu, Kubuntu and even unofficial Ubuntu-based distros as well as other versions all tend to have similar screens & menus.
Most distributions (versions or «distros» of Linux) have this LiveCd functionality on their installer CD, a few have a separate Cd to download. It is rare to find a distro that has no LiveCd session at all. Ubuntu tries to make their LiveCD the easiest to use. Although a LiveCD session is a good way to demo Ubuntu without making changes to a machine, a LiveCD will always be slower than a proper installation to the hard-drive. Cd-drives & Dvd-drives are physically slower than hard drives.
You can use a persistent image to keep data & settings safe after shut-down. This does go against many reasons for using a LiveCd session (rather than an installation) but it can be useful for multi-user machines, such as offices or in third world education projects.
Reasons for Using a LiveCD Session
LiveCD sessions are good to:
- give a ‘demo’ session on a machine before installing or upgrading
- checks hardware works as expected
check the look & feel of the distro
repair or preparation for awkward installations
repair/replace/install grub perhaps after (re)installing Windows
fix Windows problems on a machine that doesn’t have a dual-boot
anti-virus problems on a Windows system
resizing partitions to give Ubuntu more (or less) room
adding a new partition(s) to your hard-drive for other distros or for a new Windows
safely using a computer which seems to have poor security or lacks privacy. This is particularly good if you have a Usb stick or something to save your data and settings on (see ‘persistent image’)
Other Ways to Try Ubuntu
LiveCDs are designed for people that want to use Ubuntu on a computer for a few hours. If you want to carry a LiveCD around with you, a persistent image lets you customise your live session. If you want to use Ubuntu on a computer for a few weeks or months, Wubi lets you install Ubuntu inside Windows. If you want to use Linux on a computer permanently, dual-booting lets you install Window and Ubuntu (or which-ever distro) side-by-side on the same computer.
Because Wubi needs Windows and Ubuntu to co-operate, you have to deal with all the problems of both systems. For example, it’s not easy to completely uninstall Wubi. An experienced linux user or someone with considerable technical knowledge about Windows might find it better to try Wubi in some certain circumstances where dual-booting is infeasible or inadvisable. See the Wubi guide for more information about Wubi, particularly how to uninstall it cleanly.
Dual-booting can be daunting at first, but tends to work better once you’ve got it set up. This allows Window & Ubuntu to work without relying on the other for anything, except the boot-loader. As you get more comfortable with Ubuntu, you can just forget about your Windows partition. Reinstalling Windows is quite tricky, so it’s best to leave your Windows partition in place unless you’re absolutely sure you’ll never use Windows again.
How-To LiveCD Ubuntu
Preparing your LiveCD
You need to create, borrow, buy or request an Ubuntu CD or Usb-stick. Once you have an Ubuntu Cd or Usb it should work as an installer and as a !LiveCD or LiveUsb. There are some downloads, such as the Alternate Cd that cannot be used as !LiveCd/Usb.
To create a LiveCd
Download Ubuntu. For a live CD, avoid the «alternate CD» & the Server Edition because it has no desktop. For installing, using the alternate CD is a good idea, if installing using the standard CD does not work.
Make your own CD. Cheap «write once» CDs in packs of 10 or more are usually best. You could burn a new CD once every 6 months to get the latest version but all version are supported for 18 months and long time support releases for 3 years. You could also use the remaining CDs for trying out other distros Having a quick demo of other distros can help you understand Linux in general a LOT better a LOT faster, which helps you understand Ubuntu better.
To create a LiveUsb
The Usb stick needs to be 1Gb or more and there are 2 different pages giving advice. I prefer the first; Installation/FromUSBStick, Installation/FromImgFiles
To buy an Ubuntu Cd
The official Cannonical store, OnDisc, OSDisc or your local Ubuntu team might be able to help you find somewhere in your country from which to buy Ubuntu CDs. Also see GettingUbuntu for more information.
Using your LiveCD
Put the Ubuntu CD into the CD/DVD-drive and reboot the computer. You should see a menu with «Try Ubuntu without any change to your computer» at the top. If you don’t get this menu, read the booting From the CD guide for more information.
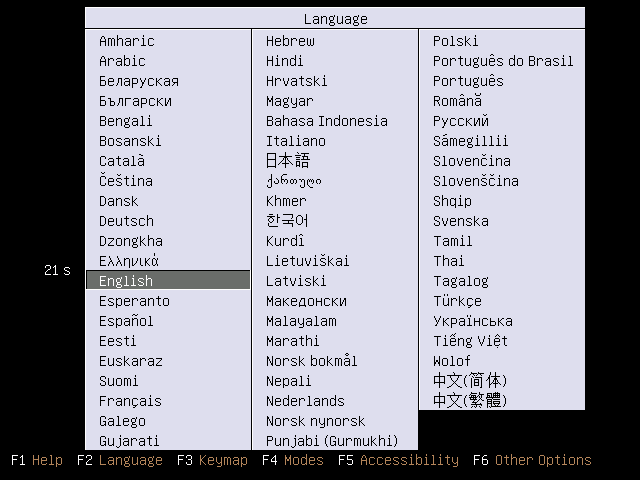
Figure 1: The first thing you will see when you boot from your Ubuntu CD
Press the up or down arrow on keyboard to get your language and then press enter
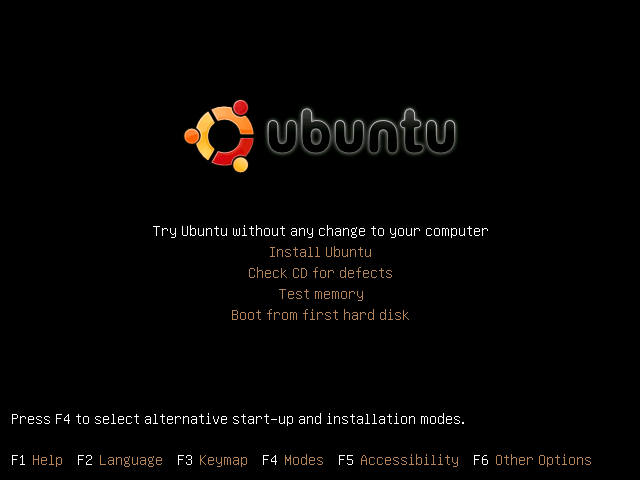
Figure 2: F6 will give you Boot Options & allows you to edit the boot-string
Choose «Try Ubuntu without any change to your computer». You should get a desktop which we call a «LiveCD session». If you don’t see a desktop, or need safe graphics mode, read the boot options for more information.
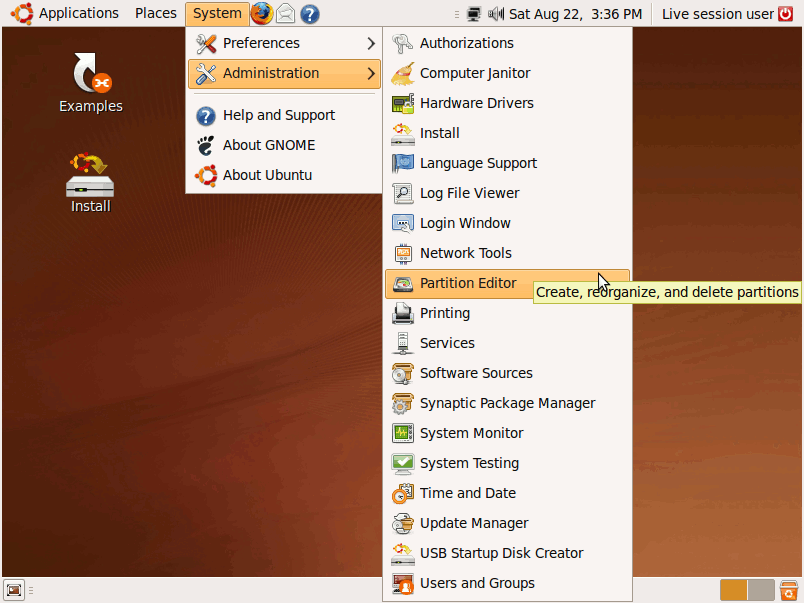
Figure 3: The LiveCD lets you manage partitions with GPartEd.
Also see the installer icon top-left
The Firefox icon on the top panel should let you surf the internet. Other normal programs are available in the menus.
After you have finished, shut the computer down and remove the CD. At this point anything you saved to the desktop or Documents folders and such will vanish — only things you saved into folders on the hard-drive will remain. This means that there won’t be any trace of your personal data (e-mails, passwords etc.) left on the machine, which can be quite useful if you don’t trust the Windows installation on the computer.
If you have troubles getting the working desktop but if it is still not behaving then try asking for help in Launchpad or use Signpost Help, or both.
Installing Programs or Other Packages
You can install programs to a LiveCD session in the normal way, although these will be forgotten as soon as you switch the machine off. For example, you might install antivirus or data-recovery tools to fix the system installed on the computer’s hard drive. Because space is limited on a LiveCD, you should limit the number of packages you install or consider using a persistent image.
Making a Customised LiveCD
If you want to make custom Ubuntu-based Live CD, you should read the LiveCD Customisation HowTo. Without even starting from an existing Ubuntu CD you can make a customised live system, see LiveCD Customisation From Scratch.
Troubles with a LiveCD
Logging in
Sometimes a LiveCD might ask you for a user-name or password. Just leave these blank and press enter (or allow it to time-out).

Figure 4: Just press enter to get past this, or let it time-out 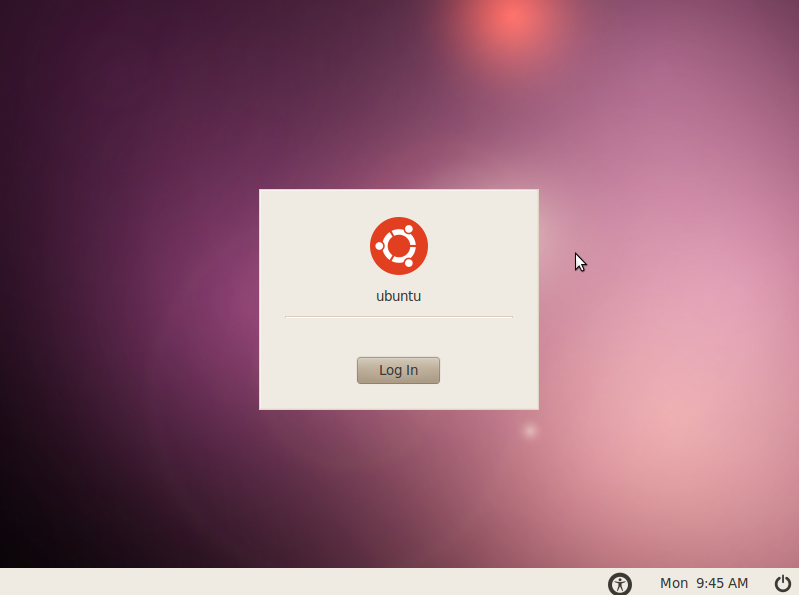
Security and Updating
While linux systems are more secure than Windows, LiveCD sessions are not meant for long-term use nor for sessions lasting several days. Because LiveCDs can’t easily be updated, they may well be vulnerable to security issues discovered in the months since their release. They also can’t protect you against scams such as phishing. If a criminal broke in to your live session, any changes he made to your session would be reset along with everything else when you reboot, although he could make permanent changes to the computer’s hard drive.
A persistent image can be updated as new security issues emerge, but also lets any damage done to your computer persist across sessions.
Setting a Password
You can set a password during a LiveCD session by opening a terminal, and typing in:
Text-Mode Installation
If your normal installation fails without giving an error message, or if you want to install on a very limited system, you can use the text-based installer instead.
Источник


