- Как создать загрузочный Linux Live USB на вашем Mac
- Загрузка на Apple Silicon
- Создание загрузочных USB-накопителей Linux в macOS
- Отформатируйте свой диск
- Конвертируйте ваш ISO
- Записать на USB
- Загрузите Linux на свой Intel Mac
- Ненавижу Терминал? Вместо этого используйте balenaEtcher
- How to: Create an Ubuntu Bootable USB on Mac, Windows or Ubuntu
- Using a Live USB drive
- Creating a Bootable Linux USB drive
- Method 1: Creating a Bootable USB Drive on Windows
- Method 2: Creating a Bootable USB Drive from Mac
- Method 3: Creating a Bootable USB Drive from Ubuntu
Как создать загрузочный Linux Live USB на вашем Mac

Установка Linux на ваш старый Mac — простой способ подарить ему новую жизнь. Для достижения наилучших результатов выберите облегченный дистрибутив Linux и верните часть производительности, потерянную из-за огромных обновлений macOS.
Загрузка на Apple Silicon
К сожалению, на момент написания этой статьи в июле 2021 года этот метод не будет работать на новых компьютерах Apple Silicon Mac с системой на кристалле M1 или более поздней версии. Кореллиум уже успел порт Linux для работы на чипе M1, но процесс намного сложнее, чем просто запись файла образа диска на USB-накопитель.
Версия ядра Linux 5.13 включает поддержка новых чипов на базе ARM, поэтому мы надеемся, что поддержка основных дистрибутивов, таких как Ubuntu, не за горами. Прежде чем начать, убедитесь, что вы используете Mac на базе Intel. Вы можете выяснить, какой у вас тип Mac, используя меню «Apple»> «Об этом Mac».
Создание загрузочных USB-накопителей Linux в macOS
Отформатируйте свой диск
Для достижения наилучших результатов рекомендуется перед запуском отформатировать USB-накопитель в файловую систему FAT. Разные дистрибутивы Linux имеют разные требования к пространству, но для большинства дистрибутивов должно хватить около 4 ГБ.
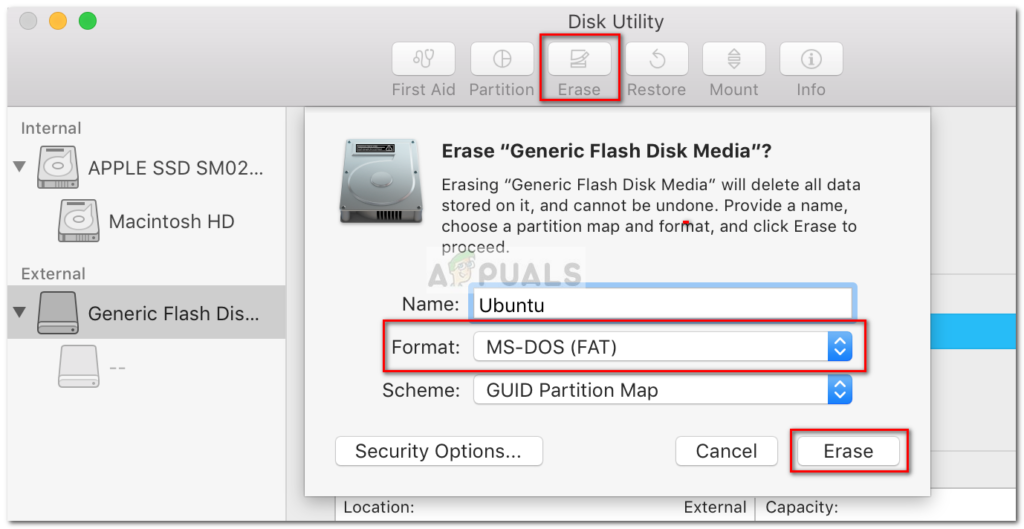
Запустите Дисковую утилиту (найдите ее с помощью Spotlight или найдите в папке «Приложения»> «Утилиты»), затем щелкните свой USB-накопитель. Если вы удовлетворены, вы можете стереть диск без потери данных, нажмите «Стереть», а затем выберите «MS-DOS (FAT)» в качестве формата и дайте ему имя. Нажмите «Стереть» и дождитесь завершения процесса.
Конвертируйте ваш ISO
Загрузив ISO-образ Linux, пора преобразовать его в формат IMG, чтобы его можно было записать как монтируемый образ диска. Откройте Терминал и введите следующую команду:
hdiutil convert /path/to/downloaded.iso -format UDRW -o / path / to / image
Замените /path/to/downloaded.iso местонахождением вашего загруженного ISO-образа Linux, например, если ubuntu.iso находится в папке «Загрузки», вы можете ввести
Точно так же вам необходимо указать место назначения, в которое будет помещен DMG (не нужно добавлять расширение «.dmg»). Для простоты мы рекомендуем использовать одно и то же место для обоих. Следуя приведенному выше примеру, вы можете ввести
Записать на USB
Когда ваш файл IMG готов к работе, самое время записать на USB. Вернитесь в Терминал и введите следующее, чтобы получить список дисков:
Вам нужен идентификатор только что отформатированного USB-накопителя. Если вы дали ему имя, например, «LINUX», то вы сможете найти его в столбце «NAME». Размер диска (например 8ГБ) тоже может выдать.
Теперь, когда вы знаете свой идентификатор, вам нужно отключить этот конкретный диск, чтобы вы могли записать на него свой файл DMG. Для этого используйте следующую команду, заменив diskX идентификатором (например, disk3 на скриншоте выше).
diskutil unmountDisk / dev / diskX
Наконец, пришло время записать файл DMG на USB-накопитель. Вы можете сделать это с помощью следующей команды:
sudo dd if = / путь / к / image.dmg of = / dev / diskX bs = 1m
Вам нужно будет заменить /path/to/image.dmg на путь к DMG-файлу, созданному выше, а / dev / diskX на идентификатор диска, использованный выше (например, disk3). Вам будет предложено ввести пароль администратора. Введите его, затем нажмите Enter, чтобы начать копирование. Вас также могут попросить предоставить Терминалу разрешение на доступ к съемному тому, которое вы должны предоставить.
Подождите, пока ваш Mac запишет содержимое DMG на ваш диск. Это может занять некоторое время в зависимости от размера DMG и скорости вашего Mac или USB-накопителя. Если вы видите ошибку «Вставленный диск не может быть прочитан этим компьютером», нажмите «Игнорировать» и продолжайте.
Загрузите Linux на свой Intel Mac
Выключите свой Intel Mac, затем вставьте USB-накопитель, если вы еще этого не сделали. Нажмите и удерживайте кнопку «Option», затем нажмите и отпустите кнопку питания, чтобы запустить Mac.
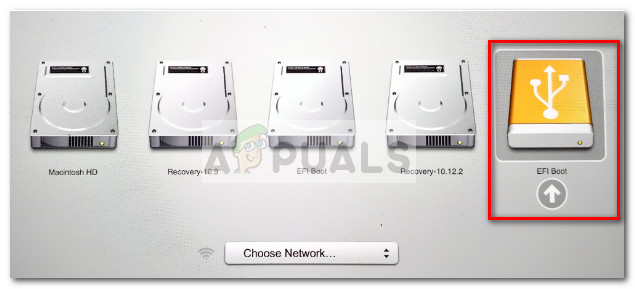
Удерживайте палец на кнопке «Option», пока на экране не появится список устройств. Вы должны увидеть свой загрузочный диск, вероятно, с надписью «Macintosh HD» и отдельный USB-накопитель с названием что-то вроде «EFI Boot» с другим значком.
Щелкните свой USB-накопитель, затем щелкните стрелку, направленную вверх, чтобы запустить Linux. Ваш Mac теперь загрузится с USB. Если вы решите установить Linux, подумайте о двойной загрузке для вашего Mac.
Ненавижу Терминал? Вместо этого используйте balenaEtcher
Хотя Терминал предоставляет способ сделать это, не полагаясь на дополнительное программное обеспечение, текстовые команды подходят не всем. Если вы предпочитаете использовать для этого приложение, попробуйте китовый гравер.
Это приложение с открытым исходным кодом выполняет весь процесс за вас, от преобразования изображения до его безопасного копирования на внешний том.
У вас есть ПК с Windows, на котором вы также хотите загружать Linux? См. Наши инструкции о том, как создать загрузочный диск Linux в Windows.
Источник
How to: Create an Ubuntu Bootable USB on Mac, Windows or Ubuntu
Ubuntu is always a good first choice if you’re looking to get into the Linux environment. Of all the popular Linux distributions, Ubuntu has one of the most solid graphical interface – which makes it a good choice for people that aren’t that comfortable with working exclusively from a terminal.
Although the are multiple ways that you can use to install the Ubuntu distribution, using a bootable USB drive is one of the most accessible ways to do it. But since Ubuntu (and most of the other Linux distributions) will only offer an ISO disc image for download, we’ll need a third-party tool capable of transforming the ISO file into an accessible bootable USB drive.
Using a Live USB drive
I know that some of you aren’t yet convinced whether you want to make the switch to Linux and leave Windows or macOS behind. To counter this potential inconvenient, we are going to run Ubuntu from a live USB drive – so you can test Ubuntu and see whether it’s something you would want without touching your current operating system.
If you end up falling in love with Ubuntu (like many other users that made the transition from Windows and Mac), you can then make it the primary operating system or set up a dual-boot scenario.
Creating a Bootable Linux USB drive
Whether you’re trying to create a live Ubuntu bootable USB from a Windows PC or from a Mac, we got you covered.
If you’re on Windows, please follow Method 1 for instructions on how to download the Ubuntu ISO file and convert it into a Live USB drive.
If you’re using a Mac, follow Method 2 for steps on using the terminal to create a Live USB Drive.
In the event that you’re already using Ubuntu but you’re looking to create a Live USB Drive for someone else to try, follow Method 3 for instructions on using the Startup Disk Creator to set up a Live USB Drive.
Method 1: Creating a Bootable USB Drive on Windows
Windows is not capable of converting an ISO file to a bootable USB drive natively, so we’ll need to use a third-party tool. Now there are quite a lot of tools that we can use to do this, but we recommend using Rufus – it’s faster and more dependable than most of the other options.
Note: Another solid tool that you can use to create a bootable USB drive is Universal USB Installer. But keep in mind that the guide below will be using Rufus.
When you are ready, follow the instructions now below to create a bootable USB drive of Ubuntu and use it as a live USB drive:
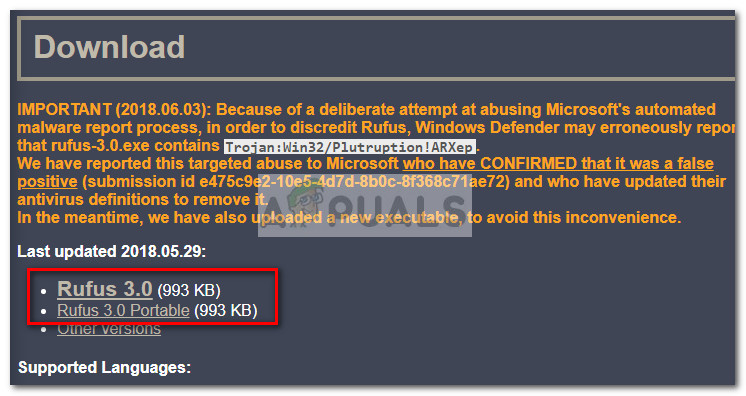
- Visit this link (here), scroll down to the Download section and download the latest version of Rufus. You can also download the portable version so you don’t have to install it on your system.
Note: If you downloaded the normal version, go through with the installation process.
- Next, we need to download the Ubuntu ISO image. Naturally, you can do this from a couple of different locations, but we recommend going the official route and visiting Ubuntu’s official download page. Next, download the latest available LTS version.
- Once the ISO file of Ubuntu is downloaded open Rufus and connect a USB drive with at least 2GB of free space. We highly encourage you to make sure that you don’t leave any important files on the disk since the entire content of the drive will be erased.
- Then, click the Device drop-down menu in Rufus and make sure that the proper USB drive is selected.
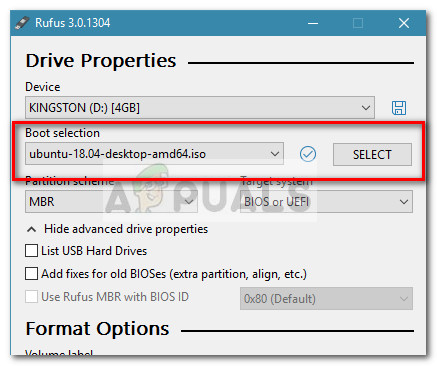
- Next, under Boot selection, select Disk or ISO image. Then, hit the Select button and navigate to the location where you previously downloaded the ISO file, select it and hit the Open button.
- Next, scroll down to Format Options and make sure that the File system is set to FAT32. Once all the options are in order, hit the Start button to begin creating the Ubuntu bootable USB drive.
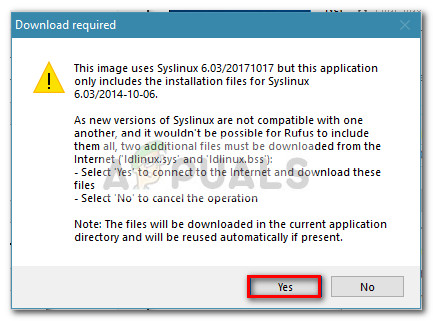
- If prompted by the Syslinux prompt, hit Yes to initiate the download.
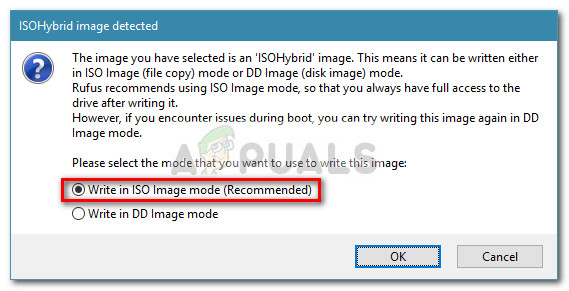
- At the ISOHybrid image detected prompt, select Write in ISO Image Mode (Recommended) and hit OK to commence the creation of the image.
- Hit OK at the final prompt to confirm the deletion of the data present on the USB flash drive. Depending on your systems specifications and the distribution that you’re using, this might take a little over 2 minutes. When the process is complete, you can close Rufus.
- Now that the bootable USB disk is created, leave the USB plugged in and reboot your computer. In case you’re using it on a different computer, plug the bootable USB into the other computer and start the computer.
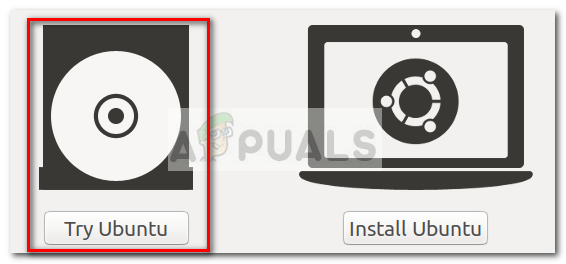
- At boot time, press the key associated with the boot menu (F2, F10, F8 or F12 on most computers). Then, select the USB disk that you’ve just created and start using Ubuntu without installing it – to use the Live USB feature, click on Try Ubuntu.
Method 2: Creating a Bootable USB Drive from Mac
If you need to create a bootable USB Drive with the Ubuntu distribution from a Mac, there’s no other native way to do it than from using the Terminal. However, we’re going to show you a much simpler way to do this. But before we get around to do this, it’s important to make sure that the USB stick is properly prepared.
Follow the guide down below to create a bootable USB stick from a MAC:
- Make sure that you prepare a USB flash drive with at least 2GB of space and backup any important information away from it since it will be re-formatted. Then, visit this official link (here) and download the Ubuntu ISO file to your Mac.
- Next, we’ll need to reformat the USB stick with the Disk Utility software. To do this, click the Spotlight icon (top-right corner) and search for Disk Utility. Once you open Disk Utility, make sure that the USB stick is properly connected. Once it becomes available inside Disk Utility, select it and click the Erase button at the top of the window. Then, set the Format to MS-DOS (FAT) and click the Erase button to re-format the USB drive.
- Now, we’ll need to install and open Etcher for macOS – a free, open source application that is capable to write the ISO file to the USB stick with minimal hassle. Note: By default, all recent macOS versions are blocked from running applications from unidentified developers. To get around this issue, we need to go to System Preferences > Security & Privacy and click the Open Anyway button associated with Etcher.
- In Etcher, click on Select image and navigate to the location of the ISO file that you previously downloaded. If you didn’t specify a custom location, you will be able to find it in the Downloads folder. Once the ISO file is selected, click the Select drive button and select the USB device that you previously reformatted.
- Next, kick-start the re-flashing process by clicking the Flash! button.
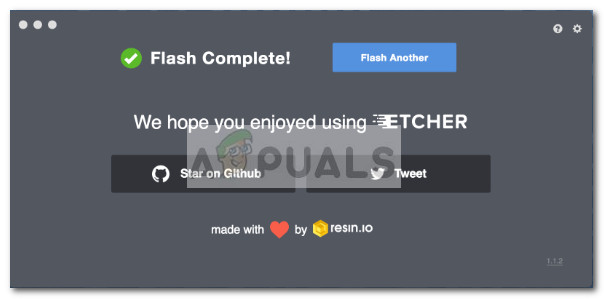
- Before starting the process, Etcher will ask you to input your administrator password. Once you do so and the process starts, wait until you see the “Flash Complete!” message.
Note: When the flash is complete, your macOS might display a message saying that “The disk you inserted is not readable by this computer”. Don’t worry about it and don’t click on Initialise. Instead, click on Eject and remove the USB device.
- In case you want to use the Ubuntu Live USB stick on a MAC, insert the USB stick and restart (or power on) your Mac while holding the Option key. This will launch the Startup manager which will show all the available bootable devices connected to the machine. The live Ubuntu USB disk that you’ve just created will appear as a yellow hard disk named “EFI Boot”. Opening it will bring you to the Standard Ubuntu boot menu, where you can choose Try Ubuntu to launch a live image.
Method 3: Creating a Bootable USB Drive from Ubuntu
If you’re already on Ubuntu, you don’t need a Windows or Mac computer to create a bootable USB drive with Ubuntu – you can do it straight from your current OS.
The Ubuntu distribution includes an extremely helpful tool called Startup Disk Creator – this will allow you to create a bootable USB drive from an ISO file.
Note: Most Linux distributions have a tool similar to Startup Disk Creator, but some have a different name. If you are running a different Linux distribution, check your Dash for a similar tool.
Here’s a quick guide to creating a bootable USB drive on Ubuntu:
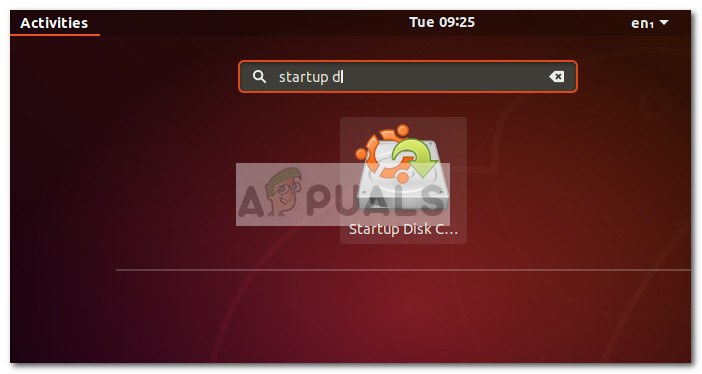
- In Ubuntu, click on the Show Application button and then use the search function to search for Startup Disk. Then, double-click Startup Disk Creator to open the application.
- Next, insert the USB driver that will act as the Live drive. Then, click the Other button and load up the Ubuntu ISO.
- Once the disk is loaded and the ISO image selected, click on the Make Startup Disk and wait for the process to complete.
- Once the Live USB bootable disk is created, insert into the computer that you wish to run Ubuntu on and boot from the USB drive. Then, click on Try Ubuntu to launch a live image.
Источник


 Note: If you downloaded the normal version, go through with the installation process.


 Note: When the flash is complete, your macOS might display a message saying that “The disk you inserted is not readable by this computer”. Don’t worry about it and don’t click on Initialise. Instead, click on Eject and remove the USB device.