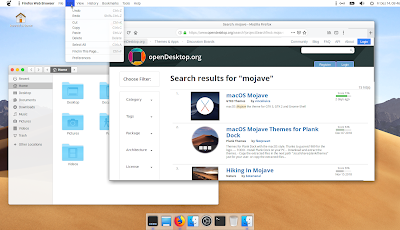
- Оформление Linux в стиле Mac OS.
- macOS look for Ubuntu MATE
- Making Ubuntu MATE look like macOS
- Install Virtual Machine
- First Steps
- Change MATE Appearance
- Making it look like macOS
- Theme
- Problem: Indicator Applet Complete Background
- Problem: Global Menu Font Weights and Colors
- Icon Theme
- Cursor / Mouse Pointer
- Wallpaper
- Dynamic Wallpapers
- Fonts
- Screensaver
- Advanced Styling
- Icons on Buttons and Menus
- Firefox
- Bootsplash
- Greeter
- Greeter Cursor / Mouse Pointer
- Как применить тему MacOS в Ubuntu 20.04?
Оформление Linux в стиле Mac OS.
Операционная система Linux сама по себе выглядит довольно симпатично, но, как известно, нет предела совершенству и почему бы не оформить свою систему ещё красивее. Так чтобы и глаз радовало и индивидуальности добавляло. Именно с этим вопросом мы сейчас и будем разбираться. Я сделаю оформление в стиле Mac OS, но, ты по аналогии, можешь оформить свою систему как твоей душе угодно. Я буду показывать на примере Ubuntu, всё таки самый популярный дистрибутив, но всё тоже самое можно делать и с другими дистрибутивами, только предварительно нужно будет установить окружение рабочего стола Gnome, это можно сделать командой:
Теперь установим утилиту Gnome Tweak Tool:
Теперь нам нужно установить расширения User Themes и Dash to dock, для этого открываем менеджер приложений и в поиске пишем User Themes, устанавливаем и точно также Dash to dock, они понадобятся нам в будущем.

Теперь пришло время скачать тему оформления. Это можно сделать на сайте https://www.opendesktop.org, в разделе Desktop Themes. Я возьму тему McOS-themes, она мне нравиться больше других, ну а ты можешь выбрать на свой вкус.
Нам нужно скачать два архива: тему для приложений: McOS-MJV-v2.0.tar.xz и тему Shell: McOS-Shell-themes.tar.xz
После скачивания архивы нужно распаковать в папку .themes в твоём домашнем каталоге, если такой папки нет её нужно создать (точка в начале имени папки говорит о том что она скрытая, чтобы увидеть скрытые папки и файлы нажми Cntl+H).
Теперь перейдём к иконкам, скачать их можно там же где и темы, только в разделе Icons. Я буду использовать набор иконок Cupertino iCons Collection. После скачивания распаковываем архив в папку .icons в домашнем каталоге.
И раз уж полностью меняем внешний вид системы, то скачаем и установим соответствующие шрифты:
На этом подготовительная часть законченна, можем переходить к настройке внешнего вида. Открываем Все приложения/Дополнительные настройки GNOME, там идем в раздел «Внешний вид» и выставляем темы:
- Приложения — McOS-MJV-v.2.0
- Значки — Cupertino
- Тема Shell — McOS-Light-Shell (если этот параметр не активен, во вкладке Расширения активируй User themes)
Там же меняем изображение фона рабочего стола и экрана блокировки.
После этого переходим в раздел Расширения и клацаем на шестерёнку возле Dash to dock. Откроются настройки панели задач:
- во вкладке «Положение и размеры» выставляем расположение — снизу, ограничить размер иконок — 40 (подбери под себя в зависимости от размера монитора), интеллектуальное скрытие — активируем
- во вкладке «Команды» ставим галку на параметре «Показывать миниатюры открытых окон
- во вкладке «Внешний вид» выставляем непрозрачность — 80%
Шрифты можно выставить так (а можно как нравиться):
- Заголовок окна — Apple Garamond Light Dold
- Интерфейс — Apple Garamond Regular
- Документ — Apple Garamond Light Regular
- Моноширинный — не меняем
После всех этих манипуляций перезагружаем компьютер и наслаждаемся обновленным интерфейсом.
А на этом на сегодня всё. Не забывай возвращаться к нам, что бы узнать ещё много интересного.
Источник
macOS look for Ubuntu MATE
Making Ubuntu MATE look like macOS
- Link abrufen
- Andere Apps
Install Virtual Machine
First Steps
Change MATE Appearance
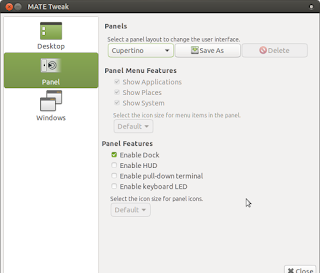
In MATE Tweak (System > Settings > Appearance > MATE Tweak) change the Panel to Cupertino:
Making it look like macOS
Theme
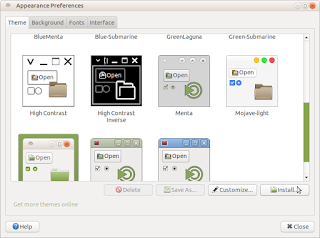
Apply it in the Appearance window:
Problem: Indicator Applet Complete Background
The background color if the indicator applet does not match the top bar:
/* needed for transparent indicator applet */
.mate-panel-menu-bar menubar <
background-color: transparent;
background-image: none;
>
Log out and log back in again, and the background is correct:
Problem: Global Menu Font Weights and Colors
/.config/gtk-3.0/gtk.css :
/**************************
* Font color and weights *
**************************/
.mate-panel-menu-bar,
.mate-panel-menu-bar menuitem > label > accelerator <
color: #382828;
font-weight: 500;
>
menubar.-vala-panel-appmenu-bold > menuitem:first-child > label <
font-weight: 800;
>
.mate-panel-menu-bar menuitem:hover > label,
.mate-panel-menu-bar menuitem:hover > label > accelerator <
color: #FFFFFF;
>
.mate-panel-menu-bar menuitem:disabled > label,
.mate-panel-menu-bar menuitem:disabled > label > accelerator <
color: rgba(54, 54, 54, 0.4);
>
Log out and log back in again, and the font color and weight is correct:
Icon Theme
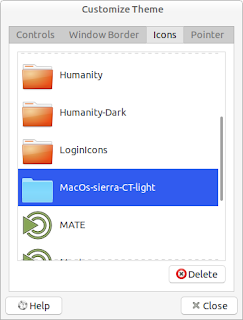
Download the light icon theme from Mojave CT icon theme. Unpack it into your local .icons folder (create it, if it doesn’t exist yet).
Now, customize your current theme in Appearance:
and select the Mojave-CT-light icon set:
Cursor / Mouse Pointer
/Downloads/175749-OSX-ElCap.tar.bz2
mv OSX-ElCap/OSX-ElCap
/.icons
rm -r OSX-ElCap
In the Appearance dialog, click Customize. to change the pointer in the Pointer tab:
The Mojave-light theme also contains a Plank theme. To use it, create the folder /usr/share/plank/themes/Mojave-light. From there, create a symbolic link to the theme definition file (dock.theme):
cd /usr/share/plank/themes
sudo mkdir Mojave-light
cd Mojave-light
sudo ln -s ../../themes/Mojave-light/plank/dock.theme .
Hold Ctrl and right-click the dock, choose Preferences, and select Mojave-light in the Theme drop-down:
Wallpaper
Just search for macos mojave wallpaper on your preferred search engine and download a picture you like. Use the Background tab in the Appearance dialog to set the background image.
Dynamic Wallpapers
Create a wallpaper folder inside your Pictures folder:
Find the link in this Github gist and download the image ZIP file. Unzip it into your newly created folder (and clean up):
/Downloads/mojave_dynamic.zip
rm -r __MACOS
Put the XML contents from the gist into
Choose the mojave.xml as your new background image in Control Center > Appearance. In the Background tab click the Add. button and change the file type to All files.
Fonts
Download the San Francisco Fonts from Github. Extract the files to a temporary folder and move the files to your local .fonts folder (create the folder, if it doesn’t exist yet):
/Downloads/SanFranciscoFont-master.zip
mv SanFranciscoFont-master/*
/.fonts/
rm -r SanFranciscoFont-master
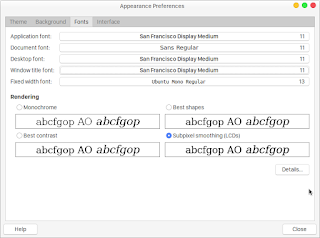
In the Appearance dialog, open the Fonts tab:
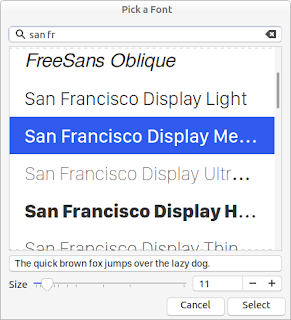
Choose San Franciso Display Medium for
- Application font
- Desktop font
- Window title font
Choose Sans Regular as Document font.
Screensaver
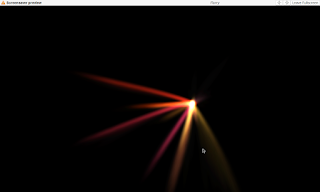
Install an additional package to get the Flurry screensaver:
sudo apt-get install xscreensaver-gl-extra
Configure it via the Control Center:
Advanced Styling
Icons on Buttons and Menus
Remove the icons from the buttons and menus using gsettings :
gsettings set org.mate.interface buttons-have-icons false
gsettings set org.mate.interface menus-have-icons false
Note: Use org.gnome.desktop.interface in standard Gnome environments.
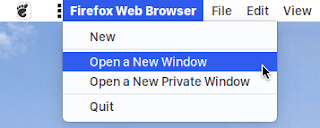
Firefox
Using the userChrome.css from Material Safari style for Firefox. This requires git (install it, if not yet done so using sudo apt install git ). Go to your default profile and clone the repository:
/.mozilla/firefox/*.default/
git clone https://git.angry.im/PeterCxy/firefox-material-safari.git chrome
Restart Firefox and you’re done:
Bootsplash
Download 170649-darwin.tar.gz from Darwin Plymouth. Run the following commands to install/activate it:
cd /usr/share/plymouth/themes/
sudo tar xvzf
/Downloads/170649-darwin.tar.gz
sudo update-alternatives —install /usr/share/plymouth/themes/default.plymouth default.plymouth /usr/share/plymouth/themes/darwin/darwin.plymouth 100
sudo update-alternatives —config default.plymouth
Modify /usr/share/plymouth/themes/darwin/darwin.plymouth and replace /lib/ with /usr/share/ in the [script] section:
Choose the appropriate option, 1 in my case:
There are 3 choices for the alternative default.plymouth (providing /usr/share/plymouth/themes/default.plymouth).
Selection Path Priority Status
————————————————————
* 0 /usr/share/plymouth/themes/ubuntu-mate-logo/ubuntu-mate-logo.plymouth 150 auto mode
1 /usr/share/plymouth/themes/darwin/darwin.plymouth 100 manual mode
2 /usr/share/plymouth/themes/ubuntu-mate-logo/ubuntu-mate-logo-scale-2.plymouth 149 manual mode
3 /usr/share/plymouth/themes/ubuntu-mate-logo/ubuntu-mate-logo.plymouth 150 manual mode
Press to keep the current choice[*], or type selection number: 1
update-alternatives: using /usr/share/plymouth/themes/darwin/darwin.plymouth to provide /usr/share/plymouth/themes/default.plymouth (default.plymouth) in manual mode
Update the boot loader:
sudo update-initramfs -u
Cross fingers and reboot!
Greeter
First, you need to install the webkit based greeter for lightdm (and the Xephyr X-server for testing):
sudo apt install lightdm-webkit-greeter xserver-xephyr
Download the ZIP file from Github, unpack it and move it to a proper location:
unzip Downloads/lightdm-webkit-theme-macos-master.zip
sudo mv lightdm-webkit-theme-macos-master /usr/share/lightdm-webkit/themes/macos
Move your local theme from .themes to /usr/share/themes:
/.themes/Mojave-light /usr/share/themes
chmod -R root:root /usr/share/themens/Mojave-light
Test the configuration using the test-mode (press Ctrl-C to exit):
Reboot or restart lightdm to activate this (caution: restarting lightdm will immediately terminate your session).
sudo service lightdm restart
Greeter Cursor / Mouse Pointer
On the login screen, the default mouse pointer is still used. Move your cursor theme from your local .icons folder to /usr/share/icons:
Источник
Как применить тему MacOS в Ubuntu 20.04?
В системах Linux уже есть много впечатляющих встроенных тем, но вам может надоесть использовать их снова и снова.
В дистрибутивах Linux интересно то, что вы можете изменить всю машинную среду, изменив темы в любое время. Это не только дает новый взгляд на операционную систему, но и обеспечивает особый опыт.
Тема macOS, несомненно, является самой чистой темой среди всех операционных систем. Как насчет того, чтобы установить такую же тему на свой Ubuntu? Коллекция тем для macOS доступна в различных онлайн-источниках, выберите любой популярный сайт и загрузите оттуда свою любимую тему.
Чтобы добавить тему macOS в среду Ubuntu, вам необходимо переделать следующие четыре функции операционной системы:
- Тема.
- Иконки.
- Расположение и внешний вид док-станции.
- Внешний вид оболочки.
Во-первых, нам нужно загрузить » Инструмент настройки Gnome «.
» Инструмент настройки Gnome » — это расширение оболочки Gnome, которое используется для внесения изменений в интерфейс среды. С помощью этого инструмента вы можете полностью изменить внешний вид системы Ubuntu.
Загрузите » Gnome Tweak Tool » с помощью команды (если у вас ее еще нет):
Вы можете получить его из следующих приложений:
Источник


