- Монтирование разделов
- Содержание
- Немного теории
- Способы монтирования
- Способ 1: монтирование через универсально уникальный идентификатор (UUID)
- Способ 2: монтирование через имена устройств
- Дополнительная информация
- Донастройка системы
- Как смонтировать разделы Windows в Ubuntu
- Монтировать Windows с помощью файлового менеджера
- Монтирование раздела Windows в режиме «только чтение» с терминала
- How to Mount Windows Partitions in Ubuntu
- Mount Windows Using the File Manager
- Mount Windows Partition in Read Only Mode From Terminal
- If You Appreciate What We Do Here On TecMint, You Should Consider:
- Access Linux filesystems in Windows and WSL 2
- Getting started
- Accessing these files with File Explorer
- Limitations
- Give us your feedback!
- Ubuntu Documentation
- Using the File Manager
- File System Differences
- FAT32
- Configuring /etc/fstab
- Preface
- Automatic Configuration
- Manual Configuration
- Other Resources
- Footnote
Монтирование разделов
Содержание
Немного теории
Способы монтирования
Способ 1: монтирование через универсально уникальный идентификатор (UUID)
UUID — это атрибут конкретной файловой системы, а не произвольное число, зависящее от физического порядка подключения дисков или случайностей инициализации дисковой подсистемы ядром.
Узнаем UUID разделов, для этого
Предположим, мы хотим подключить раздел «Shared» (NTFS-раздел, находящийся на основном диске компьютера) и «TRENDNET8GB» (флэшка, отформатированная в FAT32).
Способ 2: монтирование через имена устройств
Считается устаревшим и строго не рекомендуется к постоянному использованию.
Единственным заметным плюсом является небольшая длина имён устройств, что удобно при прямой работе с консолью. Например, во время реанимации умершей системы.
Разделы, оканчивающиеся цифрой — файловые системы. Разделы без цифры на конце — реальные физические устройства. В данном примере участвуют два физических диска (/dev/sda и /dev/sdb) и два рейд-массива (по сути — две файловые системы, не привязанные напрямую к какому-то одному физическому носителю).
Пример вывода команды fdisk (вывод parted отличается очень незначительно):
Попробуем достучаться до массива md0.
Дополнительная информация
Я не стал загружать основной текст статьи расшифровкой опций монтирования, но несколько слов пояснения сказать необходимо.
Донастройка системы
Теперь диски стали подключаться автоматически, но так как это делается от имени root, у нас пропала возможность на подключенных дисках давать права на общий доступ, чтобы восстановить эту возможность добавим настройку в Samba:
Как смонтировать разделы Windows в Ubuntu
Если вы используете двойную загрузку Ubuntu и Windows, вы не сможете получить доступ к разделу Windows (отформатированному с использованием файловой системы NTFS или FAT32), когда используете Ubuntu, после спящего режима Windows (или когда он не полностью выключен).
Это связано с тем, что Linux не может монтировать и открывать разделы Windows в спящем режиме (полное обсуждение этого выходит за рамки данной статьи).
В этой статье мы просто хотим показать раздел Windows в Ubuntu.
Мы объясним несколько полезных методов решения вышеуказанной проблемы.
Монтировать Windows с помощью файлового менеджера
Первый и самый безопасный способ загрузки в Windows и полного выключения системы.
Как только вы это сделаете, включите компьютер и выберите ядро Ubuntu в меню grub, чтобы загрузиться в Ubuntu.
После успешного входа в систему откройте ваш файловый менеджер и на левой панели найдите раздел, который вы хотите смонтировать (в разделе «Устройства»), и щелкните по нему.
Он должен быть установлен на главной панели.
Монтирование раздела Windows в режиме «только чтение» с терминала
Второй способ – вручную смонтировать файловую систему в режиме только для чтения.
Обычно все смонтированные файловые системы находятся в каталоге /media/$USERNAME/.
Убедитесь, что у вас есть точка монтирования в этом каталоге для раздела Windows (в этом примере $USERNAME=aaronkilik и раздел Windows смонтирован в каталог с именем WIN_PART, имя, которое соответствует метке устройства):

Если точка монтирования отсутствует, создайте ее с помощью команды mkdir, как показано далее (если вы получаете ошибки «В доступе отказано», используйте команду sudo для получения привилегий root):
Чтобы найти имя устройства, перечислите все устройства, подключенные к системе, с помощью утилиты lblink.

Затем подключите раздел (в данном случае /dev/sdb1) в режиме только для чтения к указанному выше каталогу, как показано.
Теперь, чтобы получить сведения о монтировании устройства (точка монтирования, параметры и т.д) выполните команду mount без каких-либо опций и передайте вывод в команду grep.

После успешной установки устройства вы можете получить доступ к файлам в разделе Windows, используя Ubuntu.
Но помните, что поскольку устройство смонтировано только для чтения, вы не сможете записывать в раздел или изменять какие-либо файлы.
Итак, обратите внимание, что если Windows находится в режиме гибернации, если вы записываете или изменяете файлы в разделе Windows из Ubuntu, все ваши изменения будут потеряны после перезагрузки.
How to Mount Windows Partitions in Ubuntu
If you are running a dual-boot of Ubuntu and Windows, sometimes you might fail to access a Windows partition (formatted with NTFS or FAT32 filesystem type), while using Ubuntu, after hibernating Windows (or when it’s not fully shutdown).
This is because, Linux cannot mount and open hibernated Windows partitions (the full discussion of this is beyond the ambit of this article).
In this article, we will simply show how to mount Windows partition in Ubuntu. We will explain a few useful methods of solving the above issue.
Mount Windows Using the File Manager
The first and safest way is to boot into Windows and fully shutdown the system. Once you have done that, power on the machine and select Ubuntu kernel from the grub menu to boot into Ubuntu.
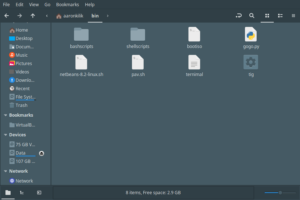
After a successful logon, open your file manager, and from the left pane, find the partition you wish to mount (under Devices) and click on it. It should be automatically mounted and its contents will show up in the main pane.
![]() Mounted Windows Partition
Mounted Windows Partition
Mount Windows Partition in Read Only Mode From Terminal
The second method is to manually mount the filesystem in read only mode. Usually, all mounted filesystems are located under the directory /media/$USERNAME/.
Ensure that you have a mount point in that directory for the Windows partition (in this example, $USERNAME=aaronkilik and the Windows partition is mounted to a directory called WIN_PART, a name which corresponds to the device label):
![]() List Mounted Partitions
List Mounted Partitions
In case the mount point is missing, create it using the mkdir command as shown (if you get “permission denied” errors, use sudo command to gain root privileges):
To find the device name, list all block devices attached to the system using the lsblk utility.
![]() List Block Devices
List Block Devices
Then mount the partition ( /dev/sdb1 in this case) in read-only mode to the above directory as shown.
Now to get mount details (mount point, options etc..) of the device, run the mount command without any options and pipe its output to grep command.
![]() List Windows Partition
List Windows Partition
After successfully mounting the device, you can access files on your Windows partition using any applications in Ubuntu. But, remember that, because the device is mounted as read-only, you will not be able to write to the partition or modify any files.
Also note that if Windows is in a hibernated state, if you write to or modify files in the Windows partition from Ubuntu, all your changes will be lost after a reboot.
For more information, refer to the Ubuntu community help wiki: Mounting Windows Partitions.
That’s all! In this article, we have shown how to mount Windows partition in Ubuntu. Use the feedback form below to reach us for any questions if you face any unique challenges or for any comments.
If You Appreciate What We Do Here On TecMint, You Should Consider:
TecMint is the fastest growing and most trusted community site for any kind of Linux Articles, Guides and Books on the web. Millions of people visit TecMint! to search or browse the thousands of published articles available FREELY to all.
If you like what you are reading, please consider buying us a coffee ( or 2 ) as a token of appreciation.

We are thankful for your never ending support.
Access Linux filesystems in Windows and WSL 2
September 10th, 2020
Starting with Windows Insiders preview build 20211, WSL 2 will be offering a new feature: wsl —mount . This new parameter allows a physical disk to be attached and mounted inside WSL 2, which enables you to access filesystems that aren’t natively supported by Windows (such as ext4).
So, if you’re dual booting with Windows & Linux using different disks, you can now access your Linux files from Windows!
Getting started
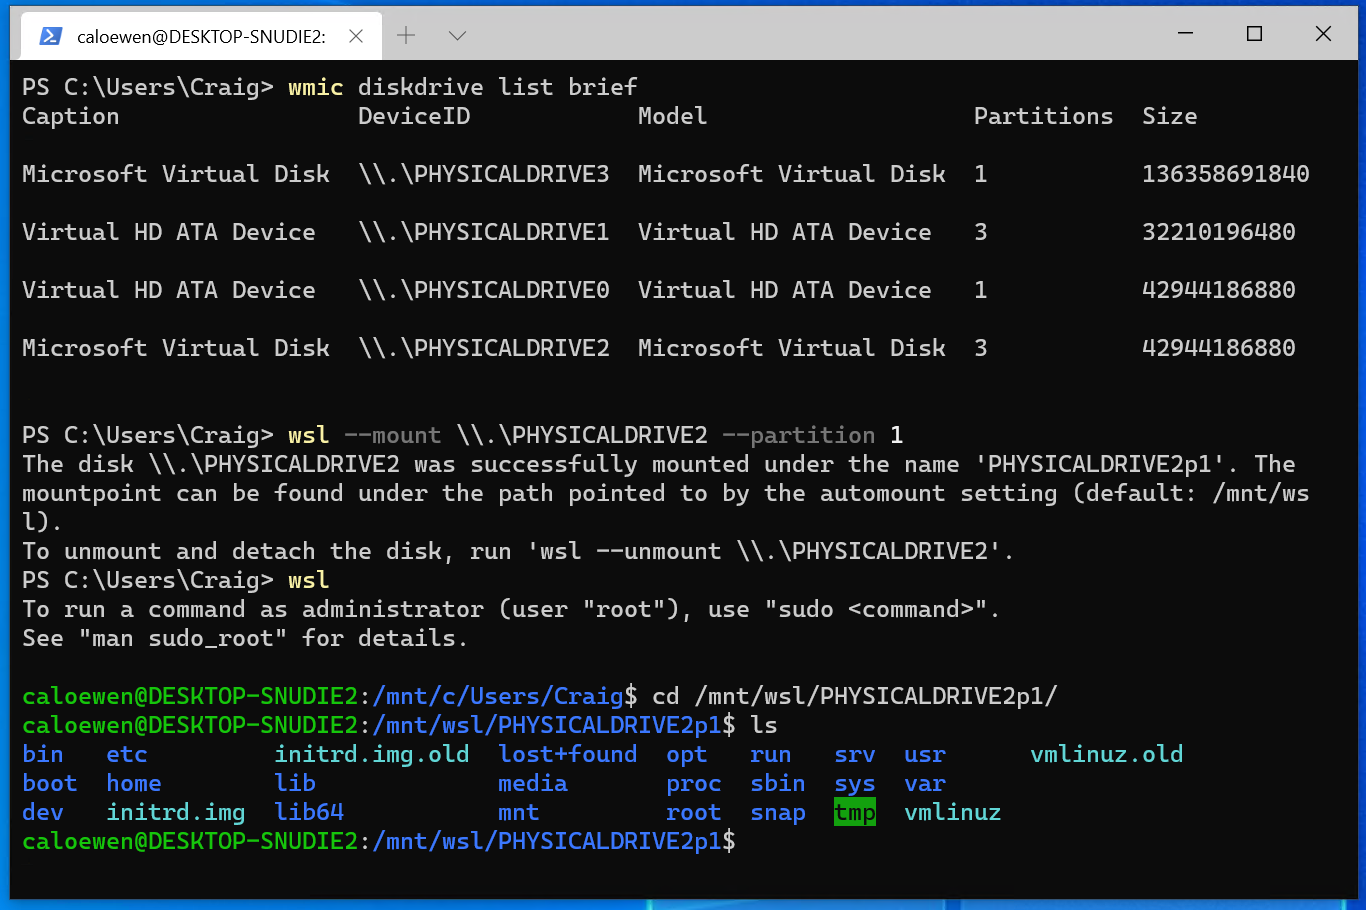
To mount a disk, open a PowerShell window with administrator privileges and run:
To list the available disks in Windows, run:
To unmount and detach the disk from WSL 2, run
The disks paths are available under the ‘DeviceID’ columns. Usually under the \\.\\\.\PHYSICALDRIVE* format. Below is an example of mounting a specific partition of a given hard disk into WSL and browsing its files.
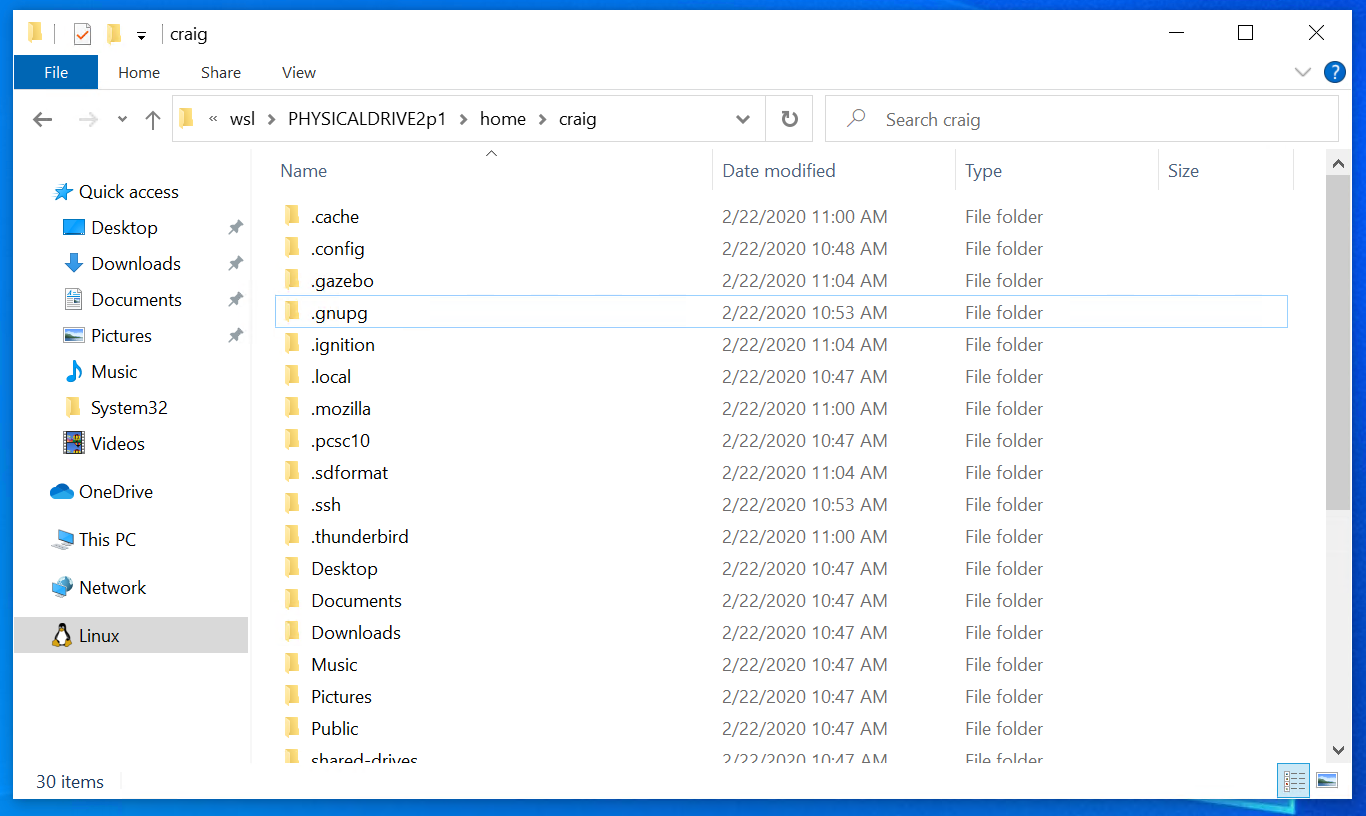
Accessing these files with File Explorer
Once mounted, it’s also possible to access these disks through the Windows explorer by navigating to \wsl$ and then to the mount folder.
Limitations
By default, wsl —mount attempts to mount the disk as ext4. To specify a filesystem, or for more advanced scenarios, check out Mount a disk in WSL 2.
Also please note that this feature comes with the limitation that only physical disks can be attached to WSL 2. At this time, it’s not possible to attach a single partition. More details on the limitations here.
Give us your feedback!
If you run into any issues, or have feedback for our team please file an issue on our Github , and if you have general questions about WSL you can find all of our team members that are on Twitter on this twitter list.
Ubuntu Documentation
Ubuntu is capable of reading and writing files stored on Windows formatted partitions. These partitions are normally formatted with NTFS, but are sometimes formatted with FAT32. You will also see FAT16 on other devices.
Ubuntu will show files and folders in NTFS/FAT32 filesystems which are hidden in Windows. Consequently, important hidden system files in the Windows C:\ partition will show up if this is mounted. Since it is all-too-easy to accidentally modify or delete files which are essential for Windows, it is advisable to mount your Windows C:\ partition as seldom as possible, preferably not at all, or read-only by configuring /etc/fstab (see below). If you have data which you want to access regularly from both Windows and Ubuntu, it is better to create a separate data partition for this, formatted NTFS.
Whether you write to your Windows C:\ partition or a shared NTFS data partition, be aware that if you are using Windows 7, and Windows 7 is in a hibernated state when you write to the NTFS partition from Ubuntu, you will lose all your changes. This is because when Windows 7 is hibernated it writes the system state to a file stored on disk and restores from that file when the system is re-awakened, thus restoring the whole fileystem to a state before any changes made from Ubuntu. In Windows 7 you must avoid using hibernation. With Windows 8, the situation is more complex in that, by default, it uses a hybrid hibernation/shutdown when you shut the system down. Any changes made by Ubuntu will be lost when you reboot into Ubuntu.
With both Windows 7 and Windows 8 (when installed to a legacy mbr partition table) there is usually a 100-200MB boot partition labelled «SYSTEM». Do not mount it — you do not need to. Similarly it is highly advisable to leave any recovery partitions unmounted.
Using the File Manager
For those using a desktop version of Ubuntu, or one of its offical derivatives, the easiest and quickest way of mounting NTFS or FAT32 partitions is from the file manager: Nautilus in Ubuntu, Thunar in Xubuntu, Dolphin in Kubuntu and PCManFM in Lubuntu. Simply look in the left pane of the file manager for the partition you wish to mount and click on it — it will be mounted and its contents will show up in the main pane. Partitions show with their labels if labelled, or their size if not.
Unless you require your Windows partition — or a NTFS/FAT32 partition for data shared with Windows — mounted every time you boot up for one of the reasons given below, mounting from the file manager in this way should suffice.
If you are using a Wubi version of Ubuntu and you wish to browse the host partition, you do not need to mount it — it is mounted already in the «host» folder. Click on «File System» in the left pane of the Nautilus file browser and then open the host folder which you will see in the main pane.
File System Differences
For a more in depth analysis, see LinuxFilesystemsExplained, but here are some basics:
- Windows 7, Vista, XP, 2000, older NT systems, and Windows Server 2003 and 2008 are formatted with NTFS. In rare cases, OEM manufacturers have pre-installed Windows XP and Windows 2000 to FAT32 filesystems.
- Older versions of Windows such as Windows ME, 98, and 95 are formatted with FAT32.
- Flash drives, such as a USB thumb drive or a camera’s flash card are typically formatted as FAT16. Some Flash drives are formatted with Microsoft’s proprietary exFAT file system.
In Windows, you can check which filesystem your partition is formatted with by right-clicking the partition in Windows Explorer and selecting Properties. In Ubuntu, run from terminal:
The ntfs-3g driver is used in Linux-based systems to read from and write to NTFS partitions.
NTFS (New Technology File System) is a file system developed by Microsoft and used by Windows computers (Windows 2000 and later). Until 2007, Linux distros relied on the kernel ntfs driver which was read-only. The userspace ntfs-3g driver now allows Linux-based systems to read from and write to NTFS formatted partitions.
The ntfs-3g driver is pre-installed in all recent versions of Ubuntu and healthy NTFS devices should work out of the box without further configuration. In Ubuntu versions 11.10 and later the ntfs-3g package included the functionality previously provided by ntfsprogs. Trying to install ntfsprogs in 11.10 (and possibly in 12.04) will cause the package-manager to ask if you wish to remove ntfs-3g. Users who have installed ntfsprogs and failed to notice the message from the package manager have unintentionally uninstalled ntfs-3g, after which the system falls back to the read-only kernel ntfs driver. Loss of the ntfs-3g driver for similar reasons has also been reported when upgrading from 11.04 to 11.10. If you are experiencing inability to write to a NTFS formatted partition or device, check whether or not the ntfs-3g package is installed.
FAT32
The vfat driver is used in linux to read and write FAT32 and FAT16 partitions.
Configuring /etc/fstab
Preface
If you require one or more of your Windows partitions mounted automatically during bootup, it is necessary to add one line to the file /etc/fstab for each partition that is to be mounted. Some reasons for mounting partitions by means of /etc/fstab, rather than relying on the file manager, include:
- Convenience.
- Where more than one user account is in use during a session. Partitions mounted from one user account by means of the file manager are not accessible to the other account(s).
- Where libraries have been set up in applications such as Banshee or Rhythmbox (for music) or Shotwell (for photos). If those libraries contain files on partitions mounted by means of the file manager, an error will occur in a subsequent session if the partition is not mounted first.
Where more advanced or special mount options are needed. Three working configurations for different needs are given below, but anything more advanced is beyond the scope of this wiki page. The NTFS-3G manual gives a list of mount options suitable for NTFS filesystems.
Automatic Configuration
Although there are a number of GUI applications available from the Ubuntu Software Centre, none of these can be recommended at the time of this writing, unfortunately. They are obsolete and unmaintained and can all cause problems. Two examples are ntfs-config and PySDM. (PySDM is no longer in the repository with effect from 12.10.) If you find a recommendation anywhere for either of these applications, it is likely to be an old one, and should not be followed. At this time it is advisable to configure /etc/fstab manually.
Manual Configuration
First, you need to find the device locations of the partition(s) you wish to mount. Open a terminal and run:
For illustration purposes, an example output from a computer setup with a Vista/Ubuntu dual-boot and shared NTFS data partition is shown here:
The first three partitions, all NTFS, are the ones that concern us here. There are no FAT32 partitions. In this instance, all three NTFS partitions have partition labels, which makes it easier to identify the purpose of each. If your blkid output does not include partition labels, this means that the partitions do not have labels and you will have to determine which partition you wish to mount by another means. Of the three NTFS partitions, we are going to configure /etc/fstab with only the third, the Data partition. Partition /dev/sda1 is the OEM manufacturer’s recovery partition and should be left unmounted, or as described below. Partition /dev/sda2 is the Windows C:\ partition and is best not included in /etc/fstab for the reasons described above, or mounted read-only — see below.
You will now need to create a mountpoint for each NTFS partition that you wish to mount by means of /etc/fstab. In our illustration we are going to add one entry only for /dev/sda3. From a terminal:
In this case we have created a mountpoint with the same name – Data – as the partition label. You may use (almost) any string you wish.
Before editing /etc/fstab directly, it is a good idea to make a backup. From a terminal:
Now open /etc/fstab in a text editor with root privileges. In Ubuntu:
In Xubuntu or Lubuntu:
For a general-purpose read-write mount, add this line to the end of /etc/fstab:
Replace the UUID with the one relevant for your partition as shown in your blkid output. “519CB82E5888AD0F” will not work for you.
Also, substitute your mountpoint for “/media/Data”. In case you have a blank space in the name of the mountpoint you want to use like «New Volume» instead of «Data» located in «/media» use «/media/New\040Volume». The space character is created by using «\040» in the fstab.
You will also need to change the “locale=en_US.utf8” option to one suitable for your location and language if you are not in the USA. You can determine your locale with this terminal command:
Or for a list of all locales available on your system:
Now save your edited /etc/fstab and close the text editor. The partition(s) you have configured will be mounted the next time you reboot, but to mount them now:
Two special cases
Sample /etc/fstab lines are suggested for two special cases.
Option 1 — for mounting read-only access. For example, this would be suitable for mounting your Windows C:\ partition if you need to access it. Modify the line below with your UUID and mountpoint:
Option 2 — to ensure that Ubuntu does not mount the partition and also disables graphical mounting from the file manager. For example, you may wish to ensure that recovery and system partitions are never inadvertently mounted and do not appear in the file manager. In this case you need to create a mountpoint in /mnt, not /media. Modify the line below with your UUID and mountpoint:
Note: with these mount options, the partition does not appear in the Devices list in the left pane of Nautilus (the Ubuntu file manager), but it still appears in Dolphin, the Kubuntu File Manager. Clicking on the partition in Dolphin causes the display of an error message. This solution is less elegant in Dolphin than with Nautilus, but the desired effect is achieved — the partition cannot be mounted.
If you need to revert to the original configuration:
Substitute your mountpoint in the second line.
FAT32 Partition
FAT32 partitions are mostly only found in older systems. If you are creating a partition to be used for data to be shared between Windows and Ubuntu, it is better to choose NTFS. Should you have a FAT32 partition which you need to mount using /etc/fstab, this will work to mount it read-write:
Replace with the UUID that blkid reveals for your partition, and adjust for your mountpoint. These mount options will make all files in the partition executable. If you have other needs, you will need to modify the options, but this is beyond the scope of this wiki page.
Other Resources
Footnote
This page has recently been subject to significant revision. If you have any comments about current content, or suggestions for further additions or edits, please head over to this Ubuntu forums discussion thread so that we can co-ordinate our efforts.
MountingWindowsPartitions (последним исправлял пользователь jeremiah-l-marks 2014-11-16 06:31:46)
The material on this wiki is available under a free license, see Copyright / License for details
You can contribute to this wiki, see Wiki Guide for details


