- Как установить подсистему Linux с рабочим столом в Windows 10
- Включение подсистемы Windows для Linux в Windows 10
- 1. Включите подсистему в PowerShell
- 2. Установите дистрибутив Linux или Ubuntu из Windows Store
- 3. Запуск дистрибутива
- Установить рабочий стол Linux в Windows
- Windows Subsystem for Linux Installation Guide for Windows 10
- Simplified Installation for Windows Insiders
- Manual Installation Steps
- Step 1 — Enable the Windows Subsystem for Linux
- Step 2 — Check requirements for running WSL 2
- Step 3 — Enable Virtual Machine feature
- Step 4 — Download the Linux kernel update package
- Step 5 — Set WSL 2 as your default version
- Step 6 — Install your Linux distribution of choice
- Install Windows Terminal (optional)
- Set your distribution version to WSL 1 or WSL 2
- Troubleshooting installation
Как установить подсистему Linux с рабочим столом в Windows 10
В последних версиях Windows 10, Microsoft разрешила пользователям устанавливать бета-версию оболочки bash через Ubuntu. С обновлением Fall Creators Update 1709, пользователи теперь могут установить подсистему Windows для Linux (WSL). С WSL вы можете запускать мощные команды оболочки через настоящую оболочку bash, управлять несколькими дистрибутивами и даже устанавливать пакеты и приложения командной строки Linux apt-get.
Вы получаете самую мощную и полезную часть Linux: интерфейс командной строки. С помощью этого инструмента вы можете управлять глубокими функциональными возможностями вашей системы, используя команды bash и приложения командной строки из Linux. Windows Subsystem для Linux позволяет пользователям запускать bash команды, как grep, sed и awk, а также bash сценариев и Linux приложений командной строки, как Vim, Emacs и tmux. Вы также получите доступ к таким языкам, как Javascript и node.js, Ruby, Python и C/C+, и сервисы, такие как sshd, MySQL, Apache и lighttpd. И если установка не идет по умолчанию с тем, что вы хотите, вы можете установить пакеты Linux с помощью apt-get диспетчера пакетов.
Подсистема Windows для Linux — это урезанная версия Linux, которая работает в Windows 10. Вы устанавливаете части полного дистрибутива Linux, вы не получаете рабочую среду или оконный менеджер, с которым ассоциируется настольный Linux. Но, с недавнего времени вы теперь можете запустить рабочий стол Linux в Windows 10. Вам больше не нужна двойная загрузка вашей системы с разными ОС и не нужны сторонние виртуальные машины для запуска виртуализации.
Включение подсистемы Windows для Linux в Windows 10
Полная версия подсистемы Windows для Linux доступна только для обновлений Fall Creators (1709, сборка 16215 и более поздних версий). С этим обновлением Windows вы можете фактически установить подсистему Windows для Linux из Windows Store. Вам просто нужно сделать некоторую подготовку в PowerShell. Выполните по порядку три пункта. Документация подсистемы Windows для Linux на сайте microsoft .
1. Включите подсистему в PowerShell
- Запустите PowerShell от имени администратора.
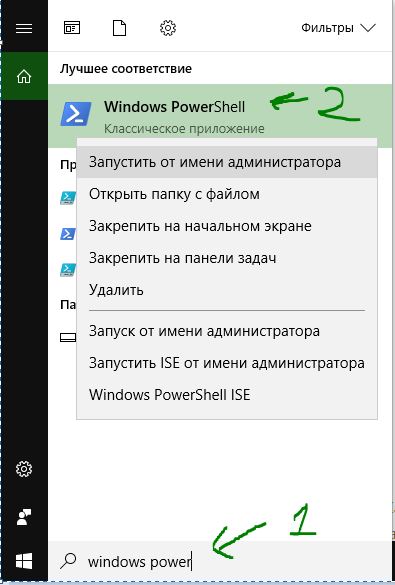
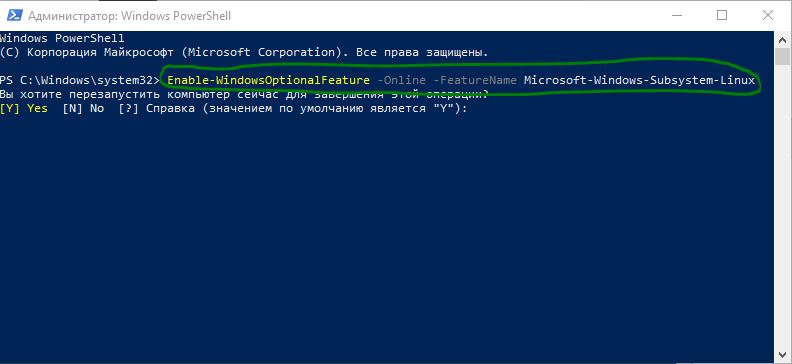
Введите или скопируйте следующую команду в окно PowerShell. Нажмите Y, затем Enter и перезагрузите компьютер при появлении запроса. Ваш компьютер будет перезагружен мгновенно, поэтому обязательно сохраните любую работу заранее.
- Enable-WindowsOptionalFeature -Online -FeatureName Microsoft-Windows-Subsystem-Linux
2. Установите дистрибутив Linux или Ubuntu из Windows Store
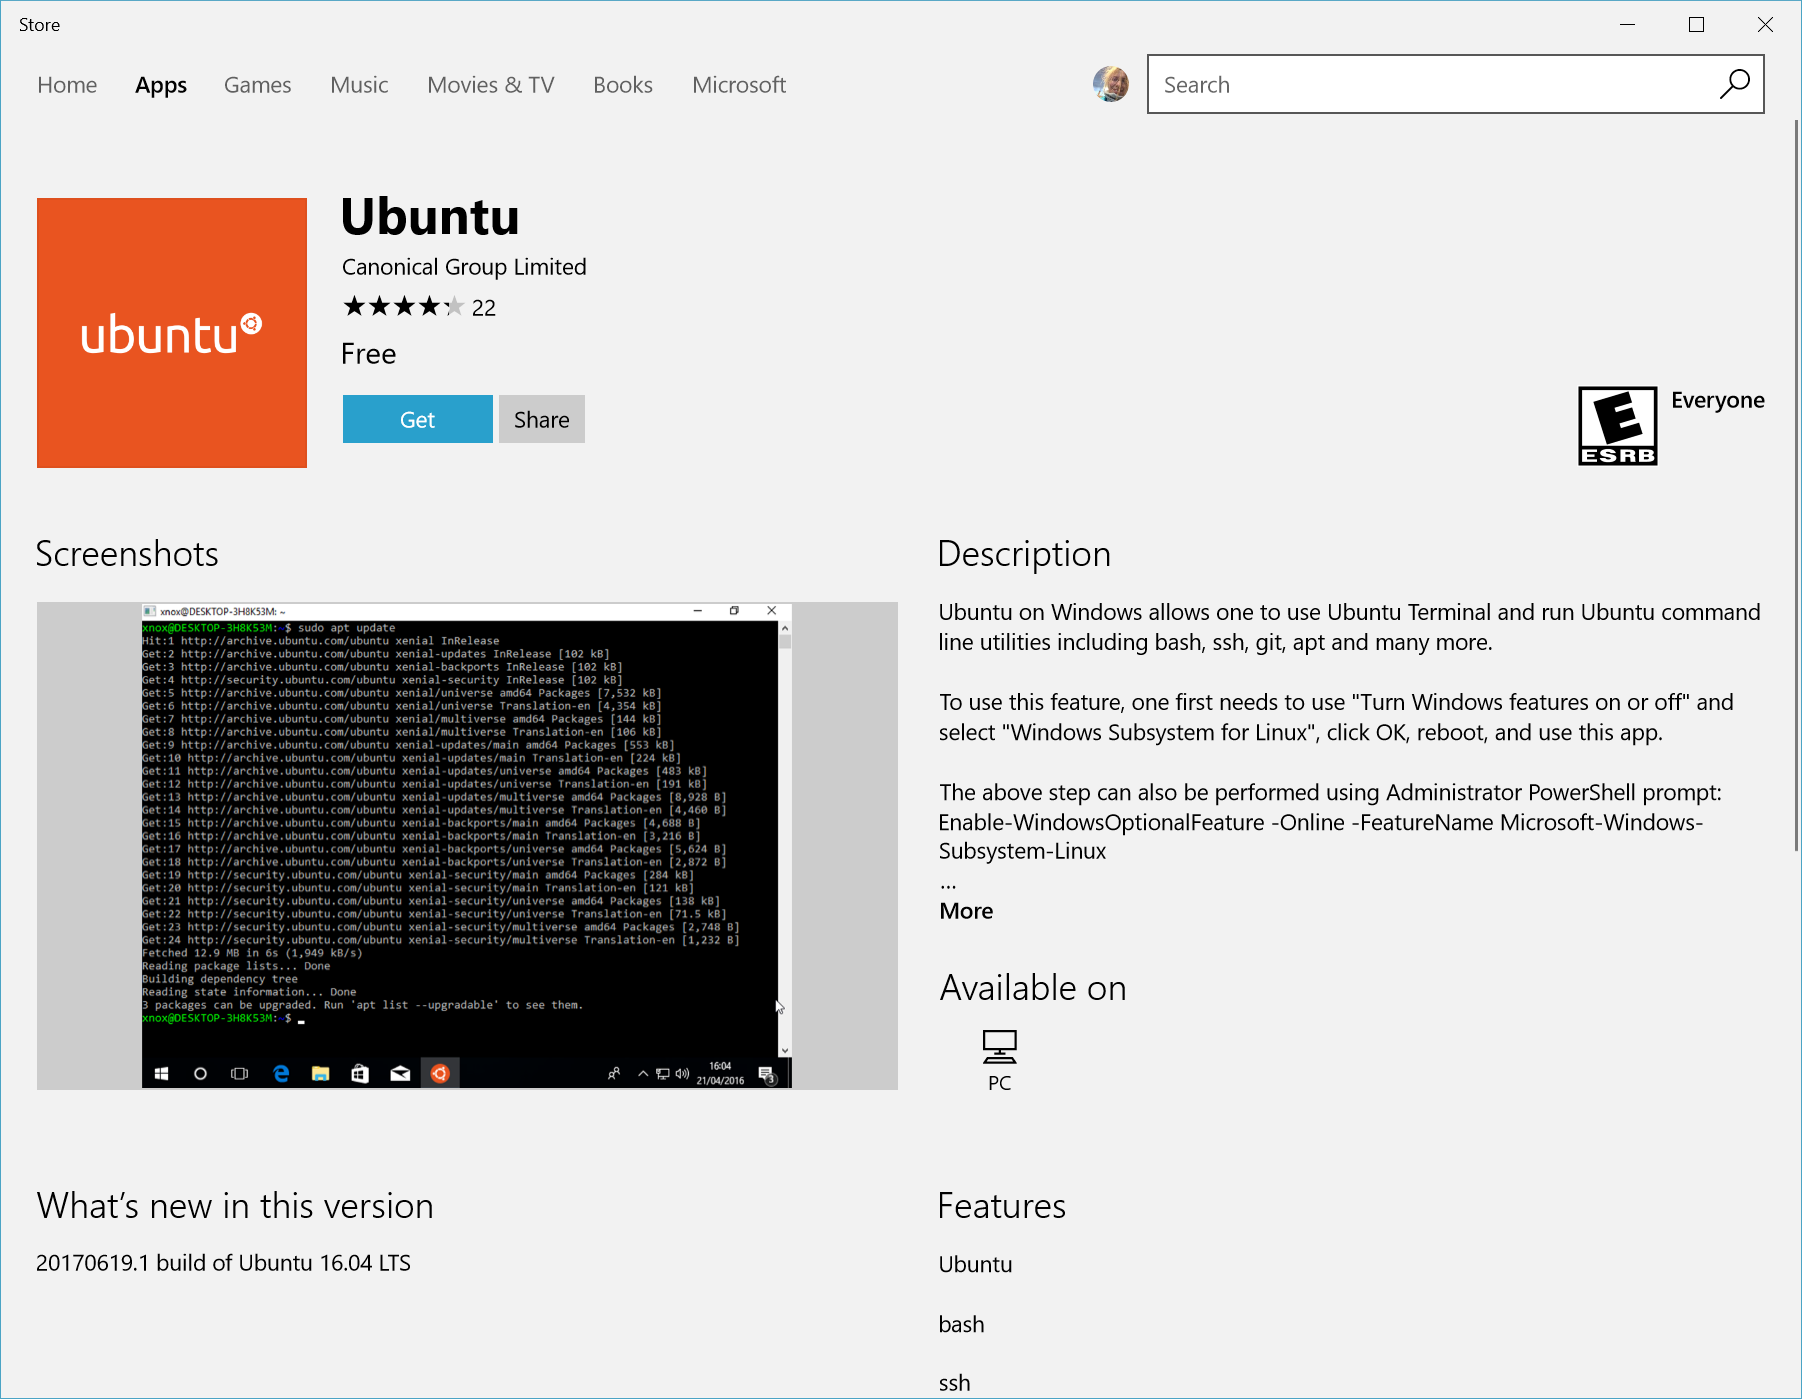
Перейдите в магазин Windows и выберите дистрибутив Linux, который вы хотите установить. На момент написания этого руководства, для установки доступны три дистрибутива Linux, включая Ubuntu.
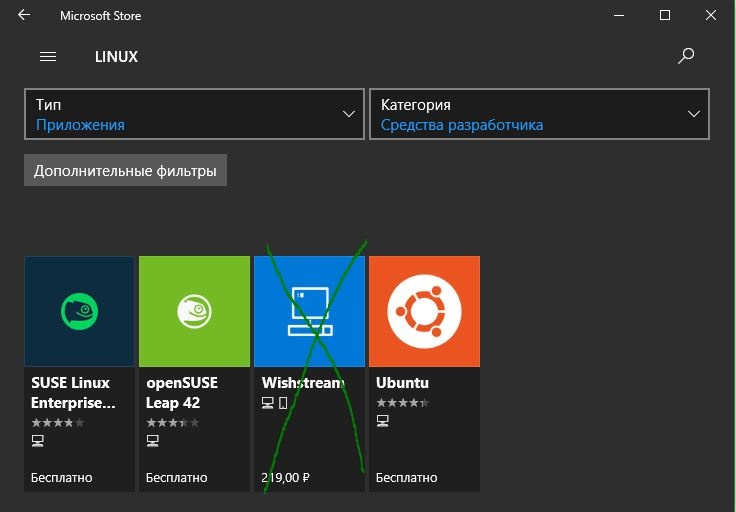
- Нажмите кнопку «Получить«, чтобы загрузить дистрибутив.
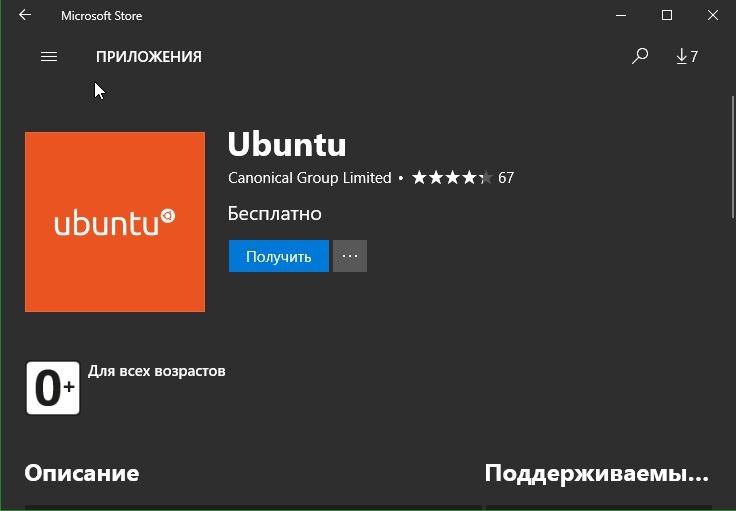
3. Запуск дистрибутива
- После скачивания, нажмите «Запустить» или в поиске windows наберите ubuntu.
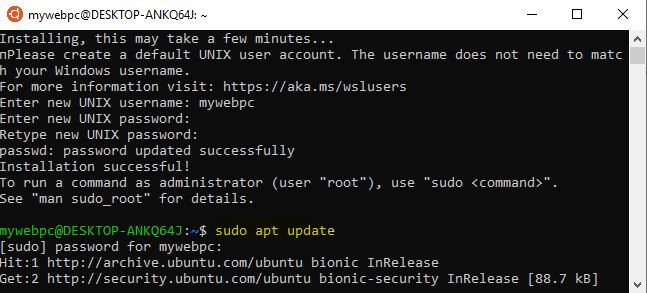
- Как только откроется окно, дождитесь завершения процесса установки.
- Создайте свое имя пользователя и пароль UNIX. Это может отличаться от текущего имени пользователя и пароля Windows и не иметь отношения к вашему существующему имени и паролю.
Если вдруг у вас запуск Ubuntu завершается ошибкой 0x8000000d, то запустите PowerShell и введите еще раз команду, а потом пробуйте запустить приложение ubuntu еще раз Enable-WindowsOptionalFeature -Online -FeatureName Microsoft-Windows-Subsystem-Linux

Установить рабочий стол Linux в Windows
Шаг 1. Как только вы проделали выше шаги, установили и включили подсиситему Linux для Windows 10, то следующим шагом будем установка графической оболочки, чтобы появился рабочий стол Linux. В окне bash Linux введите ниже команды по 1 -ой, чтобы обновить:
- sudo apt update
- sudo apt upgrade
Шаг 2. Теперь перейдите в Sourceforge, чтобы загрузить и установить утилиту VcXsrv Windows X Server . Это нужно для того, чтобы рабочий стол Ubuntu, в моем случае, отображался, как графическая оболочка.

Шаг 3. Прежде чем продолжить, убедитесь, что сервер X Window установлен, как описано в шаге 2. Следующим шагом является установка вашего рабочего стола Linux. Доступны многие окружения рабочего стола linux, такие как GNOME, Cinnamon, Xfce, LXDE. Я буду устанавливать облегченную среду под названием LXDE. Для установки вводим следующее:
- sudo apt install lxde

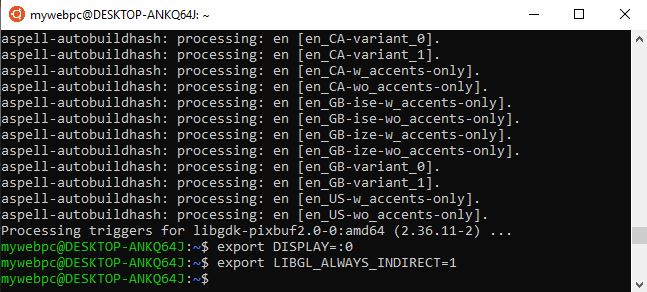
После установки LXDE введите эту команду, которая заставит Linux отображать рабочий стол через X-сервер:
- export DISPLAY=:0
- export LIBGL_ALWAYS_INDIRECT=1
Не закрывайте командную строку bash ubuntu, сверните её, и идем ниже
Шаг 3. Когда вы запустите программу X Server, которую вы скачали выше, вы увидите среду рабочего стола Linux. При запуске VcXsrv, вам будет выдан лаунчер, который предлагает запустить в окне, на весь экран и т.п. Поставьте значение 0 в графе Display number. Нажмите «Далее» и в следующем окне выберите Start no client. Далее жмите все время Next. Все готова, можете приступать к работе.
Если появился черное окно и ничего не отображается, то смотрим ниже, скорее всего не сработал экспорт дисплея или вы что-то упустили.

Шаг 4. Запуск рабочего стола Linux в Windows через командную строку bash ubuntu. Запустите сам VcXsrv (шаг 3), дойдите до черно окна и не закрывайте его, запустите bash командную строку ubuntu, если вы её закрыли, и введите следующее:
- export DISPLAY=:0
- startlxde
Таким образам отобразится графическая оболочка и появится рабочий стол Linux в Windows 10. Теперь вы можете запускать любое из предустановленного программного обеспечения Linux и даже устанавливать новые приложения и утилиты.
Windows Subsystem for Linux Installation Guide for Windows 10
There are two options available for installing Windows Subsystem for Linux (WSL):
Simplified install (preview release): wsl —install
The wsl —install simplified install command requires that you join the Windows Insiders Program and install a preview build of Windows 10 (OS build 20262 or higher), but eliminates the need to follow the manual install steps. All you need to do is open a command window with administrator privileges and run wsl —install , after a restart you will be ready to use WSL.
Manual install: Follow the six steps listed below.
The manual install steps for WSL are listed below and can be used to install Linux on any version of Windows 10.
If you run into an issue during the install process, check the Troubleshooting installation section at the bottom of this page.
Simplified Installation for Windows Insiders
The installation process for Windows Subsystem for Linux has been significantly improved in the latest Windows Insiders preview builds of Windows 10, replacing the manual steps below with a single command.
In order to use the wsl —install simplified install command, you must:
- Join the Windows Insiders Program
- Install a preview build of Windows 10 (OS build 20262 or higher).
- Open a command line windows with Administrator privileges
Once those requirements are met, to install WSL:
- Enter this command in the command line you’ve opened in Admin mode: wsl.exe —install
- Restart your machine
The first time you launch a newly installed Linux distribution, a console window will open and you’ll be asked to wait for files to de-compress and be stored on your PC. All future launches should take less than a second.
CONGRATULATIONS! You’ve successfully installed and set up a Linux distribution that is completely integrated with your Windows operating system!
The —install command performs the following actions:
- Enables the optional WSL and Virtual Machine Platform components
- Downloads and installs the latest Linux kernel
- Sets WSL 2 as the default
- Downloads and installs a Linux distribution (reboot may be required)
By default, the installed Linux distribution will be Ubuntu. This can be changed using wsl —install -d . (Replacing with the name of your desired distribution.) Additional Linux distributions may be added to your machine after the initial install using the wsl —install -d command.
To see a list of available Linux distributions, enter wsl —list —online .
Manual Installation Steps
If you are not on a Windows Insiders build, the features required for WSL will need to be enabled manually following the steps below.
Step 1 — Enable the Windows Subsystem for Linux
You must first enable the «Windows Subsystem for Linux» optional feature before installing any Linux distributions on Windows.
Open PowerShell as Administrator and run:
We recommend now moving on to step #2, updating to WSL 2, but if you wish to only install WSL 1, you can now restart your machine and move on to Step 6 — Install your Linux distribution of choice. To update to WSL 2, wait to restart your machine and move on to the next step.
Step 2 — Check requirements for running WSL 2
To update to WSL 2, you must be running Windows 10.
- For x64 systems: Version 1903 or higher, with Build 18362 or higher.
- For ARM64 systems: Version 2004 or higher, with Build 19041 or higher.
- Builds lower than 18362 do not support WSL 2. Use the Windows Update Assistant to update your version of Windows.
To check your version and build number, select Windows logo key + R, type winver, select OK. Update to the latest Windows version in the Settings menu.
If you are running Windows 10 version 1903 or 1909, open «Settings» from your Windows menu, navigate to «Update & Security» and select «Check for Updates». Your Build number must be 18362.1049+ or 18363.1049+, with the minor build # over .1049. Read more: WSL 2 Support is coming to Windows 10 Versions 1903 and 1909. See the troubleshooting instructions.
Step 3 — Enable Virtual Machine feature
Before installing WSL 2, you must enable the Virtual Machine Platform optional feature. Your machine will require virtualization capabilities to use this feature.
Open PowerShell as Administrator and run:
Restart your machine to complete the WSL install and update to WSL 2.
Step 4 — Download the Linux kernel update package
Download the latest package:
If you’re using an ARM64 machine, please download the ARM64 package instead. If you’re not sure what kind of machine you have, open Command Prompt or PowerShell and enter: systeminfo | find «System Type» . Caveat: On non-English Windows versions, you might have to modify the search text, for example, in German it would be systeminfo | find «Systemtyp» .
Run the update package downloaded in the previous step. (Double-click to run — you will be prompted for elevated permissions, select вЂyes’ to approve this installation.)
Once the installation is complete, move on to the next step — setting WSL 2 as your default version when installing new Linux distributions. (Skip this step if you want your new Linux installs to be set to WSL 1).
Step 5 — Set WSL 2 as your default version
Open PowerShell and run this command to set WSL 2 as the default version when installing a new Linux distribution:
Step 6 — Install your Linux distribution of choice
Open the Microsoft Store and select your favorite Linux distribution.

The following links will open the Microsoft store page for each distribution:
From the distribution’s page, select «Get».
The first time you launch a newly installed Linux distribution, a console window will open and you’ll be asked to wait for a minute or two for files to de-compress and be stored on your PC. All future launches should take less than a second.

CONGRATULATIONS! You’ve successfully installed and set up a Linux distribution that is completely integrated with your Windows operating system!
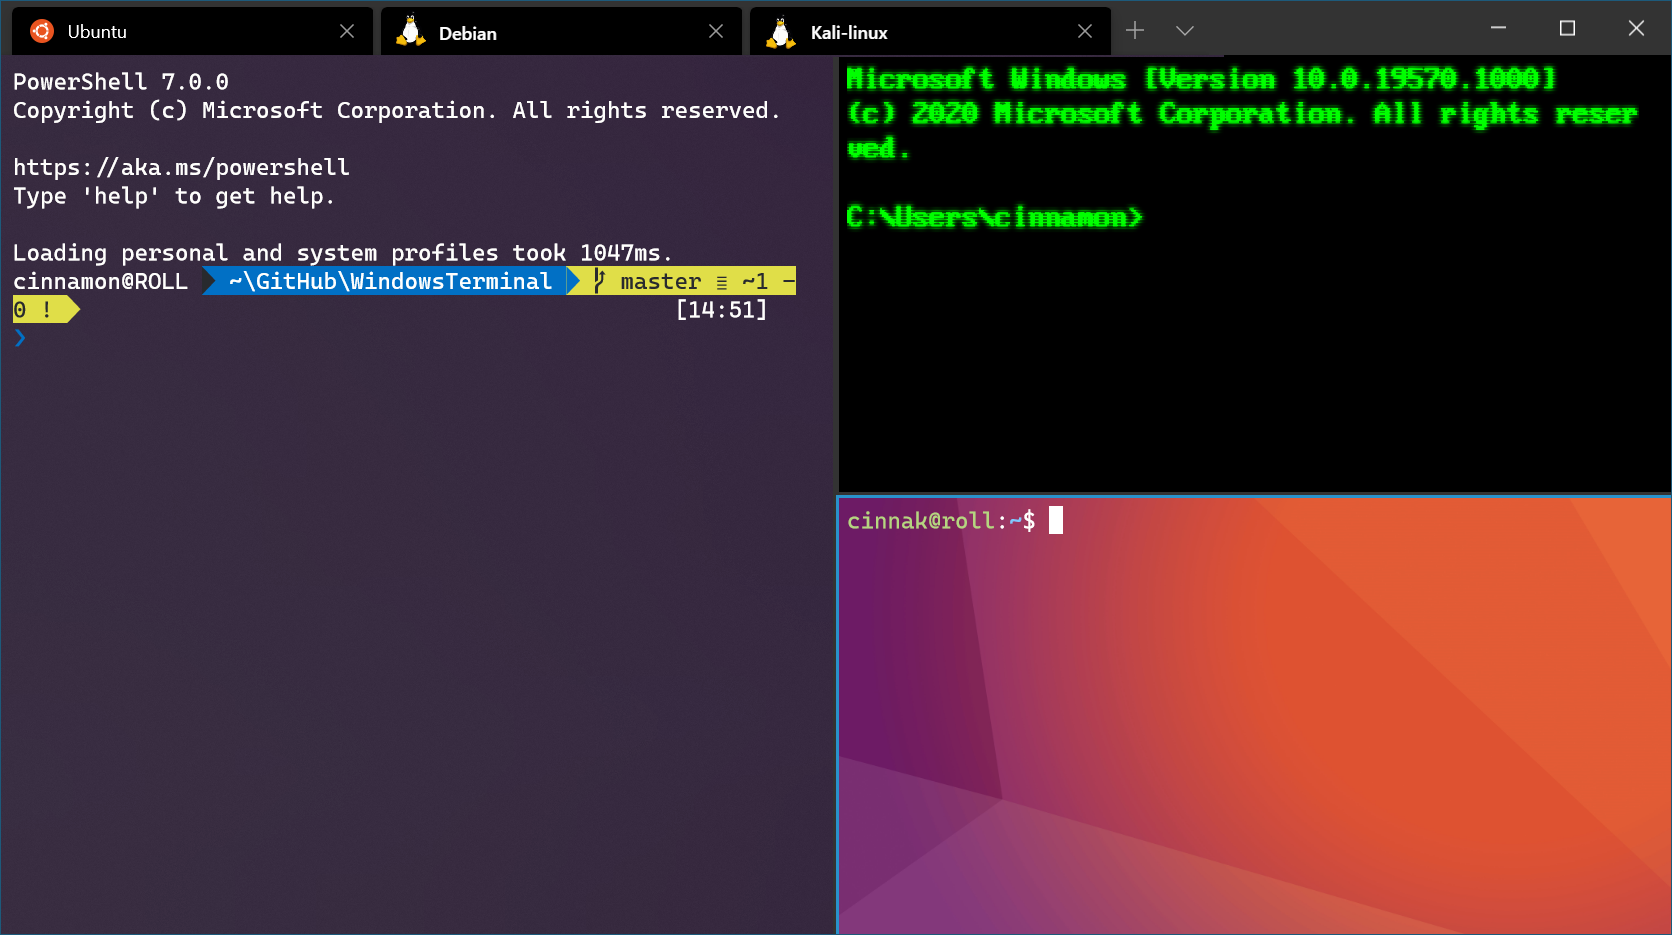
Install Windows Terminal (optional)
Windows Terminal enables multiple tabs (quickly switch between multiple Linux command lines, Windows Command Prompt, PowerShell, Azure CLI, etc), create custom key bindings (shortcut keys for opening or closing tabs, copy+paste, etc.), use the search feature, and custom themes (color schemes, font styles and sizes, background image/blur/transparency). Learn more.
Set your distribution version to WSL 1 or WSL 2
You can check the WSL version assigned to each of the Linux distributions you have installed by opening the PowerShell command line and entering the command (only available in Windows Build 18362 or higher): wsl -l -v
To set a distribution to be backed by either version of WSL please run:
Make sure to replace with the actual name of your distribution and with the number ‘1’ or ‘2’. You can change back to WSL 1 at anytime by running the same command as above but replacing the ‘2’ with a ‘1’.
The update from WSL 1 to WSL 2 may take several minutes to complete depending on the size of your targeted distribution. If you are running an older (legacy) installation of WSL 1 from Windows 10 Anniversary Update or Creators Update, you may encounter an update error. Follow these instructions to uninstall and remove any legacy distributions.
If wsl —set-default-version results as an invalid command, enter wsl —help . If the —set-default-version is not listed, it means that your OS doesn’t support it and you need to update to version 1903, Build 18362 or higher. If you are on Build 19041 for ARM64, this command may fail when using PowerShell in which case you can use a Command Prompt instead to issue the wsl.exe command.
If you see this message after running the command: WSL 2 requires an update to its kernel component. For information please visit https://aka.ms/wsl2kernel . You still need to install the MSI Linux kernel update package.
Additionally, if you want to make WSL 2 your default architecture you can do so with this command:
This will set the version of any new distribution installed to WSL 2.
Troubleshooting installation
Below are related errors and suggested fixes. Refer to the WSL troubleshooting page for other common errors and their solutions.
Installation failed with error 0x80070003
- The Windows Subsystem for Linux only runs on your system drive (usually this is your C: drive). Make sure that distributions are stored on your system drive:
- Open Settings -> **System —>Storage ->More Storage Settings: Change where new content is saved


WslRegisterDistribution failed with error 0x8007019e
- The Windows Subsystem for Linux optional component is not enabled:
- Open Control Panel ->Programs and Features ->Turn Windows Feature on or off -> Check Windows Subsystem for Linux or using the PowerShell cmdlet mentioned at the beginning of this article.
Installation failed with error 0x80070003 or error 0x80370102
- Please make sure that virtualization is enabled inside of your computer’s BIOS. The instructions on how to do this will vary from computer to computer, and will most likely be under CPU related options.
- WSL2 requires that your CPU supports the Second Level Address Translation (SLAT) feature, which was introduced in Intel Nehalem processors (Intel Core 1st Generation) and AMD Opteron. Older CPUs (such as the Intel Core 2 Duo) will not be able to run WSL2, even if the Virtual Machine Platform is successfully installed.
Error when trying to upgrade: Invalid command line option: wsl —set-version Ubuntu 2
- Enure that you have the Windows Subsystem for Linux enabled, and that you’re using Windows Build version 18362 or higher. To enable WSL run this command in a PowerShell prompt with admin privileges: Enable-WindowsOptionalFeature -Online -FeatureName Microsoft-Windows-Subsystem-Linux .
The requested operation could not be completed due to a virtual disk system limitation. Virtual hard disk files must be uncompressed and unencrypted and must not be sparse.
- Deselect “Compress contents” (as well as “Encrypt contents” if that’s checked) by opening the profile folder for your Linux distribution. It should be located in a folder on your Windows file system, something like: USERPROFILE%\AppData\Local\Packages\CanonicalGroupLimited.
- In this Linux distro profile, there should be a LocalState folder. Right-click this folder to display a menu of options. Select Properties > Advanced and then ensure that the “Compress contents to save disk space” and “Encrypt contents to secure data” checkboxes are unselected (not checked). If you are asked whether to apply this to just to the current folder or to all subfolders and files, select “just this folder” because you are only clearing the compress flag. After this, the wsl —set-version command should work.
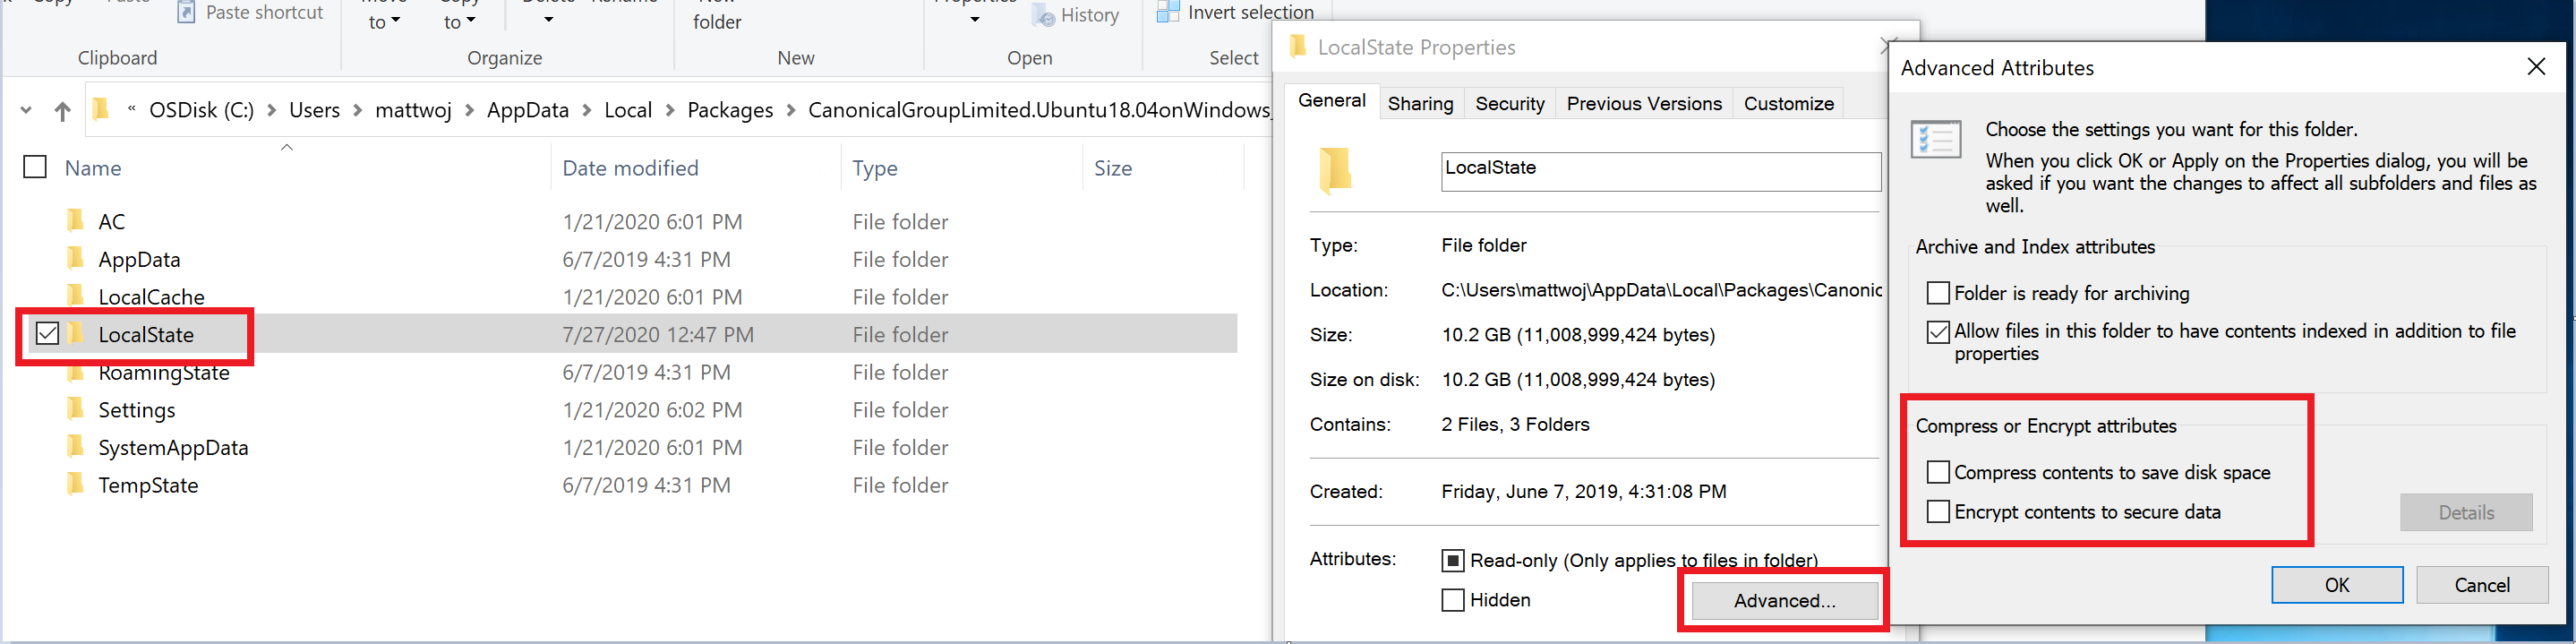
In my case, the LocalState folder for my Ubuntu 18.04 distribution was located at C:\Users \AppData\Local\Packages\CanonicalGroupLimited.Ubuntu18.04onWindows_79rhkp1fndgsc
Check WSL Docs GitHub thread #4103 where this issue is being tracked for updated information.
The term ‘wsl’ is not recognized as the name of a cmdlet, function, script file, or operable program.
- Ensure that the Windows Subsystem for Linux Optional Component is installed. Additionally, if you are using an ARM64 device and running this command from PowerShell, you will receive this error. Instead run wsl.exe from PowerShell Core, or Command Prompt.
Error: This update only applies to machines with the Windows Subsystem for Linux.
- To install the Linux kernel update MSI package, WSL is required and should be enabled first. If it fails, it you will see the message: This update only applies to machines with the Windows Subsystem for Linux .
- There are three possible reason you see this message:
- If the Linux kernel package is missing in the %SystemRoot%\system32\lxss\tools folder, you will encounter this error. Resolve it by installing the Linux kernel update MSI package in step #4 of these installation instructions. You may need to uninstall the MSI from ‘Add or Remove Programs’, and install it again.
You are still in old version of Windows which doesn’t support WSL 2. See step #2 for version requirements and links to update.
WSL is not enabled. You will need to return to step #1 and ensure that the optional WSL feature is enabled on your machine.
After you enabled WSL, a reboot is required for it to take effect, reboot your machine and try again.
Error: WSL 2 requires an update to its kernel component. For information please visit https://aka.ms/wsl2kernel .
—>


