- How to Uninstall Ubuntu from Windows Dual Boot Safely
- Uninstall Ubuntu safely from Windows dual boot mode
- Part 1: Run a sanity check and make Windows as default boot manager
- Step 1: Access UEFI boot settings
- Step 2: Move Windows Boot Manager up the boot order
- Part 2: Deleting Linux partition on Windows
- Step 1: Go to disk management
- Step 2: Identify Linux partition
- Step 3: Delete Linux partition
- Step 4: Extend Windows partition
- Step 1:
- Step 2:
- Step 3:
- Step 4:
- Step 5:
- Step 6:
- Step 7:
- Step 8: If the trick in step 6 didn’t work
- Ubuntu Documentation
- Introduction
- Getting OS-Uninstaller
- 1st option : get a disk including OS-Uninstaller
- 2nd option : install OS-Uninstaller in Ubuntu
- Using OS-Uninstaller
- External Links
- Полное удаление Ubuntu One из Ubuntu 10.10
- Подсистема Ubuntu в Windows 10. Удаление и переустановка.
- Дубликаты не найдены
- В Магазине Windows опубликовано два дистрибутива SUSE Linux
How to Uninstall Ubuntu from Windows Dual Boot Safely
Last updated April 20, 2020 By Abhishek Prakash 187 Comments
Brief: This beginner’s guide shows you how to safely remove Ubuntu or any other Linux distribution from Windows dual boot.
Trust me, installing Ubuntu in dual boot with Windows is not that difficult a task. Similarly, removing Ubuntu from dual boot is also not that complicated.
In both cases, you need to take a bit of precautions with disk partitions. Having a Windows recovery and proper backups always helps.
In this tutorial, I am going to show you the steps for uninstalling Ubuntu from Windows dual boot. The steps should be equally valid for any other Linux distribution be it Linux Mint, Debian, Fedora, Arch etc.
Uninstall Ubuntu safely from Windows dual boot mode
The process is composed of two parts:
- Change the boot order in UEFI settings and give priority to Windows Boot Manager. You may also delete Grub entry from UEFI setting, if your system gives you this option. If that doesn’t work then you’ll have to repair boot with a bootable Windows disk.
- Deleting the Ubuntu partition from Windows.
As the last resort, you need to have a bootable Windows disk or recovery disk so that you can use it to repair the boot after removing Ubuntu (if needed).
Part 1: Run a sanity check and make Windows as default boot manager
I want you to have as few troubles as possible. And hence I recommend change the boot setting and make Windows boot manager as the default option to boot.
Let me explain a bit here. When you install Ubuntu or some other Linux, it adds Grub bootloader to your boot settings and makes it the default.
So, now your system has two boot loaders or boot manager (whatever you want to call it). Grub gives you option to boot into Ubuntu or Windows.

Windows boot manager lets you boot into Windows directly. And this is what you are going to use here.
Step 1: Access UEFI boot settings
Before you go on and delete the Linux partition, it will be a wise move to check if you can make Windows boot manager as the default boot option. This way, when you remove Linux, your boot process won’t be disturbed.
Access the UEFI settings from Windows. Search for UEFI and go to Change advanced startup options:

Click on Restart now:

On the blue screen next, select Troubleshoot:

Select Advanced Options next:

On the next screen, select UEFI Firmware Settings:

Hit restart button on the next screen:

Step 2: Move Windows Boot Manager up the boot order
Now your system will boot into UEFI settings. Now, the next screen will look different for different systems and manufacturers. You have to look for boot tab here.
On my Acer predator, it looks like the image below. Here, use arrow keys to select Windows Boot Manager and press F5 to move it up the order. Press F10 to save and exit.

Now, your system should boot straight into Windows. To verify, restart your system a couple of times and see if the system boots into Windows without showing the grub screen of Linux.
If that happens, you are good to go with the next step which is to delete the Linux partition and reclaim your disk space.
Part 2: Deleting Linux partition on Windows
Let’s see how to delete the Linux partition and extend your Windows disk with available freespace afterwards.
Step 1: Go to disk management
Log into Windows. Press Windows+R and type diskmgmt.msc into the dialog box. This will open the Windows disk management tool.

Step 2: Identify Linux partition
Since you installed Linux, it’ll be easy for you to recognize the Linux partition by its size.
Another hint for identifying the Linux partition is to look for those that don’t have a file system and drive number. Windows partitions are labeled with a drive number, such as C, D, E, etc., and usually use the NTFS or FAT file system.
As you can see, I have three Linux partitions here as I created root, swap and home separately when I installed Ubuntu.

Step 3: Delete Linux partition
Select the Linux partition(s), right click on them and opt for the Delete Volume option.

It will throw you a warning – just select Yes here.

Step 4: Extend Windows partition
The deleted partition(s) will now be available as a chunk of free space. You can either extend the existing volume or create a new Windows partition from it.
I would suggest that you create a new drive (or volume or partition, whatever you want to call it) as this will be easier if you decide to dual boot Linux with Windows again.

After deleting the Linux partition, of your system boots into a broken Grub screen which shows a message like grub rescue error, you need to use Windows recovery disk and fix the Windows bootloader.
Step 1:
Put in the Windows installation disk and restart your computer. Press F10 or F12 at boot time to go into BIOS/UEFI and choose to boot from removable disk.

Step 2:
Choose to repair your computer:

Step 3:
Go for the Troubleshoot option here:

Step 4:
On the troubleshooting page, choose Advanced options:

Step 5:
Look for the command prompt option in here:

Step 6:
In the command line, type the following command to fix the Windows boot loader:
Normally, it works instantly. You don’t even have to wait for it.

Step 7:
Once it’s done, restart your computer and this time boot normally from the hard disk. You should be able to boot into Windows. If you still see a Grub rescue error, try the steps below.
Step 8: If the trick in step 6 didn’t work
If the command in step 6 didn’t work, try Automatic repair from the advanced troubleshooting options.

It will take some time to find the issue and then repair it.

Now if you reboot, you should go into Windows normally without seeing any Grub rescue error thingy.
I hope this guide helped you safely remove Ubuntu from Windows dual boot. Feel free to ask any questions or make a suggestion.
Like what you read? Please share it with others.
Ubuntu Documentation
Introduction
OS-Uninstaller is a small graphical tool to perform a clean and quick uninstall of any operating system (Windows, MacOS, Ubuntu, other Linux distribution..) of your computer.
Important: if you want to uninstall Wubi (Ubuntu installed INSIDE Windows), please follow this guide.
OS-Uninstaller is free software, licensed under GNU-GPL.

Getting OS-Uninstaller
1st option : get a disk including OS-Uninstaller
Download Boot-Repair-Disk. Then create a live-USB of it. Boot on it. A window (Boot-Repair) will appear, close it. Then launch OS-Uninstaller from the bottom-left menu.
2nd option : install OS-Uninstaller in Ubuntu
— boot your computer on a Ubuntu DVD or live-USB.
— choose «Try Ubuntu»
— open a new Terminal (Ctrl+Alt+T), then type:
— Press Enter, then type:
Using OS-Uninstaller
launch OS-Uninstaller (System->Administration->OS-Uninstaller menu if you use Gnome, or via the dash if you use Unity)

- A confirmation window will appear:

- Click «Apply» to start the removal
External Links
OS-Uninstaller (последним исправлял пользователь fitojb 2019-03-26 18:32:11)
The material on this wiki is available under a free license, see Copyright / License for details
You can contribute to this wiki, see Wiki Guide for details
Полное удаление Ubuntu One из Ubuntu 10.10
Так я люблю, чтобы в системе (Ubuntu 10.10) было только то что нужно, то в этой заметке я покажу, как удалить неиспользуемый мною сервис — Ubuntu One.
Linux vkeiz 2.6.35-22-generic #33-Ubuntu SMP Sun Sep 19 20:34:50 UTC 2010 i686 GNU/Linux
“System” – “Preferences” – “Ubuntu One”

Т.к. для установке Ubuntu One в систему нужно установить следующие пакеты, на основе них и буде м производить удаление:
$ aptitude search ubuntuone
i ubuntuone-client — Ubuntu One client
p ubuntuone-client-dbg — Debugging symbols for ubuntuone-client
i ubuntuone-client-gnome — Клиент Ubuntu One, интегрированный с GNOME
p ubuntuone-client-tools — Ubuntu One client tools
p ubuntuone-dev-tools — Ubuntu One development tools
$ sudo apt-get remove ubuntuone-client ubuntuone-client-dbg ubuntuone-client-gnome ubuntuone-client-tools ubuntuone-dev-tools
[sudo] password for keiz:
Чтение списков пакетов… Готово
Построение дерева зависимостей
Чтение информации о состоянии… Готово
Пакет ubuntuone-dev-tools не установлен, поэтому не может быть удалён
Пакет ubuntuone-client-dbg не установлен, поэтому не может быть удалён
Пакет ubuntuone-client-tools не установлен, поэтому не может быть удалён
Пакеты, которые будут УДАЛЕНЫ:
libsyncdaemon-1.0-1 libubuntuone-1.0-1 python-ubuntuone ubuntuone-client
обновлено 0, установлено 0 новых пакетов, для удаления отмечено 5 пакетов, и 357 пакетов не обновлено.
После данной операции, объём занятого дискового пространства уменьшится на 1 368kB.
Хотите продолжить [Д/н]? y
Хорошо, теперь отключ аем пункт в списке загружаемых программ с загрузкой системы :
“System” – “Preferences” – “Startup Applications”
C нимаем галку с приложения Ubuntu One, как указано на скриншоте ниже.
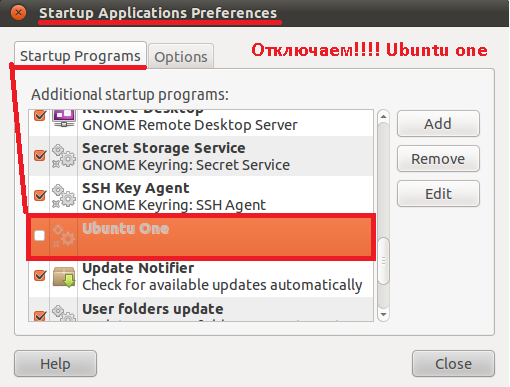
И удаляем для надёжности.
Вот собственно и всё, результат достигнут. То чем не пользуемся удаляем. Всегда можно воспользоваться консолью и произвести установку, удачи.
Используйте прокси ((заблокировано роскомнадзором, используйте vpn или proxy)) при использовании Telegram клиента:
Поблагодари автора и новые статьи
будут появляться чаще 🙂
Карта МКБ: 4432-7300-2472-8059
Yandex-деньги: 41001520055047
Большое спасибо тем кто благодарит автора за практические заметки небольшими пожертвованиями. С уважением, Олло Александр aka ekzorchik.
Подсистема Ubuntu в Windows 10. Удаление и переустановка.
Наверняка, многие уже наслышаны или даже пользуются Ubuntu, встроенной в Windows 10.
Инструкций по установке на русском языке в интернете море. На пикабу наверняка такой баян тоже писали несколько раз, но я не проверял. Если будут у кого-нибудь вопросы — пишите в комментарии.
Допустим, у тебя мелкий ssd на компьютере, а эту Ubuntu ставил «на поиграться», и наигрался. А теперь обратно нужно вернуть драгоценный ресурс ssd и удалить ненужную ubuntu.
В «Программы и компоненты» ты не увидишь Ubuntu в виде установленной программы, как бы это было когда-то давно в виде wubi.
А если и галочку уберешь в компонентах Windows — тоже ничего не изменится.
1. Правый клик на Пуск -> Командная строка(администратор)
2. Пишем lxrun /uninstall /full, жмём Enter (Если /home удалять не надо, то ключ /full не нужен).
Необходимость перестановки системы может возникнуть в любой «непонятной ситуации». Можно так же «поиграться» с этой Ubuntu и наломать там дров, а разгребать лень (себе то хоть в этом признайтесь 🙂
1. Правый клик на Пуск -> Командная строка(администратор)
2. Пишем lxrun /uninstall /full, жмём Enter (Если /home удалять не надо, то ключ /full не нужен)
3. Пишем lxrun /install /y, жмём Enter и ждём пока свеженькая Ubuntu скачается из Магазина (Ключ /y позволит отлучиться от компьютера на время установки).
4. В какой-то момент установщик попросит ввести имя пользователя и пароль. Сделай это.
Дубликаты не найдены
Да, именно он. Нужно в компонентах его включить сначала, потом устанавливать.
Для работы нужна исключительно винда или мак, так что сорян
rm -rf / работает?
Не пробовал) Думаю, сработает защита, как на просто убунте 🙂

В Магазине Windows опубликовано два дистрибутива SUSE Linux
Ещё несколько лет назад за такой заголовок вполне можно было получить путёвку в санаторий для душевнобольных, но в мире сегодняшней Microsoft он звучит вполне нормально: просто для Windows 10 и WSL (Bash) доступны новые дистрибутивы Linux, обещанные некоторое время назад.
Напомню, впервые энтузиасты запустили SUSE в среде WSL ещё в январе этого года, в мае разработчики Windows 10 официально сообщили о намерении расширить список поддерживаемых дистрибутивов, включив в него кроме Ubuntu ещё и SUSE, и Fedora. В конечном счёте разработчики WSL планируют сделать эту платформу независимой от типа дистрибутива вообще.
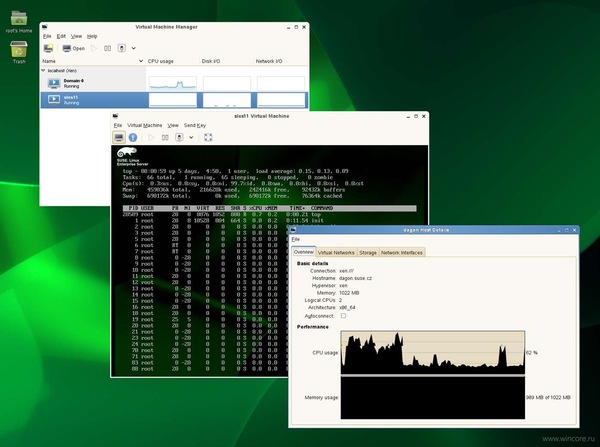
В каталоге Магазина Windows сейчас представлено два дистрибутива SUSE: openSUSE Leap 42, предназначенный широкому кругу пользователей, и созданный на его основе, «коммерческий» SUSE Linux Enterprise Server 12. Распространяются они бесплатно, для использования необходимо включить WSL (Bash).


