- Как настроить PXE сервис на Ubuntu Bionic
- Ubuntu Documentation
- Results
- Audience
- Set-up
- Server Set-up
- Networks
- Installation
- Packages
- Network Configuration
- NAT and Forwarding
- Prepare Pxe Set-up
- Starting Services
- Local Mirror
- Running a Build
- Boot-strap Lucid
- Make a Suitable Kernel and Initrd
- 1 For Both Ways
- 2a Manual
- 2b Kernel Package
- Adding Packages
- Authentication + Storage
- Automating the build (a tinderbox)
- Setting up Support
- Previous Work (to be obsoleted)
- Getting it to Work
- Future plans
Как настроить PXE сервис на Ubuntu Bionic
Долой флешки, dvd-ромы — уже все устройства давно поддерживают удаленную установку по сети.
Вот на этой ноте, точнее мне как-то понадобилось дома вместо ранее использовавшихся ригов для майнига взгромоздить не Windows , а ось Ubuntu 18.04 Desktop но тут я столкнулся, то нет USB носителя, то нет привода, а если внешний привод есть, но нет болванок. Но во всех компьютерах (по крайней мере что есть у меня дома и на работе) имеется поддержка загрузки системы по сети.
Раз у меня есть мое хранилище HP MicroServer Gen8 то пусть в дополнении к сервисам которые обслуживают мои нужды будет еще один — это PXE сервис для удаленной инсталляции.
Но прежде чем разворачивать сервис на одной из VM моего хранилища все действия должны быть отрепетированы, а значит мне на помощь приходит Ubuntu 18.04 Server развернутая внутри моего полигона Virtualbox.
$ hg clone —insecure https://172.33.33.7/hg/dproject
$ apt-cache search tftpd-hpa
tftpd-hpa — HPA’s tftp server
Устанавливаю в систему пакет tftpd-hpa:
$ sudo apt-get install tftpd-hpa -y
$ sudo mkdir /media/pxeboot
$ sudo chmod -R 777 /media/pxeboot/
$ sudo chown -R nobody:nogroup /media/pxeboot/
$ sudo cp /etc/default/tftpd-hpa /etc/default/tftpd-hpa.backup
Создаю конфигурационный файл для работы сервиса tftpd-hpa:
$ sudo nano /etc/default/tftpd-hpa
TFTP_OPTIONS=»—secure —create —verbose»
Перезапускаю сервис tftpd-hpa:
$ sudo service tftpd-hpa restart && sudo service tftpd-hpa status | head -n 5
● tftpd-hpa.service — LSB: HPA’s tftp server
Loaded: loaded (/etc/init.d/tftpd-hpa; generated)
Active: active (running) since Thu 2018-11-22 21:51:00 MSK; 57ms ago
Process: 4208 ExecStop=/etc/init.d/tftpd-hpa stop (code=exited, status=0/SUCCESS)
Проверяю, что сервис tftp ожидает подключение:
$ ss -l4 | grep tftp
udp UNCONN 0 0 0.0.0.0:tftp 0.0.0.0:*
Копирую с основной системы на данную образ Ubuntu 18.04 Server amd64
$ scp /media/ekzorchik/iso/ubuntu-18.04.1-server-amd64.iso ekzorchik@172.33.33.25:/home/ekzorchik
Монтирую образ Ubuntu 18.04 Server который был передан с основной системы в каталог /mnt:
$ sudo mount -o loop ubuntu-18.04.1-server-amd64.iso /mnt
mount: /mnt: WARNING: device write-protected, mounted read-only.
Копирую файлы netboot в каталог откуда будет стартовать загрузка системы при текущем настраиваемом PXE сервиса на данной системе:
$ sudo cp -fr /mnt/install/netboot/* /media/pxeboot/
ldlinux.c32 pxelinux.0 pxelinux.cfg ubuntu-installer version.info
Затем устанавливаю в систему Web— сервис где будут располагаться файлы ответов посредством которых система будет установлены если в ней будет выставлена установка по сети:
$ sudo apt-get install apache2 -y
Создаю каталог с именем ubuntu, а внутри него подкаталог для server на Web— сервисе откуда будет устанавливать образ Ubuntu Server:
$ sudo mkdir -p /var/www/html/ubuntu/server/preseed
$ sudo nano /var/www/html/ubuntu/server/preseed/oem.seed
d-i auto-install/enable boolean true
d-i debconf/priority string critical
d-i pkgsel/update-policy select none
d-i debian-installer/locale string en_US
d-i debian-installer/language string en
d-i debian-installer/country string US
d-i console-setup/ask_detect boolean false
d-i netcfg/get_hostname string srv-bionic
d-i clock-setup/utc boolean true
d-i time/zone string Europe/Moscow
#Use a http proxy
d-i mirror/http/proxy string
#The Debian release to install
d-i mirror/suite string bionic
d-i passwd/user-fullname string Ubuntu 18.04 test user
d-i passwd/username string ekzorchik
d-i passwd/user-password password 712mbddr@
d-i passwd/user-password-again password 712mbddr@
d-i user-setup/allow-password-weak boolean true
d-i user-setup/encrypt-home boolean false
d-i live-installer/enable boolean false
d-i partman-auto/disk string /dev/sda
d-i partman-auto/method string lvm
d-i partman-lvm/device_remove_lvm boolean true
d-i partman-lvm/confirm boolean true
d-i partman-lvm/confirm_nooverwrite boolean true
d-i partman-auto-lvm/guided_size string max
d-i partman-auto/choose_recipe select atomic
d-i partman-partitioning/confirm_write_new_label boolean true
d-i partman/choose_partition select finish
d-i partman/confirm boolean true
d-i partman/confirm_nooverwrite boolean true
d-i tasksel/first multiselect standard
d-i preseed/late_command string apt-install tmux mercurial vim build-essential multipath-tools lsscsi lvm2 htop net-tools openssh-server
d-i finish-install/reboot_in_progress no
Создаю файл где будет указано поведение загрузки системы:
$ sudo nano /media/pxeboot/pxelinux.cfg/default
# D-I config version 2.0
# search path for the c32 support libraries (libcom32, libutil etc.)
label Ubuntu 18.04 Server
append url=http://172.33.33.25/ubuntu/server/preseed/oem.seed vga=normal initrd=ubuntu-installer/amd64/initrd.gz auto=true priority=critical ramdisk_size=16432 root=/dev/rd/0 rw —
# загрузка системы с диска
label Boot from first hard disk
$ sudo chown -R nobody:nogroup /media/pxeboot/
$ sudo chown -R www-data:www-data /var/www/html/
Теперь нужно на сервисе DHCP указать порядок загрузки при обращении широковещательным запросом кто является сервисом удаленной загрузки. В моем случае сервис DHCP развернут на базе оборудования Mikrotik RB2011UiAS-2HnD
$ ssh -l ekzorchik 172.33.33.100
[ekzorchik@router] > ip dhcp-server network print
[ekzorchik@router] > ip dhcp-server network set numbers=0 next-server=172.33.33.25 boot-file-name=pxelinux.0
[ekzorchik@router] > quit
Это сейчас все кажется простым в настройке, а до этого я думал что нужна вот такая запись и что я делал чтобы понять почему она не работает:
[ekzorchik@router] > ip dhcp-server option add code=66 name=tftp66 value=»‘172.33.33.25′»
Но в момент когда пытался по сети запустить установку Ubuntu системы получал ошибку: PXE-E32: TFTP open timeout
Включив расширенное логирование:
winbox —host:port — user&pass — System — Logging — Add
- Topics: dhcp
- Prefix: _dhcp
- Action: memory
увидел в логах на Mikrotik запись: _dhcp: Unknown(66) = AC-21-21-19

и тут я задумался, ведь запись 66 я использовал когда настраивал загрузку телефонов (Cisco CP-7925G), а тут у меня другое.
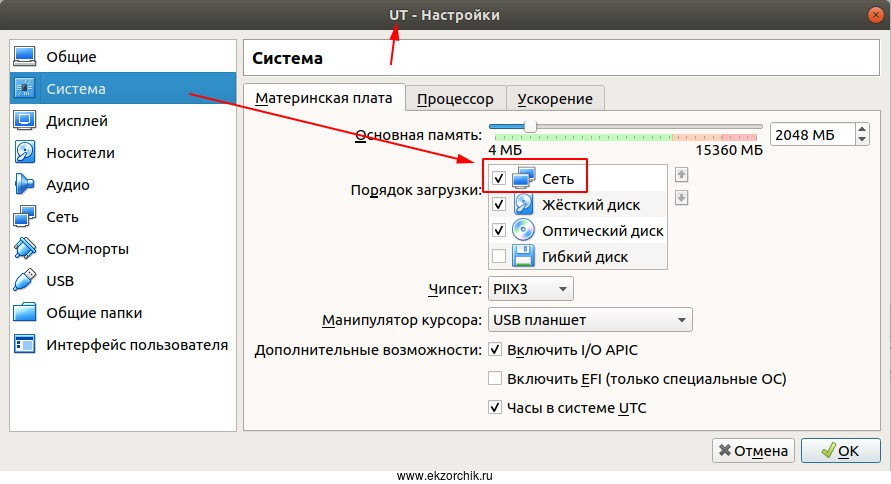
В роли подопытной системы, чтобы проверить что загрузка по сети отработает я использую Virtualbox по аналогии, как я создавал систему когда тестировал самосборный образ для Destkop & Server. В свойствах виртуальной машины выставляю что первым загрузку следует производить по сети, а уже далее «Оптический диск», «Диск».
Нажимаю ОК окна настройки виртуальной машины UT и запускаю загрузку и после того, как VM обратилась широковещательным запросом со шлюза получила направление на развернутую систему где поднят PXE сервис. И вот меня встречает мое окно с именованием выбора загрузки Ubuntu 18.04 Server:
Install → это обычная загрузка в интерактивном режиме
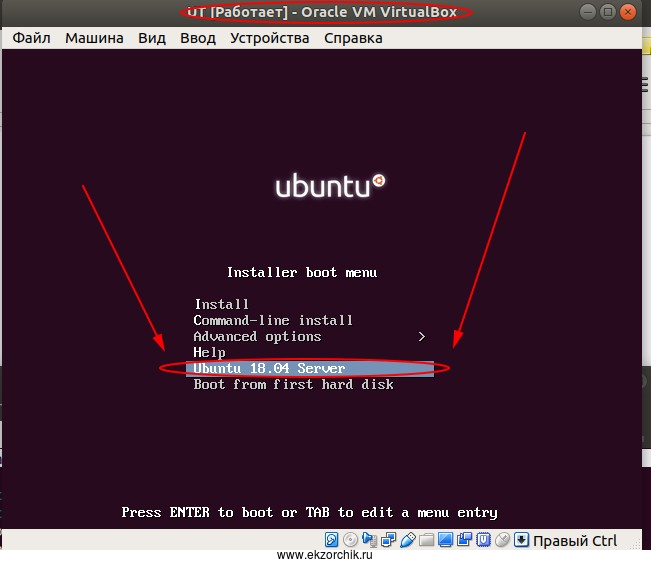
Выбираю пункт меню « Ubuntu 18.04 Server » и нажимаю клавишу Enter, ожидаю и вот сразу же в дело вступает файл ответов.
На заметку: Важно чтобы в системы которая загружается с PXE сервиса был доступ в интернет.
По окончании я получаю установленную ось Ubuntu 18.04 Server amd64 выполненную через PXE сервис при загрузке по сети. В следующей заметке я разберу, как объединить/настроить загрузку обоих систем ( Desktop & Server ).
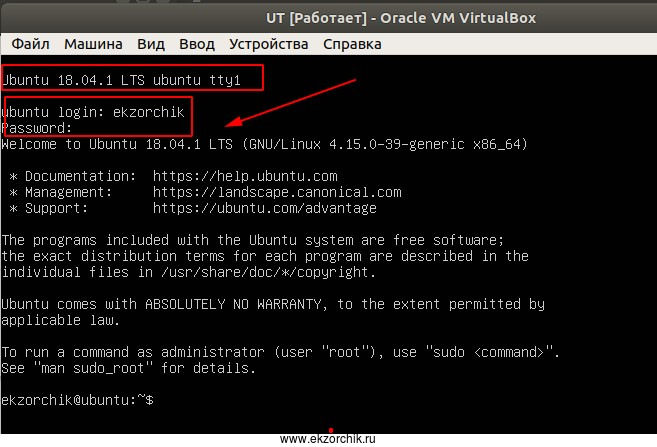
Если перезагрузиться и не убрать загрузку по сети первым пунктом то опять выйду на меню выбора, либо опять запустить установку, но система установлена — как же быть, а загрузиться в диска вот для этого я добавил меню « label Boot from first hard disk » выбираю его и нажимаю клавишу Enter и система ожидает авторизации:
Проверяю, а установлены дополнительные пакеты которые указаны у меня в oem.seed:
$ dpkg -l | grep «tmux\|mercurial\|htop» | awk ‘
ii htop
ii mercurial
ii mercurial-common
ii tmux
Ответ да они успешно установлены.
Данная заметка это не сколько построенная заметка в лабораторный условиях, но и также проверенная на физическом компьютере.
На этом я прощаюсь, заметка по разворачиванию PXE сервиса на базе Ubuntu 18.04 выполнена и теперь ее можно перенести на мое хранилище HP MicroServer Gen8 где развернуты мои боевые сервисы, такие как: Asterisk, DokuWiki, Mercurial(WEB), OwnCloud, NAS. С уважением, автор Олло Александр aka ekzorchik.
Ubuntu Documentation
STREAMING UBUNTU Desktop (or streaming linux desktop), so:
- no local installation
- highly scalable
- high performance
- low cost in administration and hardware
- highly adaptable
NOTE:: this is work in progress to port from 9.10 to 10.04 LTS and later possibly newer versions of Ubuntu, document is currently being updated.
Offering a desktop based on Ubuntu GNU/Linux, booting over a local network from one single image. This image needs to be customized for our users at the Leiden University, The Netherlands. Current authentication is done via Kerberos and LDAP. The home directories are mounted over NFS.
Results
The test deployment has currently more than 75 clients desktops booting via PXE on a read-only squashfs image, served from a one single NFS/TFTP server (having a load of 0)
Audience
Unix admins:
- shell scripting (debugging/patching / diffing)
- ubuntu / debian experience for some time
understanding the «AS IS» section in the license .
What is written here, will not work off the shelf. To make it work you have to customize it, in the end can save you a lot of time.
Set-up
Our set-up has to offer:
- NFS mounted home directories
- authentication/authorisation via Kerberos/LDAP
- tex / lyx / kyle
- mutt / pine / elm
- fully usable Gnome / KDE / Xfce4 / fluxbox
- access to Linux and Windows terminal servers
- large amount of fonts
Ubuntu Lucid 10.4.2 LTS (previous 9.10) is used as a base.
Environment:
- raid-1 Ubuntu NFS/PXE server
- raid-1 + raid-5 Ubuntu build/test host
- Gb network with several VLANs
The main focus is the staging environment, keeping staging and production separate. For this !How-To I won’t describe the production server, since they are mostly the same. But as a habit, I never build on production servers since one error in the build script could give me, and some hundred users, a bad day. This actually happened, one day my build server did not reboot any more. The build script escaped to the root and the initrd.img was replaced.
As a policy, we use LTS on servers.
Server Set-up
Networks
192.168.1.0/24 => external (uplink)
192.168.2.0/24 => internal (pxeboot)
Installation
Install the build host with 3 raid1 partitions:
- raid1
- md0 /
- md1 swap
- md2 /tmp
- md3 /var/
- md4 /usr
- raid5
- md5 /data
Or choose another appropriate setup.
Packages
First install some packages
Network Configuration
Content of /etc/network/interfaces:
Content of /etc/dhcp3/dhcpd.conf:
NAT and Forwarding
Content of /etc/sysctl.d/10-ip_forward.conf
Content of /etc/exports:
Content of /etc/default/tftpd-hpa:
Prepare Pxe Set-up
Content of /data/tftpboot/pxelinux.cfg/default :
Content of /data/tftpboot/pxelinux.cfg/graphics.cfg:
Keep an eye on the options, and make sure you understand the documentation! Setting bad options here may allow a user to escape from the loader menu and start a shell as root instead of invoking init. This would give one access to all user files on NFS, which would only make you popular to a very limited set of people (and not at all popular to many others).
Read more about PXELinux how to get nice menus and more.
Starting Services
Local Mirror
Read this info and execute the next commands:
Add to apache: assuming everything is in /data/mirror/
Be sure you use the correct Alias and replace the XX for a working directory!
Test the mirror:
Running a Build
No build scripts are available yet, but the picture
Boot-strap Lucid
generally while chrooting into build environment set correct env and mounts
Make a Suitable Kernel and Initrd
The kernel and initrd environment needs:
- nfs
- dhcp
- network-cards
- devtmpfs
- aufs
- squashf
- casper
There are two ways to build it, one is with a kernel package and the other is manual. I have found the manual manner more reliable.
1 For Both Ways
2a Manual
2b Kernel Package
This will create packages.
I found issues creating an initrd file, to solve this:
Adding Packages
chroot build apt-get install
Authentication + Storage
- To-Do:
- Auth:
- kerberos
- ldap
- Centralized Administration with gosa
- AD ?
- Storage:
- NFS (authenticated)
- CIFFS (?)
- application platforms:
- Ubuntu Server LTS
- FreeNAS
- Auth:
Automating the build (a tinderbox)
- To-Do
- Script a build for Lucid
- split configuation and script
- make script work for:
- version 10.4 10.10 11.4
- arch i386 and AMD64
Setting up Support
- online live images (http boot?)
- FAQ + #channel
- architecture paper (TOGAF-style with Archi+asciidoc)
- 2nd management paper
- commercial support for setup/administration and customized images
Previous Work (to be obsoleted)
Here a sample tarbal:
Newer versions may exist here.
So download it and untar it.
Now you should be able to use the build-script:
explanation of the files:
- config.txt
- A lot configuration options
- a error handling funtion
- build.sh builds:
- kernel
- initrd
- installation dir
- squashfs files
- preseed.txt.
- setting build environment for build tree
- dpkg*
- dpkg-set-selections_fastbuild.txt is a sample file
- dpkg-set-selections_full.txt is a sample file
- dpkg-set-selections.txt, file use by build.sh
- kernel.config is a sample kernel configation file, kernel must have
- initrd (casper)
- nfsroot
- able fetch an ipnumber by dhcp
- driver for networkcards.
Getting it to Work
With the TREE option you can add/utilize:
- logings + passwords
- kiosk functions
- root ssh keys
We add:
- ldap
- kerberos
- ssh-keys
- nfs mounts for homedirs
- nfs mounts for software
- printer settings
- postfix settings
Details of this are not public.
This is pre-alpha, meant as an example to feed unix admins creativity.
From you should be able the work yourself into it as you a unix admin.
Patches, Tips, better Ubuntu Practices are more than welcome.
send an email to mvn at math dot leidenuniv dot nl
Future plans
- liveusb-drives mounting over insecure networks
- booting over https
Desktop/PXE (последним исправлял пользователь cs-cracker 2014-06-23 22:17:44)
The material on this wiki is available under a free license, see Copyright / License for details
You can contribute to this wiki, see Wiki Guide for details


