- Ubuntu usb загрузочный диск mac os
- Apple hardware considerations
- 2. Requirements
- 3. Prepare the USB stick
- 4. Install and run Etcher
- 5. Etcher configuration
- 6. Write to device
- 7. Boot your Mac
- Finding help
- Создание загрузочной флешки USB Ubuntu для Macbook (2007-2008)
- Создание загрузочной флешки USB
- Ubuntu Documentation
- UNetbootin (Automated, graphical approach)
- Manual Approach
- MacBook Air 3,2
- Other procedure
Ubuntu usb загрузочный диск mac os
With a bootable Ubuntu USB stick, you can:
- Install or upgrade Ubuntu, even on a Mac
- Test out the Ubuntu desktop experience without touching your PC configuration
- Boot into Ubuntu on a borrowed machine or from an internet cafe
- Use tools installed by default on the USB stick to repair or fix a broken configuration
Creating a bootable USB stick is very simple, especially if you’re going to use the USB stick with a generic Windows or Linux PC. We’re going to cover the process in the next few steps.
Apple hardware considerations
There are a few additional considerations when booting the USB stick on Apple hardware. This is because Apple’s ‘Startup Manager’, summoned by holding the Option/alt (⌥) key when booting, won’t detect the USB stick without a specific partition table and layout. We’ll cover this in a later step.
2. Requirements
- A 2GB or larger USB stick/flash drive
- An Apple computer or laptop running macOS
- An Ubuntu ISO file. See Get Ubuntu for download links
3. Prepare the USB stick
To ensure maximum compatibility with Apple hardware, we’re going to first blank and reformat the USB stick using Apple’s ‘Disk Utility’. But this step can be skipped if you intend to use the USB stick with only generic PC hardware.
- Launch Disk Utility from Applications>Utilities or Spotlight search
- Insert your USB stick and observe the new device added to Disk Utility
- Select the USB stick device (you may need to enable the option View>Show All Devices) and select Erase from the tool bar (or right-click menu)
- Set the format to MS-DOS (FAT) and the scheme to GUID Partition Map
- Check you’ve chosen the correct device and click Erase

Warning: Disk Utility needs to be used with caution as selecting the wrong device or partition can result in data loss.
4. Install and run Etcher
To write the ISO file to the USB stick, we’re going to use a free and open source application called Etcher. After downloading this and clicking to mount the package, Etcher can either be run in-place or dragged into your Applications folder.
By default, recent versions of macOS block the running of applications from unidentified developers. To side-step this issue, enable ‘App Store and identified developers’ in the ‘Security & Privacy’ pane of System Preferences. If you are still warned against running the application, click ‘Open Anyway’ in the same pane.

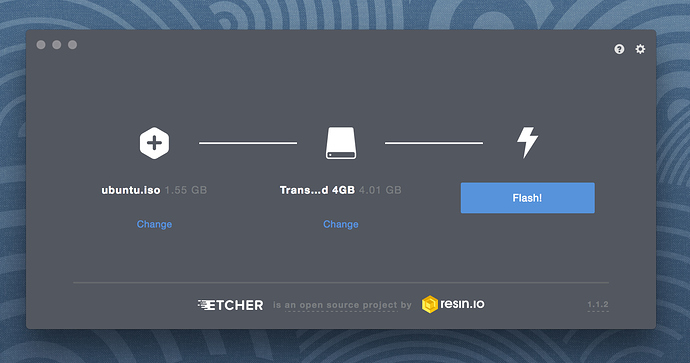
5. Etcher configuration
Etcher will configure and write to your USB device in three stages, each of which needs to be selected in turn:
Select image will open a file requester from which should navigate to and select the ISO file downloaded previously. By default, the ISO file will be in your Downloads folder.
Select drive, replaced by the name of your USB device if one is already attached, lets you select your target device. You will be warned if the storage space is too small for your selected ISO.
Flash! will activate when both the image and the drive have been selected. As with Disk Utility, Etcher needs low-level access to your storage hardware and will ask for your password after selection.
6. Write to device
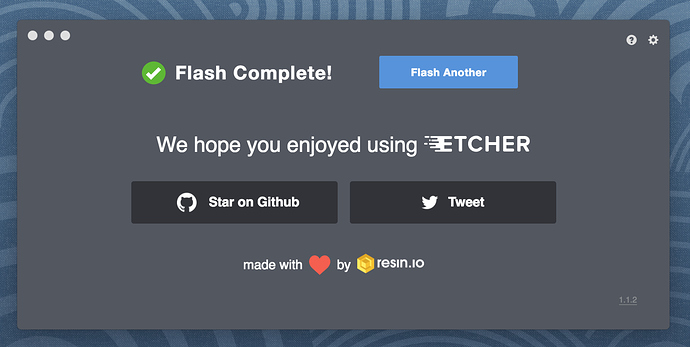
After entering your password, Etcher will start writing the ISO file to your USB device.
The Flash stage of the process will show progress, writing speed and an estimated duration until completion. This will be followed by a validation stage that will ensure the contents of the USB device are identical to the source image.
When everything has finished, Etcher will declare the process a success.
Congratulations! You now have Ubuntu on a USB stick, bootable and ready to go.
Warning: After the write process has completed, macOS may inform you that ‘The disk you inserted was not readable by this computer’. Don’t select Initialise. Instead, select Eject and remove the USB device.
7. Boot your Mac
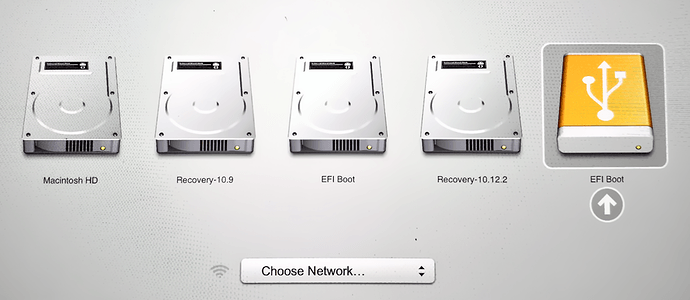
If you want to use your USB stick with an Apple Mac, you will need to restart or power-on the Mac with the USB stick inserted while the Option/alt (⌥) key is pressed.
This will launch Apple’s ‘Startup Manager’ which shows bootable devices connected to the machine. Your USB stick should appear as gold/yellow and labelled ‘EFI Boot’. Selecting this will lead you to the standard Ubuntu boot menu.
Finding help
If your Mac still refuses to boot off your USB stick you may find it easier to boot and install off an Ubuntu DVD instead. See our How to burn a DVD on macOS for further details.
Alternatively, if you feel confident using the macOS command line, see the community documentation on How to install Ubuntu on MacBook using USB Stick for a more manual approach.
If you want to install Ubuntu, follow our install Ubuntu desktop tutorial.
Finally, if you get stuck, help is always at hand:
Источник
Создание загрузочной флешки USB Ubuntu для Macbook (2007-2008)
Столкнулся с проблемой установки Ubuntu на старенький Macbook 2007-2008 года выпуска. Первая проблема, невозможно загрузиться с загрузочного диска Ubuntu 64 разрядной. Проблема в том, что на последних Macbook (чёрные и белые) устанавливали процессоры Intel Core 2 Duo и эти процессоры 64 разрядные, а операционная система OS X 10.7 (последняя на которую можно обновиться без шаманства) 32 разрядная и загрузчик EFI 32 разрядный.
Подробная инструкция, как установить Ubuntu 64 разрядную через загрузочную флешку USB. Показано будет на примере Lubuntu 18.04 LTS (64 разрядная), подойдёт и для других версий, например, 19, 16 и т.д.
Создание загрузочной флешки USB
1. Качаем с сайта образ ISO Ubuntu, Lubuntu, Xubuntu 64 разрядный.
2. Необходимо в скаченном ISO образе заменить EFI загрузчик 64 разрядный на 32 разрядный. Для этого необходимо скомпилировать код на языке Си, после чего программа сможет изменить загрузчик. Открываем Терминал. Копируем код отсюда в файл «32bitEFI.c». В Терминале можно выполнить следующее:
Вставить текст из буфера CMD + V, сохранить изменения CTRL + O (буква «О», как в слове Open) и затем Ввод/Enter, закрыть текстовый редактор Nano CTRL + X.
3. Файл образа и файл должны находиться в одной папке.
4. Компилируем файл 32bitEFI.c
На выходе у нас появляется скомпилированный запускаемый файл «32bitEFI». Можно сделать его запускаемым:
5. Переименовываем ISO файл установочного дистрибутива в blackmacbook64.iso
где «lubuntu-18.04.3-desktop-amd64.iso» скаченный образ Ubuntu или Lubuntu, Xubuntu
6. Конвертируем ISO файл «blackmacbook64.iso» в формат IMG
На выходе получаем файл «blackmacbook64.img.dmg», т.к. OS X автоматически добавляет расширение .dmg. Переименовываем его в «blackmacbook64.img»
7. Вставляем флешку в любой разъем USB на ноутбуке и смотрим, под каким устройством она определилась
где флешка должна быть, например, /dev/disk1 или /dev/disk2 в зависимости от вашего компьютера.
8. Размонтируем флешку USB
где diskN ваше устройство из предыдущего пункта, например, /dev/disk1. Если появилась ошибка при зазмонтировании, то запустите «Дисковую утилиту» и на вашей флешке нажимите «Отключить», Внимание! не нажимайте «Извлечь диск».
9. Записываем образ на флешку USB
где diskN ваше устройство из пункта 7, например, /dev/disk1.
10. Изъять флешку командой
Всё, загрузочная флешка USB готова!
Теперь можно загрузиться с загрузочной флешки. Перезагрузить компьютер и удерживать клавишу «С» или «Alt». После чего выбрать флешку с которой необходимо загрузиться. После чего можно установить Ubuntu на Macbook, но предварительно создайте пустой раздел в «Дисковой утилите» под OS X. После установки Ubuntu можно установить загрузчик rEFInd.
Дополнительно. В Ubuntu, если не определился Wi-Fi модуль, то подключите Macbook по кабелю к интернету и запустите
Источник
Ubuntu Documentation
UNetbootin (Automated, graphical approach)
UNetbootin for Mac OS X can be used to automate the process of extracting the Ubuntu ISO file to USB, and making the USB drive bootable. The resulting USB drive, however, can be booted on PCs only. If attempting to make a USB drive that can be booted from a Mac, follow the instructions below.
Manual Approach
We would encourage Mac users to download Ubuntu Desktop Edition by burning a CD for the time being. But if you would prefer to use a USB, please follow the instructions below.
Note: this procedure requires an .img file that you will be required to create from the .iso file you download.
TIP: Drag and Drop a file from Finder to Terminal to ‘paste’ the full path without typing and risking type errors.
- Download the desired file
Open the Terminal (in /Applications/Utilities/ or query Terminal in Spotlight)
Convert the .iso file to .img using the convert option of hdiutil
Note: OS X tends to put the .dmg ending on the output file automatically.
Run to get the current list of devices
Insert your flash media
Run again and determine the device node assigned to your flash media (e.g. /dev/disk2)
(replace N with the disk number from the last command; in the previous example, N would be 2)
If you see the error «Unmount of diskN failed: at least one volume could not be unmounted», start Disk Utility.app and unmount the volume (don’t eject).
Execute (replace /path/to/downloaded.img with the path where the image file is located; for example, ./ubuntu.img or ./ubuntu.dmg).
Using /dev/rdisk instead of /dev/disk may be faster.
If you see the error dd: Invalid number ‘1m’, you are using GNU dd. Use the same command but replace bs=1m with bs=1M.
If you see the error dd: /dev/diskN: Resource busy, make sure the disk is not in use. Start Disk Utility.app and unmount the volume (don’t eject).
Run and remove your flash media when the command completes
Restart your Mac and press alt while the Mac is restarting to choose the USB-Stick
MacBook Air 3,2
Please notice: While all of the info and above commands are executed properly on a MacBook Air 3,2 (that is the 2010 version 13″ version of the Air) the end result will not produce a bootable USB device, at least not with the image for Ubuntu 10.10 64-bit. When booting of the USB device the following message or something similar will appear: «Missing operating system» and the process is auto-magically halted.
To get the USB device (e.g. a USB stick) to show up at all in the boot menu you also may have to reboot/turn on/off the computer a couple of times and also resync the partition tables using rEFIt. After doing this the USB should then appear as a bootable device while holding in the alt or c key when you are rebooting the computer. Notice that both the computers built in bootloader and rEFIt will identify the USB device as a Windows device, but that’s not a problem and expected.
A workaround to the-usb-device-is-not-booting-problem is to:
- Install rEFIt.
- Create a bootable start disk using Ubuntu and a USB stick.
- Create a separate partition on the Airs HD.
- dd the whole USB stick to that partition.
- Resync with rEFIt. Turn power off and on.
- Select Pingo/Windows logo: Install should start. (Here you might want to press F6 to change parameters, e.g. use nomodeset)
Alternatively, burning a CD and installing via an external CD-drive will work fine on the Macbook Air 3,2.
Other procedure
We would encourage Mac users to download Ubuntu Desktop Edition by burning a CD for the time being. But if you would prefer to use a USB, please follow the instructions below. Note: this procedure requires an .img file that you will be required to create from the .iso file you download. TIP: Drag and Drop a file from Finder to Terminal to ‘paste’ the full path without typing and risking type errors.
- Download the desired file
Open the Terminal (in /Applications/Utilities/ or query Terminal in Spotlight)
Convert the .iso file to .img using the convert option of hdiutil (e.g., hdiutil convert -format UDRW -o
Note: OS X tends to put the .dmg ending on the output file automatically.
Run diskutil list to get the current list of devices
Insert your flash media
Run diskutil list again and determine the device node assigned to your flash media (e.g., /dev/disk2)
Run diskutil unmountDisk /dev/diskN (replace N with the disk number from the last command; in the previous example, N would be 2)
Execute sudo dd if=/path/to/downloaded.img of=/dev/rdiskN bs=1m (replace /path/to/downloaded.img with the path where the image file is located; for example, ./ubuntu.img or ./ubuntu.dmg).
Using /dev/rdisk instead of /dev/disk may be faster.
If you see the error dd: Invalid number ‘1m’, you are using GNU dd. Use the same command but replace bs=1m with bs=1M.
If you see the error dd: /dev/diskN: Resource busy, make sure the disk is not in use. Start the ‘Disk Utility.app’ and unmount (don’t eject) the drive.
Run diskutil eject /dev/diskN and remove your flash media when the command completes
How to install Ubuntu on MacBook using USB Stick (последним исправлял пользователь waitingallday 2013-04-30 12:21:08)
The material on this wiki is available under a free license, see Copyright / License for details
You can contribute to this wiki, see Wiki Guide for details
Источник


