- uDMX Treiber
- Windows
- Installationsanleitung
- KONFIGURATION
- KONFIGURATION STARTEN
- uDMX testen
- LINUX
- The Official FreeStyler DMX Community Support Forum
- uDMX drivers
- uDMX drivers
- Re: uDMX drivers
- Re: uDMX drivers
- Re: uDMX drivers
- Re: uDMX drivers
- Re: uDMX drivers
- The Official FreeStyler DMX Community Support Forum
- uDMX windows 10 64bit
- uDMX windows 10 64bit
- Re: uDMX windows 10 64bit
- Re: uDMX windows 10 64bit
- Re: uDMX windows 10 64bit
- Re: uDMX windows 10 64bit
- Re: uDMX windows 10 64bit
- LC+ nor
- Re: uDMX windows 10 64bit
- Technological Mess
- uDMX – Getting it to actually work on Windows
uDMX Treiber
Windows
Der Treiber bestehend aus den Dateien für USB und der Bibliothek uDMX.dll. Die USB-Dateien werden generell benötigt, die uDMX.dll je nach verwendeter Software.
Die Installation der Treiber wurde mit jeder Windows-Version problematischer. Es stehen mehrere uDMX-Treiber zur Verfügung, die installiert werden können.
- libusbK: Alle von mir getesteten Programme liefen einwandfrei. Probiert daher zuerst die Installation von libusbK. DOWNLOAD
- WinUSB: WinUSB ist vermutlich kompatibler mit Windows, allerdings funktionierte im Test nicht jede Software mit WinUSB. uDMXArtnetP5 funktioniert einwandfrei, uDMXArtnet jedoch nicht. DOWNLOAD
- libusb: Die alte Variante. Ab Windows 10 eher ungeeignet. DOWNLOAD
Installationsanleitung
- Einen der oben aufgelisteten Treiber runterladen.
- Dateien irgendwo entpacken und dann
- die Hardware einstecken.
- Das Betriebssystem sucht jetzt nach einem Treiber.
- Jetzt die Datei uDMX.inf im oben gewählten Verzeichnis anwählen
- Nach kurzer Zeit sollte der Treiber damit installiert sein. Ab Windows Vista muss evtl. die Meldung, dass ein nicht signierter Treiber installiert wird, bestätigt werden. Falls Ihr Probleme habt, bitte die FAQ lesen.
- ACHTUNG: Derzeit muss die Datei uDMX.dll noch MANUELL in das Verzeichnis Windows\System32 kopiert werden !
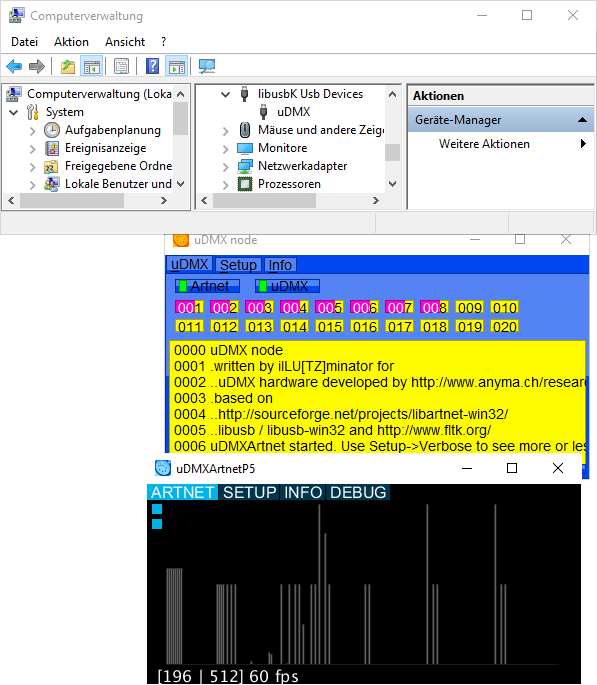
Bild: Der installierte uDMX-libusbK-Treiber unter Windows10-64Bit und die damit laufenden Artnet-Programme.
KONFIGURATION
Folgende Werte können angepasst werden, wobei die Zeiten nur dann geändert werden können, wenn die uDMX Firmware >= 1.4 verwendet wird.
- Anzahl der Kanäle: kann von standardmässigen 512 reduziert werden
- Anzahl der maximal gleichzeitig zu übertragenen Werte der Kanäle: von allen bisher getesteten Windows-Programmen wird sowieso nie mehr als 1 gesendet. Trotzdem solltet Ihr erstmal die Einstellung 512 probieren, erst bei Problemen die Zahl reduzieren.
- Break (Reset): Die Zeit des Resets vor dem Senden des ersten DMX-Wertes (typischerweise 88µs)
- Mark: Zeit zwischen Reset und Startbyte (typischerweise 8µs)
- Gap: Zeit zwischen den einzelnen DMX-Werten (typischerweise 0µs). Muss für einige Geräte z.B. Eurolite TS-5, Laserworld EL200RGY auf ca 20 gesetzt werden.
KONFIGURATION STARTEN
Wenn Euer DMX-Programm den Aufruf der Konfiguration nicht unterstützt, kann die Konfiguration mit dem Skript uDMXConfigure.bat (im Treiber enthalten) aufgerufen werden.
 uDMX testen
 uDMX testen
Um das uDMX Interface einfach testen zu können, kann aus dem Konfigurations-Dialog der Test aufgerufen werden.
Im Dialog werden Werte für die Kanäle 1-6 mit den Reglern eingestellt und an das Interface gesendet.
LINUX
Unter Linux muss lediglich libusb installiert werden.
Damit auch nicht root Benutzer unter Linux das USB-Gerät nutzen können, muss eine Datei z65-anyma-udmx.rules in /etc/udev/rules.d mit folgendem Inhalt erzeugt werden:
SUBSYSTEM==»usb*», ACTION==»add|change», ATTRS
SUBSYSTEM==»usb*», ACTION==»add|change», SYSFS
The Official FreeStyler DMX Community Support Forum
Get help and support from the community and the most latest FS news and downloads!
uDMX drivers
uDMX drivers
Post by Greyfox » June 10th, 2015, 1:40 pm
Re: uDMX drivers
Post by lazyman » August 31st, 2015, 11:15 am
Re: uDMX drivers
Post by MusicSync » January 23rd, 2016, 3:04 am
I recommend below ArtNet to DMX interface and give up the uDMX.
Re: uDMX drivers
Post by mrstretch » October 25th, 2017, 6:05 am
Re: uDMX drivers
Post by drcarlos1975 » November 20th, 2017, 4:07 pm
Easiest solution is to download Zadig http://zadig.akeo.ie/
This will get around the signature issue without the need to put the PC into test mode or any of that business.
Load Zadig, select the win32 USB drivers on the uDMX interface and load the driver. Simple as that.
I have tested and had this working on both Win7 32bit, Win10 32bit and Win10 64bit. The interface is stable for a 5hour show running 6 lights.
Sent the instructions to a fellow mobile DJ on mobile DJ forum on Facebook on Saturday after he’d spent a day fruitlessly trying to get it to work, 30 mins later I get a message it was up and running.
Re: uDMX drivers
Post by DreNL » November 6th, 2018, 7:34 am
Illutzmination made drivers for both 64 and 32 bit system. Use the LibUSBK Driver. An installer is even present in the zip.
The Official FreeStyler DMX Community Support Forum
Get help and support from the community and the most latest FS news and downloads!
uDMX windows 10 64bit
uDMX windows 10 64bit
Post by nokka » June 1st, 2017, 7:04 pm
Re: uDMX windows 10 64bit
Post by mrstretch » October 25th, 2017, 5:56 am
I just posted this .. it will work have a issue leave me a comment.
I bought the dmx for 19.00 on ebay. It came with a small disk with a udmx driver. I couldnt get it to load . I figured it out after about a hour of searching. The issue lie in the device signature , the driver was not recognized. In order to deal with this here is the solution. Go to the start menue in the lower bottem then press and hold down the shift key while clicking on the restart button. the computer will open a blue screen with , continue , trouble shoot, or turn off pc.press trouble shoot. then press advanced options. now 6 options will show up.press start settings . then restart. The computer will reload and then it will ask you to press a button to continue . Here is where you press f7 or the 7 key. the computer will reset. now once this happens you wait to have it load as normal. once windows is open you can go to the go to the device manager. now plug in the udmx. the udmx will appear but has a issue . now click on the udmx and go to the driver section and select from the location like hard drive or file you put on the desk top. now it will ask you if you want to open this even tho the driver is not signed. the answer is yes . It will now load. once it loads it will come up as udmx in the driver section. now open freestyler and use the udmx as a 512 and your ready to work.
hope this helps someone else as the video from the company and youtube didnt help..
respect. Dj Stretch from Canada
Re: uDMX windows 10 64bit
Post by mrstretch » October 25th, 2017, 5:58 am
Re: uDMX windows 10 64bit
Post by brin » October 3rd, 2019, 10:30 pm
THANKS a lot for this hint, didn’t know windows 8.1 good enough.
no I got the drivers installed
again thanks for sharing
Re: uDMX windows 10 64bit
Post by Bikash Saha » December 11th, 2019, 9:37 am
Re: uDMX windows 10 64bit
Post by Bikash Saha » December 11th, 2019, 9:38 am
LC+ nor
Post by RRRocks505 » February 20th, 2021, 9:51 pm
Re: uDMX windows 10 64bit
Post by SiGNe » February 23rd, 2021, 7:49 pm
Technological Mess

uDMX – Getting it to actually work on Windows
uDMX is an interesting middle man between your computer and your DMX lighting fixtures. Unlike most DMX computer interfaces, uDMX is most often tiny. I purchased a cheap uDMX interface from eBay, and its width and height are smaller than a credit card, with a thickness of only over 1cm. Although the colour is a 1990’s cream, I was impressed by the size of it. Best of all, it was only £20 including shipping, a massive difference compared to the £139 of ADJ’s MyDMX.
However, my little uDMX interface was an absolute pain to get going – and I’m assuming that’s why you are here.
Contents
- Installing ‘libusb’
- Installing the uDMX driver
- Getting software to control your lights
- Common problems
My uDMX interface came with a mini CD filled with folders of random drivers and installers. If yours has come with one of these discs, then to make things similar you should just download the software I am giving you as links. It will be more up to date then the versions on those discs anyway.
Before we continue, this is a guide for Windows computers only .
STEP 1 – Installing ‘libusb’
uDMX uses a very specific version of a driver called ‘libusb’ to make connections between the software and the hardware. Installing it is simple, however it is different depending on how many ‘bits’ your processor has – this is not as complicated as it sounds. Finding this information out, if you do not know it already, is also very simple.
Notice: Oristo Po has suggested, in the comments, using the program ‘Zadig‘. I’ve never used it before so I can’t guarantee that it works for what we need, but from what I can see, it should install ‘libusb’ for you. If you try it and it works, please let me know! If you use this method, ensure you install Libusb version 0.1, as uDMX requires this version.
First, open your start menu, and right click on ‘Computer’. Click ‘Properties’.

The following window will appear:

In this window, under ‘System type’, you can see whether your operating system is 32-bit or 64-bit. You need to remember this information.
Next, we will need to download version 0.1 of ‘libusb’. If you download this from an alternative source, although there are many new versions of ‘libusb’, it is vital that you get version 0.1 for uDMX to run correctly.
Your browser may warn you that this file can be dangerous as the file is a .dll driver file. This is a false positive, you can check it with any antivirus to prove this.
If you are using a 32-bit operating system:
Locate where you saved this file and copy the file. Open your start menu again, and type into the search box ‘C:\Windows\System32’. Paste ‘libusb0_x86.dll’ into this folder, accepting any warnings Windows gives you.
If you are using a 64-bit operating system:
Locate where you saved this file. Rename this file to ‘libusb0.dll’ – it is very important that it is spelt correctly, with everything in lower case.
Copy the file. Open your start menu again, and type into the search box: “C:\Windows\syswow64”, and press enter. Windows Explorer will open. Finally, you need to paste the ‘libusb0.dll’ into this folder. Accept any warnings your computer gives you.

STEP 2 – Installing the uDMX driver
For this next step, you need to download the uDMX driver, which is a small .dll file which your uDMX interface needs to talk to your light controlling programs.
Again, your browser may complain and say that the file may be dangerous. This is a false positive, you can check it with your antivirus program.
If your uDMX interface device is not already plugged in, plug it into your PC now. Your computer will attempt (and will almost definitely fail) to search for drivers for your device.
Once your computer has finished looking for drivers, open your start menu and click on ‘Devices and Printers’. Right click on your uDMX device, and click on ‘Properties’.

In the window which appears, click on the ‘Hardware’ tab, and then click on ‘Properties’.

In the window which appears, click on ‘Change settings’ in the ‘General’ tab.

In this window, click on the “Update Driver” button.

In the ‘Update Driver Software’ dialog, click on the large ‘Browse my computer for driver software’ button.

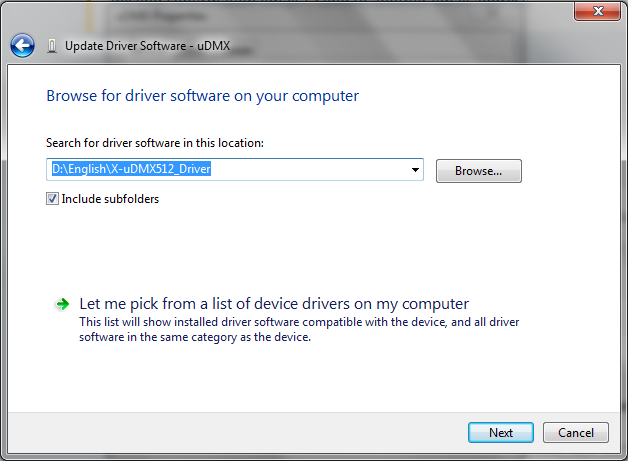
On the next screen, click the ‘Browse’ button. In the small dialog which appears, you need to locate the folder where you saved the ‘uDMX.dll’ file you downloaded earlier. For Windows to find the driver, you need to click on the same folder. Once you’ve done this, click ‘Next’.
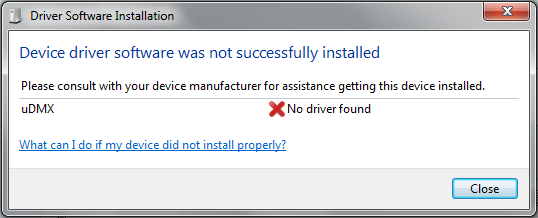
Unfortunately, the developers behind uDMX did not get their software digitally signed, resulting in a large, scary pop up box appearing when you attempt to install the driver. This driver is safe, however. You can scan it with your antivirus software, and I have been using it for around 2 years. Click ‘Install this driver software anyway’.

Once you’ve done this, your computer will install the driver software. This may take a few minutes.

Once this has been done, you will see this screen:

You’ve now installed the uDMX driver software! We’re nearly done!
STEP 3 – Getting software to control your lights
Now your drivers and your modified Artnet server is working, you need to get some software to control your lighting fixtures. There are several free options available to you.
My personal preference is FreeStyler. It is open, entirely free and has a community of people willing to help you with any problems. FreeStyler is good for live lighting control, especially for live chases and fast transitions. FreeStyler has plugin support and has several plugins included, such as LedTrix, which allows you to control LED par can chases using animated gifs. The graphical user interface can sometimes be awkward to work with, however. As well as this, I have occasionally come across some minor bugs.
Another free option which I have tested is DMXControl. To me, DMXControl seems a lot less intuitive in comparison to FreeStyler. Whereas FreeStyler shows you most things graphically, DMXControl gives scenes and lights in text-based lists. As well as this, it was difficult to get my fixtures working with it as as far as I could see, there is no option to create custom fixtures. DMXControl does seem ideal for theatre productions, however.


