- How To Set Up Dedicated Servers for Windows and Linux For Your UE4 Game (using Windows)
- Michael Allar
- Requirements
- Adding Dedicated Server Support
- Building your Dedicated Server
- Packaging Your Dedicated Server
- Locating your Dedicated Server Builds
- Note about running the Windows Dedicated Server
- Note about running the Linux Dedicated Server
- Sign up for more like this.
- How To Offset UE4 Pop-Up Notifications
- Now that the game industry is working from home.
- UE4 UMG UUserWidget: Which fires first, NativePreConstruct or Blueprint PreConstruct?
- zhiguangwang / README.md
- This comment has been minimized.
- crozar commented Nov 20, 2019 •
- This comment has been minimized.
- crozar commented Nov 20, 2019
- Setting Up Dedicated Servers
- How to set up and package a dedicated server for your project.
- 1. Required Setup
- 2. Setting Up a Server Build Target
- 3. Setting Up Entry and Default Maps
How To Set Up Dedicated Servers for Windows and Linux For Your UE4 Game (using Windows)
Michael Allar
This document covers the bare basics on how to get your Unreal Engine 4 game project able to build both Windows and Linux dedicated server builds, using just a Windows machine for compiling.
Requirements
Unreal Engine 4 compiled from source code
Project must be a C++ code project
- If your project is a Blueprint Only project, follow this tutorial to wrap it in C++. Don’t worry, you won’t have to write any code.
Linux Toolchain for Windows installed for Linux x86 Server Support
Adding Dedicated Server Support
Note: The word Project in any referenced file name or code will refer to your project’s name. For example, my project for this tutorial is named GenShooter , so in my case Project.Target.cs refers to GenShooter.Target.cs . ProjectTarget in my case would be GenShooterTarget .
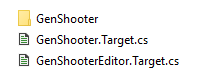
- Navigate to your Project’s Source folder. You should see some .Target.cs files.

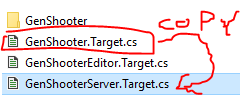
- Make a copy of Project.Target.cs file and rename it ProjectServer.Target.cs , be sure not to grab ProjectEditor.Target.cs .
- Open up ProjectServer.Target.cs in your favorite text editor. I’ll be using Visual Studio here.
- Rename all instances of ProjectTarget to ProjectServerTarget .
- Change Type = TargetType.Game; to Type = TargetType.Server; .
- Save this file. Your ProjectServer.Target.cs file should look something like this now:
Building your Dedicated Server
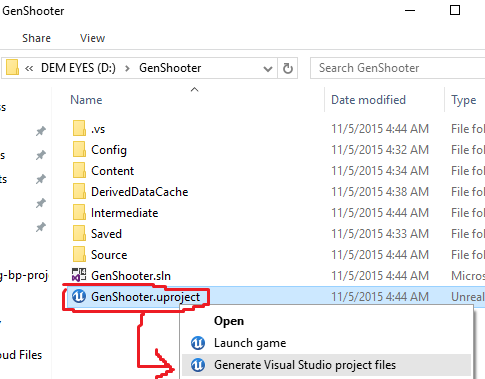
- Right-click your project’s .uproject file in your project’s folder and «Generate Visual Studio project files».
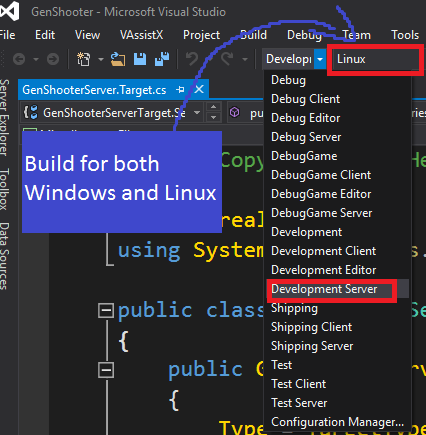
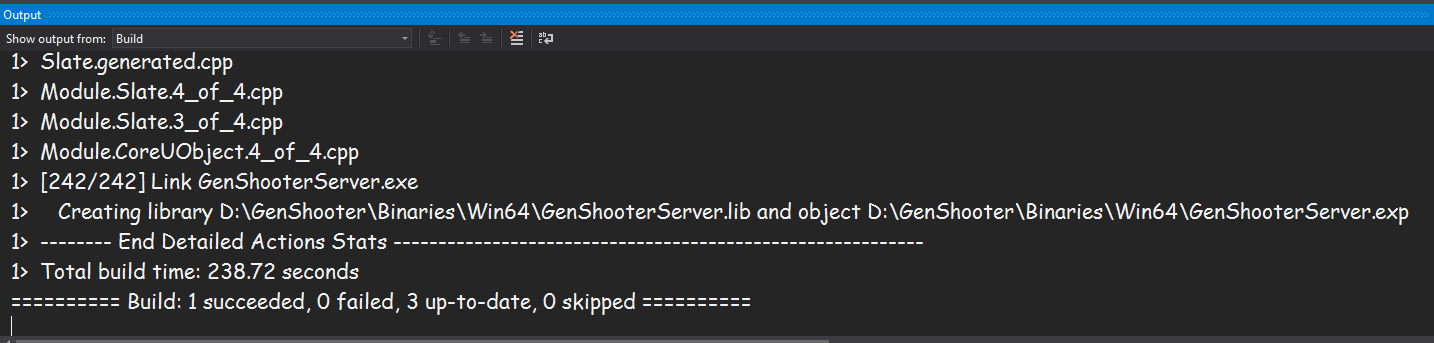
- Now we need to build our project in Visual Studio with the Development Server configuration for the Windows platform, and for the Linux platform as well if you have the Linux x86 Cross-Compile Toolchain installed. To do this, build your game project just as we built it in the past tutorials but this time with the Development Server build configuration.
When the Windows server is done building, your output should look like this.
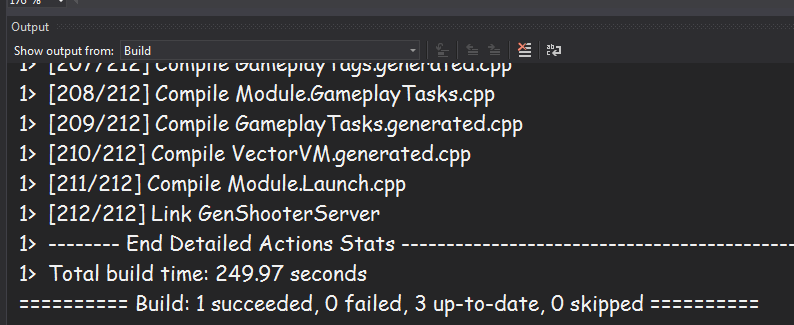
Here is the build output for the Linux server.
Now your project supports building for dedicated servers, for all platforms, including Linux. Whether Linux will compile is dependant on if your Linux x86 Cross-Compile Toolchain is setup correctly.
Packaging Your Dedicated Server
- Open up your project in the UE4 Editor.
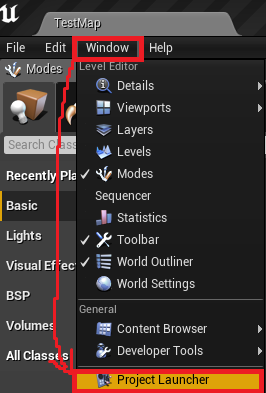
- Open up the Project Launcher using Window -> Project Launcher.
This should greet you with a window that looks like this.
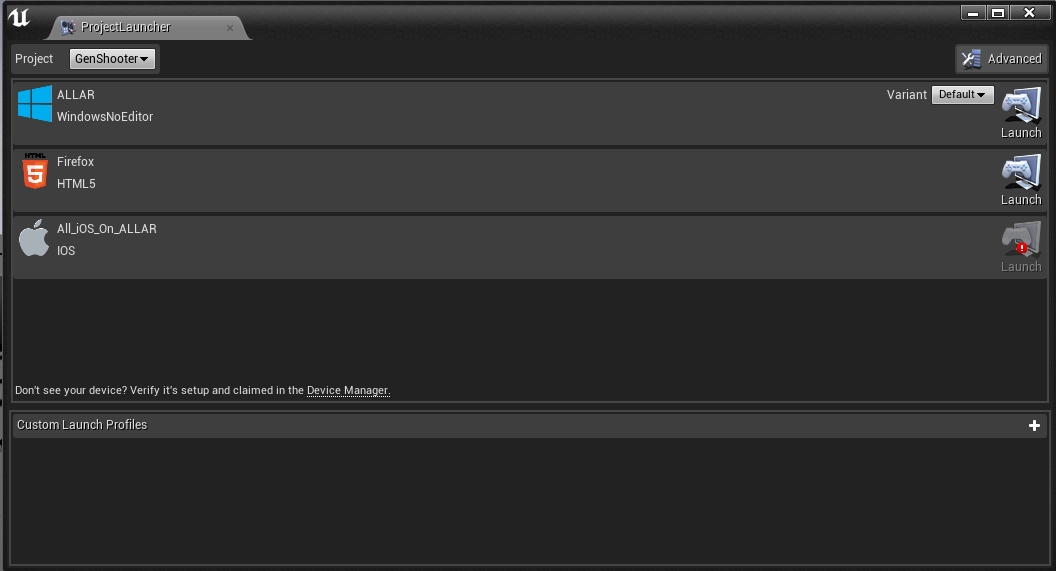
This window allows for launching various project deployment configurations.
- To build your project in dedicated server form, we need to make a custom build profile. Click the «Add a new custom launch profile» button in the bottom panel that looks like a plus sign. This should open up the custom profile editing screen.
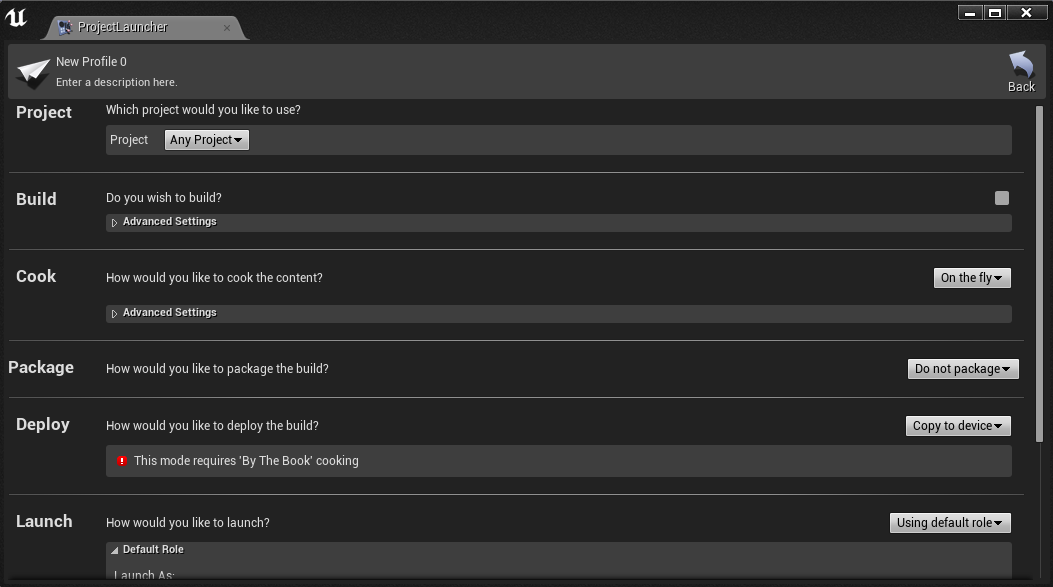
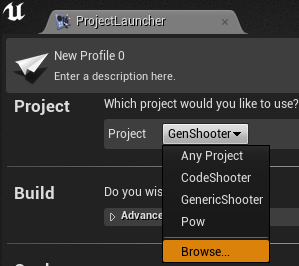
- Choose your Project in the Project drop down. If you do not see it, click browse and feed it your project’s .uproject file.
- Change Cook mode from On the fly to By the Book . Select the WindowsServer platform under Cooked Platforms. Select the LinuxServer platform as well if you have the Linux x86 Cross-Compile Toolchain installed. Also, select en under Cooked Cultures, or select your base language if your project is not English centric. Click here to see what these settings look like.

- Change Package mode from Do not package to Package & store locally . Leave all the settings in here blank by default.

- Change Deploy mode to Do not deploy .

- Click «Back» on the top right of this window to go back to the main Project Launcher Window.
- Click the «Launch This Profile» button next to your new custom profile. This button looks like the Play button in the level editor window.

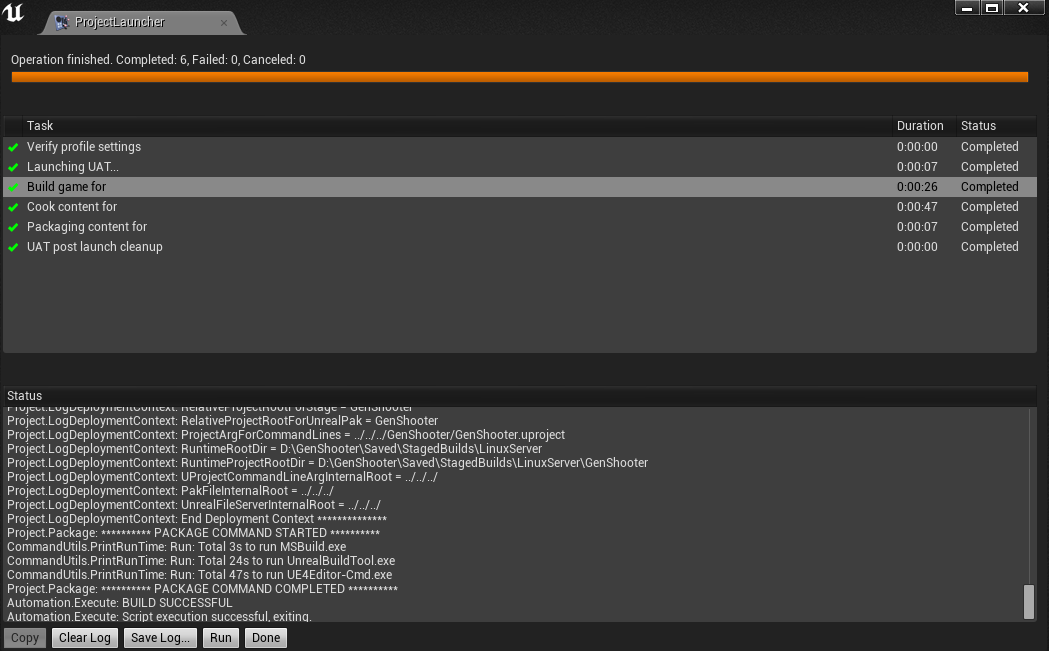
- This will begin the process of cooking and packaging your dedicated servers for your selected platforms. This will take a while. When it is done, it should look like this.
Locating your Dedicated Server Builds
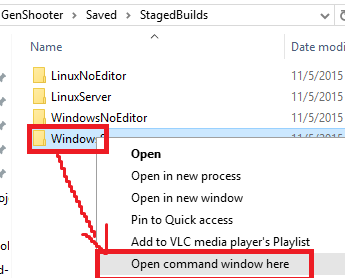
Now that you have packaged your dedicated server builds, you can find them in your project’s Saved\StagedBuild directory. If you have packaged your regular game builds, you’ll see them listed here as WindowsNoEditor and LinuxNoEditor as well. You are free to copy these builds to your target machines and distribute them as you like.
Note about running the Windows Dedicated Server
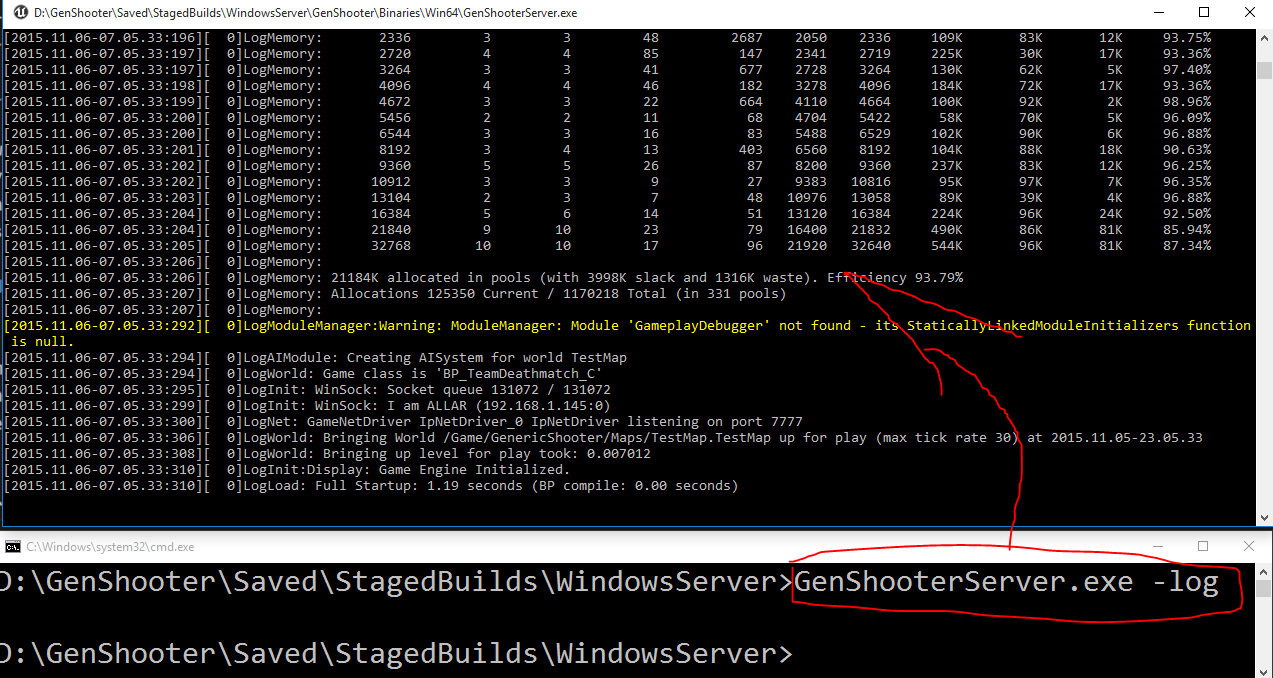
If you load the Windows Dedicated Server, it will seem that nothing loads up and that there is no UI or command prompt of any kind. If you open up your Windows Task Manager, you will see that your server is in fact running, but it is invisible. If you would like to see the log output of your Windows Dedicated Server, you need to run it with the -log command argument. The easiest way to do this is:
- Hold Shift and Right-click the folder your Windows Dedicated Server is in and choose «Open command window here.»
- Type in ProjectServer.exe -log and hit Enter . In my case, this is named GenShooterServer.exe -log
- This will load your Windows Dedicated Server with a log window.
Note about running the Linux Dedicated Server
After copying your files to your Linux server (which is outside the scope of this tutorial), you will need to run ProjectServer located in your builds Project/Binaries/Linux/ folder.
In my case that is, loading it from a terminal would look like:
If you want to load it and then send it to the background so that it will not terminate when you close your terminal session, you can load it with:
To kill a server that has been sent to the background, find it’s process name using the command top , then route that name to pkill , which would look like this:
Your process name is usually your server binary’s name limited to 16 characters.
Sign up for more like this.
How To Offset UE4 Pop-Up Notifications
I made a tutorial about how to move the notifications that the Unreal Engine editor can spew in case you. need to move them. https://www.youtube.com/watch?v=U4lpnOGt_M4
Now that the game industry is working from home.
. I hope more developers will have «spare time» for some «content creation».
UE4 UMG UUserWidget: Which fires first, NativePreConstruct or Blueprint PreConstruct?
NativePreConstruct fires first. NativePreConstruct then fires Blueprint PreConstruct.
Источник
zhiguangwang / README.md
Building Unreal Engine Game Client and Dedicated Server on Linux
Because the build tools of UE4 works across platforms (Windows, Mac OS, Linux), steps in this article can be applied to Mac OS and Windows as well.
On Windows, You need to replace RunUAT.sh with RunUAT.bat though.
First, get Unreal Engine 4 sourcecode and export the following environment variables:
- $UE4_ROOT Engine sourcecode directory, which contains Setup.sh
- $GAME_UPROJECT Path of the .uproject file of your game project
- $ARCHIVED_DIR Your build output directory.
Prepare for Engine Build
Build the Engine
Generate Game Project Files
This will generate Makefiles on Linux (Visual Studio files on Windows, XCode files on Mac OS).
Build and Cook the Dedicated Server
Build and Cook the Client
This comment has been minimized.
Copy link Quote reply
crozar commented Nov 20, 2019 •
hi thanks for this script but i have an error » ERROR: Failed to find scripts to execute in the command line params.
AutomationTool exiting with ExitCode=1 (Error_Unknown)
RunUAT ERROR: AutomationTool was unable to run successfully. «,
and is their a possibility for making 1 compiled deployment script that can take care of all of this for the UT community who have passion for helping support this game to grow. a deployment script that will finilize a UT4 server hub instead of a game server , thank you , please PM me if this requirement will take or consume ur time and ill be helpful to negotiate terms for costs under the fundraisers of philanthropist from the UT community
This comment has been minimized.
Copy link Quote reply
crozar commented Nov 20, 2019
can u join this discord server and PM me , my nick name is uaedude
im @ https://discord.gg/wQVTfE
You can’t perform that action at this time.
You signed in with another tab or window. Reload to refresh your session. You signed out in another tab or window. Reload to refresh your session.
Источник
Setting Up Dedicated Servers
How to set up and package a dedicated server for your project.
The server-client model used by Unreal Engine represents network multiplayer games with one server acting as the host of the game, and players joining that game as clients. The true game state is moderated by the server, while each player controls their pawns remotely with an autonomous proxy. The server then replicates changes out to each connected client so that all players experience a very close approximation of the game being played on the server.
Where a listen server represents a player hosting a game on their machine, a dedicated server is a server that runs headlessly. A headless server does not render any visuals, and there is nobody playing on it locally. This enables a dedicated server to focus on gameplay logic and moderating incoming information from clients, making the most of its resources for hosting a game. Additionally, this ensures a level playing field between all players participating in a multiplayer game. While a listen server is often acceptable for casual multiplayer and cooperative play, dedicated servers are ideal for large-scale or competitive games.
This how-to will show you how to build and package a dedicated server for your own multiplayer games.
1. Required Setup
To follow the steps in this how-to, your project needs to satisfy the following requirements:
You must be using a source build of Unreal Engine, which you can download from the Epic Games Github .
If your project is using a binary build from the Epic Games Launcher, you will need to migrate it to a Github source build.
You must have a C++ project that can support server-client multiplayer gameplay.
If you are using a Blueprint project, you will need to convert it to a C++ project before you can proceed.
This example will use a new project from the third-person template as an example.
To build a new multiplayer project from scratch, refer to the [Network Multiplayer Quick Start Guide](InteractiveExperiences/Networking/Quickstart], which adds some basic multiplayer mechanics to the third-person template.
2. Setting Up a Server Build Target
Dedicated servers are a separate build target for your project. When you create one, you create a different executable compared with the base game. Instead of being called «TestProjectGame.exe,» it would be «TestProjectServer.exe,» and launching that executable would start a dedicated server on your computer. This section will walk you through the process of adding the server build target to your project and compiling it.
Open the C++ solution for your project. This will be located in your project folder. Here it is called MyProject.sln.

If you do not have a C++ solution, you can right-click your .uproject file and click Generate Visual Studio Project Files to create one.
In the Solution Explorer, unfold the Source folder and locate the [Project].Target.cs file. This is the default build target for your project. There is also a [Project]Editor.Target.cs file for configuring how the Unreal Editor builds for this project. We will create the server build target in this same directory.

Open the Source folder in Windows Explorer. Create a copy of [ProjectName].Target.cs and rename it [ProjectName]Server.Target.cs . Here, the resulting file is called TestProjectServer.Target.cs .

Return to Visual Studio, then click and drag *Server.Target.cs from your Explorer window into the Source folder in the Solution Explorer.

Open [ProjectName]Server.Target.cs and replace its contents with the following target file instructions:
Be sure to replace all instances of TestProject with the name of your own project.
Locate the .uproject file for your project in its base directory, then right-click it and select Generate Visual Studio Project Files. This will regenerate the Visual Studio solution for your game, and it will discover your *Server.Target.cs file .

Select the Development Editor build configuration.

Build your solution by clicking Build > Build Solution in the toolbar. You can also do this through the right-click menu in the Solution Explorer window.
Select the Development Server build configuration and build the solution again.

Locate your project’s Binaries/Win64 folder. You should see Server files inside this folder, including [ProjectName]Server.exe .
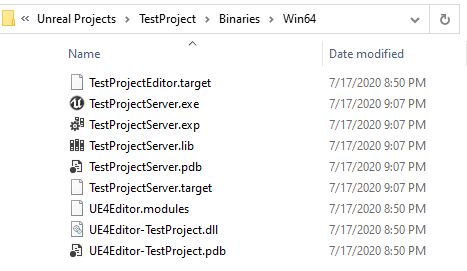
This executable is the one you will use to deploy a dedicated server.
3. Setting Up Entry and Default Maps
To test our dedicated server, we need to set up our default maps for our project so that the server will run a playable map, and so that users will connect to the server. There are many ways to accomplish this, but the quickest and most direct method is to build the connection flow directly into the user’s entry map when they start up the application.
Open your project in Unreal Editor. Inside the Content Browser, make sure to relocate all Level files to a Content/Maps folder. This can be done by moving the Maps folder from ThirdPersonCPP into the base Content folder.

Create a new level titled [ProjectName]Entry, where [ProjectName] is replaced with the name of your project. In this example, it will be called TestProjectEntry. You can make this with a blank map as the starting template.

Open the Entry map, then open the Level Blueprint script. From the BeginPlay node, add an Open Level node and give it a value of 127.0.0.1. This is your local IP address, which means that you are telling the game to connect to a server located on your own computer. If you substitute this value with a valid IP address, you will instead connect to a server located at that address.

Normally, an entry map is where you would set up your main menu UI. In this example, the entry level simply connects directly to the user’s own local IP so that we can quickly connect to the dedicated server. For an example of a fully featured entry map with a UI, refer to the ShooterGame sample project .
Open the ThirdPersonExampleMap and delete the third-person character that is normally pre-placed in the level. Instead, make sure there are two PlayerStarts in the level. This will ensure that when players connect, they have a consistent startup experience.

Open your Project Settings, navigate to Project > Maps and Modes, and unfold the Default Maps. Change them to the following:
Источник


