- Boot and UEFI
- Overview of the boot process
- SoC firmware boot loaders
- Understanding the Windows Boot Manager
- Как скачать Windows 10 и создать загрузочную флешку c поддержкой UEFI
- Как получить обновление до Windows 10?
- Создание загрузочного USB носителя для установки Windows 10
- Создание загрузочного USB носителя Windows 10 с поддержкой UEFI
- Почему важна поддержка UEFI BIOS?
- BIOS vs UEFI BIOS
- Windows UEFI firmware update platform
- UEFI firmware update support in Windows 10
- Overview of the UEFI firmware update platform
- System firmware updates
- Device firmware updates
- System requirements for Windows firmware updates
Boot and UEFI
NoteВ В Some information in this section may apply only to WindowsВ 10 Mobile and certain processor architectures.
A device running WindowsВ 10 has several requirements for booting into the OS. After the device’s firmware initializes all the hardware, the device needs to ensure that there is enough power to boot. Afterwards, the device needs to ensure that the device is booting into the appropriate OS depending on if the user wants to perform an update or a restore on the device, or if the user wants to boot the device into the main OS.
To accommodate each of these scenarios, the WindowsВ 10 boot process uses the following components:
Firmware boot loaders provided by the SoC vendor.
UEFI (Unified Extensible Firmware Interface) environment provided by the SoC vendor.
Windows Boot Manager provided by Microsoft.
This topic provides an overview of the boot process, and it describes the SoC firmware boot loaders, UEFI, and Windows Boot Manager in more detail.
Overview of the boot process
When a WindowsВ 10 device is turned on, it goes through the following high-level process:
The device is powered on and runs the SoC-specific firmware boot loaders, which initialize the hardware on the device and provide emergency flashing functionality.
The firmware boot loaders boot the UEFI environment and hands over control to UEFI applications written by the SoC vendor, Microsoft, and OEMs. These applications can utilize UEFI drivers and services.
The UEFI environment launches the Windows Boot Manager, which determines whether to boot to FFU flashing or device reset mode, to the update OS, or to the main OS.
The following diagram illustrates this process at a high level.

Following are additional details about some of the components in this diagram:
The update OS is a minimal OS environment provided by Microsoft. This OS is used specifically for installing updates.
FFU flashing mode refers to a UEFI application that flashes an OS image to device storage. Microsoft provides a UEFI flashing application which can be used in non-manufacturing scenarios. OEMs can also implement their own UEFI flashing application.
SoC firmware boot loaders
The SoC firmware boot loaders initialize the minimal set of hardware required for the device to run. The SoC firmware boot loaders are designed to finish as fast as possible, and nothing is drawn to the screen while they are running. After the SoC firmware boot loaders finish, the device is booted into the UEFI environment.
The SoC firmware boot loaders also contain an emergency flashing capability that allows devices to be flashed when the boot environment is not stable and FFU-based flashing using the Microsoft-provided flashing tool is not possible. Emergency flashing requires tools specific to the SoC. For more information, contact the SoC vendor.
WindowsВ 10 utilizes the Unified Extensible Firmware Interface (UEFI) to support the handoff of system control from the SoC firmware boot loader to the OS. The UEFI environment is a minimal boot OS upon which devices are booted and the WindowsВ 10 OS runs. For more information, see UEFI in Windows.
Understanding the Windows Boot Manager
The Windows Boot Manager is a Microsoft-provided UEFI application that sets up the boot environment. Inside the boot environment, individual boot applications started by the Boot Manager provide functionality for all customer-facing scenarios before the device boots.
ImportantВ В All components inside the boot environment are provided by Microsoft and cannot be modified, replaced, or omitted by OEMs.
Boot applications implement functionality for the following scenarios:
Charging the device battery before boot.
Capturing and saving offline crash dumps (developer builds only).
Flashing the device with a new image.
Resetting the device.
Updating the device.
Booting the device to the main OS.
The following diagram illustrates some of the key portions of the process that the Boot Manager follows after it is launched by the UEFI environment.
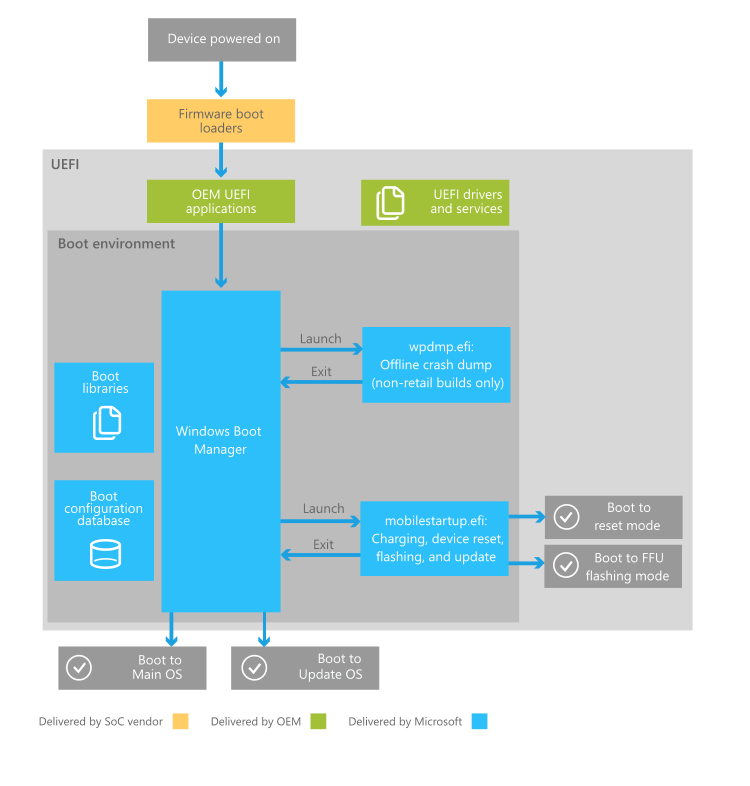
The following steps describe this process in more detail:
After the UEFI environment launches the Boot Manager, the Boot Manager initializes boot libraries, reads the boot configuration database to determine which boot applications to run and in which order to run them. The Boot Manager launches boot applications sequentially, and each application exits back to the Boot Manager after finishing.
Boot libraries are libraries of functions that extend upon existing UEFI functionality, and are designed to be used within the boot environment. Only boot applications, which are launched by the Boot Manager, have access to the boot libraries.
The Boot Manager first captures any reserved hardware button combinations that are pressed by the user.
In non-retail OS images, the Boot Manager next runs an offline crash dump boot application which allows the device to capture a snapshot of physical memory from the previous OS session. When the device resets abnormally, the previous OS session’s memory is preserved across the reset. When this happens, the offline crash dump application will save that memory and turn it into an offline crash dump file, which can be transferred off the device and analyzed. If the device did not reset abnormally in the previous OS session, the offline crash dump application exits immediately.
Как скачать Windows 10 и создать загрузочную флешку c поддержкой UEFI
13 августа 2015 года
Официальный релиз новейшей операционной системы Windows 10 от компании Microsoft, наконец, состоялся. 29 июля система, тестируемая на протяжении 9 месяцев, стала доступна в 190 странах мира. Решение познакомиться со всеми ее достоинствами и недостатками уже приняли для себя многие читатели нашего блога. Пошаговый мануал, который позволит вам самостоятельно подготовить флэш-накопитель для «чистой» установки Windows 10 с поддержкой технологии UEFI мы подробно опишем в этой статье.
Как получить обновление до Windows 10?
Получить обновление текущих версий лицензионных Windows 7, 8, 8.1 и Windows Phone 8.1 до Windows 10 вы сможете в течение всего года совершенно бесплатно. При этом если вы воспользуйтесь предложением в течение “бесплатного года”, то устройство на котором будет установлен пакет 10-ки, будет получать обновление до тех пор, пока будет осуществляться его поддержка производителем. Для этой цели можно использовать удобный инструмент Get Windows 10, уведомляющий о доступности новой версии и обеспечивающий автоматическую загрузку и установку всех необходимых компонентов.
Такая беспрецедентная щедрость привлекает многих, но все преимущества нового продукта, конечно же, будут доступны тем, кто установит у себя на компьютере свежую систему, не отягощенную уже имеющимися багами настроек и ошибок предыдущих версий. Установка “чистой” Windows 10 может заинтересовать и тех, кто устанавливает 10-ку в качестве второй ОС.
Создание загрузочного USB носителя для установки Windows 10
Для установки программного пакета понадобиться загрузить на сменный носитель образ ISO, загрузить с него устройство и выполнить установку, следуя простым рекомендациям. Создать установочный USB носитель вы можете непосредственно на официальном сайте. Образ ISO с Win 10 при выборе соответствующей опции в процессе создания загрузочной флэшки предоставляется Microsoft в автоматическом режиме.
Опишем последовательность действий:
Подсоединяем к нашему устройству флэшку, объемом не менее 4 Гб.
Переходим на страницу, на которой компания предлагает нам скачать дистрибутив Windows 10.
В открывшемся окне вводим свой логин и пароль к учетной записи, жмем подключиться (SIGN IN). За неимением учетной записи создаем новую (SIGN UP Now). На следующей странице жмем:
На следующей странице выбираем разрядность дистрибутива Win 10 (Download Tool Now (32-bit version или 64-bit version)).
Скачиваем утилиту MediaCreationToolх32/x64.exe которая поможет нам создать загрузочную флэшку Windows 10. Запускаем.
Выбираем опцию: Создать установочный носитель для другого компьютера.
В следующем окне настраиваем параметры:
Жмем далее, запуская процесс создания загрузочной флэшки.
Создание загрузочного USB носителя Windows 10 с поддержкой UEFI
На новых системах, использующих в качестве альтернативы привычному BIOS прогрессивную технологию UEFI стандартная установка может повлечь за собой множество ошибок, а в ряде случаев не позволит загрузиться со сменного носителя. Почему, будет понятно ниже. Для тех, кто не знаком с технологией UEFI мы приведем краткий ознакомительный экскурс, который позволит представить себе базовые отличия технологий BIOS и UEFI. Те, кто уже активно пользуется UEFI, могут пропустить эту часть статьи и перейти к описанию процесса создания загрузочной флэшки Windows с поддержкой UEFI.
Почему важна поддержка UEFI BIOS?
Привычная для нас микросхема БИОС, размещенная на материнской плате проверяет жесткие диски на предмет главной загрузочной записи MBR (Master Boot Record) весом 512 байт в нулевом секторе. При ее обнаружении БИОС запускает код на выполнение, после чего загружается операционная система. Таким образом, БИОС запускается до старта операционной системы, проверяет (POST), задает требуемые параметры работы процессору, материнке и прочим элементам системы и, при обнаружении проблем подает соответствующий звуковой сигнал о неисправности.
Для того, чтобы представлять себе, зачем авторам потребовалось столь кардинально менять стереотипы и привычные концепции, разберемся, что же представляет собой UEFI BIOS в сравнении со знакомой нам системой ввода-вывода (BIOS).
BIOS vs UEFI BIOS
UEFI (Unified Extensible Firmware Interface — унифицированный расширяемый интерфейс прошивки) — технология от компании Intel, пришедшая на смену привычному нам BIOS, от которого она отличается целым рядом принципиальных решений.
- Объем максимального адресного пространства жесткого диска на компьютере под управлением стандартного БИОС с главной загрузочной записью MBR не превышает 2,2 ТБ. Другими словами, если на вашем компьютере будет установлен жесткий диск в 3 ТБ операционной системе будет доступно лишь 2 из них. UEFI BIOS не ограничивает полезный объем винчестера 2,2 терабайтами, открывая доступ к разделам с максимальным объемом 18 экзабайт (18 000 000 терабайт).
- На компьютере под управлением стандартного БИОС с главной загрузочной записью MBR жесткие диски имеют ограничение на создание первичных разделов в количестве 3-х основных и 1 дополнительного (всего до 4 разделов), в котором вы можете создавать логические диски с последующей установкой ОС. В свою очередь, операционная система не будет запускаться без соответствующего диспетчера загрузки на основном раздела. UEFI BIOS способна обеспечить работу винчестеров с таблицей разделов GUID (GPT), которых можно разбить на 128 первичных разделов.
- Микросхема БИОС подвержена атакам руткитов, коды которых способны загрузиться до операционной системы, получив, таким образом, полный контроль над компьютером пользователя. UEFI BIOS на этом этапе надежно защищена от описанной проблемы, поскольку загрузка стартует в безопасном режиме «Secure Boot».
- UEFI BIOS — своего рода самостоятельная мини-операционка между основной ОС и микропрограммами, обеспечивающими управление аппаратными низкоуровневыми функциями оборудования. UEFI — это удобный, гибкий и понятный графический интерфейс управления и, что немаловажно для комфортной работы, с поддержкой мыши и русскоязычной версии меню.
К перечисленным преимуществам UEFI BIOS нужно добавить:
- поддержку жесткими дисками с таблицей (GPT) прогрессивной адресации LBA (в отличие от устаревшей CHS);
- ощутимо возросшую скорость загрузки системы, что достигается благодаря ускоренному режиму чтения блоков EFI I/O до 1 Мб за раз, заранее определенного UEFI на этапе установки ОС загрузочного диска;
- сетевая аутентификация;
- простоту обновления, универсальные графические драйверы.
- поддержку 32-х и 64-х битных процессоров, возможность использования совместно с процессорами Itanium, x64, x86 и ARM;
- поддержку загрузочных и тестовых сервисов;
- реализацию стандартных протоколов взаимодействия (включая сетевые);
- наличие собственной EFI-оболочки с возможностями запуска собственных EFI-приложений и выхода в сеть Интернет на уровне UEFI и пр.
Заметим, что для возможности загрузки старых ОС, которые поддерживают только BIOS, в UEFI предусмотрен режим эмуляции BIOS CSM (Compatibility Support Module).
Код UEFI по своему размеру значительно превышает загрузочный код BIOS и располагается в специальном каталоге /EFI/, который, в свою очередь, может храниться в самых различных местах: от микросхемы системной платы — до раздела жесткого диска или сетевого хранилища.
Чтобы создать установочную флэшку для компьютеров с обновленным BIOS UEFI нам понадобиться специальная компактная бесплатная программка, не требующая установки и именуемая Rufus. Поскольку Rufus поддерживает как MBR, так и GPT (см. описание UEFI выше), то установить Windows 10 с ее помощью вы сможете на любой компьютер, как с БИОС, так и с UEFI.
- Скачиваем портативную версию Rufus. Запускаем программу.
- В меню ”Устройства” выбираем сменный накопитель, на который вы намерены записать образ системы.
- В меню “Схема раздела и тип системного интерфейса” отмечаем опцию “GPT для компьютеров с UEFI”.
- В меню “Файловая система” и “Размер кластера” ничего не меняем. Отмечаем флажком опцию “Создать загрузочный диск”.
- В выпадающем окне выбираем опцию “ISO-образ” и указываем на образ диска ОС.
- Жмем кнопку “Старт” и дожидаемся окончания операции.
После проделанных операций загружаемся с подготовленной флэшки и устанавливаем Win 10. Если вся последовательность операций соблюдена, то проблем при инсталляции возникнуть не должно.
Скачать образ Windows 10 Insider Preview ISO для работы с программой можно, опять-таки, пройдя по ссылке. Процесс, описанный выше, полностью повторяется за исключением пункта 9, где мы выбираем создать ”образ ISO” и двух последующих простейших ступеней.
Что ж, теперь вы знаете, как получить доступ к преимуществам нового продукта от Microsoft. В добрый путь!
Windows UEFI firmware update platform
Windows supports a platform for installing system and device firmware updates via driver packages that are processed by using the UEFI UpdateCapsule function. This platform provides a consistent, reliable firmware update experience, and it improves the discoverability of important system firmware updates for end-users.
The UEFI firmware update platform guidance is intended for SoC vendors and OEMs who are building hardware platforms that run Windows. The UEFI firmware update platform is supported by the following operating system versions:
- WindowsВ 8
- WindowsВ 8.1
- WindowsВ 10 for desktop editions (Home, Pro, Enterprise, and Education)
- WindowsВ 10 Mobile
UEFI firmware update support in Windows 10
All systems that run WindowsВ 10 for desktop editions should implement UEFI firmware updates by following the UpdateCapsule-based update process described in this section of the documentation.
Devices that run WindowsВ 10 Mobile can follow the UpdateCapsule-based process used for Windows 10 Desktop. These devices can also follow the binary update process, which performs a binary update to the storage partition which contains the UEFI firmware.
Microsoft strongly recommends that devices running WindowsВ 10 Mobile should update UEFI firmware by using the binary update process. Devices that run Windows 10 Mobile can use the UpdateCapsule-based process only in scenarios where the binary update process cannot be used. For example, if the partition layout of the device prevents the UEFI firmware from being updated by using a binary update package.
For more information about .spkg packages for WindowsВ 10 Mobile, see Creating packages.
Overview of the UEFI firmware update platform
There are two types of firmware that can be serviced via Windows: system firmware and device firmware. System firmware is responsible for providing critical boot and runtime services to the system as a whole, and device firmware is associated with a particular device integrated into a system. Such device firmware typically works together with a device driver, allowing the OS to expose the device to OS-level services and applications.
System firmware updates
System firmware updates for UEFI-based systems will be deployed as device driver packages (INFs). Windows will use information provided by the platform to ensure that the update package only applies to appropriate systems. A firmware update package contains a binary file containing the system firmware image. After the firmware update package is on the end-user’s system, Windows will use the UEFI UpdateCapsule function to hand-off the firmware payload to the platform firmware for processing.
Deploying the update as a driver package allows the firmware update process to align with many existing deployment and servicing tools, and ensures simple update package authoring for hardware vendors.
The fact that the firmware update is delivered as a driver package does not mean that the update is written as an actual driver. The driver package will contain an INF file and a binary file containing the system or device firmware image.
Device firmware updates
For the purposes of updating device firmware, the device firmware can be assigned to one of these two categories:
UEFI-updatable device firmware.
This device firmware can be updated using a device driver package leveraging the same mechanism as system firmware. A device firmware update is distributed as a firmware update package. After the firmware update package is on the end-user’s system, Windows will use the UEFI UpdateCapsule function to hand-off the device firmware payload to the platform firmware for processing. This process is virtually identical to how Windows hands off system firmware update payload, and is discussed below.
It is recommended that device firmware be updated using a discrete firmware update driver package, but device firmware may also be updated with system firmware as part of a single firmware update driver package.
NoteВ В UEFI should not be used to update peripheral devices. UEFI requires devices to be present during reboot to apply a firmware update which cannot be guaranteed with (external, removable) peripheral devices.
Driver-updatable device firmware.
This device firmware can be updated by the device driver during the normal Windows OS runtime. Updating device firmware using normal Windows OS drivers is not covered by this paper.
System requirements for Windows firmware updates
In order for a system to be compatible with the Windows firmware updating mechanism, it must meet the following requirements:
The system must implement UpdateCapsule and QueryCapsuleCapabilities as defined by section 8.5.3 of the UEFI specification 2.8.
UpdateCapsule is used to pass the firmware update payload between Windows and the platform firmware.
Platform firmware must support firmware updates initiated by Windows.
System firmware, and some classes of device firmware, must be updatable using this process. Firmware code recognizes a firmware update payload passed to UpdateCapsule and initiates the update process. The implementation is owned by the partner.
Must specify a Firmware Resource in the EFI System Resource Table (ESRT)
The Firmware Resource allows Windows to surface a device instance with a Hardware ID, which will be used to target the system or device firmware update to appropriate systems and devices. It also describes the current firmware version and provides status for previous updates.
There exists a single entry for system firmware updates. All devices with updateable firmware must have a resource specified in the ESRT, unless a device’s firmware is updated as part of a system firmware update.


