- Download UFS Explorer
- UFS Explorer Professional Recovery
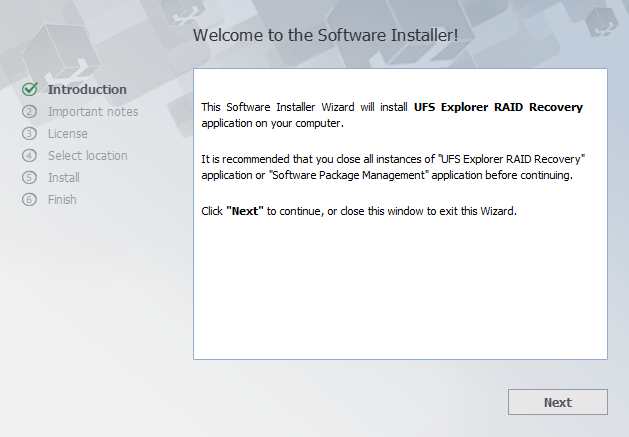
- UFS Explorer RAID Recovery
- UFS Explorer Network RAID
- UFS Explorer Standard Recovery
- UFS Explorer Professional Recovery
- Overview
- Step-by-step setup guidance
- UFS Explorer Professional Recovery
- UFS Explorer Professional Recovery for Windows
- UFS Explorer Professional Recovery for macOS
- UFS Explorer Professional Recovery for Linux
- UFS Explorer RAID Recovery
- UFS Explorer RAID Recovery for Windows
- UFS Explorer RAID Recovery for macOS
- UFS Explorer RAID Recovery for Linux
- UFS Explorer Network RAID
- UFS Explorer Network RAID for Windows
- UFS Explorer Network RAID for macOS
- UFS Explorer Network RAID for Linux
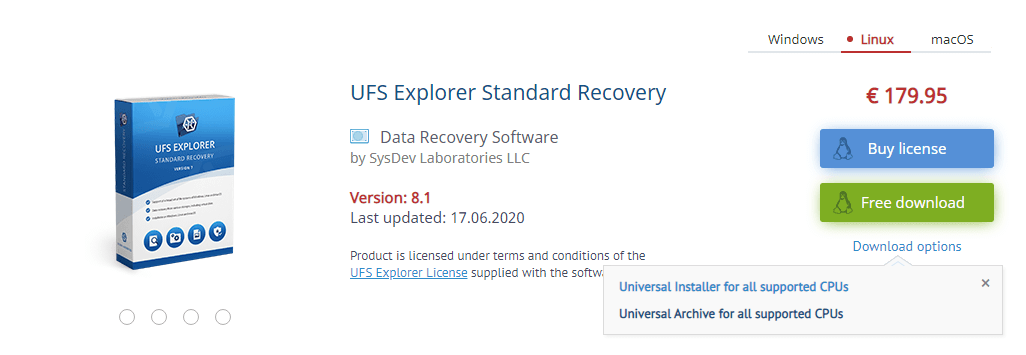
- UFS Explorer Standard Recovery
- UFS Explorer Standard Recovery for Windows
- UFS Explorer Standard Recovery for macOS
- UFS Explorer Standard Recovery for Linux
- UFS Explorer Standard Access
- UFS Explorer Standard Access for Windows
Download UFS Explorer
Choose your personal assistant in data access and recovery.


UFS Explorer Professional Recovery
- Enhanced storage reading mechanism
- Advanced possibilities for creating disk images
- Support of various storage technologies
- Built-in disk decryption techniques
- Automatic reconstruction of different RAID types
- Adjustable RAID builder with an embedded script handler
- Comprehensive toolkit for work with defective storages
- Diverse means for effective analysis and editing of binary data
Never download or install the software to the storage you have lost your information from. Why?
By downloading this software you agree to End-User License Agreement
UFS Explorer Professional Recovery is highly efficient software created for solving complex data loss cases. With an advanced toolkit for work with different storage technologies, including RAID, virtualization and encryption, the utility is a perfect assistant for data recovery specialists.
Shareware:
All UFS Explorer products are created as ‘shareware’, meaning, you can try the product before you buy it.
It’s strongly recommended to check out the trial application before purchasing software license to ensure that it matches your needs and has all required functions.
- any supported operating systems;
- at least 20 MB for software executable files;
- at least 1 GB RAM;
- Linux version can run from most modern Linux Live CD.
- The software copies files with the size under 768 KB only;
- «Save» function of certain hexadecimal viewer/editor dialogs is disabled.
UFS Explorer RAID Recovery
- Well-suited to tackle most common data loss issues
- Auto-detection of RAID parameters and prompt virtual assembly
- Smooth manual definition of various RAID configurations
- Support of specific RAID layouts and other storage technologies
- Extensive possibilities for creating disk images
- A variety of means for work with defective drives and RAID sets
Never download or install the software to the storage you have lost your information from. Why?
By downloading this software you agree to End-User License Agreement
UFS Explorer RAID Recovery is software solution for common data loss cases and for data recovery tasks related to RAID systems of any level and complexity. This cross-platform program works with different file systems and a wide range of storages. The software embraces all tools necessary for efficient data recovery from complex storages.
Shareware:
All UFS Explorer products are created as ‘shareware’, meaning, you can try the product before you buy it.
It’s strongly recommended to check out the trial application before purchasing software license to ensure that it matches your needs and has all required functions.
- any supported operating systems;
- at least 20 MB for software executable files;
- at least 1 GB RAM;
- Linux version can run from most modern Linux Live CD.
- The software copies files with the size under 768 KB only.
UFS Explorer Network RAID
- Distributed data recovery from remote computers over LAN
- Equally efficient work with locally attached storage devices
- Auto-reconstruction of various RAID configurations
- Adjustable RAID builder for manual RAID assembly
- Support of specific RAID patterns and other storage technologies
- Extensive options for creating disk images
- Instruments for work with defective drives and RAID sets
Never download or install the software on the storage you have lost your information from. Why?
By downloading this software you agree to End-User License Agreement
UFS Explorer Network RAID is a software application aimed at data recovery from RAID systems of any level and complexity. This program allows restoring lost and deleted files from a RAID system over a local area network, making simultaneous data recovery performed on several computers possible.
Shareware:
All UFS Explorer products are created as ‘shareware’, meaning, you can try the product before you buy it.
It’s strongly recommended to check out the trial application before purchasing software license to ensure that it matches your needs and has all required functions.
- any of the supported operating systems;
- at least 20 MB of space for software executable files;
- at least 1 GB of RAM;
- Linux version can run from most modern Linux Live CD.
- The software copies files with the size under 768 KB only.
UFS Explorer Standard Recovery
- Effective resolving of standard data recovery cases
- Immediate access to the intact storage content
- Great variety of supported file systems
- Auto-assembly of spanned volumes
- Broad set of auxiliary tools and options
- Extensive possibilities for disk reading and imaging
Never download or install the software to the storage you have lost your information from. Why?
By downloading this software you agree to End-User License Agreement
UFS Explorer Standard Recovery is an essential utility for common data loss cases, including accidental deletion of files, storage formatting, software and hardware malfunctions. This cross-platform software works with a broad set of file systems applied in Windows, macOS and Linux allowing users to successfully restore files created in these operating systems regardless of their formats.
Shareware:
All UFS Explorer products are created as ‘shareware’, meaning, you can try the product before you buy it.
It’s strongly recommended to check out the trial application before purchasing software license to ensure that it matches your needs and has all required functions.
Источник
UFS Explorer Professional Recovery
Overview
UFS Explorer Professional Recovery is an expert-level software instrument created to address highly complicated data recovery challenges.
Along with linear electronic media, like hard disks, thumb drives and memory cards, the program handles RAID-based storages with various layouts, including standard, nested, custom and specific configurations – Drobo BeyondRAID, Synology Hybrid RAID, Btrfs-RAID and ZFS RAID-Z. The integrated decryption algorithms make it possible to open volumes encrypted with BitLocker, LUKS, FileVault 2 and APFS without having to unlock them in the operating system. The software also supports numerous file systems used in Windows, Linux, macOS and BSD, offering direct access to their content, well as a variety of storage technologies, among which are Windows Dynamic Disks, Storage Spaces and deduplication, Apple Software RAID, Core Storage and Time Machine, Linux mdadm and LVM with Thin Provisioning. Furthermore, the application allows working with various virtualization systems, like VMware, Hyper-V, VirtualBox, QEMU, XEN and many formats of disk images.
Moreover, UFS Explorer Professional Recovery features extended possibilities for efficient processing of storage devices, especially ones that demonstrate certain hardware problems. The software offers an advanced procedure for opening storages with parameters as to their usage and an opportunity to save a sparse image file with the processed data. Operations with drives connected to DeepSpar Disk Imager can be performed via LAN and controlled by the software without the need for any third-party solutions. A full or partial image of a disk can also be created with the help of an embedded imaging function with various settings for disk reading and omission of damaged blocks. A map with defective areas can be generated during imaging or through the conversion of used/free file system space to mask and employed during the recovery procedure. The raw content of files and storages can be analyzed and edited directly in the software with a broad set of supplementary tools.
Источник
Step-by-step
setup guidance
— User-friendly setup manager
— Straightforward installation process

This section describes in detail how you can install UFS Explorer products on your computer system.
The download and installation process can be easily carried out with the help of the installer’s prompts and handy tips. However, if you are not sure that you can perform it right, please, follow the instructions given below.
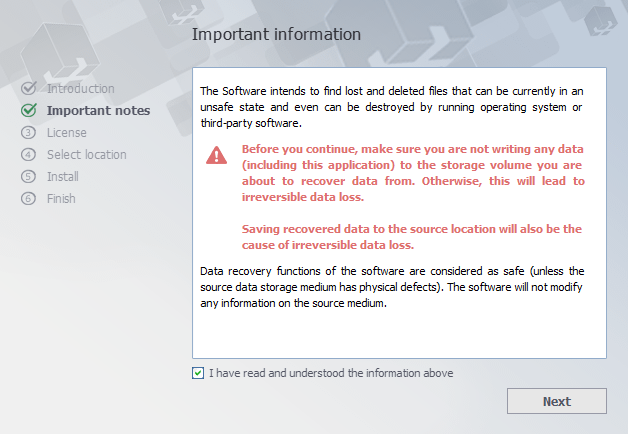
The software should not be downloaded or installed to the storage from which the data will be recovered.
This may erase the lost information, leaving no chances for its restoration. Please, make sure that you choose another logical volume or storage device. Alternatively, you may use UFS Explorer Backup and Emergency Recovery CD. If your storage medium has any signs of physical failure, turning to a professional service provider is strongly recommended.
UFS Explorer Professional Recovery
The software can be downloaded from the following web page:
To install a new copy of the software or update the program, you should follow the steps of fresh software installation. In case of an update from an older software version, there is no necessity to remove the older software. Yet, a rollback to the previous software version requires uninstallation of the newer one. Other editions of UFS Explorer can be installed along with UFS Explorer Professional Recovery.
UFS Explorer Professional Recovery for Windows
You can install the software on Microsoft Windows NT 5.1 OS and later versions of the Windows operating system (Windows XP/Windows 2003 Server and later). It is also possible to run the program on older Windows NT versions starting from NT 4 SP6 while the installation on Windows 95/98/МЕ is not supported at all. To install the software simply download the executable file of the installer and run it.
Warning: Never download or install the software to the drive containing the lost data you are going to recover. This may lead to its permanent damage or loss. If the data was lost from a non-system partition, it’s recommended to download and install the software to the system partition. If the files were lost from the system partition, it’s recommended to shut down the computer immediately and boot it using UFS Explorer Backup and Emergency Recovery CD.
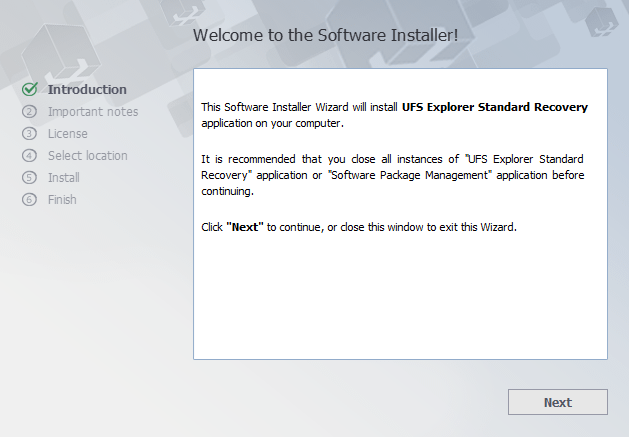
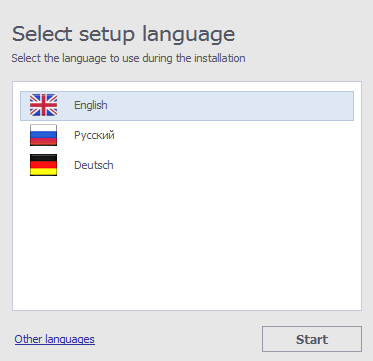
After the start of the installation process, you will be prompted for the language of the user interface that will be used as the language of the software installer and the software user manual.

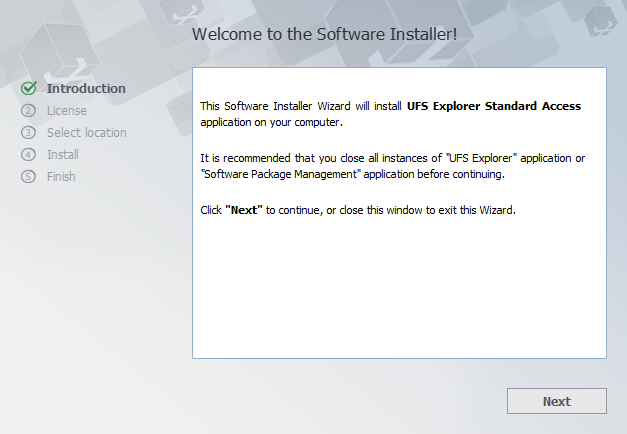
From now on the installation process begins.

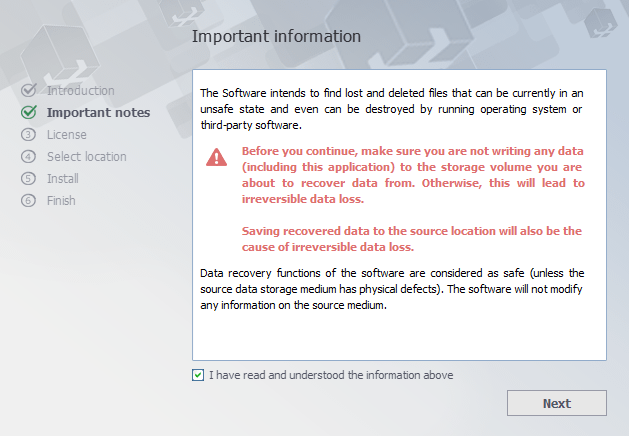
Carefully read the notes of importance before proceeding to the next step.

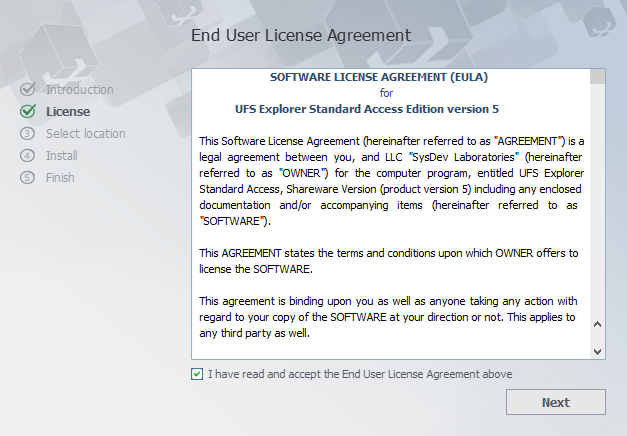
The installer will show the End User License Agreement (EULA) for acceptance.
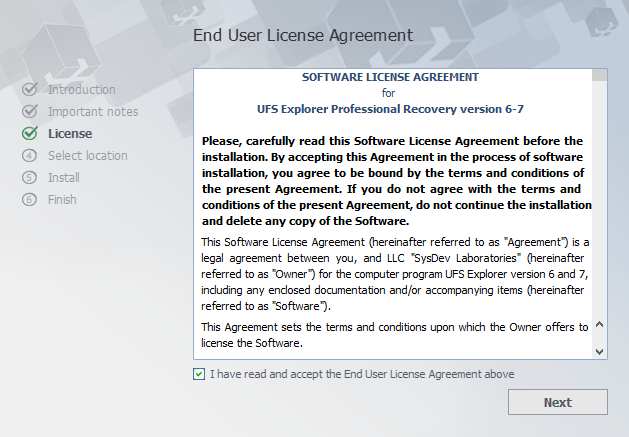
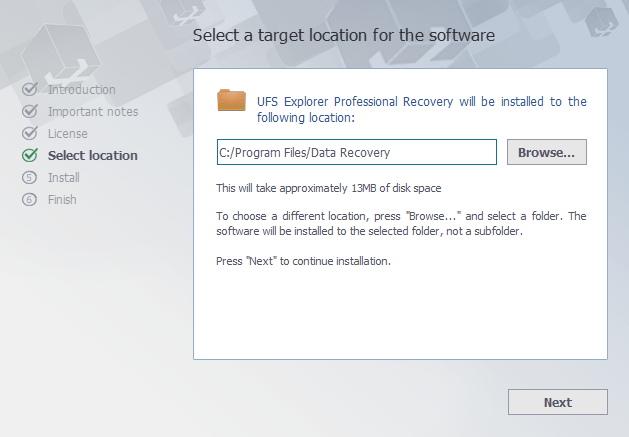
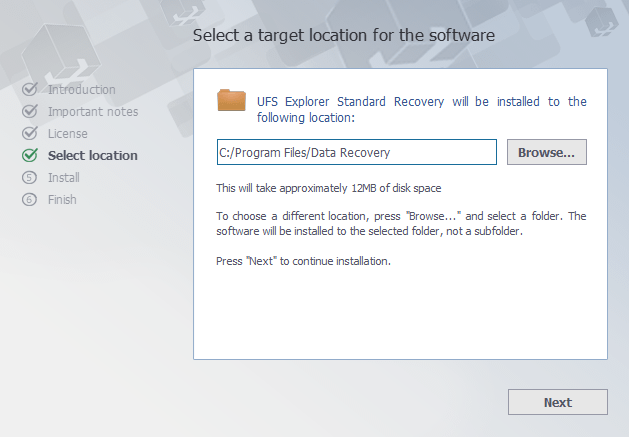
You may continue with the installation only after the EULA is accepted. At the next step, the software will prompt for the target folder used for the installation. In case of a software update from a previous version, the installation folder will be set as the folder of a previous software version by default.
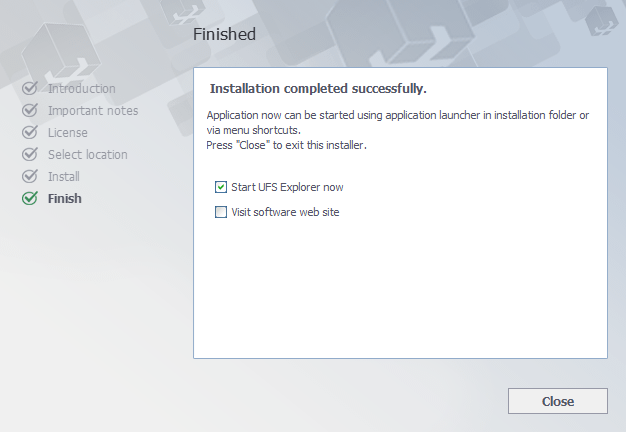
Then the installer will prompt for the name of the product group in the «Start» menu (the default one is «Data Recovery»). At this stage, the installer will finish collecting the necessary information and start the installation process.
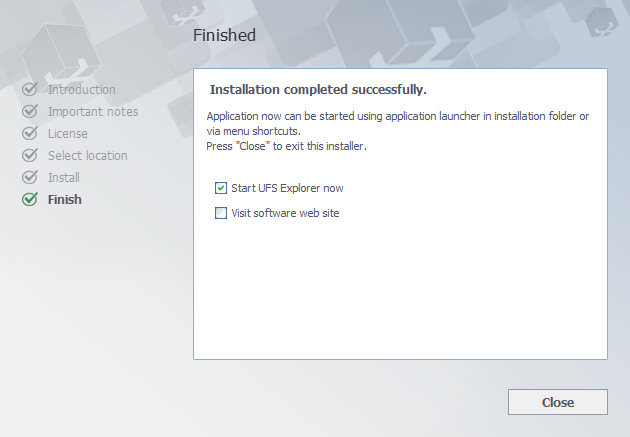
After it is finished, you will be able to launch the software from the final window of the software installation wizard. You may also start the software using its shortcut in the «Start» menu («All programs», then the software group (the default one is «Data Recovery») and then «UFS Explorer Professional Recovery».
Hint: To remove the installed utility, please follow the steps described in the instruction for Uninstallation of UFS Explorer Professional Recovery.
UFS Explorer Professional Recovery for macOS
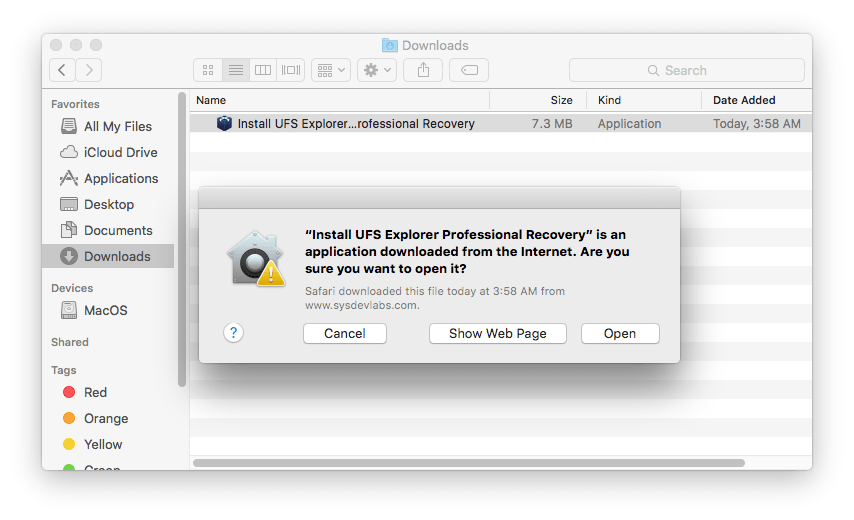
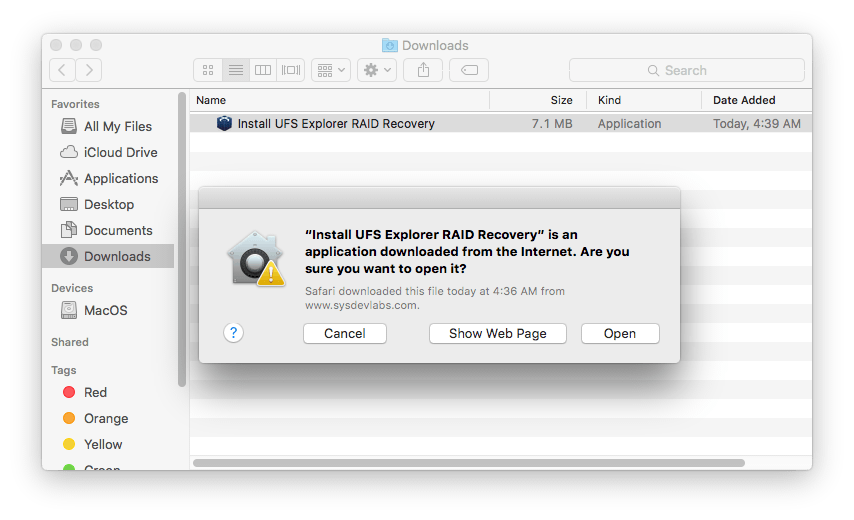
No special actions are required: just download the compressed DMG-image file from the software web site and open it using Finder. After the installation process is completed, go to the «Applications» folder (the «⇧Shift + ⌘ Cmd + A» hotkeys), find UFS Explorer Professional Recovery and run the software using its icon.
Warning: Never download or install the software to the drive containing the lost data you are going to recover. This may lead to its permanent damage or loss. If the data was lost from a non-system partition, it’s recommended to download and install the software to the system partition. If the files were lost from the system partition, it’s recommended to shut down the computer immediately and boot it using UFS Explorer Backup and Emergency Recovery CD.
Hint: To remove the installed utility, please follow the steps described in the instruction for Uninstallation of UFS Explorer Professional Recovery.
UFS Explorer Professional Recovery for Linux
Download the software from the website by choosing the download option for Linux users. Extract the content of the downloaded Universal Installer archive. Open the folder with the extracted content and run the Installer after entering your user password. You will then see the prompts of the Installer concerning the language and the target folder. To finish the installation simply follow the steps in the Installation Manager.
If the standard installation doesn’t work properly, install the software via the Terminal application. In the Terminal open the folder with the extracted file using the ‘cd’ command (e.g. cd
/Downloads). Run the install script as a local Administrator (e.g. sudo ./ufs-explorer-pro.install).

The application can be launched from the Menu. You can also execute the file using the Terminal.
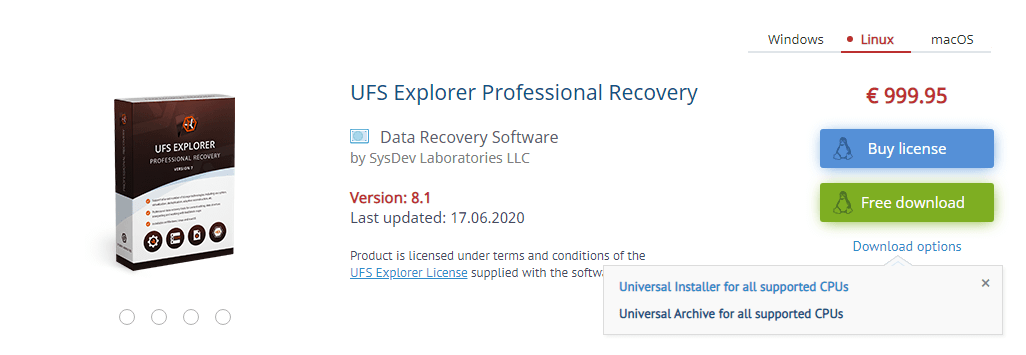
If the described approach fails, try running the program via the Terminal using executable files from the Universal Archive. Download the archive from the product page in the Software Store using the second option for Linux users, then extract its content.
Open the Terminal and enter the commands in the following order:
/Downloads
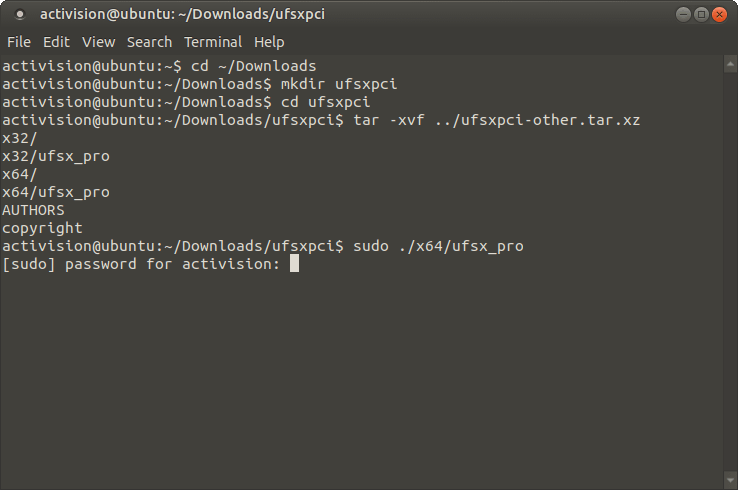
Depending on the employed computer architecture, start software with the «sudo /x32/ufsx_pro» or «sudo /x64/ufsx_pro» («su root -c /x32/ufsx_pro» or «su root -c /x64/ufsx_pro» for Debian) command. To run the program you will be asked to enter your user password. After that, the software will be launched without installation. This method can also be used to run UFS Explorer on UFS Explorer Backup and Emergency Recovery CD without installation, as all the applications on it are pre-installed and cannot be updated.
Warning: Never download or install the software to the drive containing the lost data you are going to recover. This may lead to its permanent damage or loss. If the data was lost from a non-system partition, it’s recommended to download and install the software to the system partition. If the files were lost from the system partition, it’s recommended to shut down the computer immediately and boot it using UFS Explorer Backup and Emergency Recovery CD.
- press Alt+F2 to invoke the «Start application» dialog;
type «ufs» to find the application;
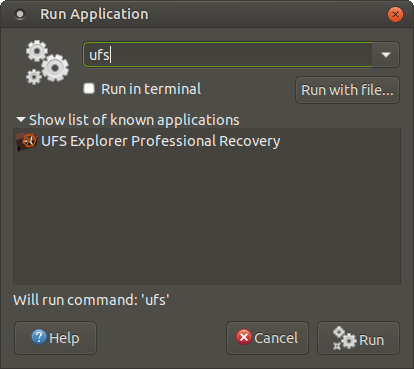
choose the application from the list and make sure that the «Run in terminal» option is enabled. After that, run the program.
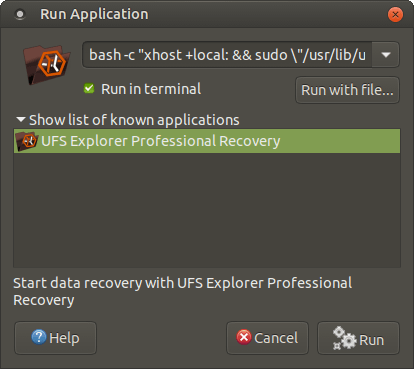
Another way is to enter the «bash -c «xhost +local: && sudo \»/usr/lib/ufs-explorer/ufs-explorer-pro\»»» or «su root bash -c «xhost +local: && sudo \»/usr/lib/ufs-explorer/ufs-explorer-pro\»»» command, enable the «Run in terminal» option and press the «Run» button.
In the Terminal:
- type «sudo /usr/lib/ufs-explorer/ufs-explorer-pro» or «su root -c /usr/lib/ufs-explorer/ufs-explorer-pro».

If the installation still fails, try checking the missing libraries through LDD, add them and install the software again.
UFS Explorer RAID Recovery
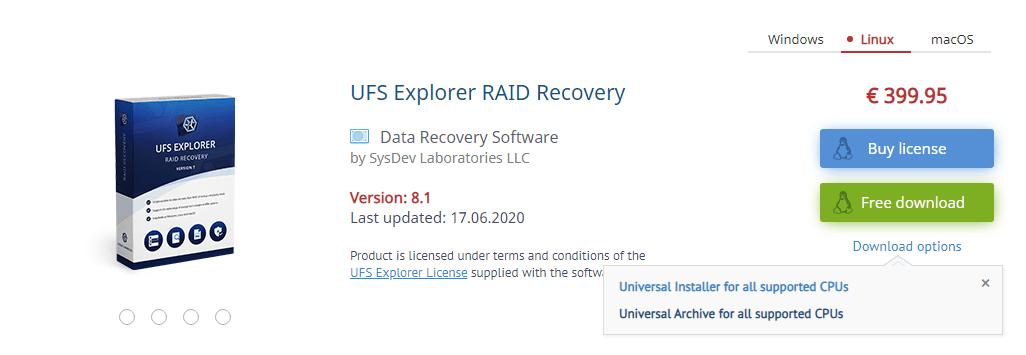
The software can be downloaded from the following web page:
To install a new copy of the software or update the program, you should follow the steps of fresh software installation. In case of an update from an older software version, there is no necessity to remove the older software. Yet, a rollback to the previous software version requires uninstallation of the newer one. Other editions of UFS Explorer can be installed along with UFS Explorer RAID Recovery.
UFS Explorer RAID Recovery for Windows
You can install software on Microsoft Windows NT 5.1 OS and later (Windows XP/Windows 2003 Server and later). It is possible to run the software on older Windows NT versions starting from NT 4 SP6. Software installation to Windows 95/98/МЕ is not supported at all.
To install the software simply download the executable file of the software installer and run it.
Warning: Never download or install the software to the drive containing the lost data you are going to recover. This may lead to its permanent damage or loss. If the data was lost from a non-system partition, it’s recommended to download and install the software to the system partition. If the files were lost from the system partition, it’s recommended to shut down the computer immediately and boot it using UFS Explorer Backup and Emergency Recovery CD.
After the start of the installation process, you will be prompted for the language of the user interface that will be used as the language of the software installer and the software user manual.

From now on the installation process begins.
Carefully read the notes of importance before proceeding to the next step.
The installer will show the End User License Agreement (EULA) for acceptance. You may continue with the installation only after the EULA is accepted.

At the next step, the software will prompt for the target folder used for the installation. In case of a software update from a previous version, the installation folder will be set as the folder of a previous software version by default.

Then the installer will prompt for the name of the product group in the «Start» menu (the default one is «Data Recovery»). At this stage, the installer will finish collecting the necessary information and start the installation process. After it is finished, you will be able to launch the software from the final window of the software installation wizard.

You may also start the software using its shortcut in the «Start» menu («All programs», then the software group (the default one is «Data Recovery») and then «UFS Explorer RAID Recovery».
Hint: To remove the installed utility, please follow the steps described in the instruction for Uninstallation of UFS Explorer Professional Recovery.
UFS Explorer RAID Recovery for macOS
No special actions are required: just download the compressed DMG-image file from the software web site and open it using Finder. After the installation process is completed, go to the «Applications» folder (the «⇧Shift + ⌘ Cmd + A» hotkeys), find UFS Explorer RAID Recovery and run the software using its icon.
Warning: Never download or install the software to the drive containing the lost data you are going to recover. This may lead to its permanent damage or loss. If the data was lost from a non-system partition, it’s recommended to download and install the software to the system partition. If the files were lost from the system partition, it’s recommended to shut down the computer immediately and boot it using UFS Explorer Backup and Emergency Recovery CD.
Hint: To remove the installed utility, please follow the steps described in the instruction for Uninstallation of UFS Explorer Professional Recovery.
UFS Explorer RAID Recovery for Linux
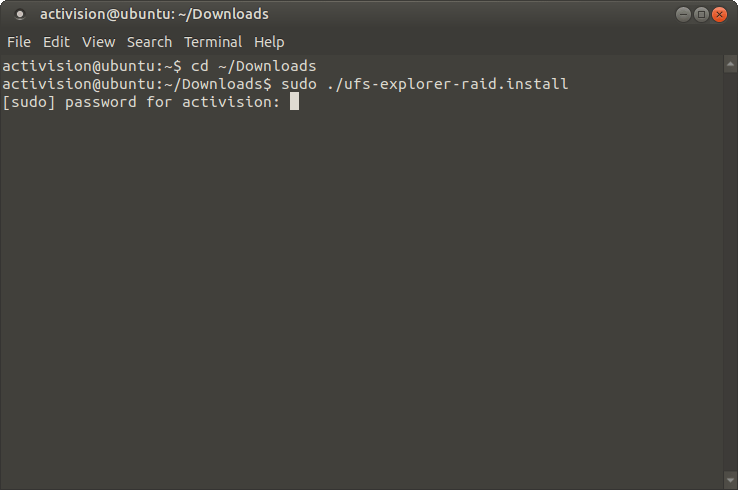
Download the software from the website by choosing the download option for Linux users. Extract the content of the downloaded Universal Installer archive. Open the folder with the extracted content and run the Installer after entering your user password. You will then see the prompts of the Installer concerning the language and the target folder. To finish the installation simply follow the steps in the Installation Manager.
If the standard installation doesn’t work properly, install the software via the Terminal application. In the Terminal open the folder with the extracted file using the ‘cd’ command (e.g. cd
/Downloads). Run the install script as a local Administrator (e.g. sudo ./ufs-explorer-raid.install).
The application can be launched from the Menu. You can also execute the file using the terminal.
If the described approach fails, try running the program via the Terminal using executable files from the Universal Archive. Download the archive from the product page in the Software Store using the second option for Linux users, then extract its content.
Open the Terminal and enter the commands in the following order:
/Downloads

Depending on the employed computer architecture, start software with the «sudo /x32/ufsx_raid» or «sudo /x64/ufsx_raid» («su root -c /x32/ufsx_raid» or «su root -c /x64/ufsx_raid» for Debian) command. To run the program you will be asked to enter your user password. After that, the software will be launched without installation. This method can also be used to run UFS Explorer on UFS Explorer Backup and Emergency Recovery CD without installation, as all the applications on it are pre-installed and cannot be updated.
Warning: Never download or install the software to the drive containing the lost data you are going to recover. This may lead to its permanent damage or loss. If the data was lost from a non-system partition, it’s recommended to download and install the software to the system partition. If the files were lost from the system partition, it’s recommended to shut down the computer immediately and boot it using UFS Explorer Backup and Emergency Recovery CD.
press Alt+F2 to invoke the «Start application» dialog;
type «ufs» to find the application;
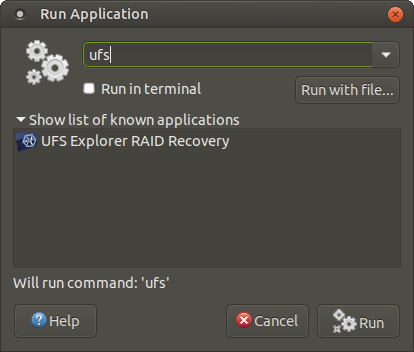
choose the application from the list and make sure that the «Run in terminal» option is enabled. After that, run the program.
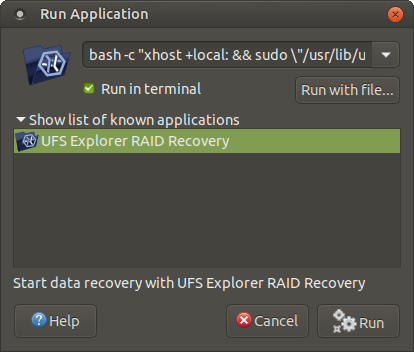
Another way is to enter the «bash -c «xhost +local: && sudo \»/usr/lib/ufs-explorer/ufs-explorer-raid\»»» or «su root bash -c «xhost +local: && sudo \»/usr/lib/ufs-explorer/ufs-explorer-raid\»»» command, enable the «Run in terminal» option and press the «Run» button.
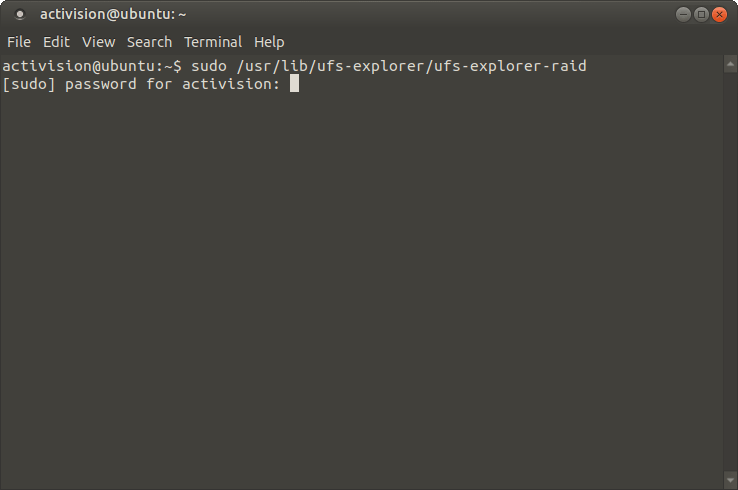
In the Terminal:
- type «sudo /usr/lib/ufs-explorer/ufs-explorer-raid» or «su root -c /usr/lib/ufs-explorer/ufs-explorer-raid».
If the installation still fails, try checking the missing libraries through LDD, add them and install the software again.
Hint: To remove the installed utility, please follow the steps described in the instruction for Uninstallation of UFS Explorer Professional Recovery.
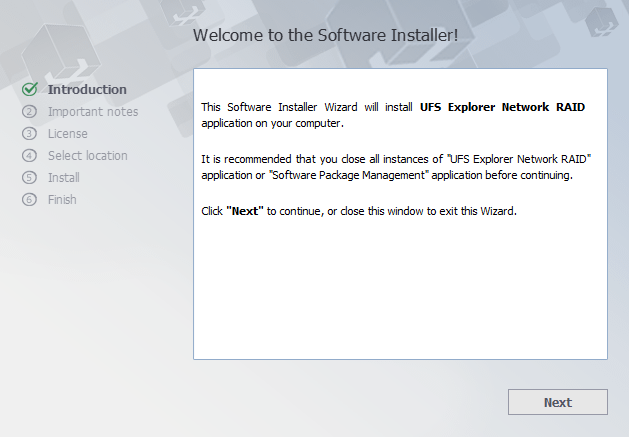
UFS Explorer Network RAID
The software can be downloaded from the following web page:
To install a new copy of the software or update the program, you should follow the steps of fresh software installation. In case of an update from an older software version, there is no necessity to remove the older software. Yet, a rollback to the previous software version requires uninstallation of the newer one. Other editions of UFS Explorer can be installed along with UFS Explorer Network RAID.
UFS Explorer Network RAID for Windows
You can install the software on Microsoft Windows NT 5.1 OS and later versions of the Windows operating system (Windows XP/Windows 2003 Server and later). It is also possible to run the program on older Windows NT versions starting from NT 4 SP6 while the installation on Windows 95/98/МЕ is not supported at all. To install the software simply download the executable file of the installer and run it.
To install the software simply download software installer executable file and start it.
Warning: Never download or install the software to the drive containing the lost data you are going to recover. This may lead to its permanent damage or loss. If the data was lost from a non-system partition, it’s recommended to download and install the software to the system partition. If the files were lost from the system partition, it’s recommended to shut down the computer immediately and boot it using UFS Explorer Backup and Emergency Recovery CD.
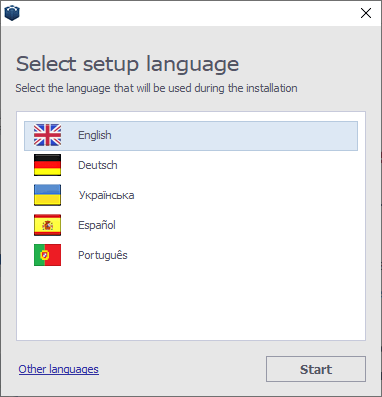
After the start of the installation process, you will be prompted for the language of the user interface that will be used as the language of the software installer and the software user manual.

From now on the installation process begins.
Carefully read the notes of importance before proceeding to the next step.

The installer will show the End User License Agreement (EULA) for acceptance. You may continue with the installation only after the EULA is accepted.
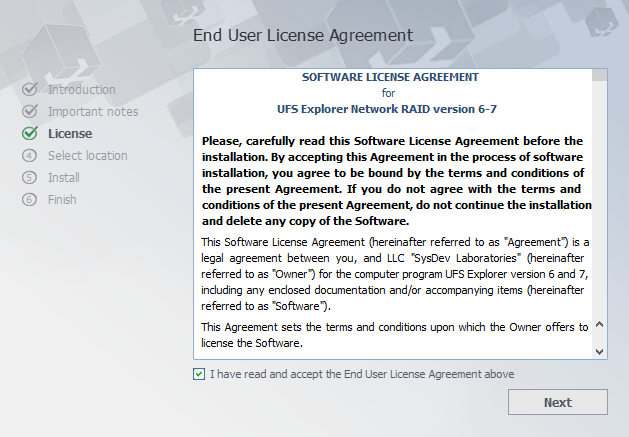
At the next step, the software will prompt for the target folder used for the installation. In case of a software update from a previous version, the installation folder will be set as the folder of a previous software version by default.

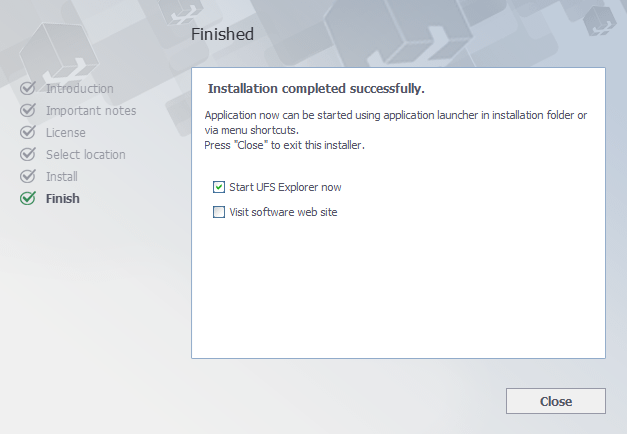
Then the installer will prompt for the name of the product group in the «Start» menu (the default one is «Data Recovery»). At this stage, the installer will finish collecting the necessary information and start the installation process. After it is finished, you will be able to launch the software from the final window of the software installation wizard.
You may also start the software using its shortcut in the «Start» menu («All programs», then the software group (the default one is «Data Recovery») and — Network RAID».
Hint: To remove the installed utility, please follow the steps described in the instruction for Uninstallation of UFS Explorer Professional Recovery.
UFS Explorer Network RAID for macOS
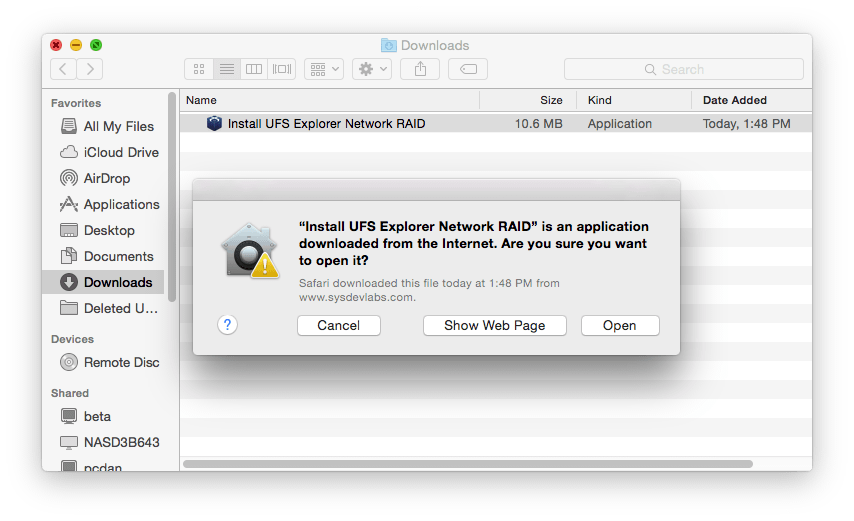
No special actions are required: just download the compressed DMG-image file from the software web site and open it using Finder. After the installation process is completed, go to the «Applications» folder (the «⇧Shift + ⌘ Cmd + A» hotkeys), find UFS Explorer Network RAID and run the software using its icon.
Warning: Never download or install the software to the drive containing the lost data you are going to recover. This may lead to its permanent damage or loss. If the data was lost from a non-system partition, it’s recommended to download and install the software to the system partition. If the files were lost from the system partition, it’s recommended to shut down the computer immediately and boot it using UFS Explorer Backup and Emergency Recovery CD.
Hint: To remove the installed utility, please follow the steps described in the instruction for Uninstallation of UFS Explorer Professional Recovery.
UFS Explorer Network RAID for Linux
Download the software from the website by choosing the download option for Linux users. Extract the content of the downloaded Universal Installer archive. Open the folder with the extracted content and run the Installer after entering your user password. You will then see the prompts of the Installer concerning the language and the target folder. To finish the installation simply follow the steps in the Installation Manager.
If the standard installation doesn’t work properly, install the software via the Terminal application. In the Terminal open the folder with the extracted file using the ‘cd’ command (e.g. cd
/Downloads). Run the install script as a local Administrator (e.g. sudo ./ufs-explorer-net.install).

The application can be launched from the Menu. You can also execute the file using the terminal.
If the described approach fails, try running the program via the Terminal using executable files from the Universal Archive. Download the archive from the product page in the Software Store using the second option for Linux users, then extract its content.
Open the Terminal and enter the commands in the following order:
/Downloads

Depending on the employed computer architecture, start software with the «sudo /x32/ufsx_net» or «sudo /x64/ufsx_net» («su root -c /x32/ufsx_net» or «su root -c /x64/ufsx_net» for Debian) command. To run the program you will be asked to enter your user password. After that, the software will be launched without installation. This method can also be used to run UFS Explorer on UFS Explorer Backup and Emergency Recovery CD without installation, as all the applications on it are pre-installed and cannot be updated.
Warning: Never download or install the software to the drive containing the lost data you are going to recover. This may lead to its permanent damage or loss. If the data was lost from a non-system partition, it’s recommended to download and install the software to the system partition. If the files were lost from the system partition, it’s recommended to shut down the computer immediately and boot it using UFS Explorer Backup and Emergency Recovery CD.
press Alt+F2 to invoke the «Start application» dialog;
type «ufs» to find the application;
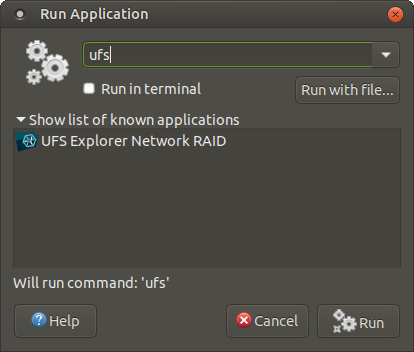
choose the application from the list and make sure that the «Run in terminal» option is enabled. After that, run the program.
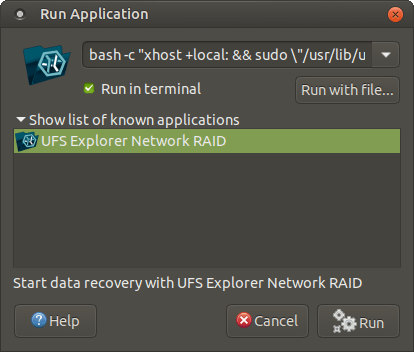
Another way is to enter the «bash -c «xhost +local: && sudo \»/usr/lib/ufs-explorer/ufs-explorer-net\»»» or «su root bash -c «xhost +local: && sudo \»/usr/lib/ufs-explorer/ufs-explorer-net\»»» command, enable the «Run in terminal» option and press the «Run» button.
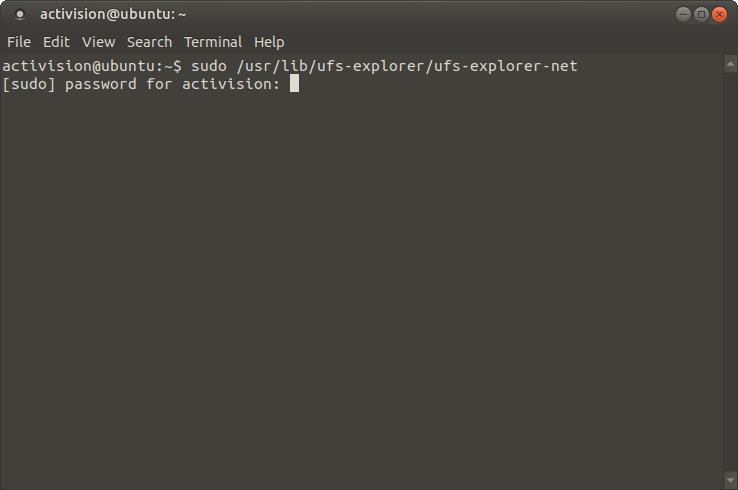
In the Terminal:
- type «sudo /usr/lib/ufs-explorer/ufs-explorer-net» or «su root -c /usr/lib/ufs-explorer/ufs-explorer-net».
If the installation still fails, try checking the missing libraries through LDD, add them and install the software again.
Hint: To remove the installed utility, please follow the steps described in the instruction for Uninstallation of UFS Explorer Professional Recovery.
UFS Explorer Standard Recovery
The software can be downloaded from the following web page:
To install a new copy of the software or update the program, you should follow the steps of fresh software installation. In case of an update from an older software version, there is no necessity to remove the older software. Yet, a rollback to the previous software version requires uninstallation of the newer one. Other editions of UFS Explorer can be installed along with UFS Explorer Standard Recovery.
UFS Explorer Standard Recovery for Windows
You can install the software on Microsoft Windows NT 5.1 OS and later versions of the Windows operating system (Windows XP/Windows 2003 Server and later). It is also possible to run the program on older Windows NT versions starting from NT 4 SP6 while the installation on Windows 95/98/МЕ is not supported at all. To install the software simply download the executable file of the installer and run it.
Warning: Never download or install the software to the drive containing the lost data you are going to recover. This may lead to its permanent damage or loss. If the data was lost from a non-system partition, it’s recommended to download and install the software to the system partition. If the files were lost from the system partition, it’s recommended to shut down the computer immediately and boot it using UFS Explorer Backup and Emergency Recovery CD.
After the start of the installation process, you will be prompted for the language of the user interface that will be used as the language of the software installer and the software user manual.
From now on the installation process begins.
Carefully read the notes of importance before proceeding to the next step.
The installer will show the End User License Agreement (EULA) for acceptance. You may continue with the installation only after the EULA is accepted.

At the next step, the software will prompt for the target folder used for the installation. In case of a software update from a previous version, the installation folder will be set as the folder of a previous software version by default.
Then the installer will prompt for the name of the product group in the «Start» menu (the default one is «Data Recovery»). At this stage, the installer will finish collecting the necessary information and start the installation process. After it is finished, you will be able to launch the software from the final window of the software installation wizard.
You may also start the software using its shortcut in the «Start» menu («All programs», then the software group (the default one is «Data Recovery») and then «UFS Explorer Standard Recovery».
Hint: To remove the installed utility, please follow the steps described in the instruction for Uninstallation of UFS Explorer Professional Recovery.
UFS Explorer Standard Recovery for macOS
No special actions are required: just download the compressed DMG-image file from the software web site and open it using Finder. After the installation process is completed, go to the «Applications» folder (the «⇧Shift + ⌘ Cmd + A» hotkeys), find UFS Explorer Standard Recovery and run the software using its icon.

Warning: Never download or install the software to the drive containing the lost data you are going to recover. This may lead to its permanent damage or loss. If the data was lost from a non-system partition, it’s recommended to download and install the software to the system partition. If the files were lost from the system partition, it’s recommended to shut down the computer immediately and boot it using UFS Explorer Backup and Emergency Recovery CD.
Hint: To remove the installed utility, please follow the steps described in the instruction for Uninstallation of UFS Explorer Professional Recovery.
UFS Explorer Standard Recovery for Linux
Download the software from the website by choosing the download option for Linux users. Extract the content of the downloaded Universal Installer archive. Open the folder with the extracted content and run the Installer after entering your user password. You will then see the prompts of the Installer concerning the language and the target folder. To finish the installation simply follow the steps in the Installation Manager.
If the standard installation doesn’t work properly, install the software via the Terminal application. In the Terminal open the folder with the extracted file using the ‘cd’ command (e.g. cd
/Downloads). Run the install script as a local Administrator (e.g. sudo ./ufs-explorer-std.install).

The application can be launched from the Menu. You can also execute the file using the terminal.
If the described approach fails, try running the program via the Terminal using executable files from the Universal Archive. Download the archive from the product page in the Software Store using the second option for Linux users, then extract its content.
Open the Terminal and enter the commands in the following order:
/Downloads
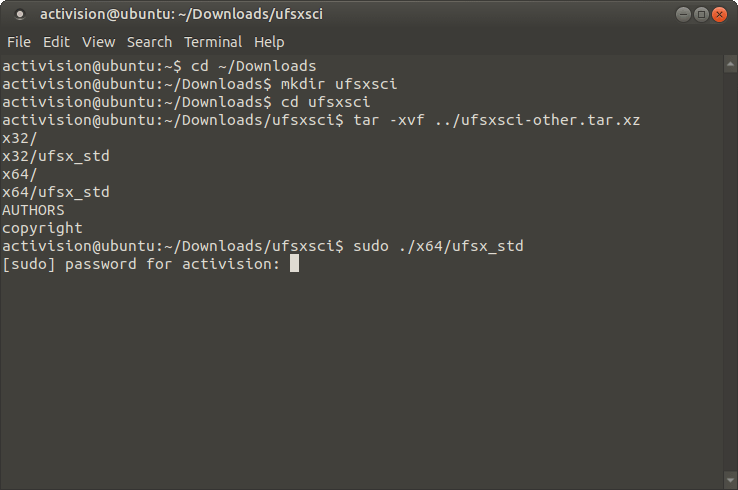
Depending on the employed computer architecture, start software with the «sudo /x32/ufsx_std» or «sudo /x64/ufsx_std» («su root -c /x32/ufsx_std» or «su root -c /x64/ufsx_std» for Debian) command. To run the program you will be asked to enter your user password. After that, the software will be launched without installation. This method can also be used to run UFS Explorer on UFS Explorer Backup and Emergency Recovery CD without installation, as all the applications on it are pre-installed and cannot be updated.
Warning: Never download or install the software to the drive containing the lost data you are going to recover. This may lead to its permanent damage or loss. If the data was lost from a non-system partition, it’s recommended to download and install the software to the system partition. If the files were lost from the system partition, it’s recommended to shut down the computer immediately and boot it using UFS Explorer Backup and Emergency Recovery CD.
press Alt+F2 to invoke the «Start application» dialog;
type «ufs» to find the application;
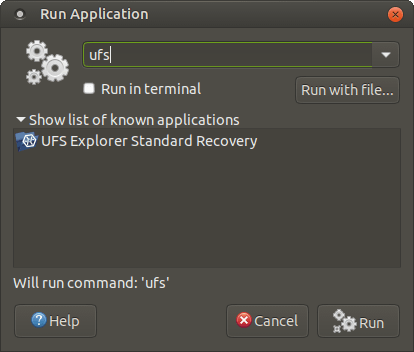
choose the application from the list and make sure that the «Run in terminal» option is enabled. After that, run the program.
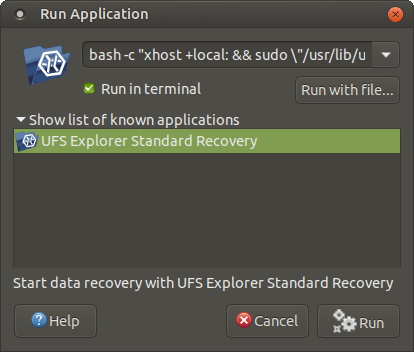
Another way is to enter the «bash -c «xhost +local: && sudo \»/usr/lib/ufs-explorer/ufs-explorer-std\»»» or «su root bash -c «xhost +local: && sudo \»/usr/lib/ufs-explorer/ufs-explorer-std\»»» command, enable the «Run in terminal» option and press the «Run» button.
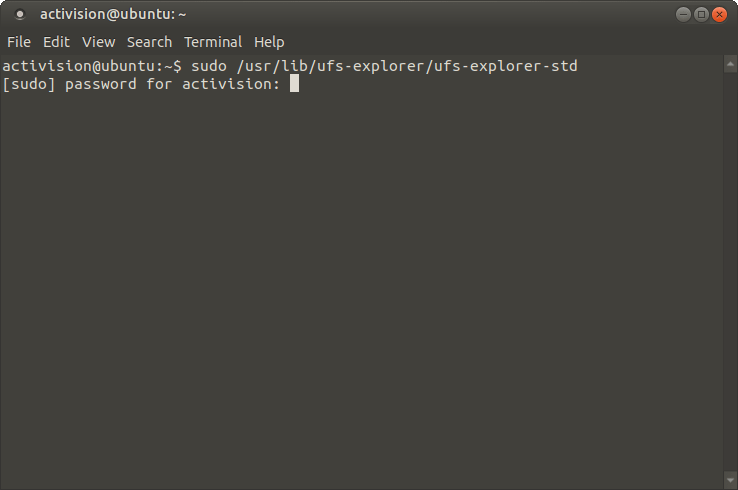
In the Terminal:
- type «sudo /usr/lib/ufs-explorer/ufs-explorer-std» or «su root -c /usr/lib/ufs-explorer/ufs-explorer-std».
If the installation still fails, try checking the missing libraries through LDD, add them and install the software again.
Hint: To remove the installed utility, please follow the steps described in the instruction for Uninstallation of UFS Explorer Professional Recovery.
UFS Explorer Standard Access
The software can be downloaded from the following web page:
To install a new copy of the software or update the program, you should follow the steps of fresh software installation. In case of an update from an older software version, there is no necessity to remove the older software. Yet, a rollback to the previous software version requires uninstallation of the newer one. Other editions of UFS Explorer can be installed along with UFS Explorer Standard Access.
UFS Explorer Standard Access for Windows
You can install the software on Microsoft Windows starting with Windows ® XP with Service Pack 3 and later (Windows XP/Windows 2003 Server and later). It is also possible to run the software on older Windows NT versions starting from NT 4 SP6 while software installation on Windows 95/98/МЕ is not supported.
To install the software simply download the executable file of the software installer and start it.
Warning: Never download or install the software to the drive containing the lost data you are going to recover. This may lead to its permanent damage or loss. If the data was lost from a non-system partition, it’s recommended to download and install the software to the system partition. If the files were lost from the system partition, it’s recommended to shut down the computer immediately and boot it using UFS Explorer Backup and Emergency Recovery CD.
After the start of the installation process, you will be prompted for the language of the user interface that will be used as the language of the software installer and the software user manual.
From now on the installation process begins.
The installer will show the End User License Agreement (EULA). You may continue with the installation only after the EULA is accepted.
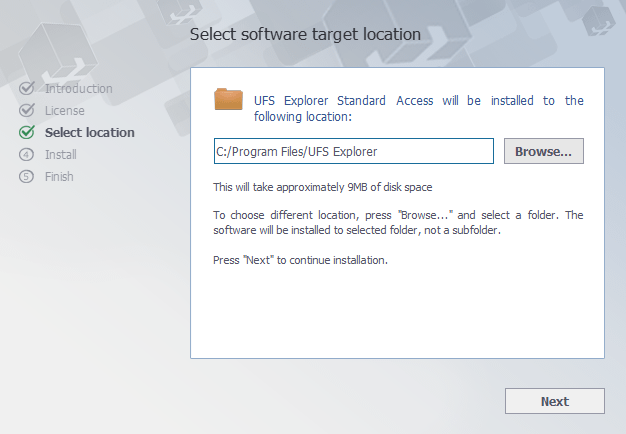
At the next step, the software will prompt for the target folder used for the installation. In case of a software update from a previous version, the installation folder will be set as the folder of a previous software version by default.
Then the installer will prompt for the name of the product group in the “Start” menu (default one is “UFS Explorer”). At this stage, the installer will finish collecting the necessary information and start the installation process. After it is finished, you will be able to launch the software from the final window of the software installation wizard.
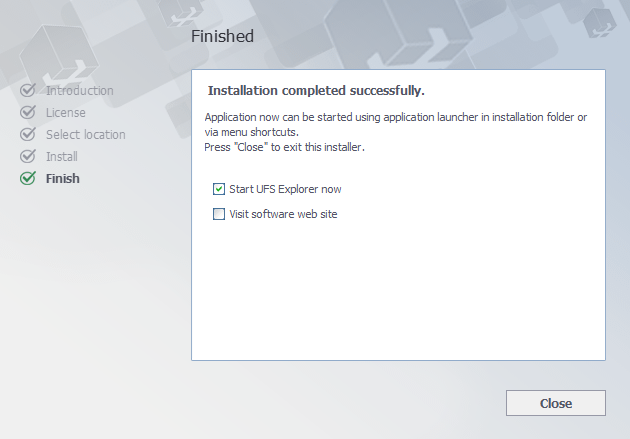
You may also start the software using its shortcut in the “Start” menu (“All programs”, then the software group (default one is “UFS Explorer”) and then “Start UFS Explorer Standard Access”.
Hint: To remove the installed utility, please follow the steps described in the instruction for Uninstallation of UFS Explorer Professional Recovery.
Источник


