- UFS Explorer Backup and Emergency Recovery CD
- Live CD with data recovery software
- Bootable operating system
- Ready-to-use data recovery software
- Completely safe environment for data recovery
- Overview
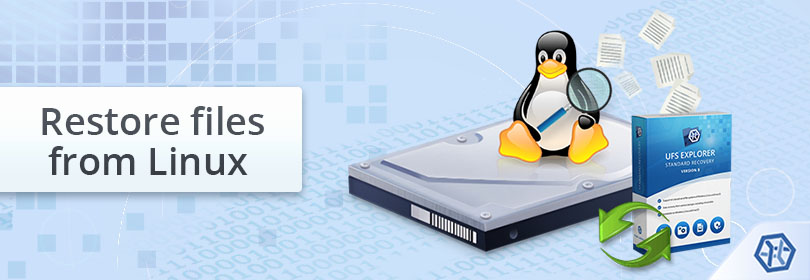
- What can be done to restore deleted files from Linux?
- Restore deleted files from the file systems of Linux
- Step-by-step setup guidance
- UFS Explorer Professional Recovery
- UFS Explorer Professional Recovery for Windows
- UFS Explorer Professional Recovery for macOS
- UFS Explorer Professional Recovery for Linux
- UFS Explorer RAID Recovery
- UFS Explorer RAID Recovery for Windows
- UFS Explorer RAID Recovery for macOS
- UFS Explorer RAID Recovery for Linux
- UFS Explorer Network RAID
- UFS Explorer Network RAID for Windows
- UFS Explorer Network RAID for macOS
- UFS Explorer Network RAID for Linux
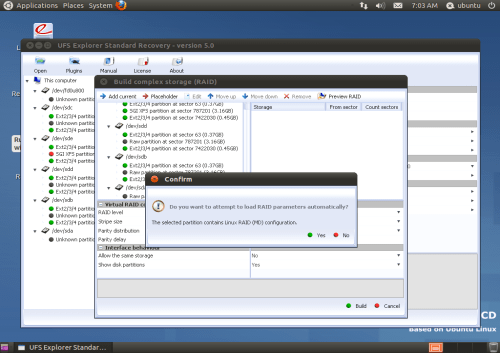
- UFS Explorer Standard Recovery
- UFS Explorer Standard Recovery for Windows
- UFS Explorer Standard Recovery for macOS
- UFS Explorer Standard Recovery for Linux
- UFS Explorer Standard Access
- UFS Explorer Standard Access for Windows
UFS Explorer Backup and Emergency Recovery CD
Based on the principles of safety and reliability the CD serves to provide secure software backup and safe data recovery environment.

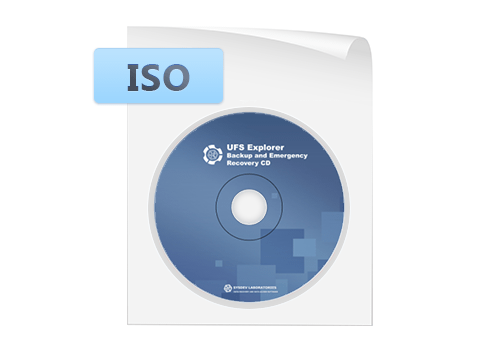

Live CD with data recovery software
A complete data recovery package which includes a set of powerful utilities and a bootable version of the Linux operating system for secure rescue of files from an unbootable computer.
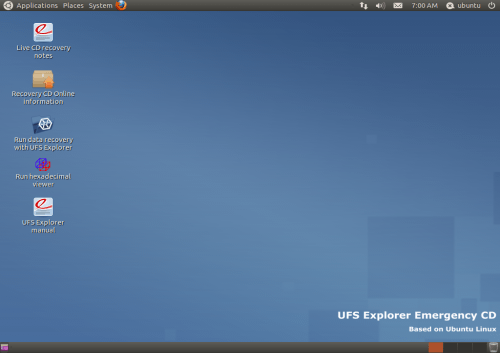
Bootable operating system
Ubuntu Linux 16.04 with MATE desktop can be run from any portable storage media to bypass the host operating system and used for safe retrieval of data from a system partition or after OS crash
Ready-to-use data recovery software
A single ISO image file contains all modern versions of UFS Explorer and Recovery Explorer software to handle practically any data loss issue.
Completely safe environment for data recovery
A bootable live system serves as a perfect data recovery environment as its allows performing the procedure without starting the host OS while the UFS Explorer and Recovery Explorer utilities work in the read-only mode, guaranteeing the safety of the lost files.
Overview
UFS Explorer Backup and Emergency Recovery CD serves as a reliable environment for cases of emergency data recovery when the computer refuses to start up or its booting is undesirable due to the high risk of data overwriting — users can safely access the system partition and restore lost or deleted files without removing the hard drive and attaching it to another computer as a secondary disk.
The Live CD contains a collection of all latest releases of UFS Explorer and Recovery Explorer and some other subsidiary applications. This product enables the installation of UFS Explorer software from a USB flash drive or other portable storage containing the ISO image file and makes it easy to keep it safe on an external medium for future references.
This product also contains a full-featured Linux operating system which allows booting the computer in a safe manner when starting the host OS is impossible or undesirable and accessing the local disks without effort.
With UFS Explorer Backup and Emergency Recovery CD, users get a functioning Linux operating system which allows conducting data recovery procedures directly on the PC the data was lost from. Pre-installed software doesn’t require installation to the hard drive and works in a safe read-only mode. The software allows scanning an internal hard drive for lost data and recovers lost and deleted files. Powerful software techniques help to find and recover any types of files on a wide range of operating and file systems of Windows, macOS, Linux and FreeBSD. After the software finds the necessary files, they can be copied to an external USB flash drive, external hard drive or any network drive.
UFS Explorer Backup and Emergency Recovery CD maximizes chances for successful recovery of lost or deleted files from a system partition or after system crash and minimizes your stress eliminating the possibility of accidental data damage.
Источник
What can be done to restore deleted files from Linux?
The habit of deleting unwanted files through the Command Line becomes the cause of data loss for many Linux users, as having used this method, one is not able to go to the Trash folder and quickly restore inadvertently removed items to their original location. However, even those who prefer the UI or the Del key may also be faced with the need to recover mistakenly deleted files after the Trash can in which they are kept for a while as a safety measure, was emptied. Fortunately, in both cases, regardless of what is indicated by the directory listing, the file is not immediately gone and its data may be still located on the disk as long as that area is not overwritten by new information, leaving the possibilities for data recovery. Still, the actions taken after the deletion operation together with some other factors may influence the likelihood of its success.
Restore deleted files from the file systems of Linux
The internal mechanisms used to delete a file are determined by the underlying file system employed on a storage device. Although the list of file systems supported by the kernel is very long, the ones commonly applied on popular Linux distributions, like Ubuntu, Mint, Fedora, elementary OS, OpenSUSE, etc. include Ext2/Ext3/Ext4, XFS, JFS, ReiserFS, UFS and Btrfs while FAT32/exFAT is utilized on most removable devices. Each of them has certain specifics which impacts the quality of the recovery results: for instance, files deleted from XFS and Btrfs have very high chances to be retrieved, while files from Ext2/Ext3/Ext4 are poorly recovered due to high fragmentation.
Hint: To learn more about the file systems of Linux, please, refer to the basics of file systems. If you want to assess the possibility of a successful data recovery operation, familiarize yourself with the article describing the specifics of data recovery depending on the OS and chances for data recovery.
SysDev Laboratories recommends UFS Explorer Standard Recovery as an effective software solution capable of working with all of the most popular Linux file systems and restoring files present on both simple and spanned volumes, including mdadm and LVM, before the deletion was performed.
Note: Recovery of deleted files is possible as long as they are not overwritten with some other information. For this reason, it is highly recommended to stop all operations with the storage from which the data has been deleted and immediately start recovering files.
Note: If the files were deleted from a solid state drive (SSD) with enabled TRIM, their contents are very likely to have been wiped by the command invoked right after deletion. Successful recovery of such files is usually beyond the bounds of possibility.
In order to reduce the risk of deleted files being overwritten by some user/process, take down the system to a single-user mode and unmount the file system of the problem directory by running the “unmount” command with the name of the disk or the mount point. If the deleted files were located in the «/root» directory, which is always mounted, is strongly recommended to remove the disk and connect it to another computer as a secondary device.
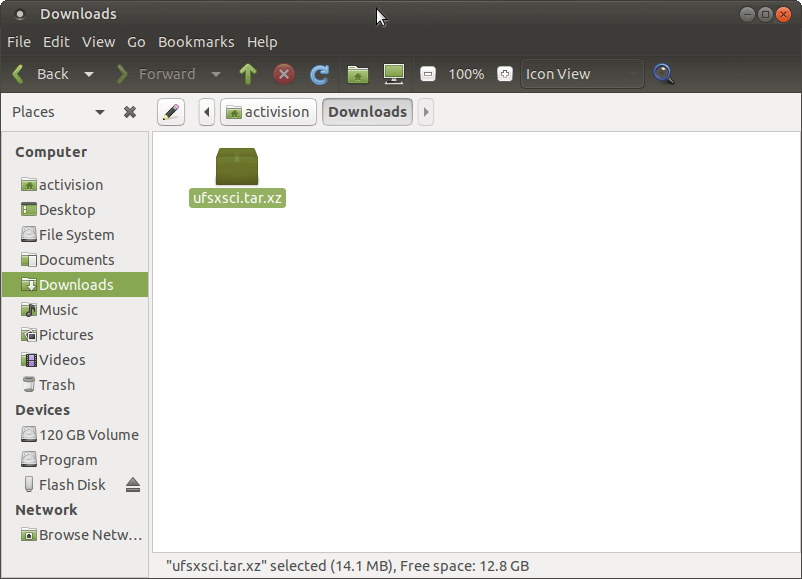
Download the compressed Universal Installer of UFS Explorer Standard Recovery choosing the “Download for Linux” option, extract the content of the downloaded archive and launch the installation manager after entering your user password. Don’t use the storage which contains the deleted data to avoid its overwriting.
Hint: If you have any difficulties with the installation of the utility, please refer to the installation manual for UFS Explorer Standard Recovery.
Run the program and, if needed, modify the software settings from the settings pane.
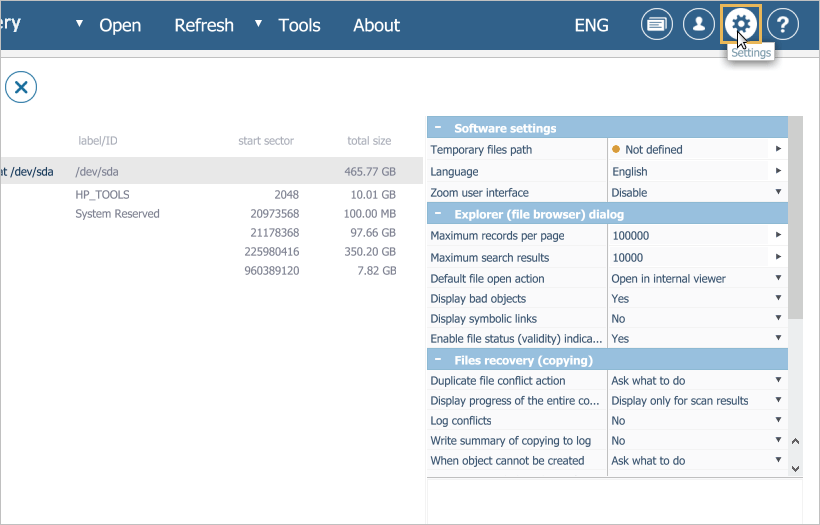
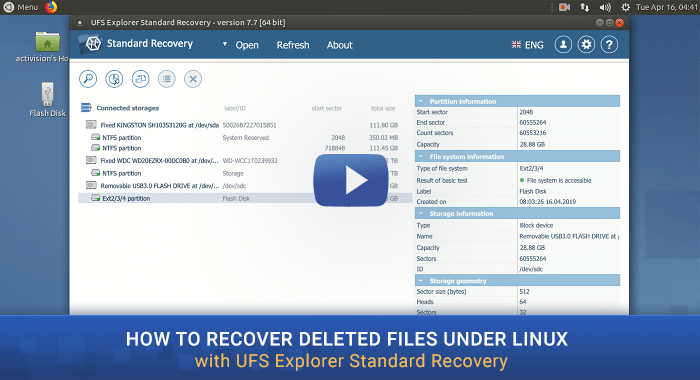
UFS Explorer Standard Recovery automatically recognizes available partitions and displays them in the list of attached storages in the left pane. Choose the needed partition based on its size, file system type or content and scan it for lost data using the corresponding storage context menu option, the “Start scan” button or the “Scan this storage” tool from the toolbar.
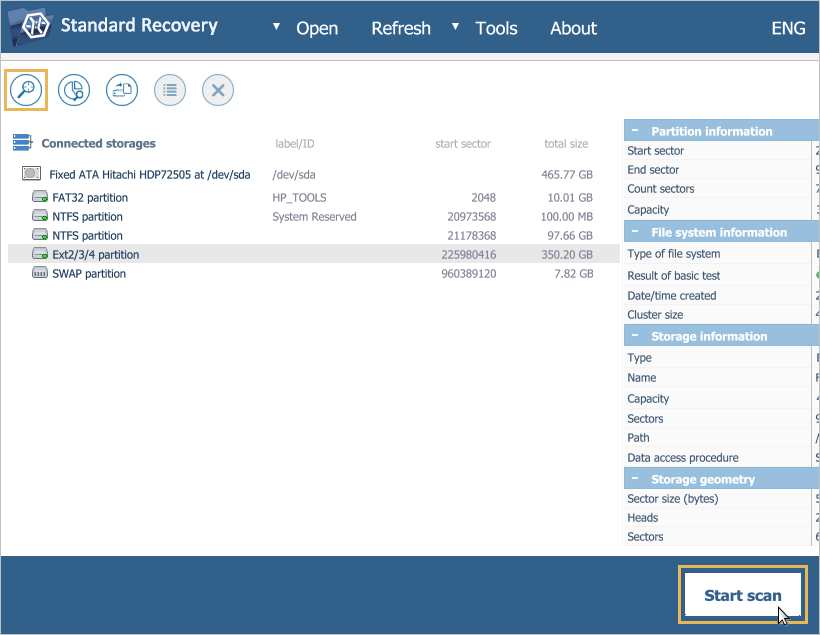
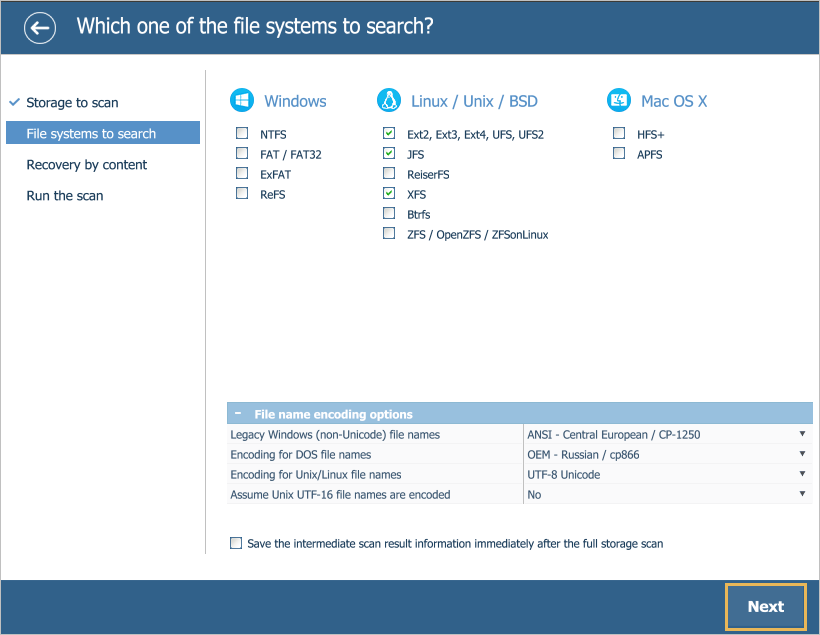
Set up the preferred scan parameters. If you want the process to be accomplished faster, you may deselect all file systems except the one applied on your partition and disable InelliRAW. After that, click “Start scan” and wait until the process is completed.
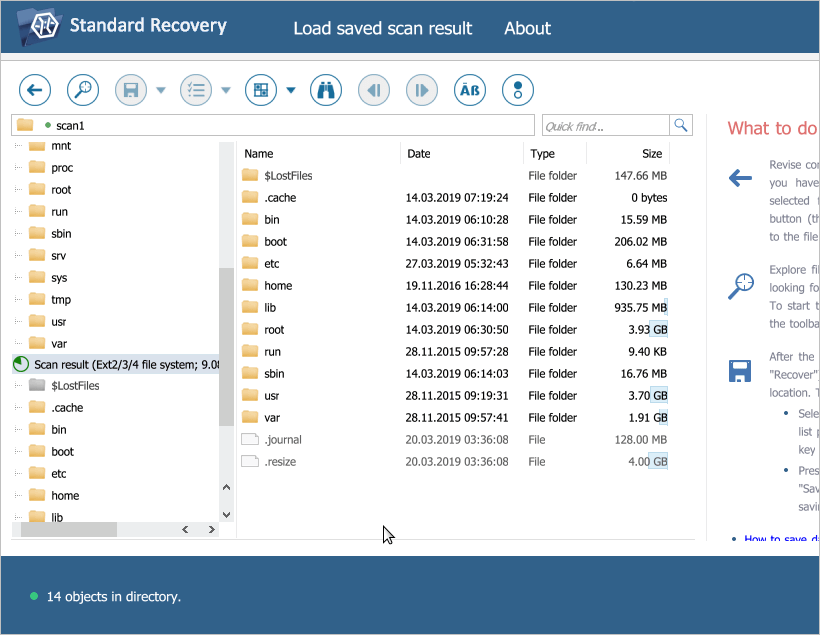
Check the found files and folders. They can be sorted by name, date, type or previewed in the internal viewer. Quick and advanced search options can also be used if you need to find specific files.
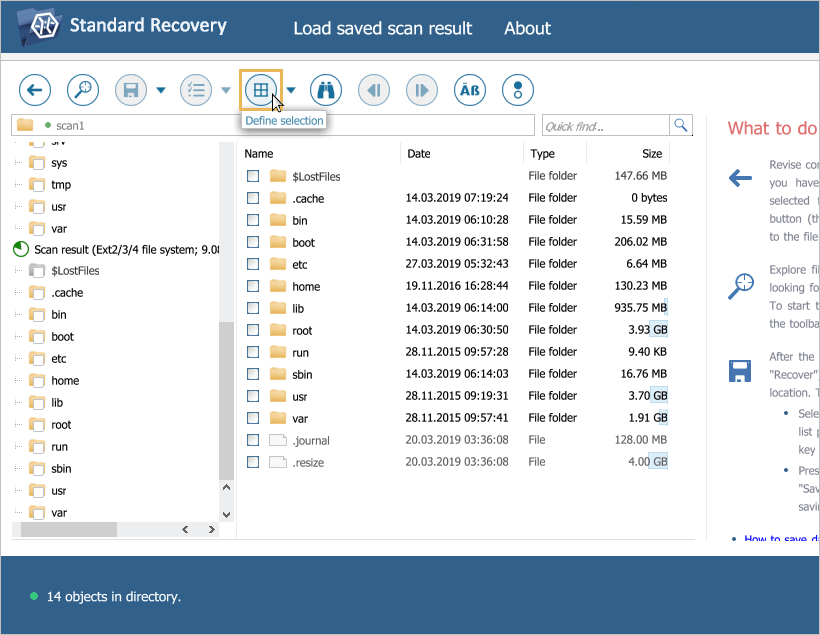
Press the “Define selection” button, select the files and folders to be recovered and press “Save (recover) selection”. Choose some additional storage to copy the files to avoid data overwriting.
Watch this short video to see the overall procedure for yourself:
Note: If the data was lost from the «/root» directory and there is no possibility to extract the drive and attach it to another computer, you can boot the machine using UFS Explorer Backup and Emergency Recovery CD for safe data recovery. For more details, please, refer to Data recovery from a system partition.
Источник
Step-by-step
setup guidance
— User-friendly setup manager
— Straightforward installation process

This section describes in detail how you can install UFS Explorer products on your computer system.
The download and installation process can be easily carried out with the help of the installer’s prompts and handy tips. However, if you are not sure that you can perform it right, please, follow the instructions given below.
The software should not be downloaded or installed to the storage from which the data will be recovered.
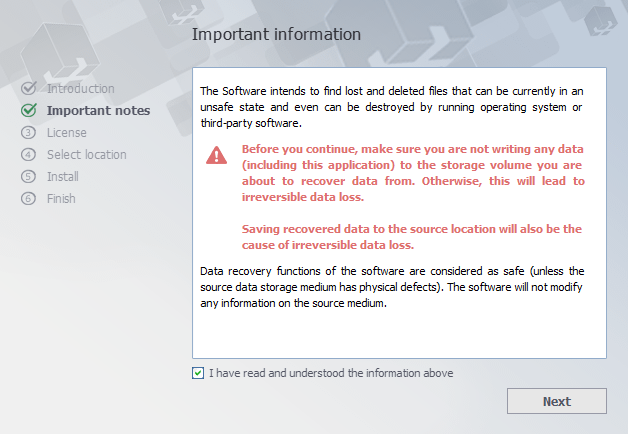
This may erase the lost information, leaving no chances for its restoration. Please, make sure that you choose another logical volume or storage device. Alternatively, you may use UFS Explorer Backup and Emergency Recovery CD. If your storage medium has any signs of physical failure, turning to a professional service provider is strongly recommended.
UFS Explorer Professional Recovery
The software can be downloaded from the following web page:
To install a new copy of the software or update the program, you should follow the steps of fresh software installation. In case of an update from an older software version, there is no necessity to remove the older software. Yet, a rollback to the previous software version requires uninstallation of the newer one. Other editions of UFS Explorer can be installed along with UFS Explorer Professional Recovery.
UFS Explorer Professional Recovery for Windows
You can install the software on Microsoft Windows NT 5.1 OS and later versions of the Windows operating system (Windows XP/Windows 2003 Server and later). It is also possible to run the program on older Windows NT versions starting from NT 4 SP6 while the installation on Windows 95/98/МЕ is not supported at all. To install the software simply download the executable file of the installer and run it.
Warning: Never download or install the software to the drive containing the lost data you are going to recover. This may lead to its permanent damage or loss. If the data was lost from a non-system partition, it’s recommended to download and install the software to the system partition. If the files were lost from the system partition, it’s recommended to shut down the computer immediately and boot it using UFS Explorer Backup and Emergency Recovery CD.
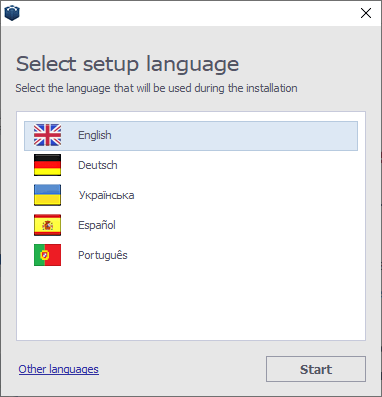
After the start of the installation process, you will be prompted for the language of the user interface that will be used as the language of the software installer and the software user manual.

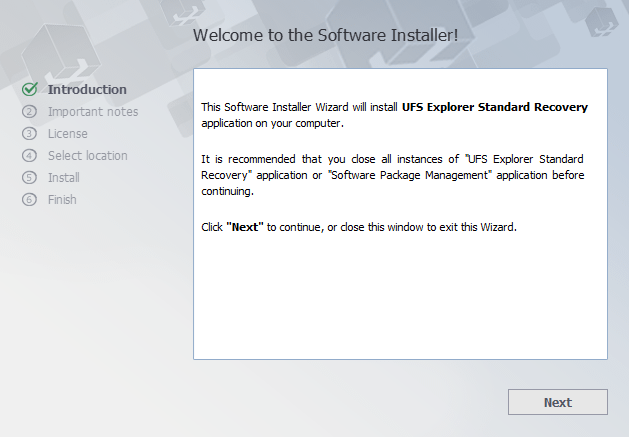
From now on the installation process begins.

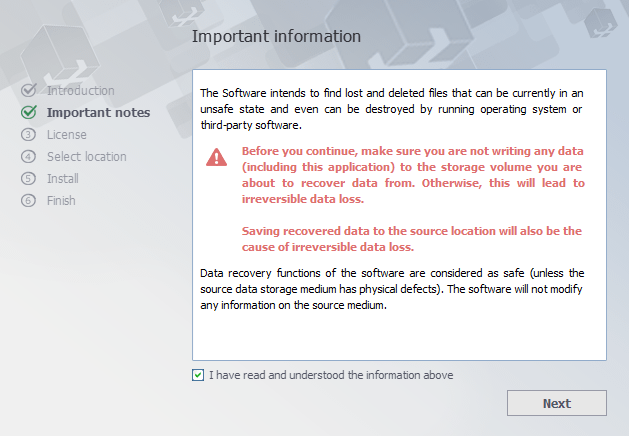
Carefully read the notes of importance before proceeding to the next step.

The installer will show the End User License Agreement (EULA) for acceptance.
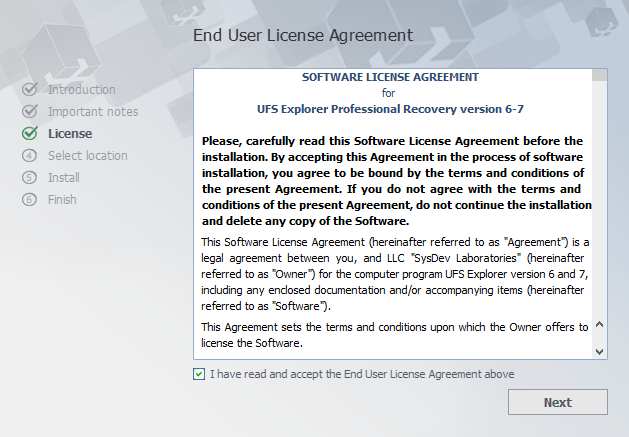
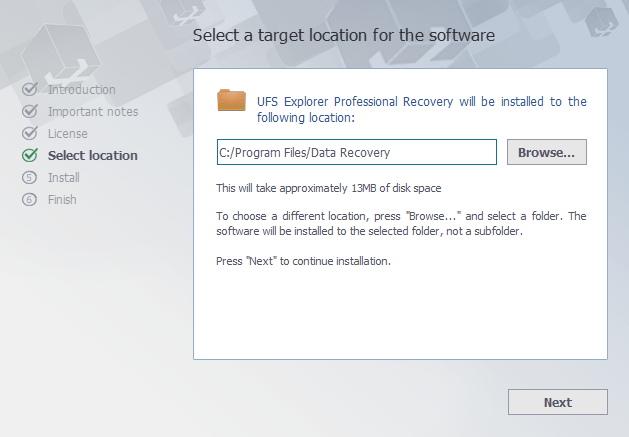
You may continue with the installation only after the EULA is accepted. At the next step, the software will prompt for the target folder used for the installation. In case of a software update from a previous version, the installation folder will be set as the folder of a previous software version by default.
Then the installer will prompt for the name of the product group in the «Start» menu (the default one is «Data Recovery»). At this stage, the installer will finish collecting the necessary information and start the installation process.
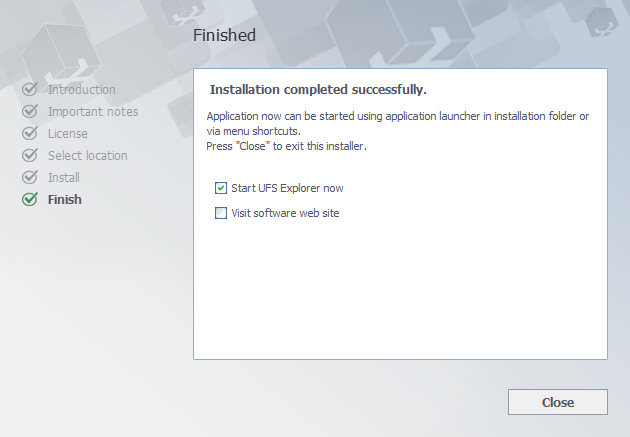
After it is finished, you will be able to launch the software from the final window of the software installation wizard. You may also start the software using its shortcut in the «Start» menu («All programs», then the software group (the default one is «Data Recovery») and then «UFS Explorer Professional Recovery».
Hint: To remove the installed utility, please follow the steps described in the instruction for Uninstallation of UFS Explorer Professional Recovery.
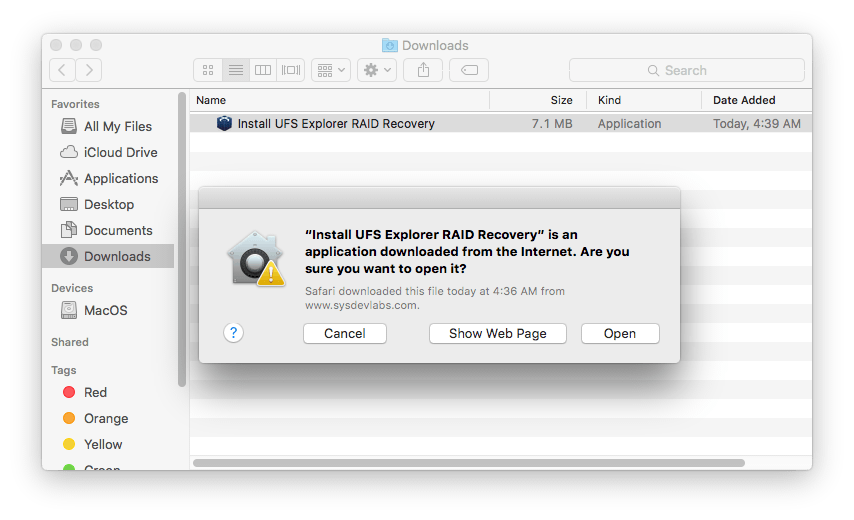
UFS Explorer Professional Recovery for macOS
No special actions are required: just download the compressed DMG-image file from the software web site and open it using Finder. After the installation process is completed, go to the «Applications» folder (the «⇧Shift + ⌘ Cmd + A» hotkeys), find UFS Explorer Professional Recovery and run the software using its icon.
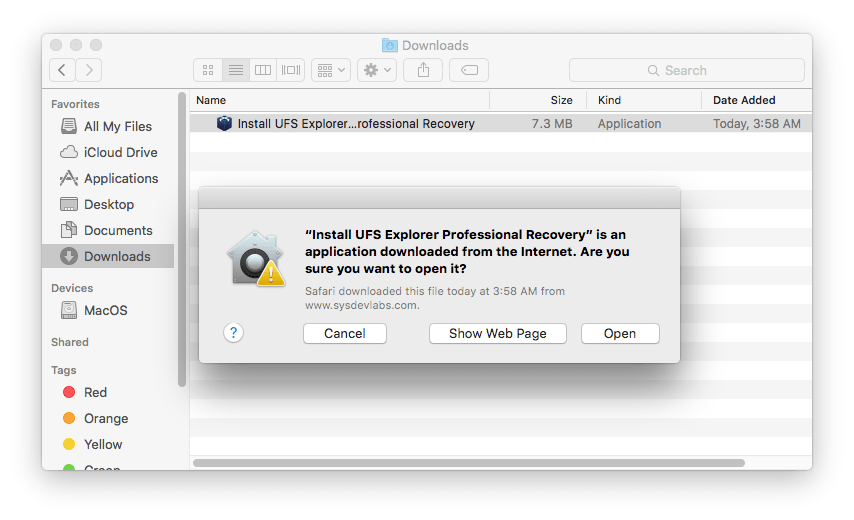
Warning: Never download or install the software to the drive containing the lost data you are going to recover. This may lead to its permanent damage or loss. If the data was lost from a non-system partition, it’s recommended to download and install the software to the system partition. If the files were lost from the system partition, it’s recommended to shut down the computer immediately and boot it using UFS Explorer Backup and Emergency Recovery CD.
Hint: To remove the installed utility, please follow the steps described in the instruction for Uninstallation of UFS Explorer Professional Recovery.
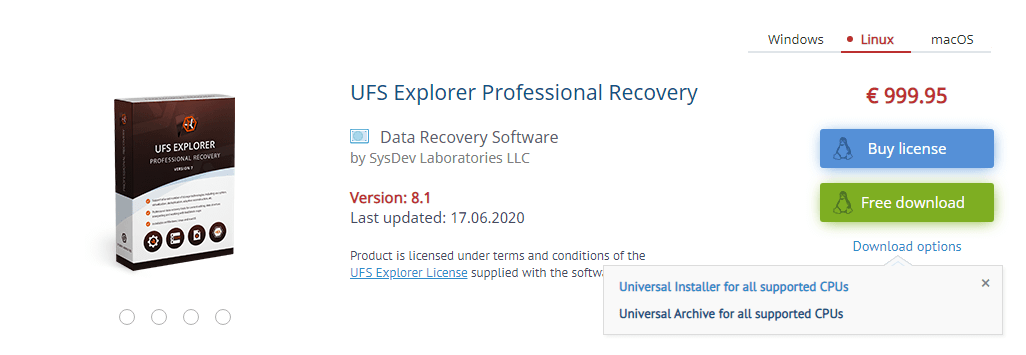
UFS Explorer Professional Recovery for Linux
Download the software from the website by choosing the download option for Linux users. Extract the content of the downloaded Universal Installer archive. Open the folder with the extracted content and run the Installer after entering your user password. You will then see the prompts of the Installer concerning the language and the target folder. To finish the installation simply follow the steps in the Installation Manager.
If the standard installation doesn’t work properly, install the software via the Terminal application. In the Terminal open the folder with the extracted file using the ‘cd’ command (e.g. cd
/Downloads). Run the install script as a local Administrator (e.g. sudo ./ufs-explorer-pro.install).

The application can be launched from the Menu. You can also execute the file using the Terminal.
If the described approach fails, try running the program via the Terminal using executable files from the Universal Archive. Download the archive from the product page in the Software Store using the second option for Linux users, then extract its content.
Open the Terminal and enter the commands in the following order:
/Downloads
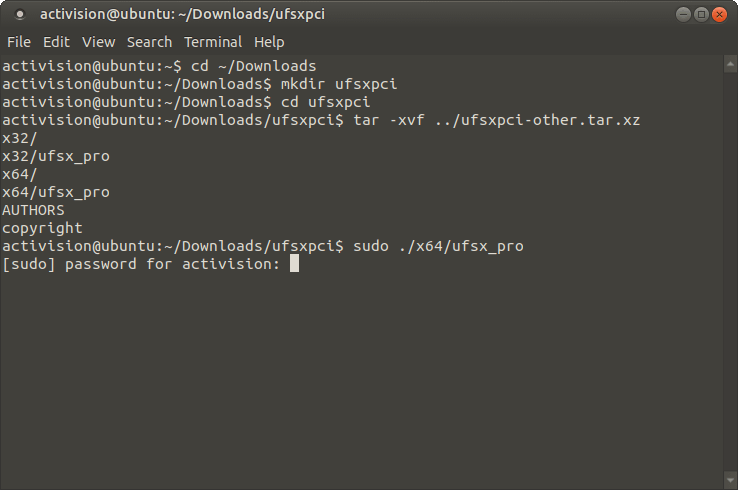
Depending on the employed computer architecture, start software with the «sudo /x32/ufsx_pro» or «sudo /x64/ufsx_pro» («su root -c /x32/ufsx_pro» or «su root -c /x64/ufsx_pro» for Debian) command. To run the program you will be asked to enter your user password. After that, the software will be launched without installation. This method can also be used to run UFS Explorer on UFS Explorer Backup and Emergency Recovery CD without installation, as all the applications on it are pre-installed and cannot be updated.
Warning: Never download or install the software to the drive containing the lost data you are going to recover. This may lead to its permanent damage or loss. If the data was lost from a non-system partition, it’s recommended to download and install the software to the system partition. If the files were lost from the system partition, it’s recommended to shut down the computer immediately and boot it using UFS Explorer Backup and Emergency Recovery CD.
- press Alt+F2 to invoke the «Start application» dialog;
type «ufs» to find the application;
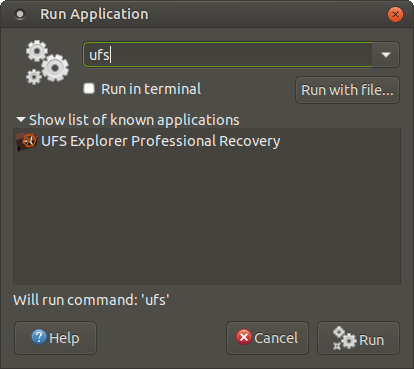
choose the application from the list and make sure that the «Run in terminal» option is enabled. After that, run the program.
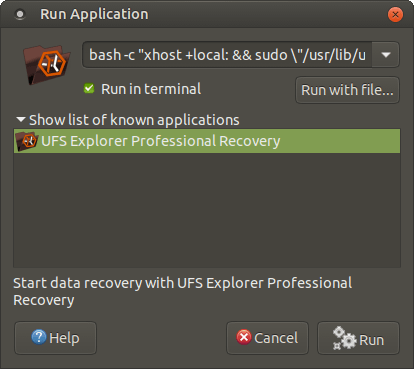
Another way is to enter the «bash -c «xhost +local: && sudo \»/usr/lib/ufs-explorer/ufs-explorer-pro\»»» or «su root bash -c «xhost +local: && sudo \»/usr/lib/ufs-explorer/ufs-explorer-pro\»»» command, enable the «Run in terminal» option and press the «Run» button.
In the Terminal:
- type «sudo /usr/lib/ufs-explorer/ufs-explorer-pro» or «su root -c /usr/lib/ufs-explorer/ufs-explorer-pro».

If the installation still fails, try checking the missing libraries through LDD, add them and install the software again.
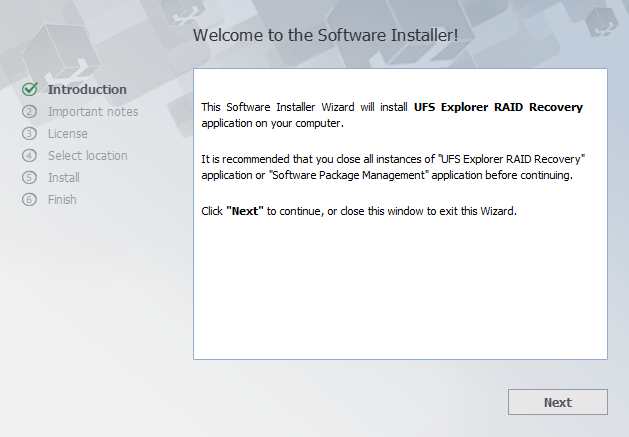
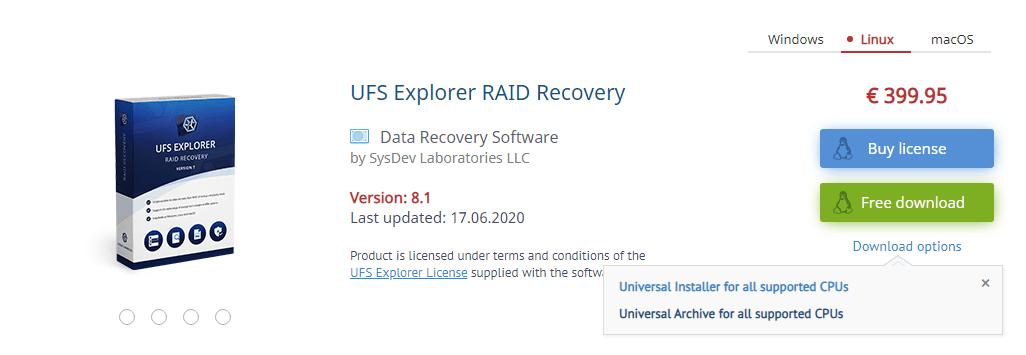
UFS Explorer RAID Recovery
The software can be downloaded from the following web page:
To install a new copy of the software or update the program, you should follow the steps of fresh software installation. In case of an update from an older software version, there is no necessity to remove the older software. Yet, a rollback to the previous software version requires uninstallation of the newer one. Other editions of UFS Explorer can be installed along with UFS Explorer RAID Recovery.
UFS Explorer RAID Recovery for Windows
You can install software on Microsoft Windows NT 5.1 OS and later (Windows XP/Windows 2003 Server and later). It is possible to run the software on older Windows NT versions starting from NT 4 SP6. Software installation to Windows 95/98/МЕ is not supported at all.
To install the software simply download the executable file of the software installer and run it.
Warning: Never download or install the software to the drive containing the lost data you are going to recover. This may lead to its permanent damage or loss. If the data was lost from a non-system partition, it’s recommended to download and install the software to the system partition. If the files were lost from the system partition, it’s recommended to shut down the computer immediately and boot it using UFS Explorer Backup and Emergency Recovery CD.
After the start of the installation process, you will be prompted for the language of the user interface that will be used as the language of the software installer and the software user manual.

From now on the installation process begins.
Carefully read the notes of importance before proceeding to the next step.
The installer will show the End User License Agreement (EULA) for acceptance. You may continue with the installation only after the EULA is accepted.

At the next step, the software will prompt for the target folder used for the installation. In case of a software update from a previous version, the installation folder will be set as the folder of a previous software version by default.

Then the installer will prompt for the name of the product group in the «Start» menu (the default one is «Data Recovery»). At this stage, the installer will finish collecting the necessary information and start the installation process. After it is finished, you will be able to launch the software from the final window of the software installation wizard.

You may also start the software using its shortcut in the «Start» menu («All programs», then the software group (the default one is «Data Recovery») and then «UFS Explorer RAID Recovery».
Hint: To remove the installed utility, please follow the steps described in the instruction for Uninstallation of UFS Explorer Professional Recovery.
UFS Explorer RAID Recovery for macOS
No special actions are required: just download the compressed DMG-image file from the software web site and open it using Finder. After the installation process is completed, go to the «Applications» folder (the «⇧Shift + ⌘ Cmd + A» hotkeys), find UFS Explorer RAID Recovery and run the software using its icon.
Warning: Never download or install the software to the drive containing the lost data you are going to recover. This may lead to its permanent damage or loss. If the data was lost from a non-system partition, it’s recommended to download and install the software to the system partition. If the files were lost from the system partition, it’s recommended to shut down the computer immediately and boot it using UFS Explorer Backup and Emergency Recovery CD.
Hint: To remove the installed utility, please follow the steps described in the instruction for Uninstallation of UFS Explorer Professional Recovery.
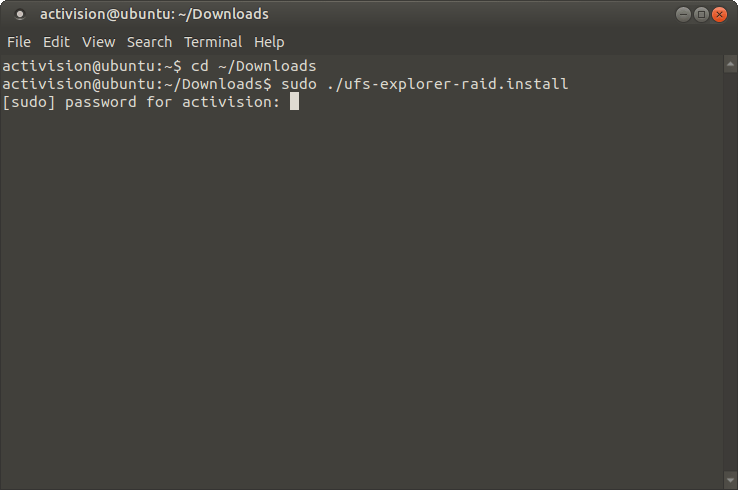
UFS Explorer RAID Recovery for Linux
Download the software from the website by choosing the download option for Linux users. Extract the content of the downloaded Universal Installer archive. Open the folder with the extracted content and run the Installer after entering your user password. You will then see the prompts of the Installer concerning the language and the target folder. To finish the installation simply follow the steps in the Installation Manager.
If the standard installation doesn’t work properly, install the software via the Terminal application. In the Terminal open the folder with the extracted file using the ‘cd’ command (e.g. cd
/Downloads). Run the install script as a local Administrator (e.g. sudo ./ufs-explorer-raid.install).
The application can be launched from the Menu. You can also execute the file using the terminal.
If the described approach fails, try running the program via the Terminal using executable files from the Universal Archive. Download the archive from the product page in the Software Store using the second option for Linux users, then extract its content.
Open the Terminal and enter the commands in the following order:
/Downloads

Depending on the employed computer architecture, start software with the «sudo /x32/ufsx_raid» or «sudo /x64/ufsx_raid» («su root -c /x32/ufsx_raid» or «su root -c /x64/ufsx_raid» for Debian) command. To run the program you will be asked to enter your user password. After that, the software will be launched without installation. This method can also be used to run UFS Explorer on UFS Explorer Backup and Emergency Recovery CD without installation, as all the applications on it are pre-installed and cannot be updated.
Warning: Never download or install the software to the drive containing the lost data you are going to recover. This may lead to its permanent damage or loss. If the data was lost from a non-system partition, it’s recommended to download and install the software to the system partition. If the files were lost from the system partition, it’s recommended to shut down the computer immediately and boot it using UFS Explorer Backup and Emergency Recovery CD.
press Alt+F2 to invoke the «Start application» dialog;
type «ufs» to find the application;
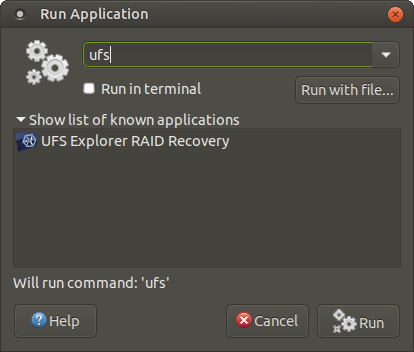
choose the application from the list and make sure that the «Run in terminal» option is enabled. After that, run the program.
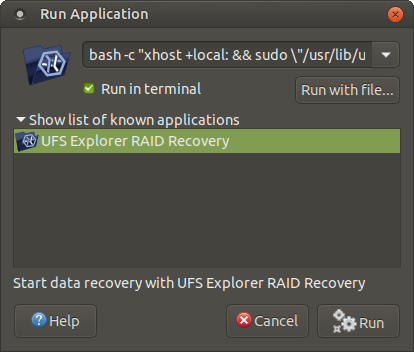
Another way is to enter the «bash -c «xhost +local: && sudo \»/usr/lib/ufs-explorer/ufs-explorer-raid\»»» or «su root bash -c «xhost +local: && sudo \»/usr/lib/ufs-explorer/ufs-explorer-raid\»»» command, enable the «Run in terminal» option and press the «Run» button.
In the Terminal:
- type «sudo /usr/lib/ufs-explorer/ufs-explorer-raid» or «su root -c /usr/lib/ufs-explorer/ufs-explorer-raid».
If the installation still fails, try checking the missing libraries through LDD, add them and install the software again.
Hint: To remove the installed utility, please follow the steps described in the instruction for Uninstallation of UFS Explorer Professional Recovery.
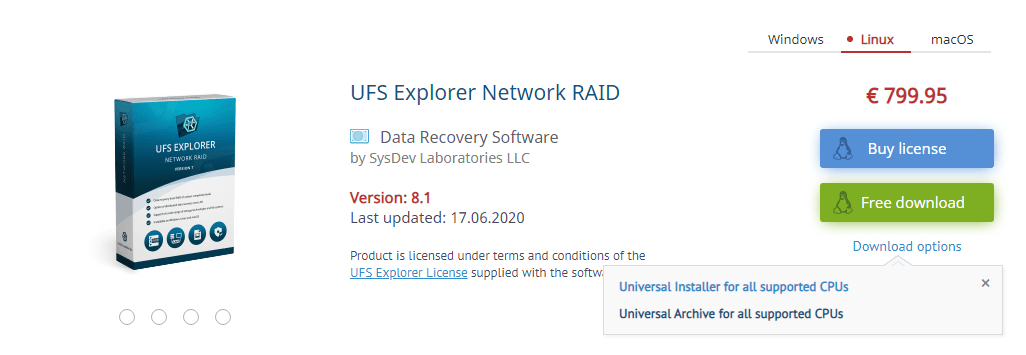
UFS Explorer Network RAID
The software can be downloaded from the following web page:
To install a new copy of the software or update the program, you should follow the steps of fresh software installation. In case of an update from an older software version, there is no necessity to remove the older software. Yet, a rollback to the previous software version requires uninstallation of the newer one. Other editions of UFS Explorer can be installed along with UFS Explorer Network RAID.
UFS Explorer Network RAID for Windows
You can install the software on Microsoft Windows NT 5.1 OS and later versions of the Windows operating system (Windows XP/Windows 2003 Server and later). It is also possible to run the program on older Windows NT versions starting from NT 4 SP6 while the installation on Windows 95/98/МЕ is not supported at all. To install the software simply download the executable file of the installer and run it.
To install the software simply download software installer executable file and start it.
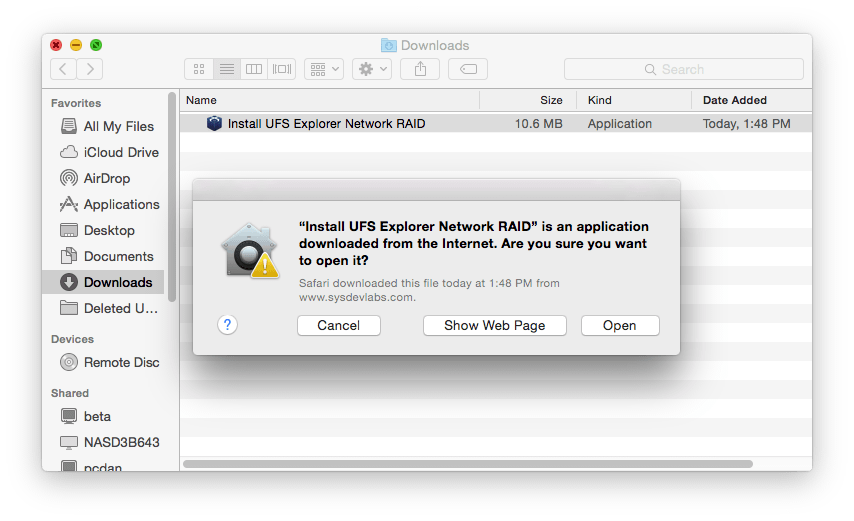
Warning: Never download or install the software to the drive containing the lost data you are going to recover. This may lead to its permanent damage or loss. If the data was lost from a non-system partition, it’s recommended to download and install the software to the system partition. If the files were lost from the system partition, it’s recommended to shut down the computer immediately and boot it using UFS Explorer Backup and Emergency Recovery CD.
After the start of the installation process, you will be prompted for the language of the user interface that will be used as the language of the software installer and the software user manual.

From now on the installation process begins.
Carefully read the notes of importance before proceeding to the next step.

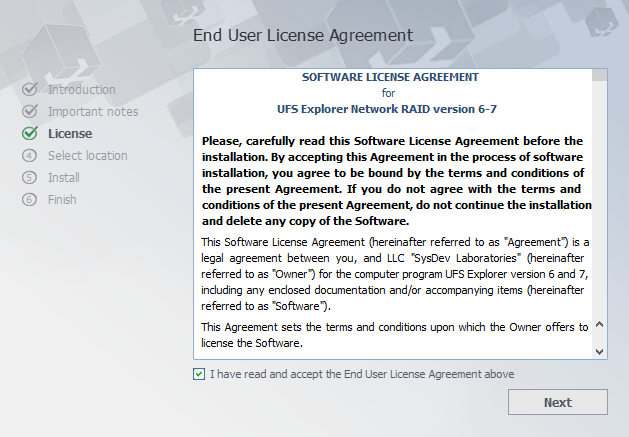
The installer will show the End User License Agreement (EULA) for acceptance. You may continue with the installation only after the EULA is accepted.
At the next step, the software will prompt for the target folder used for the installation. In case of a software update from a previous version, the installation folder will be set as the folder of a previous software version by default.

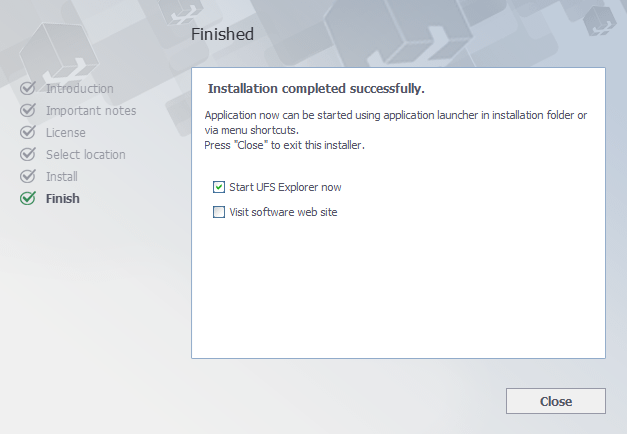
Then the installer will prompt for the name of the product group in the «Start» menu (the default one is «Data Recovery»). At this stage, the installer will finish collecting the necessary information and start the installation process. After it is finished, you will be able to launch the software from the final window of the software installation wizard.
You may also start the software using its shortcut in the «Start» menu («All programs», then the software group (the default one is «Data Recovery») and — Network RAID».
Hint: To remove the installed utility, please follow the steps described in the instruction for Uninstallation of UFS Explorer Professional Recovery.
UFS Explorer Network RAID for macOS
No special actions are required: just download the compressed DMG-image file from the software web site and open it using Finder. After the installation process is completed, go to the «Applications» folder (the «⇧Shift + ⌘ Cmd + A» hotkeys), find UFS Explorer Network RAID and run the software using its icon.
Warning: Never download or install the software to the drive containing the lost data you are going to recover. This may lead to its permanent damage or loss. If the data was lost from a non-system partition, it’s recommended to download and install the software to the system partition. If the files were lost from the system partition, it’s recommended to shut down the computer immediately and boot it using UFS Explorer Backup and Emergency Recovery CD.
Hint: To remove the installed utility, please follow the steps described in the instruction for Uninstallation of UFS Explorer Professional Recovery.
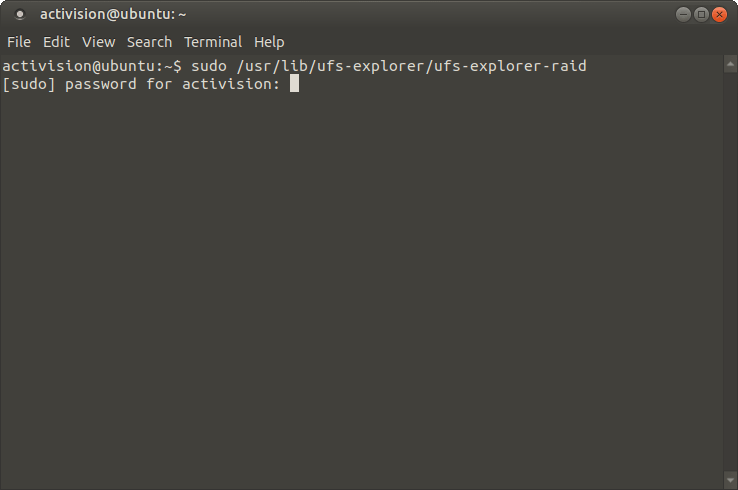
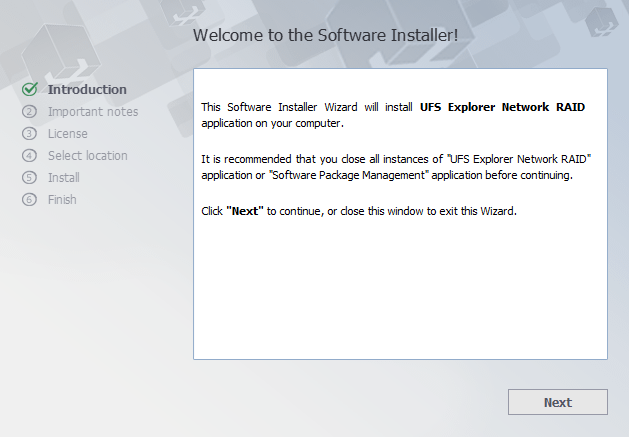
UFS Explorer Network RAID for Linux
Download the software from the website by choosing the download option for Linux users. Extract the content of the downloaded Universal Installer archive. Open the folder with the extracted content and run the Installer after entering your user password. You will then see the prompts of the Installer concerning the language and the target folder. To finish the installation simply follow the steps in the Installation Manager.
If the standard installation doesn’t work properly, install the software via the Terminal application. In the Terminal open the folder with the extracted file using the ‘cd’ command (e.g. cd
/Downloads). Run the install script as a local Administrator (e.g. sudo ./ufs-explorer-net.install).

The application can be launched from the Menu. You can also execute the file using the terminal.
If the described approach fails, try running the program via the Terminal using executable files from the Universal Archive. Download the archive from the product page in the Software Store using the second option for Linux users, then extract its content.
Open the Terminal and enter the commands in the following order:
/Downloads

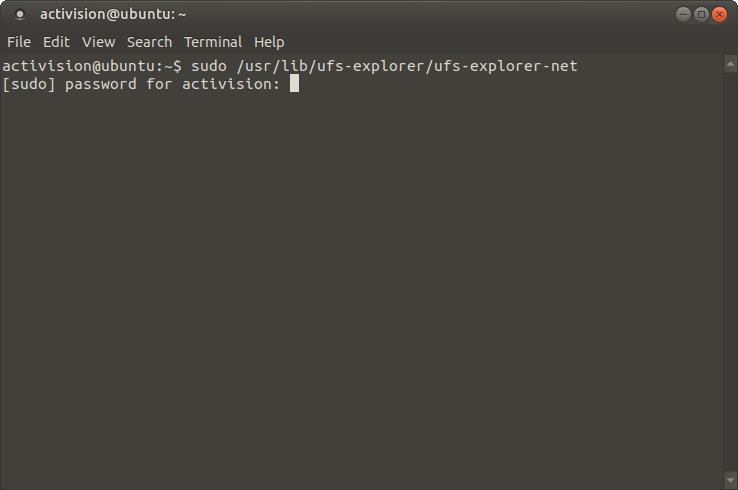
Depending on the employed computer architecture, start software with the «sudo /x32/ufsx_net» or «sudo /x64/ufsx_net» («su root -c /x32/ufsx_net» or «su root -c /x64/ufsx_net» for Debian) command. To run the program you will be asked to enter your user password. After that, the software will be launched without installation. This method can also be used to run UFS Explorer on UFS Explorer Backup and Emergency Recovery CD without installation, as all the applications on it are pre-installed and cannot be updated.
Warning: Never download or install the software to the drive containing the lost data you are going to recover. This may lead to its permanent damage or loss. If the data was lost from a non-system partition, it’s recommended to download and install the software to the system partition. If the files were lost from the system partition, it’s recommended to shut down the computer immediately and boot it using UFS Explorer Backup and Emergency Recovery CD.
press Alt+F2 to invoke the «Start application» dialog;
type «ufs» to find the application;
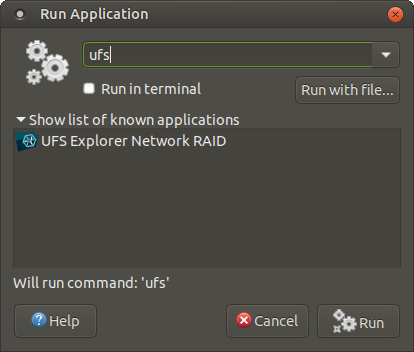
choose the application from the list and make sure that the «Run in terminal» option is enabled. After that, run the program.
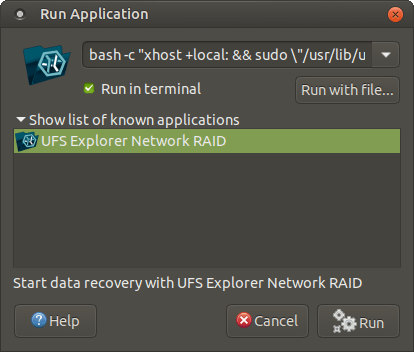
Another way is to enter the «bash -c «xhost +local: && sudo \»/usr/lib/ufs-explorer/ufs-explorer-net\»»» or «su root bash -c «xhost +local: && sudo \»/usr/lib/ufs-explorer/ufs-explorer-net\»»» command, enable the «Run in terminal» option and press the «Run» button.
In the Terminal:
- type «sudo /usr/lib/ufs-explorer/ufs-explorer-net» or «su root -c /usr/lib/ufs-explorer/ufs-explorer-net».
If the installation still fails, try checking the missing libraries through LDD, add them and install the software again.
Hint: To remove the installed utility, please follow the steps described in the instruction for Uninstallation of UFS Explorer Professional Recovery.
UFS Explorer Standard Recovery
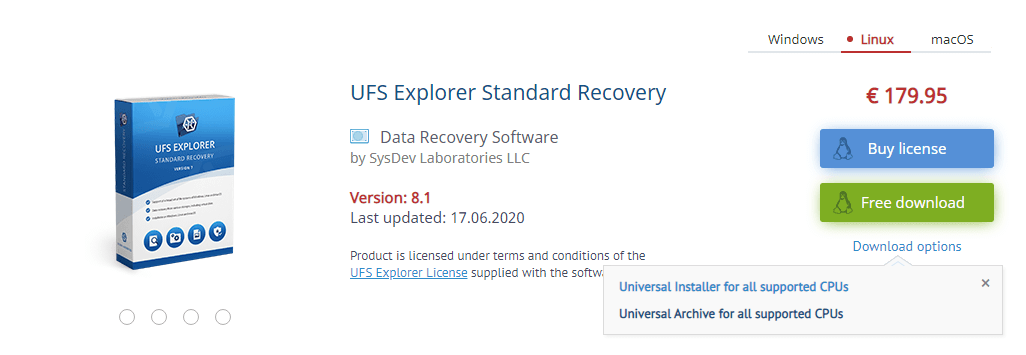
The software can be downloaded from the following web page:
To install a new copy of the software or update the program, you should follow the steps of fresh software installation. In case of an update from an older software version, there is no necessity to remove the older software. Yet, a rollback to the previous software version requires uninstallation of the newer one. Other editions of UFS Explorer can be installed along with UFS Explorer Standard Recovery.
UFS Explorer Standard Recovery for Windows
You can install the software on Microsoft Windows NT 5.1 OS and later versions of the Windows operating system (Windows XP/Windows 2003 Server and later). It is also possible to run the program on older Windows NT versions starting from NT 4 SP6 while the installation on Windows 95/98/МЕ is not supported at all. To install the software simply download the executable file of the installer and run it.
Warning: Never download or install the software to the drive containing the lost data you are going to recover. This may lead to its permanent damage or loss. If the data was lost from a non-system partition, it’s recommended to download and install the software to the system partition. If the files were lost from the system partition, it’s recommended to shut down the computer immediately and boot it using UFS Explorer Backup and Emergency Recovery CD.
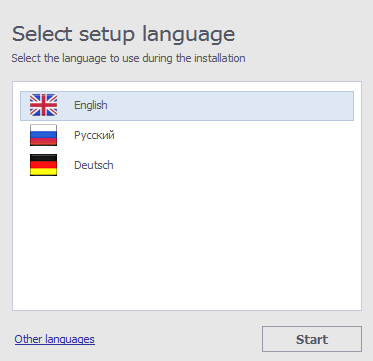
After the start of the installation process, you will be prompted for the language of the user interface that will be used as the language of the software installer and the software user manual.
From now on the installation process begins.
Carefully read the notes of importance before proceeding to the next step.
The installer will show the End User License Agreement (EULA) for acceptance. You may continue with the installation only after the EULA is accepted.

At the next step, the software will prompt for the target folder used for the installation. In case of a software update from a previous version, the installation folder will be set as the folder of a previous software version by default.
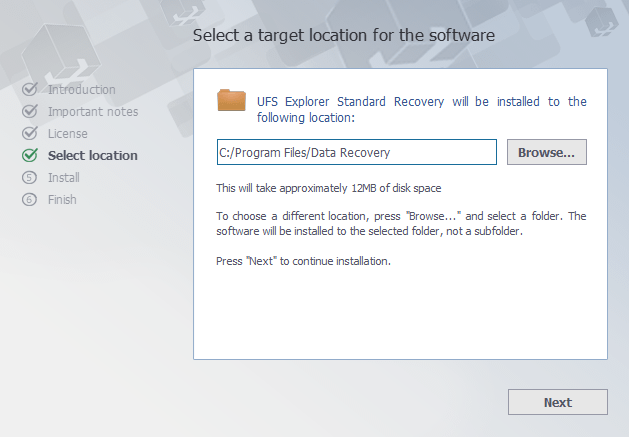
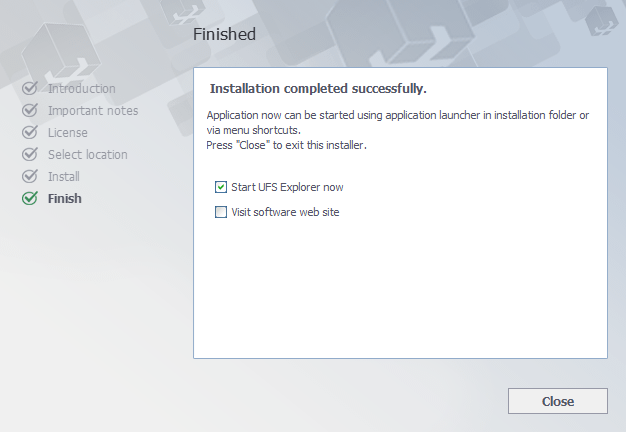
Then the installer will prompt for the name of the product group in the «Start» menu (the default one is «Data Recovery»). At this stage, the installer will finish collecting the necessary information and start the installation process. After it is finished, you will be able to launch the software from the final window of the software installation wizard.
You may also start the software using its shortcut in the «Start» menu («All programs», then the software group (the default one is «Data Recovery») and then «UFS Explorer Standard Recovery».
Hint: To remove the installed utility, please follow the steps described in the instruction for Uninstallation of UFS Explorer Professional Recovery.
UFS Explorer Standard Recovery for macOS
No special actions are required: just download the compressed DMG-image file from the software web site and open it using Finder. After the installation process is completed, go to the «Applications» folder (the «⇧Shift + ⌘ Cmd + A» hotkeys), find UFS Explorer Standard Recovery and run the software using its icon.

Warning: Never download or install the software to the drive containing the lost data you are going to recover. This may lead to its permanent damage or loss. If the data was lost from a non-system partition, it’s recommended to download and install the software to the system partition. If the files were lost from the system partition, it’s recommended to shut down the computer immediately and boot it using UFS Explorer Backup and Emergency Recovery CD.
Hint: To remove the installed utility, please follow the steps described in the instruction for Uninstallation of UFS Explorer Professional Recovery.
UFS Explorer Standard Recovery for Linux
Download the software from the website by choosing the download option for Linux users. Extract the content of the downloaded Universal Installer archive. Open the folder with the extracted content and run the Installer after entering your user password. You will then see the prompts of the Installer concerning the language and the target folder. To finish the installation simply follow the steps in the Installation Manager.
If the standard installation doesn’t work properly, install the software via the Terminal application. In the Terminal open the folder with the extracted file using the ‘cd’ command (e.g. cd
/Downloads). Run the install script as a local Administrator (e.g. sudo ./ufs-explorer-std.install).

The application can be launched from the Menu. You can also execute the file using the terminal.
If the described approach fails, try running the program via the Terminal using executable files from the Universal Archive. Download the archive from the product page in the Software Store using the second option for Linux users, then extract its content.
Open the Terminal and enter the commands in the following order:
/Downloads
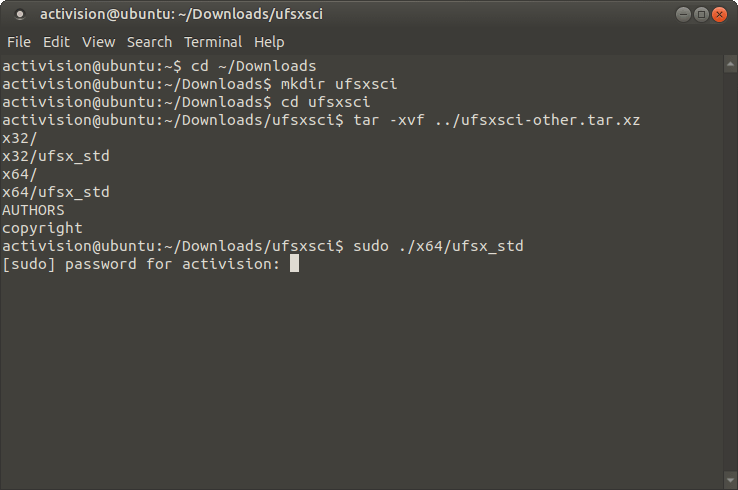
Depending on the employed computer architecture, start software with the «sudo /x32/ufsx_std» or «sudo /x64/ufsx_std» («su root -c /x32/ufsx_std» or «su root -c /x64/ufsx_std» for Debian) command. To run the program you will be asked to enter your user password. After that, the software will be launched without installation. This method can also be used to run UFS Explorer on UFS Explorer Backup and Emergency Recovery CD without installation, as all the applications on it are pre-installed and cannot be updated.
Warning: Never download or install the software to the drive containing the lost data you are going to recover. This may lead to its permanent damage or loss. If the data was lost from a non-system partition, it’s recommended to download and install the software to the system partition. If the files were lost from the system partition, it’s recommended to shut down the computer immediately and boot it using UFS Explorer Backup and Emergency Recovery CD.
press Alt+F2 to invoke the «Start application» dialog;
type «ufs» to find the application;
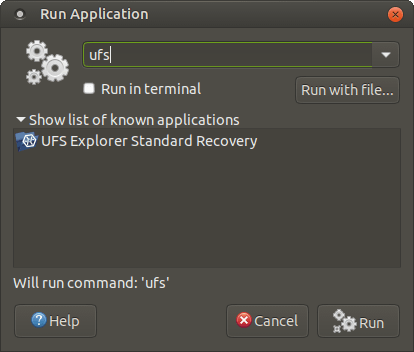
choose the application from the list and make sure that the «Run in terminal» option is enabled. After that, run the program.
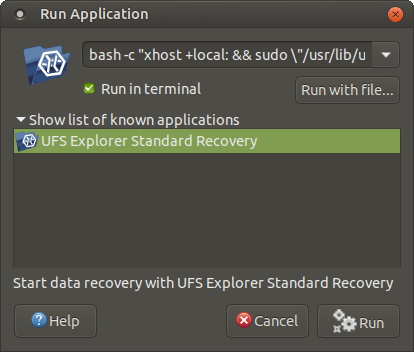
Another way is to enter the «bash -c «xhost +local: && sudo \»/usr/lib/ufs-explorer/ufs-explorer-std\»»» or «su root bash -c «xhost +local: && sudo \»/usr/lib/ufs-explorer/ufs-explorer-std\»»» command, enable the «Run in terminal» option and press the «Run» button.
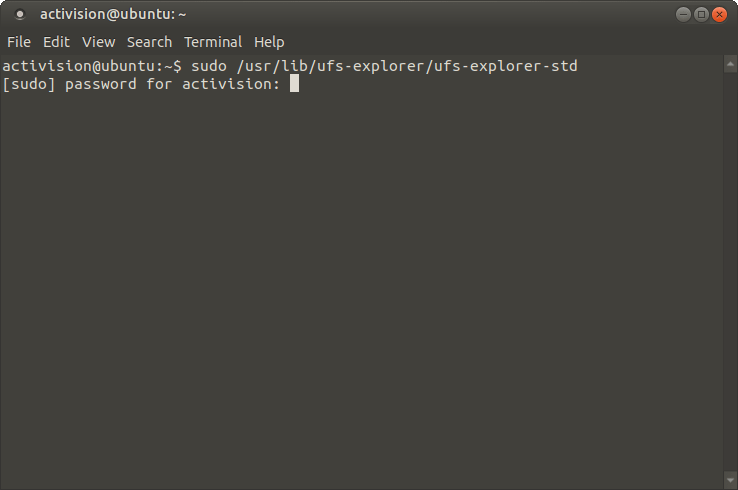
In the Terminal:
- type «sudo /usr/lib/ufs-explorer/ufs-explorer-std» or «su root -c /usr/lib/ufs-explorer/ufs-explorer-std».
If the installation still fails, try checking the missing libraries through LDD, add them and install the software again.
Hint: To remove the installed utility, please follow the steps described in the instruction for Uninstallation of UFS Explorer Professional Recovery.
UFS Explorer Standard Access
The software can be downloaded from the following web page:
To install a new copy of the software or update the program, you should follow the steps of fresh software installation. In case of an update from an older software version, there is no necessity to remove the older software. Yet, a rollback to the previous software version requires uninstallation of the newer one. Other editions of UFS Explorer can be installed along with UFS Explorer Standard Access.
UFS Explorer Standard Access for Windows
You can install the software on Microsoft Windows starting with Windows ® XP with Service Pack 3 and later (Windows XP/Windows 2003 Server and later). It is also possible to run the software on older Windows NT versions starting from NT 4 SP6 while software installation on Windows 95/98/МЕ is not supported.
To install the software simply download the executable file of the software installer and start it.
Warning: Never download or install the software to the drive containing the lost data you are going to recover. This may lead to its permanent damage or loss. If the data was lost from a non-system partition, it’s recommended to download and install the software to the system partition. If the files were lost from the system partition, it’s recommended to shut down the computer immediately and boot it using UFS Explorer Backup and Emergency Recovery CD.
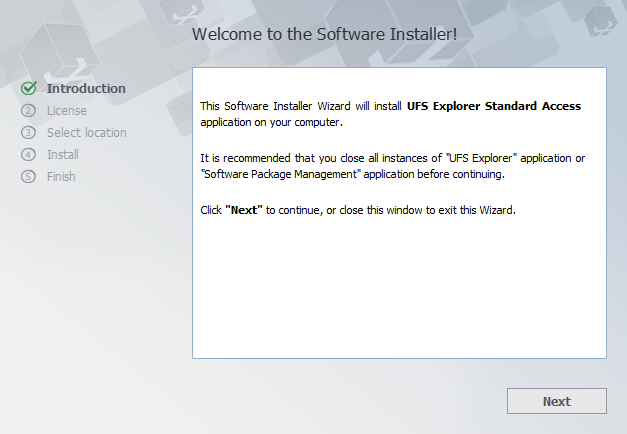
After the start of the installation process, you will be prompted for the language of the user interface that will be used as the language of the software installer and the software user manual.
From now on the installation process begins.
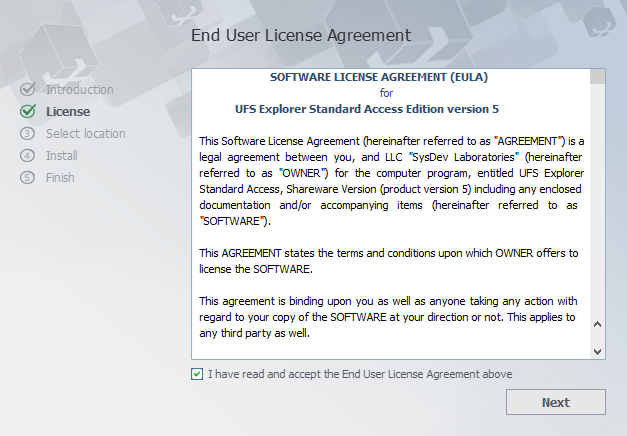
The installer will show the End User License Agreement (EULA). You may continue with the installation only after the EULA is accepted.
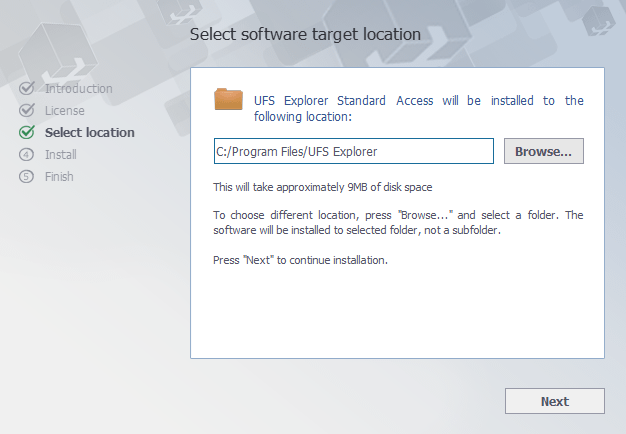
At the next step, the software will prompt for the target folder used for the installation. In case of a software update from a previous version, the installation folder will be set as the folder of a previous software version by default.
Then the installer will prompt for the name of the product group in the “Start” menu (default one is “UFS Explorer”). At this stage, the installer will finish collecting the necessary information and start the installation process. After it is finished, you will be able to launch the software from the final window of the software installation wizard.
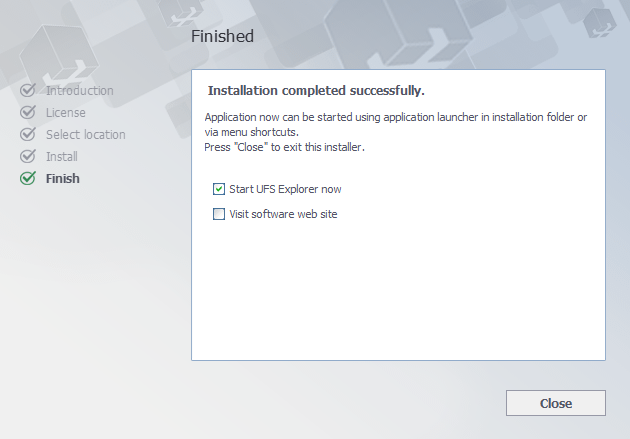
You may also start the software using its shortcut in the “Start” menu (“All programs”, then the software group (default one is “UFS Explorer”) and then “Start UFS Explorer Standard Access”.
Hint: To remove the installed utility, please follow the steps described in the instruction for Uninstallation of UFS Explorer Professional Recovery.
Источник


