- How to Increase Number of Open Files Limit in Linux
- Find Linux Open File Limit
- Check Hard Limit in Linux
- Check Soft Limits in Linux
- How to Check System wide File Descriptors Limits in Linux
- Set User Level Open File limits in Linux
- Final thoughts
- If You Appreciate What We Do Here On TecMint, You Should Consider:
- Управление ресурсами системы с помощью команды Ulimit
- Что такое ulimit в Linux?
- Мягкие и жесткие ограничения
- Использование ulimit в Linux
- Показать все ограничения для любого пользователя
- Отображать жесткие и мягкие ограничения
- Изменить ограничения (временно)
- Внесение постоянных изменений в ulimit
- Изменить ulimit для групп
- How to set ulimit and file descriptors limit on Linux Servers
- To see what is the present open file limit in any Linux System
- ulimit command :
- How to fix the problem when limit on number of Maximum Files was reached ?
- Set User level resource limit via limit.conf file
How to Increase Number of Open Files Limit in Linux
In Linux, you can change the maximum amount of open files. You may modify this number by using the ulimit command. It grants you the ability to control the resources available for the shell or process started by it.
In this short tutorial we will show you how to check your current limit of open files and files descriptions, but to do so, you will need to have root access to your system.
First, Lets see how we can find out the maximum number of opened file descriptors on your Linux system.
Find Linux Open File Limit
The value is stored in:
The number you will see, shows the number of files that a user can have opened per login session. The result might be different depending on your system.
For example on a CentOS server of mine, the limit was set to 818354, while on Ubuntu server that I run at home the default limit was set to 176772.
If you want to see the hard and soft limits, you can use the following commands:
Check Hard Limit in Linux
Check Soft Limits in Linux
To see the hard and soft values for different users, you can simply switch user with “su” to the user which limits you want to check.
How to Check System wide File Descriptors Limits in Linux
If you are running a server, some of your applications may require higher limits for opened file descriptors. A good example for such are MySQL/MariaDB services or Apache web server.
You can increase the limit of opened files in Linux by editing the kernel directive fs.file-max . For that purpose, you can use the sysctl utility.
For example, to increase open file limit to 500000, you can use the following command as root:
You can check the current value for opened files with the following command:
With the above command the changes you have made will only remain active until the next reboot. If you wish to apply them permanently, you will have to edit the following file:
Add the following line:
Of course, you can change the number per your needs. To verify the changes again use:
Users will need to logout and login again for the changes to take effect. If you want to apply the limit immediately, you can use the following command:
Set User Level Open File limits in Linux
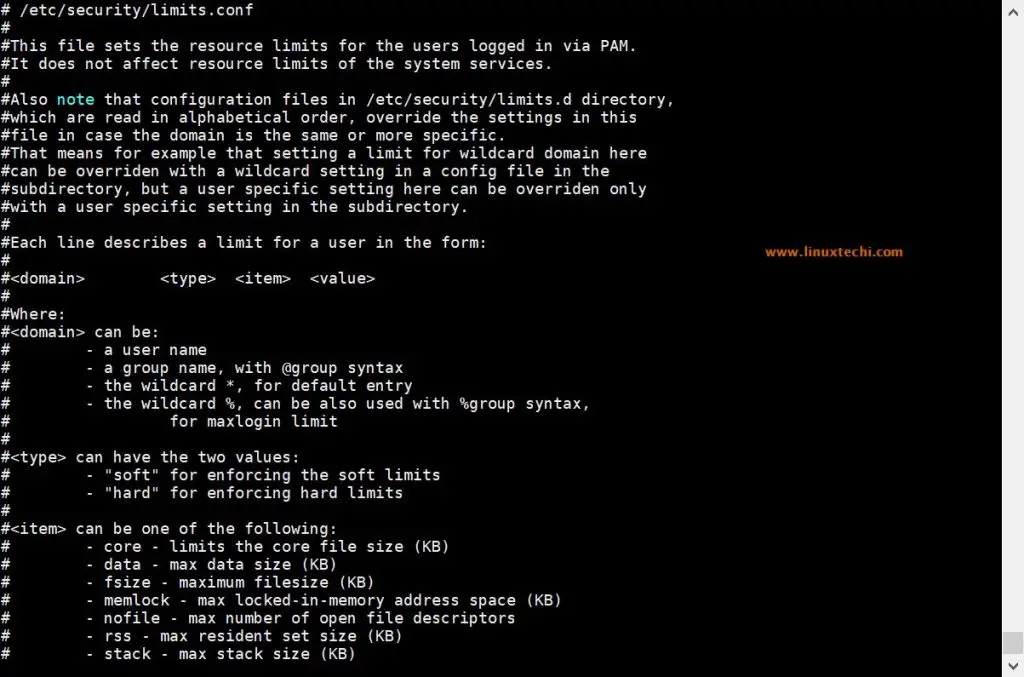
The above examples, showed how to set global limits, but you may want to apply limits per user basis. For that purpose, as user root, you will need to edit the following file:
If you are a Linux administrator, I suggest you that you become very familiar with that file and what you can do to it. Read all of the comments in it as it provides great flexibility in terms of managing system resources by limiting users/groups on different levels.
The lines that you should add take the following parameters:
Here is an example of setting a soft and hard limits for user marin:
Final thoughts
This brief article showed you a basic example of how you can check and configure global and user level limits for maximum number of opened files.
While we just scratched the surface, I highly encourage you to have a more detailed look and read regarding /etc/sysctl.conf and /etc/security/limits.conf and learn how to use them. They will be of great help for you one day.
If You Appreciate What We Do Here On TecMint, You Should Consider:
TecMint is the fastest growing and most trusted community site for any kind of Linux Articles, Guides and Books on the web. Millions of people visit TecMint! to search or browse the thousands of published articles available FREELY to all.
If you like what you are reading, please consider buying us a coffee ( or 2 ) as a token of appreciation.

We are thankful for your never ending support.
Источник
Управление ресурсами системы с помощью команды Ulimit
Главное меню » Linux » Команды Linux и команды Shell » Управление ресурсами системы с помощью команды Ulimit

Что такое ulimit в Linux?
Ulimit – это встроенная команда оболочки, предназначенная для отображения, распределения и ограничения ресурсов. Для любой системы важно регулировать эти типы контроля.
Этот тип управления может быть применен на глобальном, групповом и пользовательском уровнях. Помимо обеспечения бесперебойной обработки задач, он не позволяет нежелательным процессам поглощать системные ресурсы, такие как оперативная память и мощность процессора.
Ulimit связан с файлом конфигурации безопасности. Ваше точное местоположение может отличаться, но обычно это что-то вроде /etc/security/limits.conf. Ulimit позволяет нам быстро редактировать эту конфигурацию.
Мягкие и жесткие ограничения
Как пользователь, вы можете настроить свои параметры ulimit.
Вы можете быть удивлены, зачем даже устанавливать лимит, если пользователь может его изменить. Здесь вступают в игру мягкие и жесткие ограничения.
Таким образом, с точки зрения администратора, вы можете предпочесть, чтобы ваш пользователь колебался вокруг определенного значения. Это будет ваш мягкий предел (скажем, 25).
Затем вы можете установить жесткий предел, который не может быть превышен этим пользователем (50). Пользователь будет уполномочен увеличить свой лимит с 25 до 50.
Использование ulimit в Linux
Вот синтаксис для команды ulimit:
Показать все ограничения для любого пользователя
Вы можете отобразить все виды ограничений для указанного пользователя следующим образом:
Флаг -a будет отображать все параметры и их конфигурацию для конкретного имени пользователя.
Если вы опустите user_name, он покажет ограничения для вас. Позвольте мне показать вам ограничения, установленные для меня по умолчанию:
Ваши значения по умолчанию могут отличаться от наших, конечно. В этом представлении отображается описание, назначенный флаг (который можно использовать для изменения ограничений) и конфигурация.
Отображать жесткие и мягкие ограничения
Также возможно видеть любой из этих соответствующих пределов с флагом.
Чтобы отобразить мягкие ограничения, используйте опцию -S:
Для отображения жестких ограничений используйте опцию -H:
Полезнее сочетать их с конкретными флагами сверху. Поэтому, если вы хотите проверить жесткое ограничение на максимальное количество пользовательских процессов, введите:
Изменить ограничения (временно)
Теперь давайте изменим это значение на 31500 для демонстрационных целей и еще раз проверим жесткий лимит.
Стоит отметить, что любые изменения, которые ваша привилегия позволяет вам, будут только временно записаны и затронут вашу текущую оболочку.
Чтобы подтвердить это, мы вышли из своей оболочки и создал новый терминал и получил исходное значение по умолчанию.
В следующем разделе показано, как сделать изменения постоянными.
Внесение постоянных изменений в ulimit
Как мы упоминали в начале статьи, ulimit регулируется /etc/security/limits.conf. Если вы хотите внести какие-либо постоянные изменения в ограничения любого пользователя, вам нужно будет внести изменения в файл безопасности как root.
При редактировании вам необходимо включить эти четыре элемента:
Вот текст, который мы добавили к файлу, чтобы установить жесткое ограничение на количество процессов для пользователя destroyer (т.е. нашей учетной записи):
Помните, что рекомендуется не включать корневую учетную запись, если вы не полностью осведомлены о возможных последствиях. Мы сделали это на виртуальной машине, поэтому вам не нужно делать это самостоятельно.
Как видите, предел для «destroyer» был изменен на 20000.
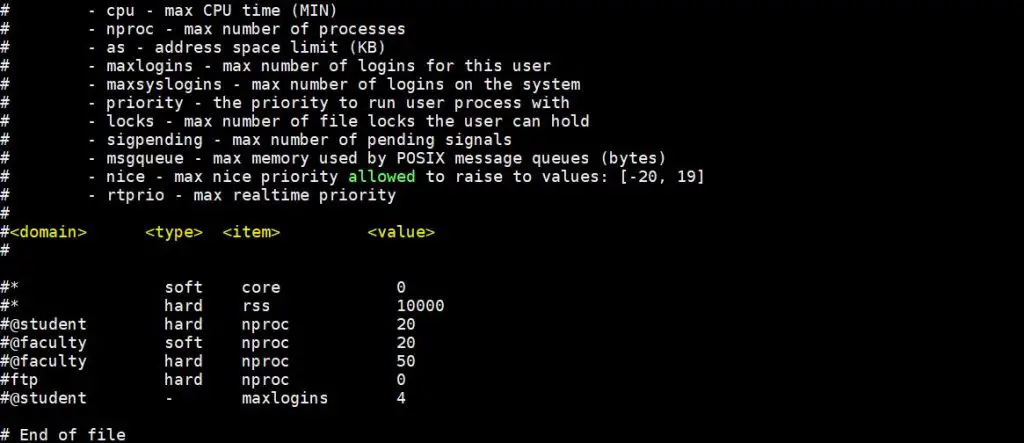
Как узнать, какое ключевое слово использовать для редактирования файла /etc/security/limits.conf? Ну, вот таблица, которая включает в себя возможные ключевые слова элемента и их описания:
| Ключевое слово предмета | Описание |
|---|---|
| core | ограничивает размер файла ядра (КБ) |
| data | максимальный размер данных (КБ) |
| fsize | максимальный размер файла (КБ) |
| memlock | Максимальное адресное пространство заблокировано в памяти (КБ) |
| nofile | максимальное количество открытых файловых дескрипторов |
| rss | максимальный размер резидентного набора (КБ) |
| stack | максимальный размер стека (КБ) |
| cpu | максимальное время процессора (MIN) |
| nproc | максимальное количество процессов |
| as | ограничение адресного пространства (КБ) |
| maxlogins | максимальное количество логинов для этого пользователя |
| maxsyslogins | максимальное количество входов в систему |
| priority | приоритет для запуска пользовательского процесса с |
| locks | максимальное количество блокировок файлов, которые может хранить пользователь |
| sigpending | максимальное количество ожидающих сигналов |
| msgqueue | – максимальная память, используемая очередями сообщений POSIX (в байтах) |
| nice | Максимальный приоритет можно повысить до значений: [-20, 19] |
| rtprio | максимальный приоритет в реальном времени |
| chroot | изменить корень на каталог (специфичный для Debian) |
| Тип лимита | Описание |
|---|---|
| hard | жесткий предел |
| soft | мягкий предел |
| – | жесткий и мягкий предел |
Изменить ulimit для групп
Изменение групповой политики очень похоже на то, что вы видели в предыдущем разделе, но перед названием группы вы добавите символ @.
Вот пример, где мы установили максимальное число входов в систему для студента группы 4, отредактировав файл /etc/security/limits.conf:
Вывод
Надеюсь, вам понравился этот краткий учебник по Linux-команде ulimit.
Если у вас есть какие-либо комментарии или вопросы, оставьте их ниже. Если у вас есть предложения по темам, которые вы бы хотели охватить, не стесняйтесь также оставлять их.
Если вы нашли ошибку, пожалуйста, выделите фрагмент текста и нажмите Ctrl+Enter.
Источник
How to set ulimit and file descriptors limit on Linux Servers
Introduction: Challenges like number of open files in any of the production environment has become common now a day. Since many applications which are Java based and Apache based, are getting installed and configured, which may lead to too many open files, file descriptors etc. If this exceeds the default limit that is set, then one may face access control problems and file opening challenges. Many production environments come to standstill kind of situations because of this.
Luckily, we have “ulimit” command in any of the Linux based server, by which one can see/set/get number of files open status/configuration details. This command is equipped with many options and with this combination one can set number of open files. Following are step-by-step commands with examples explained in detail.
To see what is the present open file limit in any Linux System
To get open file limit on any Linux server, execute the following command,
The above number shows that user can open ‘146013’ file per user login session.
This clearly indicates that individual Linux operating systems have different number of open files. This is based on dependencies and applications which are running in respective systems.
ulimit command :
As the name suggests, ulimit (user limit) is used to display and set resources limit for logged in user.When we run ulimit command with -a option then it will print all resources’ limit for the logged in user. Now let’s run “ulimit -a” on Ubuntu / Debian and CentOS systems,
Ubuntu / Debian System,
CentOS System
As we can be seen here different OS have different limits set. All these limits can be configured/changed using “ulimit” command.
To display the individual resource limit then pass the individual parameter in ulimit command, some of parameters are listed below:
- ulimit -n –> It will display number of open files limit
- ulimit -c –> It display the size of core file
- umilit -u –> It will display the maximum user process limit for the logged in user.
- ulimit -f –> It will display the maximum file size that the user can have.
- umilit -m –> It will display the maximum memory size for logged in user.
- ulimit -v –> It will display the maximum memory size limit
Use below commands check hard and soft limits for number of open file for the logged in user
How to fix the problem when limit on number of Maximum Files was reached ?
Let’s assume our Linux server has reached the limit of maximum number of open files and want to extend that limit system wide, for example we want to set 100000 as limit of number of open files.
Use sysctl command to pass fs.file-max parameter to kernel on the fly, execute beneath command as root user,
Above changes will be active until the next reboot, so to make these changes persistent across the reboot, edit the file /etc/sysctl.conf and add same parameter,
save and exit file,
Run the beneath command to make above changes into effect immediately without logout and reboot.
Now verify whether new changes are in effect or not.
Use below command to find out how many file descriptors are currently being utilized:
Note:- Command “sysctl -p” is used to commit the changes without reboot and logout.
Set User level resource limit via limit.conf file
“/etc/sysctl.conf” file is used to set resource limit system wide but if you want to set resource limit for specific user like Oracle, MariaDB and Apache then this can be achieved via “/etc/security/limits.conf” file.
Sample Limit.conf is shown below,
Let’s assume we want to set hard and soft limit on number of open files for linuxtechi user and for oracle user set hard and soft limit on number of open process, edit the file “/etc/security/limits.conf” and add the following lines
Save & exit the file.
Note: In case you want to put resource limit on a group instead of users, then it can also be possible via limit.conf file, in place of user name , type @ and rest of the items will be same, example is shown below,
Verify whether new changes are in effect or not,
Note: Other majorly used command is “ lsof ” which is used for finding out “how many files are opened currently”. This command is very helpful for admins.
Conclusion:
As mentioned in the introduction section “ulimit” command is very powerful and helps one to configure and make sure application installations are smoother without any bottlenecks. This command helps in fixing many of the number of file limitations in Linux based servers.
Источник


